5. Thymeleaf视图
让我们回到 Spring 应用程序的架构 MVC。
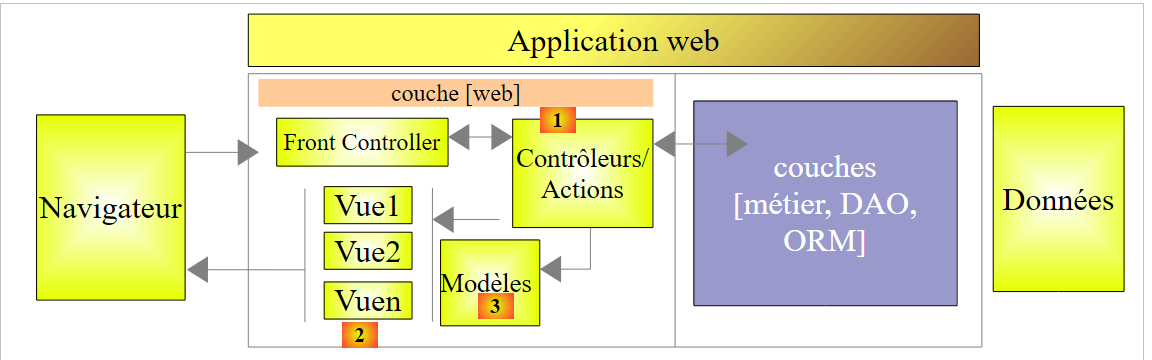 |
前两章描述了 [1] 模块的各个方面,即操作。现在我们将探讨:
- 视图 V 的 [2] 模块;
- 由这些视图显示的模型 M 模块 [3];
自 Spring MVC 诞生以来,生成发送至客户端浏览器的 HTML 页面的技术一直采用的是 JSP(Java Server Pages)技术。 近年来,[Thymeleaf] [http://www.thymeleaf.org/] 技术也可用于此目的。本文将重点介绍该技术。
5.1. STS 项目
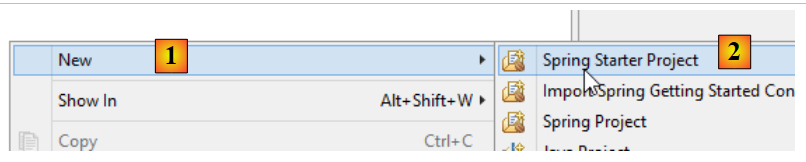
我们创建一个新项目:
 |
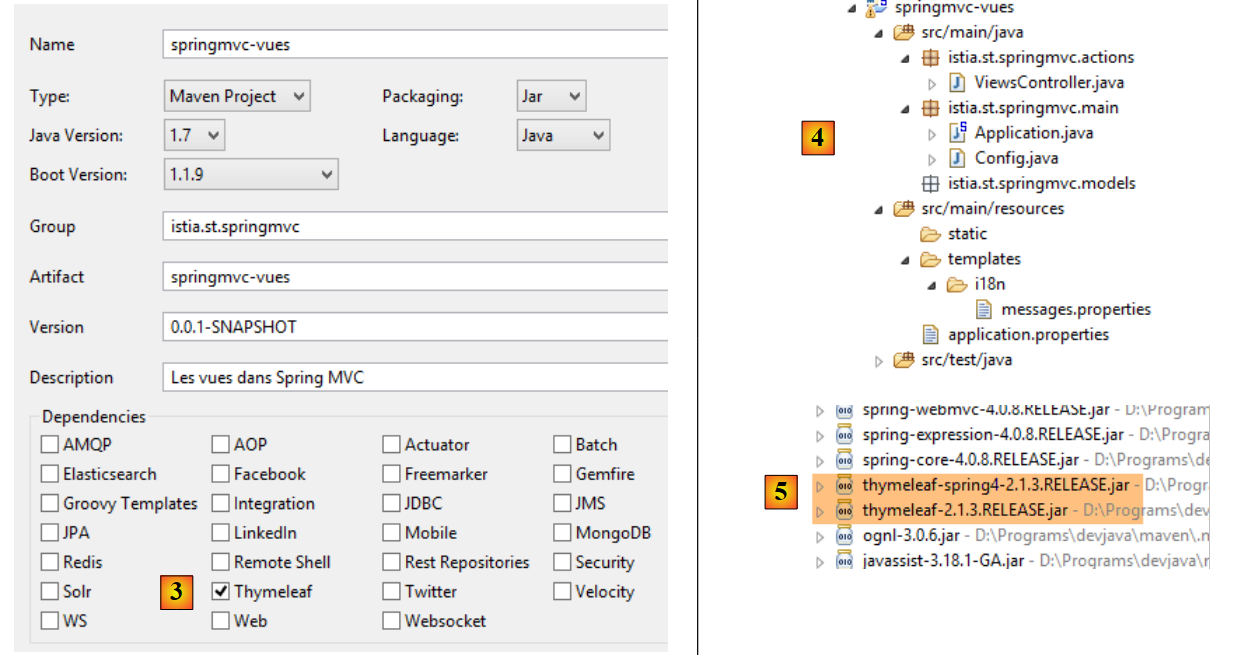 |
- 在 [3] 中,需指定该项目依赖于 [Thymeleaf]。 这将使该项目除了继承自前一个项目的 [Spring MVC] 依赖项外,还包含框架 [Thymeleaf] 和 [5] 的依赖项;
现在,让我们按以下方式更新该项目:
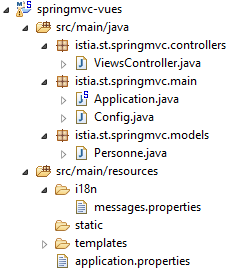 |
我们参考了之前的项目:
- [istia.st.springmvc.controllers] 将包含控制器;
- [istia.st.springmvc.models] 将包含操作和视图的模型;
- [istia.st.springmvc.main] 是 Spring Boot 可执行类的包;
- [templates] 将包含 Thymeleaf 视图;
- [i18n] 将包含视图中显示的国际化消息;
[Application] 类如下:
package istia.st.springmvc.main;

import org.springframework.boot.SpringApplication;

public class Application {

    public static void main(String[] args) {
        SpringApplication.run(Config.class, args);
    }
}
[Config] 类如下:
package istia.st.springmvc.main;

import java.util.Locale;

import org.springframework.boot.autoconfigure.EnableAutoConfiguration;
import org.springframework.context.MessageSource;
import org.springframework.context.annotation.Bean;
import org.springframework.context.annotation.ComponentScan;
import org.springframework.context.annotation.Configuration;
import org.springframework.context.support.ResourceBundleMessageSource;
import org.springframework.web.servlet.config.annotation.InterceptorRegistry;
import org.springframework.web.servlet.config.annotation.WebMvcConfigurerAdapter;
import org.springframework.web.servlet.i18n.CookieLocaleResolver;
import org.springframework.web.servlet.i18n.LocaleChangeInterceptor;

@Configuration
@ComponentScan({ "istia.st.springmvc.controllers", "istia.st.springmvc.models" })
@EnableAutoConfiguration
public class Config extends WebMvcConfigurerAdapter {
    @Bean
    public MessageSource messageSource() {
        ResourceBundleMessageSource messageSource = new ResourceBundleMessageSource();
        messageSource.setBasename("i18n/messages");
        return messageSource;
    }

    @Bean
    public LocaleChangeInterceptor localeChangeInterceptor() {
        LocaleChangeInterceptor localeChangeInterceptor = new LocaleChangeInterceptor();
        localeChangeInterceptor.setParamName("lang");
        return localeChangeInterceptor;
    }

    @Override
    public void addInterceptors(InterceptorRegistry registry) {
        registry.addInterceptor(localeChangeInterceptor());
    }

    @Bean
    public CookieLocaleResolver localeResolver() {
        CookieLocaleResolver localeResolver = new CookieLocaleResolver();
        localeResolver.setCookieName("lang");
        localeResolver.setDefaultLocale(new Locale("fr"));
        return localeResolver;
    }
}
此配置目前支持区域设置管理。
控制器 [ViewController] 如下:
package istia.st.springmvc.actions;

import org.springframework.stereotype.Controller;

@Controller
public class ViewsController {

}
- 第 5 行,注释 [@Controller] 已替换注释 [@RestController],因为现在这些操作不会向客户端生成响应。它们将:
- 构建一个 M 模型
- 返回类型 [String],该类型即为负责显示该模型的视图 [Thymeleaf] 的名称。正是该视图 V 与模型 M 的组合,将生成发送给客户端的流 HTML;
文件 [messages.properties] 目前为空。
5.2. [/v01]:Thymeleaf 基础
我们来看 [ViewsController] 中的下一个操作:
    // Thymeleaf 基础 - 1
    @RequestMapping(value = "/v01", method = RequestMethod.GET)
    public String v01() {
        return "v01";
}
- 第 3 行:该操作返回类型 [String]。这将是操作的名称;
- 第 4 行:该视图为 [v01]。默认情况下,它应位于 [templates] 文件夹中,并命名为 [v01.html];
视图 [v01.html] 如下所示:
 |
<!DOCTYPE html>
<html xmlns:th="http://www.thymeleaf.org">
<head>
<title th:text="'Les vues'">Spring 4 MVC</title>
<meta http-equiv="Content-Type" content="text/html; charset=UTF-8" />
</head>
<body>
    <h2 th:text="'Les vues dans Spring MVC'">Spring 4 MVC</h2>
</body>
</html>
这是一个名为 HTML 的文件。其中可见 Thymeleaf 的存在:
- 第2行的[th]命名空间;
- 第 4 行和第 8 行的 [th:text] 属性;
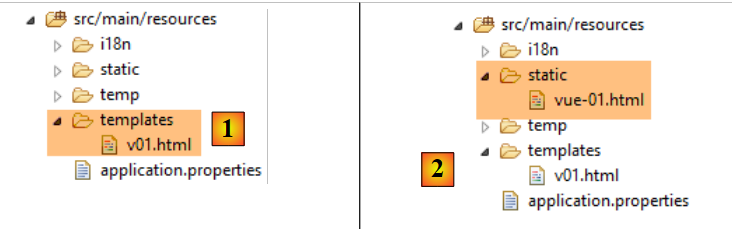
这是一个有效的 HTML 文件,可以进行查看。我们将它存入 [static] [2] 文件夹中,命名为 [vue-01.html],然后直接通过浏览器访问:
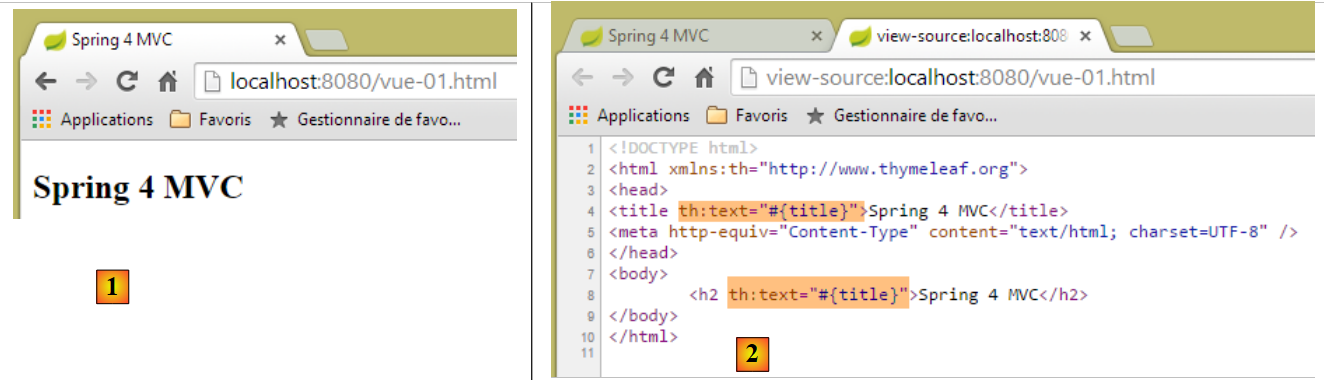 |
如果查看 [2] 页面的源代码,我们会发现服务器发送的 [th:text] 属性被浏览器忽略了。 当视图是某个操作的结果时,Thymeleaf 会介入并在向客户端发送响应之前解析 [th] 属性。
HTML 标签:
<title th:text="'Les vues'">Spring 4 MVC</title>
由 Thymeleaf 按以下方式处理:
- th:text 的语法为 th:text="表达式",其中表达式是一个待求值的表达式。当该表达式如本例中一样为字符串时,必须用单引号将其包围;
- [expression] 的值将替换 HTML 标签中的文本,此处即替换 [title] 标签中的文本;
处理后,上述标签变为:
<title>Les vues</title>
现在执行操作 [/v01]:
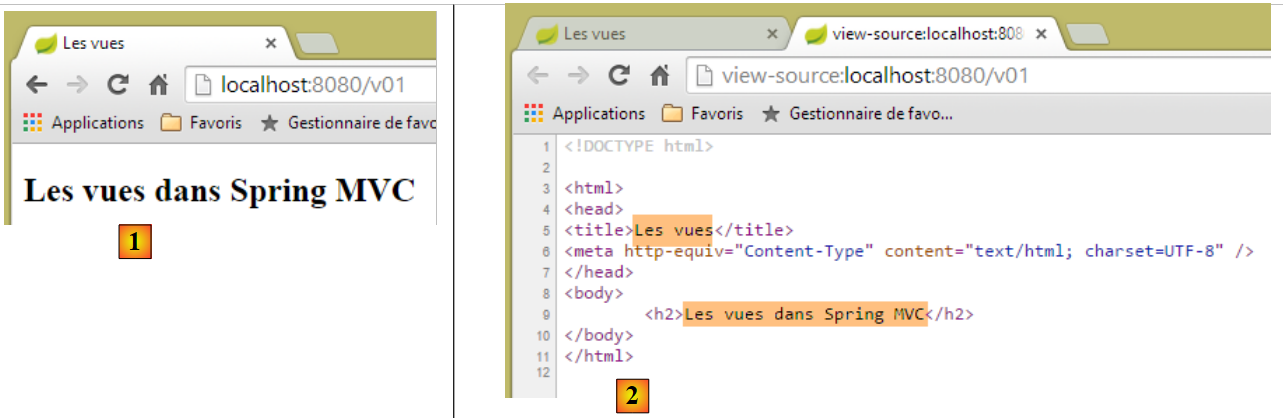 |
- 在 [2] 中,可以看到 Thymeleaf 执行的替换操作;
现在将 URL 转换为 [http://localhost:8080/v01.html]:
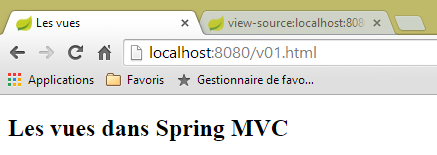 |
这该如何解释?[templates/v01.html]视图是否未经操作直接返回了?为了澄清这一点,我们创建了以下操作[/v02]:
    // Thymeleaf 基础 - 2
    @RequestMapping(value = "/v02", method = RequestMethod.GET)
    public String v02() {
        System.out.println("action v02");
        return "vue-02";
}
视图 [vue-02.html] 是 [v01.html] 的副本:
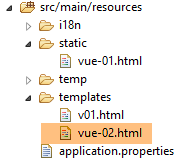 |
现在,让我们调用 URL 和 [http://localhost:8080/vue-02.html]:
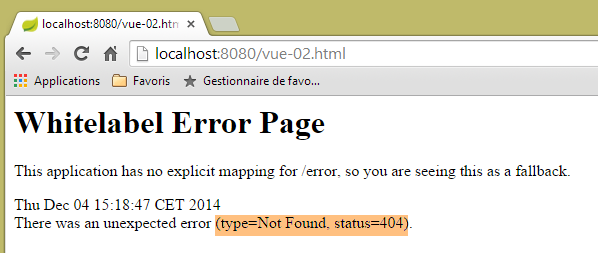 |
未找到 URL。现在请求 URL 和 [http://localhost:8080/v02.html]
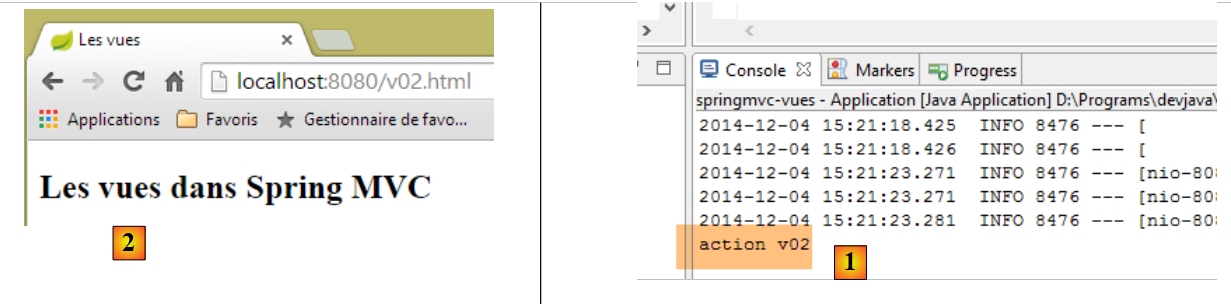 |
- 在 [1] 的控制台日志中,可以看到已调用操作 [/v02],该操作在 [2] 中显示了视图 [vue-02.html];
现在我们知道,URL [http://localhost:8080/v02.html] 可能还指向 [static] 文件夹中的 [/v02.html] 文件。如果该文件存在,会发生什么情况?我们来试一试。 我们在 [static] 文件夹中创建以下 [v02.html] 文件:
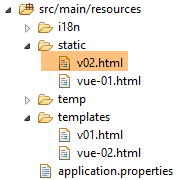 |
<!DOCTYPE html>
<html xmlns:th="http://www.thymeleaf.org">
<head>
<title>Spring 4 MVC</title>
<meta http-equiv="Content-Type" content="text/html; charset=UTF-8" />
</head>
<body>
    <h2>Spring 4 MVC</h2>
</body>
</html>
然后我们请求 URL [http://localhost:8080/v02.html]:
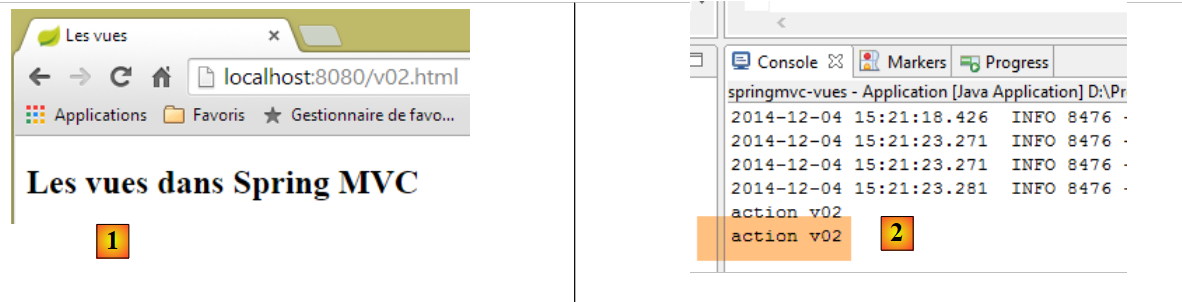 |
[1] 和 [2] 表明被调用的正是 [/v02] 操作。 因此需要注意的是,当请求的 URL 采用 [/x.html] 这种形式时,Spring / Thymeleaf:
- 若存在,则执行操作 [/x];
- 若页面 [/static/x.html] 存在,则返回该页面;
- 否则抛出 404 Not Found 异常;
为避免混淆,从现在起,操作和视图将不再使用相同的名称。
5.3. [/v03]:视图国际化
Spring/Thymeleaf集成使Thymeleaf能够使用Spring的消息文件。考虑以下新的操作[/v03]:
    // 视图的国际化
    @RequestMapping(value = "/v03", method = RequestMethod.GET)
    public String v03() {
        return "vue-03";
}
它会显示以下视图 [vue-03.html]:
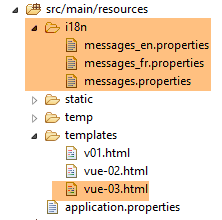 |
<!DOCTYPE html>
<html xmlns:th="http://www.thymeleaf.org">
<head>
<title th:text="#{title}">Spring 4 MVC</title>
<meta http-equiv="Content-Type" content="text/html; charset=UTF-8" />
</head>
<body>
    <h2 th:text="#{title}">Spring 4 MVC</h2>
</body>
</html>
在第 4 行和第 8 行,[th:text] 属性的表达式为 #{title},其值为键值消息 [title]。 我们创建以下文件:[messages_fr.properties] 和 [messages_en.properties]:
[messages_fr.properties]
title=Les vues dans Spring MVC
[messages_en.properties]
title=Views in Spring MVC
我们来查看 URL、[http://localhost:8080/v03.html?lang=fr] 和 [http://localhost:8080/v03.html?lang=en]:
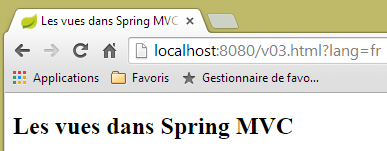 | 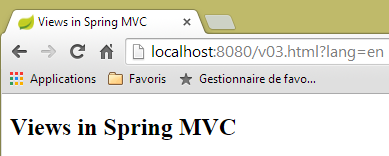 |
请注意,我们运用了最近学到的知识。我们将操作 [v03] 命名为 [/v03.html],而不是 [/v03]。
5.4. [/v04]:创建视图 V 的模型 M
考虑以下新的操作 [/v04]:
    // 创建视图 V 的模板 M
    @RequestMapping(value = "/v04", method = RequestMethod.GET)
    public String v04(Model model) {
        model.addAttribute("personne", new Personne(7, "martin", 17));
        System.out.println(String.format("Modèle=%s", model));
        return "vue-04";
}
- 第 4 行:视图模板被注入到操作的参数中。默认情况下,该初始模板为空。我们将看到可以对其进行预填充;
- 第 4 行:类型为 [Model] 的模板是一种包含 <String, Object> 类型元素的字典。 第 4 行,我们在该字典中添加了一条条目,其键为 [personne],值类型为 [Personne];
- 第 5 行:在控制台显示该模型,以查看其外观;
- 第 6 行:显示视图 [vue-04.html];
类 [Personne] 是上一章中使用的类:
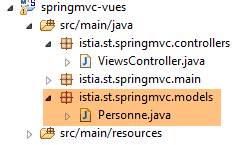 |
package istia.st.springmvc.models;

public class Personne {

    // 标识符
    private Integer id;
    // 姓名
    private String nom;
    // 年龄
    private int age;

    // 构造函数
    public Personne() {

    }

    public Personne(String nom, int age) {
        this.nom = nom;
        this.age = age;
    }

    public Personne(Integer id, String nom, int age) {
        this(nom, age);
        this.id = id;
    }

    @Override
    public String toString() {
        return String.format("[id=%s, nom=%s,  age=%d]", id, nom, age);
    }

    // 获取器和设置器
...
}
视图 [vue-04.html] 如下所示:
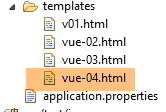 |
<!DOCTYPE html>
<html xmlns:th="http://www.thymeleaf.org">
    <head>
        <title th:text="#{title}">Spring 4 MVC</title>
        <meta http-equiv="Content-Type" content="text/html; charset=UTF-8" />
    </head>
    <body>
        <p>
            <span th:text="#{personne.nom}">Nom :</span>
            <span th:text="${personne.nom}">Bill</span>
        </p>
        <p>
            <span th:text="#{personne.age}">Age :</span>
            <span th:text="${personne.age}">56</span>
        </p>
    </body>
</html>
- 第 10 行引入了一种新的 Thymeleaf 表达式类型 ${var},其中 var 是视图 M 模板中的一个键。 回顾一下,操作 [/v04] 在模板中添加了一个键 [personne],其关联类型为 Personne[id, nom, age];
- 第 10 行:显示模型中该人的姓名;
- 第 14 行:显示其年龄;
消息文件已修改,以添加第 9 行和第 13 行中的键 [personne.nom] 和 [personne.age]。结果如下:
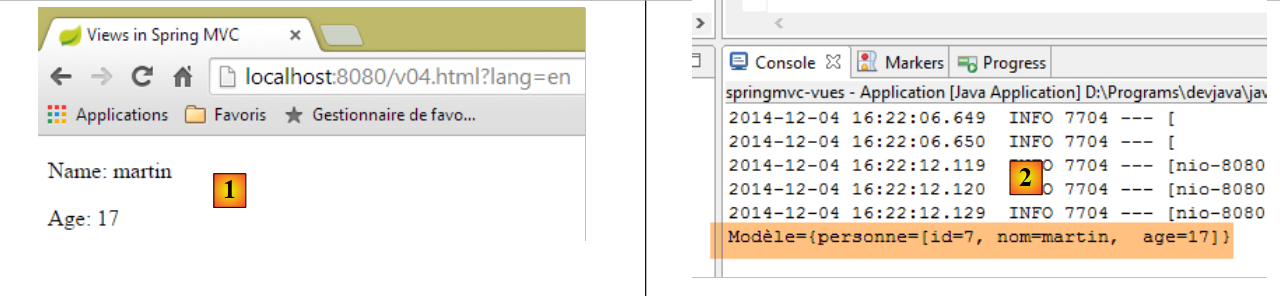 |
并在 [2] 控制台日志中查看到模板 M 的类型。
有人可能会问,为什么不将视图 [vue-04] 写成如下形式:
<!DOCTYPE html>
<html xmlns:th="http://www.thymeleaf.org">
    <head>
        <title th:text="#{title}"></title>
        <meta http-equiv="Content-Type" content="text/html; charset=UTF-8" />
    </head>
    <body>
        <p>
            <span th:text="#{personne.nom}" /></span>
            <span th:text="${personne.nom}"></span>
        </p>
        <p>
            <span th:text="#{personne.age}"></span>
            <span th:text="${personne.age}"></span>
        </p>
    </body>
</html>
这种写法完全合法,且会产生与之前相同的结果。Thymeleaf 的目标之一是,即使页面未经过 Thymeleaf 处理,也能正常显示。因此,让我们创建两个新的静态页面:
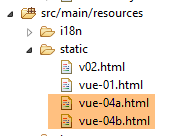 |
视图 [vue-04b.html] 是视图 [vue-04.html] 的副本。视图 [vue-04a.html] 也是如此,但我们去除了页面中的静态文本。如果我们查看这两个页面,将得到以下结果:
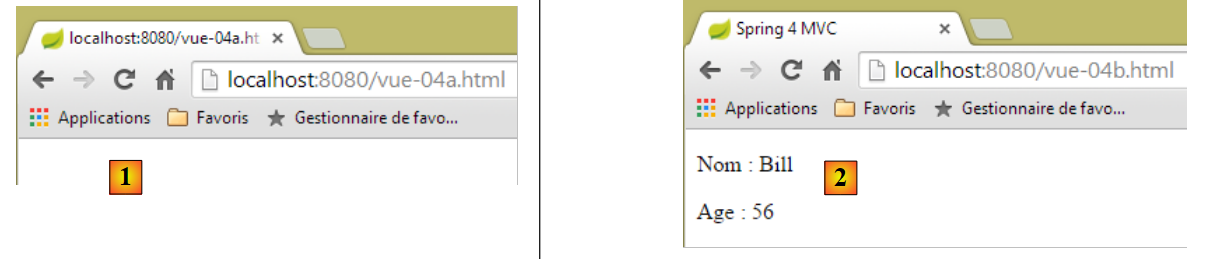 |
在 [1] 视图中,页面结构未显示;而在 [2] 视图中,页面结构清晰可见。这就是将静态文本放入 Thymeleaf 视图中的意义所在,即使在运行时它们会被其他文本替换。
现在,让我们关注一个技术细节。在视图 [vue-04.html] 中,我们通过 [ctrl-Maj-F] 对代码进行格式化。我们得到以下结果:
<!DOCTYPE html>
<html xmlns:th="http://www.thymeleaf.org">
<head>
<title th:text="#{title}">Spring 4 MVC</title>
<meta http-equiv="Content-Type" content="text/html; charset=UTF-8" />
</head>
<body>
    <p>
        <span th:text="#{personne.nom}">Nom :</span> <span
            th:text="${personne.nom}">Bill</span>
    </p>
    <p>
        <span th:text="#{personne.age}">Age :</span> <span
            th:text="${personne.age}">56</span>
    </p>
</body>
</html>
标签对齐不齐,导致代码难以阅读。如果我们将 [vue-04.html] 重命名为 [vue-04.xml] 并重新格式化代码,标签就会重新对齐。 因此,后缀 [xml] 会更实用。我们可以使用这个后缀进行开发,但需要配置 Thymeleaf。为了不破坏已有的工作成果,我们将之前研究的 [springmvc-vues] 项目复制为 [springmvc-vues-xml] 项目
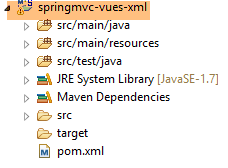 |
我们将文件 [pom.xml] 修改如下:
    <groupId>istia.st.springmvc</groupId>
    <artifactId>springmvc-vues-xml</artifactId>
    <version>0.0.1-SNAPSHOT</version>
    <packaging>jar</packaging>

    <name>springmvc-vues-xml</name>
<description>Les vues dans Spring MVC</description>
在第 2 行和第 6 行更改了项目名称。此外,我们还更改了 [templates] 文件夹中视图的后缀:
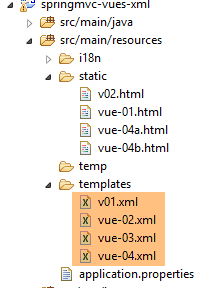 |
文档 [http://docs.spring.io/spring-boot/docs/current/reference/html/common-application-properties.html] 列出了可在文件 [application.properties] 中使用的 Spring Boot 配置属性:
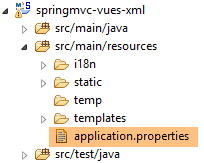 |
本文档列出了 Spring Boot 在进行自动配置时使用的属性,这些属性可通过在 [application.properties] 中进行不同配置来修改。对于 Thymeleaf,自动配置属性如下:
# THYMELEAF (ThymeleafAutoConfiguration)
spring.thymeleaf.check-template-location=true
spring.thymeleaf.prefix=classpath:/templates/
spring.thymeleaf.suffix=.html
spring.thymeleaf.mode=HTML5
spring.thymeleaf.encoding=UTF-8
spring.thymeleaf.content-type=text/html # ;charset=<encoding> 已添加
spring.thymeleaf.cache=true # 将热刷新设置为 false
因此,只需添加以下一行代码即可:
spring.thymeleaf.suffix=.xml
。但我们将采取另一种方法,即通过编程进行配置。我们将在类 [Config] 中配置 Thymeleaf:
package istia.st.springmvc.main;

import java.util.Locale;

...
import org.thymeleaf.spring4.SpringTemplateEngine;
import org.thymeleaf.spring4.templateresolver.SpringResourceTemplateResolver;

@Configuration
@ComponentScan({ "istia.st.springmvc.controllers", "istia.st.springmvc.models" })
@EnableAutoConfiguration
public class Config extends WebMvcConfigurerAdapter {
    ...

    @Bean
    public SpringResourceTemplateResolver templateResolver() {
        SpringResourceTemplateResolver templateResolver = new SpringResourceTemplateResolver();
        templateResolver.setPrefix("classpath:/templates/");
        templateResolver.setSuffix(".xml");
        templateResolver.setTemplateMode("HTML5");
        templateResolver.setCharacterEncoding("UTF-8");
     templateResolver.setCacheable(true);
        return templateResolver;
    }

    @Bean
    SpringTemplateEngine templateEngine(SpringResourceTemplateResolver templateResolver) {
        SpringTemplateEngine templateEngine = new SpringTemplateEngine();
        templateEngine.setTemplateResolver(templateResolver);
        return templateEngine;
    }

}
- 第 16-24 行配置了一个用于 Thymeleaf 的 [TemplateResolver] 对象。该对象会根据操作返回的视图名称加载,并查找对应的文件;
- 第18和19行设定了在视图名称前添加的前缀和后缀,以便定位文件。因此,如果视图名称为[vue04],则要查找的文件将是[classpath:/templates/vue04.xml]。 [classpath:/templates] 是 Spring 的语法,表示位于项目 Classpath 根目录下的 [/templates] 文件夹;
- 第 21 行:为了使返回给客户端的响应包含 HTTP 头部:
Content-Type:text/html;charset=UTF-8
- 第 20 行:表示该视图符合 HTML5 规范;
- 第 22 行:表明 Thymeleaf 视图可以被缓存;
- 第26-31行:将Spring/Thymeleaf视图解析引擎设置为之前的解析引擎;
运行该新项目的可执行文件,并请求 URL [http://localhost:8080/v04.html?lang=en]:
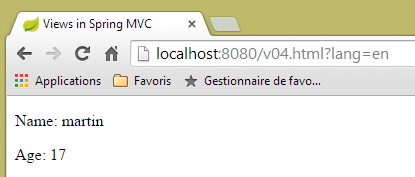 |
我们注意到,在 URL 中,操作 [/v04] 再次被替换为 [v04.html]。
5.5. [/v05]:在 Thymeleaf 视图中对对象进行分解
我们创建以下操作 [/v05]:
    // 创建视图 V 的模型 M - 2
    @RequestMapping(value = "/v05", method = RequestMethod.GET)
    public String v05(Model model) {
        model.addAttribute("personne", new Personne(7, "martin", 17));
        return "vue-05";
}
它与操作 [/v04] 完全相同。视图 [vue-05.xml] 如下所示:
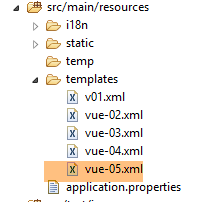 |
<!DOCTYPE html>
<html xmlns:th="http://www.thymeleaf.org">
    <head>
        <title th:text="#{title}">Spring 4 MVC</title>
        <meta http-equiv="Content-Type" content="text/html; charset=UTF-8" />
    </head>
    <body>
        <div th:object="${personne}">
            <p>
                <span th:text="#{personne.nom}">Nom :</span>
                <span th:text="*{nom}">Bill</span>
            </p>
            <p>
                <span th:text="#{personne.age}">Age :</span>
                <span th:text="*{age}">56</span>
            </p>
        </div>
    </body>
</html>
- 第 8-17 行:在这几行中,通过属性 [th:object="${personne}"](第 8 行)定义了一个 Thymeleaf 对象。此处该对象是模板中键 [personne] 对应的对象:
- 第 11 行:Thymeleaf 表达式 [*{nom}] 等同于 [${objet.nom}],其中 [objet] 是当前的 Thymeleaf 对象。 因此,此处的表达式 [*{nom}] 等同于 [${personne.nom}];
- 第 15 行:同上;
结果:
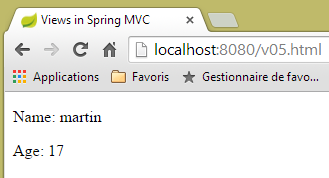 |
5.6. [/v06]:Thymeleaf视图中的测试
考虑以下操作 [/v06]:
    // 创建视图 V 的模型 M - 3
    @RequestMapping(value = "/v06", method = RequestMethod.GET)
    public String v06(Model model) {
        model.addAttribute("personne", new Personne(7, "martin", 17));
        return "vue-06";
}
它与前两个操作完全相同。它显示以下视图 [vue-06.xml]:
<!DOCTYPE html>
<html xmlns:th="http://www.thymeleaf.org">
<head>
<title th:text="#{title}">Spring 4 MVC</title>
<meta http-equiv="Content-Type" content="text/html; charset=UTF-8" />
</head>
<body>
<div th:object="${personne}">
<p>
<span th:text="#{personne.nom}">Nom :</span>
<span th:text="*{nom}">Bill</span>
</p>
<p>
<span th:text="#{personne.age}">Age :</span>
<span th:text="*{age}">56</span>
</p>
<p th:if="*{age} >= 18" th:text="#{personne.majeure}">Vous êtes majeur</p>
<p th:if="*{age} < 18" th:text="#{personne.mineure}">Vous êtes mineur</p>
</div>
</body>
</html>
- 第 17 行:[th:if] 属性评估一个布尔表达式。如果该表达式为真,则显示该标签;否则不显示。 因此,在此处若 ${personne.age}>=18,则会显示文本 [#{personne.majeure}],即消息文件中键 [personne.majeure] 对应的消息;
- 第 18 行:不能写成 [*{age} < 18],因为 < 符号是保留字符。 因此必须使用其等效形式 HTML [<],也称为实体 HTML [http://en.wikipedia.org/wiki/List_of_XML_and_HTML_character_entity_references];
消息文件已修改:
[messages_fr.properties]
title=Les vues dans Spring MVC
personne.nom=Nom :
personne.age=Age :
personne.mineure=Vous êtes mineur
personne.majeure=Vous êtes majeur
[messages_en.properties]
title=Views in Spring MVC
personne.nom=Name:
personne.age=Age:
personne.mineure=You are under 18
personne.majeure=You are over 18
结果如下:
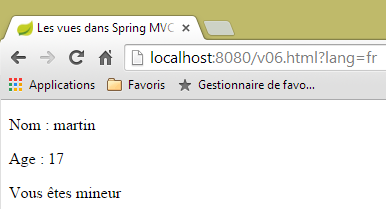 | 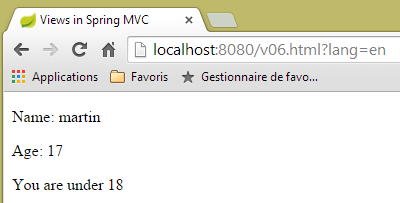 |
5.7. [/v07]:Thymeleaf视图中的迭代
考虑以下操作 [/v07]:
    // 创建视图 V 的模型 M - 4
    @RequestMapping(value = "/v07", method = RequestMethod.GET)
    public String v07(Model model) {
        model.addAttribute("liste", new Personne[] { new Personne(7, "martin", 17), new Personne(8, "lucie", 32),
                new Personne(9, "paul", 7) });
        return "vue-07";
}
- 该操作创建一个包含三人的列表,将其放入与键 [liste] 关联的模板中,并显示视图 [vue-07];
视图 [vue-07.xml] 如下所示:
<!DOCTYPE html>
<html xmlns:th="http://www.thymeleaf.org">
    <head>
        <title th:text="#{title}">Spring 4 MVC</title>
        <meta http-equiv="Content-Type" content="text/html; charset=UTF-8" />
    </head>
    <body>
        <h3 th:text="#{liste.personnes}">Liste de personnes</h3>
        <ul>
            <li th:each="element : ${liste}" th:text="'['+ ${element.id} + ', ' +${element.nom}+ ', ' + ${element.age} + ']'">[id,nom,age]</li>
        </ul>
    </body>
</html>
- 第 10 行:[th:each] 属性重复了其所在的标签,此处为 <li> 标签。该属性有两个参数 [element : collection],其中 [collection] 是一个对象集合,此处为人员列表。 Thymeleaf 将遍历该集合,并生成与集合中元素数量相等的 <li> 标签。对于每个 <li> 标签,[element] 将表示与该标签关联的集合元素。 对于该元素,将求值 [th:text] 属性。其表达式在此处是字符串的连接,结果为 [id, nom, age];
- 第 8 行:在消息文件中添加键 [liste.personnes];
结果如下:
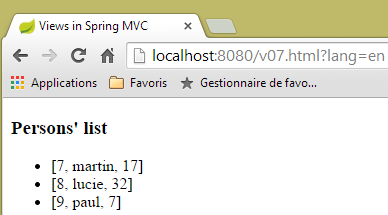 | 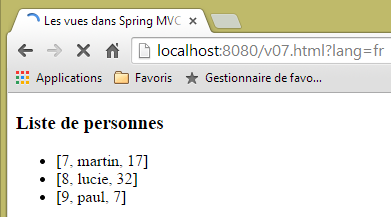 |
5.8. [/v08-/v10]:@ModelAttribute
我们回顾一下在研究操作时看到的内容,即注释 [@ModelAttribute] 的作用。我们添加以下新操作:
    // --------------- 绑定与 ModelAttribute ----------------------------------

    // 如果参数是一个对象,则会对其进行实例化,并可能根据查询参数进行修改
    // 它将自动作为视图模型的一部分,键名为 [key]
    // 对于 @ModelAttribute("xx") 参数,key 将等于 xx
    // 对于 @ModelAttribute 参数,key 将等于该参数类名的首字母(小写)
    // 如果 @ModelAttribute 不存在,则一切处理过程将视其为存在但无键值
    // 需注意,若参数不是对象,则不会在模型中自动生成

    @RequestMapping(value = "/v08", method = RequestMethod.GET)
    public String v08(@ModelAttribute("someone") Personne p, Model model) {
        System.out.println(String.format("Modèle=%s", model));
        return "vue-08";
}
- 第 11 行:注释 [@ModelAttribute("someone")] 将自动在模型中添加对象 [Personne p],并将其关联到键 [someone];
- 第 12 行:用于验证模型;
- 第 13 行:显示视图 [vue-08.xml];
视图 [vue-08.xml] 如下所示:
<!DOCTYPE html>
<html xmlns:th="http://www.thymeleaf.org">
    <head>
        <title th:text="#{title}">Spring 4 MVC</title>
        <meta http-equiv="Content-Type" content="text/html; charset=UTF-8" />
    </head>
    <body>
        <div th:object="${someone}">
            <p>
                <span th:text="#{personne.id}">Id :</span>
                <span th:text="*{id}">14</span>
            </p>
            <p>
                <span th:text="#{personne.nom}">Nom :</span>
                <span th:text="*{nom}">Bill</span>
            </p>
            <p>
                <span th:text="#{personne.age}">Age :</span>
                <span th:text="*{age}">56</span>
            </p>
        </div>
    </body>
</html>
- 第 8 行:使用键对象 [someone] 初始化 Thymeleaf 对象;
结果如下:
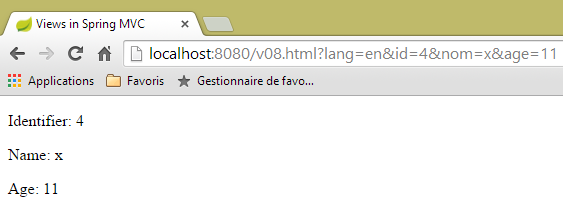 |
而在控制台中,有以下日志:
Modèle={someone=[id=4, nom=x, age=11], org.springframework.validation.BindingResult.someone=org.springframework.validation.BeanPropertyBindingResult: 0 errors}
现在考虑以下 [/v09] 操作:
    @RequestMapping(value = "/v09", method = RequestMethod.GET)
    public String v09(Personne p, Model model) {
        System.out.println(String.format("Modèle=%s", model));
        return "vue-09";
}
- 第 1 行:参数 [Personne p] 的存在将自动将人员 [p] 放入模板中。 由于未指定键,因此使用的键是类名,且首字母为小写。因此 [Personne p] 等同于 [@ModelAttribute("personne") Personne p];
视图 [vue.09.xml] 如下所示:
<!DOCTYPE html>
<html xmlns:th="http://www.thymeleaf.org">
    <head>
        <title th:text="#{title}">Spring 4 MVC</title>
        <meta http-equiv="Content-Type" content="text/html; charset=UTF-8" />
    </head>
    <body>
        <div th:object="${personne}">
            <p>
                <span th:text="#{personne.id}">Id :</span>
                <span th:text="*{id}">14</span>
            </p>
            <p>
                <span th:text="#{personne.nom}">Nom :</span>
                <span th:text="*{nom}">Bill</span>
            </p>
            <p>
                <span th:text="#{personne.age}">Age :</span>
                <span th:text="*{age}">56</span>
            </p>
        </div>
    </body>
</html>
- 第 8 行:使用的模板键为 [personne];
以下是结果:
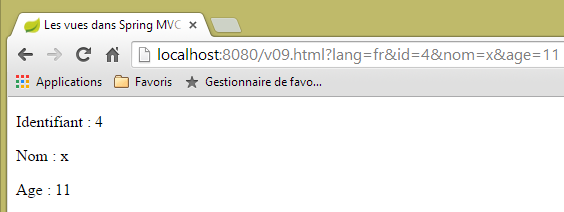 |
以及服务器控制台中的日志:
Modèle={personne=[id=4, nom=x, age=11], org.springframework.validation.BindingResult.personne=org.springframework.validation.BeanPropertyBindingResult: 0 errors}
现在,我们来看以下新的操作 [/v10]:
    @ModelAttribute("uneAutrePersonne")
    private Personne getPersonne(){
        return new Personne(24,"pauline",55);
    }

    @RequestMapping(value = "/v10", method = RequestMethod.GET)
    public String v10(Model model) {
        System.out.println(String.format("Modèle=%s", model));
        return "vue-10";
}
- 第 1-4 行:定义了一个方法,该方法在每个请求的模型中创建一个键元素 [uneAutrePersonne],并将其关联到对象 [new Personne(24,"pauline",55)];
- 第6-10行:操作[/v10]除了将接收到的模板传递给视图[vue-10.xml]外,不执行任何其他操作。 请注意,参数 [Model model] 仅在第 8 行语句中需要存在。若无该参数,则该参数毫无用处;
视图 [vue-10.xml] 如下所示:
<!DOCTYPE html>
<html xmlns:th="http://www.thymeleaf.org">
    <head>
        <title th:text="#{title}">Spring 4 MVC</title>
        <meta http-equiv="Content-Type" content="text/html; charset=UTF-8" />
    </head>
    <body>
        <div th:object="${uneAutrePersonne}">
            <p>
                <span th:text="#{personne.id}">Id :</span>
                <span th:text="*{id}">14</span>
            </p>
            <p>
                <span th:text="#{personne.nom}">Nom :</span>
                <span th:text="*{nom}">Bill</span>
            </p>
            <p>
                <span th:text="#{personne.age}">Age :</span>
                <span th:text="*{age}">56</span>
            </p>
        </div>
    </body>
</html>
结果如下:
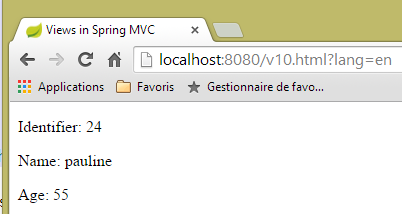 |
控制台日志如下:
5.9. [/v11] : @SessionAttributes
我们回顾一下在研究操作时看到的内容,即注释 [@SessionAttributes] 的作用。我们添加以下新的操作 [/v11]:
    @ModelAttribute("jean")
    private Personne getJean(){
        return new Personne(33,"jean",10);
    }

    @RequestMapping(value = "/v11", method = RequestMethod.GET)
    public String v11(Model model, HttpSession session) {
        System.out.println(String.format("Modèle=%s, Session[jean]=%s", model, session.getAttribute("jean")));
        return "vue-11";
}
这与刚才研究的内容类似。区别在于,[@SessionAttributes]注解被放置在类本身上:
@Controller
@SessionAttributes("jean")
public class ViewsController {
- 第 2 行:指定模型的键 [jean] 必须放入会话中;
因此,在操作的第 7 行,我们注入了会话。第 8 行,我们显示了与键 [jean] 关联的会话值。
视图 [vue-11.xml] 如下所示:
<!DOCTYPE html>
<html xmlns:th="http://www.thymeleaf.org">
    <head>
        <title th:text="#{title}">Spring 4 MVC</title>
        <meta http-equiv="Content-Type" content="text/html; charset=UTF-8" />
    </head>
    <body>
        <div th:object="${jean}">
            <p>
                <span th:text="#{personne.id}">Id :</span>
                <span th:text="*{id}">14</span>
            </p>
            <p>
                <span th:text="#{personne.nom}">Nom :</span>
                <span th:text="*{nom}">Bill</span>
            </p>
            <p>
                <span th:text="#{personne.age}">Age :</span>
                <span th:text="*{age}">56</span>
            </p>
        </div>
        <hr />
        <div th:object="${session.jean}">
            <p>
                <span th:text="#{personne.id}">Id :</span>
                <span th:text="*{id}">14</span>
            </p>
            <p>
                <span th:text="#{personne.nom}">Nom :</span>
                <span th:text="*{nom}">Bill</span>
            </p>
            <p>
                <span th:text="#{personne.age}">Age :</span>
                <span th:text="*{age}">56</span>
            </p>
        </div>
    </body>
</html>
显示了两个人:
- 第8-21行:模型中键为[jean]的人员;
- 第23-36行:会话中键为[jean]的人员;
结果如下:
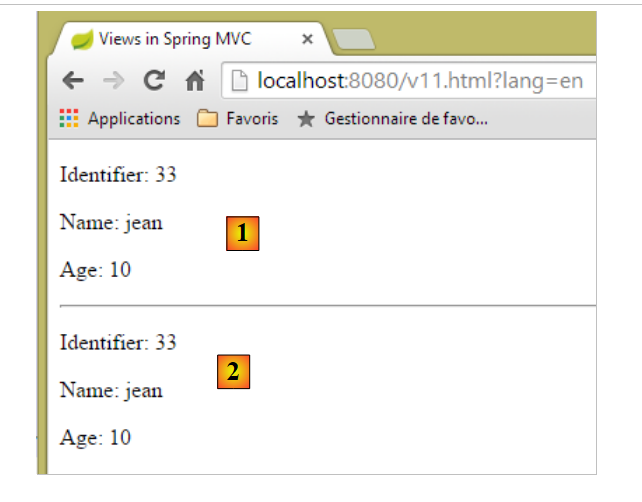 |
- 在 [1] 中,模型中的键为 [jean] 的个人;
- 在 [2] 中,会话中的键为 [jean];
控制台日志如下:
Modèle={uneAutrePersonne=[id=24, nom=pauline, age=55], jean=[id=33, nom=jean, age=10]}, Session[jean]=null
从上文可以看出,密钥 [jean] 并未出现在接收该操作的会话中。由此可推断,密钥 [jean] 是在操作执行后、视图显示前被放入会话的。
现在,我们考虑一种情况:某个键同时被 [@ModelAttribute] 和 [@SessionAttributes] 引用。我们构建以下两个操作:
    @RequestMapping(value = "/v12a", method = RequestMethod.GET)
    @ResponseBody
    public void v12a(HttpSession session) {
        session.setAttribute("paul", new Personne(51, "paul", 33));
    }

    // 当 [@ModelAttribute] 的键同时也是 [@SessionAttributes] 的键时
    // 在此情况下,相应的参数将初始化为会话值
    @RequestMapping(value = "/v12b", method = RequestMethod.GET)
    public String v12b(Model model, @ModelAttribute("paul") Personne p) {
        System.out.println(String.format("Modèle=%s", model));
        return "vue-12";
}
操作 [/v12a] 仅用于将元素 ['paul',new Personne(51, "paul", 33)] 放入会话中。它不执行其他任何操作。 它被 [@ResponseBody] 标记的事实表明,正是它向客户端生成响应。由于其类型为 [void],因此不会生成任何响应。
操作 [/v12b] 接受 [@ModelAttribute("paul") Personne p] 作为参数。 如果不进行其他操作,将实例化一个 [Personne] 对象,并使用请求参数对其进行初始化,而该对象与由操作 [/v12a] 放入会话中的键对象 [paul] 没有任何关联。 我们将 [paul] 键添加到类的会话属性中:
@Controller
@SessionAttributes({ "jean", "paul" })
public class ViewsController {
- 第 2 行,现在有两个会话属性;
让我们回到操作 [/v12b] 的参数:
public String v12b(Model model, @ModelAttribute("paul") Personne p) {
现在,对象 [Personne p] 不会被实例化,而是会引用会话中的键对象 [paul]。 后续流程保持不变。特别是,键对象 [paul] 将出现在待显示视图的模板中。这正是我们在操作 [/v12b] 的第 11 行所期望看到的。
视图 [vue-12.xml] 将如下所示:
<!DOCTYPE html>
<html xmlns:th="http://www.thymeleaf.org">
    <head>
        <title th:text="#{title}">Spring 4 MVC</title>
        <meta http-equiv="Content-Type" content="text/html; charset=UTF-8" />
    </head>
    <body>
        <div th:object="${paul}">
            <p>
                <span th:text="#{personne.id}">Id :</span>
                <span th:text="*{id}">14</span>
            </p>
            <p>
                <span th:text="#{personne.nom}">Nom :</span>
                <span th:text="*{nom}">Bill</span>
            </p>
            <p>
                <span th:text="#{personne.age}">Age :</span>
                <span th:text="*{age}">56</span>
            </p>
        </div>
    </body>
</html>
- 第 8 行:引用视图模型中的键 [paul];
执行将键 [paul] 放入会话的操作 [/v12a] 后,结果如下:
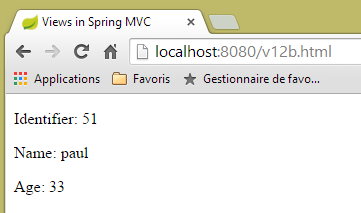 |
控制台日志如下:
Modèle={jean=[id=33, nom=jean, age=10], uneAutrePersonne=[id=24, nom=pauline, age=55], paul=[id=51, nom=paul, age=33], org.springframework.validation.BindingResult.paul=org.springframework.validation.BeanPropertyBindingResult: 0 errors}
密钥 [paul] 已成功放入模板中,其值为会话中与密钥 [paul] 关联的值。
5.10. [/v13]:生成输入表单
现在我们来探讨表单的输入及其验证。我们将通过以下操作 [/v13] 构建第一个表单:
  // 生成一个用于输入人员的表单
  @RequestMapping(value = "/v13", method = RequestMethod.GET)
  public String v13() {
    return "vue-13";
}
该操作仅用于显示以下视图 [vue-13.xml]:
<!DOCTYPE html>
<html xmlns:th="http://www.thymeleaf.org">
    <head>
        <title th:text="#{title}">Spring 4 MVC</title>
        <meta http-equiv="Content-Type" content="text/html; charset=UTF-8" />
    </head>
    <body>
        <form action="/someURL" th:action="@{/v14.html}" method="post">
            <h2 th:text="#{personne.formulaire.titre}">Entrez les informations suivantes</h2>
            <div th:object="${personne}">
                <table>
                    <thead></thead>
                    <tbody>
                        <tr>
                            <td th:text="#{personne.id}">Id :</td>
                            <td>
                                <input type="text" name="id" value="11" th:value="''" />
                            </td>
                        </tr>
                        <tr>
                            <td th:text="#{personne.nom}">Nom :</td>
                            <td>
                                <input type="text" name="nom" value="Tintin" th:value="''" />
                            </td>
                        </tr>
                        <tr>
                            <td th:text="#{personne.age}">Age :</td>
                            <td>
                                <input type="text" name="age" value="17" th:value="''" />
                            </td>
                        </tr>
                    </tbody>
                </table>
            </div>
            <input type="submit" value="Valider" th:value="#{personne.formulaire.valider}" />
        </form>
    </body>
</html>
如果我们将该视图以 [vue-13.html] 的名称存入 [static] 文件夹,并请求 URL [http://localhost:8080/vue-13.html],则会得到以下页面:
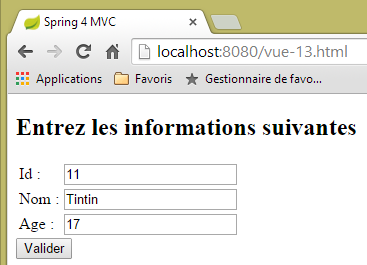 |
- 表单的第 8 行中,有一个带有 [th:action] 属性的 <form> 标签。该属性将由 Thymeleaf 进行求值,其值将替换 [action] 属性的当前值,因此后者仅作为装饰存在。 此处 [th:action] 属性的值将变为 [/v14.html];
- 第 17、23 和 29 行,[th:value] 属性的值将替换 [value] 属性的值。此处的值将是空字符串;
当查询 URL [/v13.html] 时,将得到以下结果:
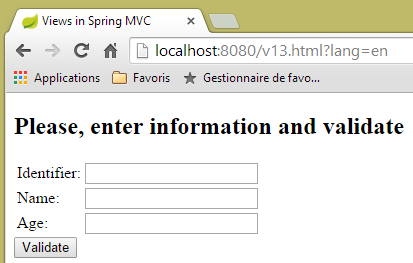 |
让我们看看 Thymeleaf 生成的源代码:
<!DOCTYPE html>

<html>
    <head>
        <title>Views in Spring MVC</title>
        <meta http-equiv="Content-Type" content="text/html; charset=UTF-8" />
    </head>
    <body>
        <form action="/v14.html" method="post">
            <h2>Please, enter information and validate</h2>
            <div>
                <table>
                    <thead></thead>
                    <tbody>
                        <tr>
                            <td>Identifier:</td>
                            <td>
                                <input type="text" name="id" value="" />
                            </td>
                        </tr>
                        <tr>
                            <td>Name:</td>
                            <td>
                                <input type="text" name="nom" value="" />
                            </td>
                        </tr>
                        <tr>
                            <td>Age:</td>
                            <td>
                                <input type="text" name="age" value="" />
                            </td>
                        </tr>
                    </tbody>
                </table>
            </div>
            <input type="submit" value="Validate" />
        </form>
    </body>
</html>
在第 9、18、24 和 30 行,可以看到 Thymeleaf 对 [th:action] 和 [th:value] 属性的求值。
5.11. [/v14]:处理表单提交的值
[/v14] 操作是接收提交值的操作,具体如下:
  // 处理表单中的值
  @RequestMapping(value = "/v14", method = RequestMethod.POST)
  public String v14(Personne p) {
    return "vue-14";
}
- 第 3 行:提交的值被封装在 [Personne p] 对象中。我们知道该对象会自动成为视图 V 的模型 M 的一部分(该视图将由该操作显示),并关联键 [personne];
- 第 4 行,显示的视图是 [vue-14.xml];
视图 [vue-14.xml] 如下所示:
<!DOCTYPE html>
<html xmlns:th="http://www.thymeleaf.org">
    <head>
        <title th:text="#{title}">Spring 4 MVC</title>
        <meta http-equiv="Content-Type" content="text/html; charset=UTF-8" />
    </head>
    <body>
    <h2 th:text="#{personne.formulaire.saisies}">Voici vos saisies</h2>
        <div th:object="${personne}">
            <p>
                <span th:text="#{personne.id}">Id :</span>
                <span th:text="*{id}">14</span>
            </p>
            <p>
                <span th:text="#{personne.nom}">Nom :</span>
                <span th:text="*{nom}">Bill</span>
            </p>
            <p>
                <span th:text="#{personne.age}">Age :</span>
                <span th:text="*{age}">56</span>
            </p>
        </div>
    </body>
</html>
- 第 9 行:从模型中获取与键 [personne] 关联的对象;
- 第12、16和20行:显示该对象的属性;
结果如下:
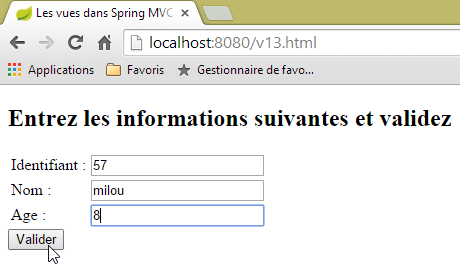 | 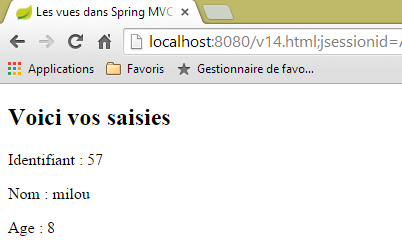 |
5.12. [/v15-/v16]:验证一个模板
结合前面的示例,让我们来看以下代码片段:
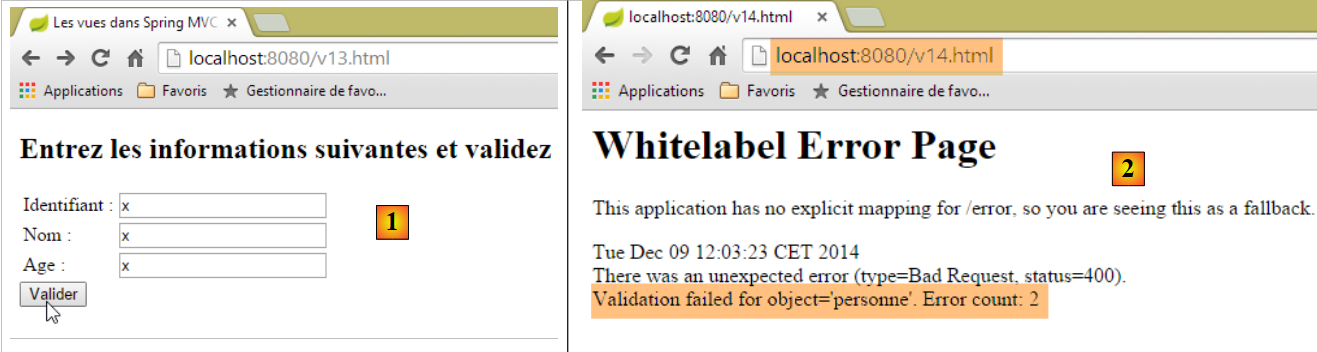 |
- 在 [1] 中,为类型为 [int] 的字段 [id] 和 [age] 输入了错误值;
- 在 [2] 中,服务器的响应提示我们发生了两处错误;
我们将使用相同的表单,但在验证出现错误时,会跳转至一个显示错误信息的页面,以便用户进行修正。
操作 [/v15] 如下:
    // ---------------------- 显示表单
    @RequestMapping(value = "/v15", method = RequestMethod.GET)
    public String v15(SecuredPerson p) {
        return "vue-15";
}
它接收的参数类型为 [SecuredPerson],具体如下:
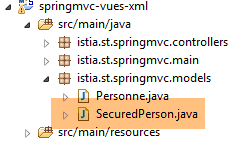 |
package istia.st.springmvc.models;

import javax.validation.constraints.NotNull;

import org.hibernate.validator.constraints.Length;
import org.hibernate.validator.constraints.Range;

public class SecuredPerson {

    @Range(min = 1)
    private int id;

    @Length(min = 4, max = 10)
    private String nom;

    @Range(min = 8, max = 14)
    private int age;

    // 制造商
    public SecuredPerson() {

    }

    public SecuredPerson(int id, String nom, int age) {
        this.id=id;
        this.nom = nom;
        this.age = age;
    }

    // 获取器和设置器
...
}
字段 [id, nom, age] 已标注了验证约束。由操作 [/v15] 显示的视图 [vue-15.xml] 如下:
<!DOCTYPE html>
<html xmlns:th="http://www.thymeleaf.org">
    <head>
        <title th:text="#{title}">Spring 4 MVC</title>
        <meta http-equiv="Content-Type" content="text/html; charset=UTF-8" />
    </head>
    <body>
        <form action="/someURL" th:action="@{/v16.html}" method="post">
            <h2 th:text="#{personne.formulaire.titre}">Entrez les informations suivantes</h2>
            <div th:object="${securedPerson}">
                <table>
                    <thead></thead>
                    <tbody>
                        <tr>
                            <td th:text="#{personne.id}">Id :</td>
                            <td>
                                <input type="text" name="id" value="11" th:value="*{id}" />
                            </td>
                            <td>
                                <span th:if="${#fields.hasErrors('id')}" th:errors="*{id}" style="color: red">Identifiant erroné</span>
                            </td>
                        </tr>
                        <tr>
                            <td th:text="#{personne.nom}">Nom :</td>
                            <td>
                                <input type="text" name="nom" value="Tintin" th:value="*{nom}" />
                            </td>
                            <td>
                                <span th:if="${#fields.hasErrors('nom')}" th:errors="*{nom}" style="color: red">Nom erroné</span>
                            </td>
                        </tr>
                        <tr>
                            <td th:text="#{personne.age}">Age :</td>
                            <td>
                                <input type="text" name="age" value="17" th:value="*{age}" />
                            </td>
                            <td>
                                <span th:if="${#fields.hasErrors('age')}" th:errors="*{age}" style="color: red">Âge erroné</span>
                            </td>
                        </tr>
                    </tbody>
                </table>
                <input type="submit" value="Valider" th:value="#{personne.formulaire.valider}" />
                <ul>
                    <li th:each="err : ${#fields.errors('*')}" th:text="${err}" style="color: red" />
                </ul>
            </div>
        </form>
    </body>
</html>
- 第 10-47 行:检索了与键 [securedPerson] 关联的页面模型对象。在执行完 GET 后,得到一个具有实例化值 [id=0, nom=null, age=0] 的对象;
- 第 17 行:字段 [securedPerson.id] 的值;
- 第 20 行:表达式 [${#fields.hasErrors('id')}] 用于判断字段 [securedPerson.id] 是否存在验证错误。若存在,则属性 [th:errors="*{id}"] 将显示相应的错误消息;
- 该处理流程在第29行针对字段[nom]以及第38行针对字段[age]重复出现;
- 第45行:表达式[${#fields.errors('*')}]表示对象[securedPerson]所有字段的错误集合。因此,第44至46行将显示该错误集合;
- 第16行:可见表单的值将被提交至操作[/v16]。该操作如下:
    // -------------------- 模型验证 -------------------
    @RequestMapping(value = "/v16", method = RequestMethod.POST)
    public String v16(@Valid SecuredPerson p, BindingResult result) {
        // 错误?
        if (result.hasErrors()) {
            return "vue-15";
        } else {
            return "vue-16";
        }
}
- 第3行,注释[@Valid SecuredPerson p]强制对提交的值进行验证;
- 第5行:检查操作模板是否存在错误;
- 第 6 行:若模板有误,则返回表单 [vue-15.xml]。由于该表单会显示错误信息,我们将查看这些信息;
- 第 8 行:如果操作模板通过验证,则显示以下视图 [vue-16.xml]:
<!DOCTYPE html>
<html xmlns:th="http://www.thymeleaf.org">
    <head>
        <title th:text="#{title}">Spring 4 MVC</title>
        <meta http-equiv="Content-Type" content="text/html; charset=UTF-8" />
    </head>
    <body>
    <h2 th:text="#{personne.formulaire.saisies}">Voici vos saisies</h2>
        <div th:object="${securedPerson}">
            <p>
                <span th:text="#{personne.id}">Id :</span>
                <span th:text="*{id}">14</span>
            </p>
            <p>
                <span th:text="#{personne.nom}">Nom :</span>
                <span th:text="*{nom}">Bill</span>
            </p>
            <p>
                <span th:text="#{personne.age}">Age :</span>
                <span th:text="*{age}">56</span>
            </p>
        </div>
    </body>
</html>
以下是执行示例:
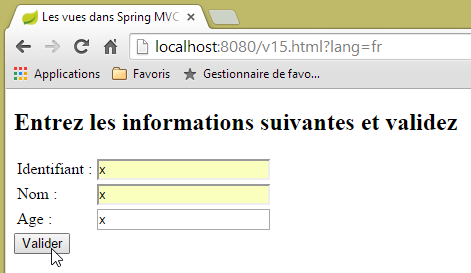 | 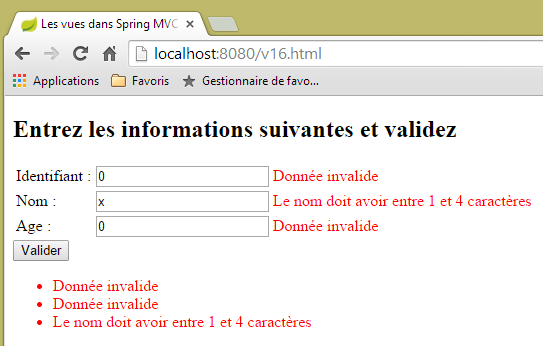 |
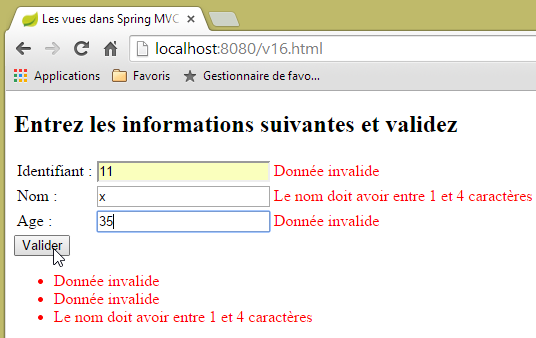 | 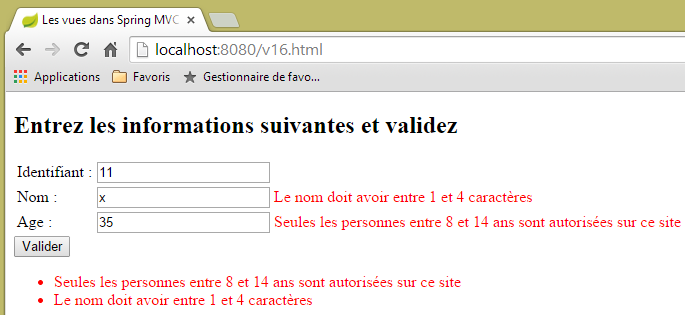 |
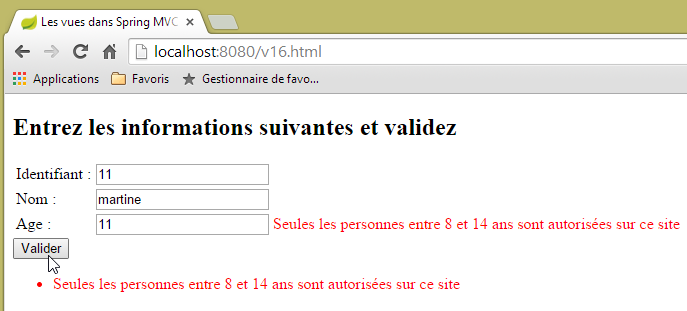 |
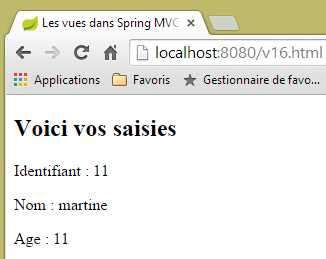 |
5.13. [/v17-/v18]:错误消息检查
首次调用操作 [/v15] 时,将得到以下结果:
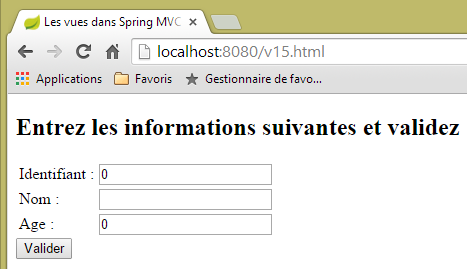 |
我们可能希望在 [Identifiant, Age] 字段中显示空表单,而不是零。要实现这一点,我们按以下方式修改操作的模型:
package istia.st.springmvc.models;

import javax.validation.constraints.Digits;

import org.hibernate.validator.constraints.Length;
import org.hibernate.validator.constraints.Range;

public class StringSecuredPerson {

    @Range(min = 1)
    @Digits(fraction = 0, integer = 4)
    private String id;

    @Length(min = 4, max = 10)
    private String nom;

    @Range(min = 8, max = 14)
    @Digits(fraction = 0, integer = 2)
    private String age;

    // 构造函数
    public StringSecuredPerson() {

    }

    public StringSecuredPerson(String id, String nom, String age) {
        this.id = id;
        this.nom = nom;
        this.age = age;
    }

    // getter 和 setter
...

}
- 第 12 行和第 19 行:将字段 [id] 和 [age] 的类型改为 [String];
- 第 11 行:指定字段 [id] 必须为最多四位数的整数,且不包含小数;
- 第18行:字段[age]同样需为最多两位数的整数;
操作 [/v17] 变为如下:
    // ---------------------- 表单显示
    @RequestMapping(value = "/v17", method = RequestMethod.GET)
    public String v17(StringSecuredPerson p) {
        return "vue-17";
}
由操作 [/v17] 显示的视图 [vue-17.xml] 如下:
<!DOCTYPE html>
<html xmlns:th="http://www.thymeleaf.org">
    <head>
        <title th:text="#{title}">Spring 4 MVC</title>
        <meta http-equiv="Content-Type" content="text/html; charset=UTF-8" />
    </head>
    <body>
        <form action="/someURL" th:action="@{/v18.html}" method="post">
            <h2 th:text="#{personne.formulaire.titre}">Entrez les informations suivantes</h2>
            <div th:object="${stringSecuredPerson}">
                <table>
                    <thead></thead>
                    <tbody>
                        <tr>
                            <td th:text="#{personne.id}">Id :</td>
                            <td>
                                <input type="text" name="id" value="11" th:value="*{id}" />
                            </td>
                            <td>
                                <span th:each="err,status : ${#fields.errors('id')}" th:if="${status.index}==0" th:text="${err}" style="color: red">
                                    Identifiant erroné
                                </span>
                            </td>
                        </tr>
                        <tr>
                            <td th:text="#{personne.nom}">Nom :</td>
                            <td>
                                <input type="text" name="nom" value="Tintin" th:value="*{nom}" />
                            </td>
                            <td>
                                <span th:if="${#fields.hasErrors('nom')}" th:errors="*{nom}" style="color: red">Nom erroné</span>
                            </td>
                        </tr>
                        <tr>
                            <td th:text="#{personne.age}">Age :</td>
                            <td>
                                <input type="text" name="age" value="17" th:value="*{age}" />
                            </td>
                            <td>
                                <span th:if="${#fields.hasErrors('age')}" th:errors="*{age}" style="color: red">Âge erroné</span>
                            </td>
                        </tr>
                    </tbody>
                </table>
                <input type="submit" value="Valider" th:value="#{personne.formulaire.valider}" />
                <ul>
                    <li th:each="err : ${#fields.errors('*')}" th:text="${err}" style="color: red" />
                </ul>
            </div>
        </form>
    </body>
</html>
更改发生在以下行:
- 第 10 行:现在使用键模板对象 [stringSecuredPerson];
- 第 20 行:遍历字段 [id] 的错误列表。在 [th:each="err,status : ${#fields.errors('id')}"] 语法中,是变量 [err] 负责遍历该列表。 变量 [status] 提供每次迭代的信息。这是一个 [index, count, size, current] 对象,其中:
- index:是当前元素的编号,
- current:当前元素的值,
- count、size:所遍历列表的大小;
- 第 20 行:仅显示列表 [th:if="${status.index}==0"] 的第一个元素;
处理 [/v17] 操作中 POST 的 [/v18] 操作如下:
    // -------------------- 模型验证------------------
    @RequestMapping(value = "/v18", method = RequestMethod.POST)
    public String v18(@Valid StringSecuredPerson p, BindingResult result) {
        // 错误?
        if (result.hasErrors()) {
            return "vue-17";
        } else {
            return "vue-18";
        }
}
消息文件的演变过程如下:
[messages_fr.properties]
title=Les vues dans Spring MVC
personne.nom=Nom :
personne.age=Age :
personne.id=Identifiant :
personne.mineure=Vous êtes mineur
personne.majeure=Vous êtes majeur
liste.personnes=Liste de personnes
personne.formulaire.titre=Entrez les informations suivantes et validez
personne.formulaire.valider=Valider
personne.formulaire.saisies=Voici vos saisies
notNull=La donnée est obligatoire
Range.securedPerson.id=L''identifiant doit être un nombre entier >=1
Range.securedPerson.age=Seules les personnes entre 8 et 14 ans sont autorisées sur ce site
Length.securedPerson.nom=Le nom doit avoir entre 1 et 4 caractères
typeMismatch=Donnée invalide
Range.stringSecuredPerson.id=L''identifiant doit être un nombre entier >=1
Range.stringSecuredPerson.age=Seules les personnes entre 8 et 14 ans sont autorisées sur ce site
Length.stringSecuredPerson.nom=Le nom doit avoir entre 1 et 4 caractères
Digits.stringSecuredPerson.id=Tapez un nombre entier de 4 chiffres au plus
Digits.stringSecuredPerson.age=Tapez un nombre entier de 2 chiffres au plus
[messages_en.properties]
title=Views in Spring MVC
personne.nom=Name:
personne.age=Age:
personne.id=Identifier:
personne.mineure=You are under 18
personne.majeure=You are over 18
liste.personnes=Persons' list
personne.formulaire.titre=Please, enter information and validate
personne.formulaire.valider=Validate
personne.formulaire.saisies=Here are your inputs
NotNull=Data is required
Range.securedPerson.id=Identifier must be an integer >=1
Range.securedPerson.age=Only kids who are 8 to 14 years old are allowed on this site
Length.securedPerson.nom=Name must be 4 to 10 characters long
typeMismatch=Invalid format
Range.stringSecuredPerson.id=Identifier must be an integer >=1
Range.stringSecuredPerson.age=Only kids who are 8 to 14 years old are allowed on this site
Length.stringSecuredPerson.nom=Name must be 4 to 10 characters long
Digits.stringSecuredPerson.id=Should be an integer with at most four digits
Digits.stringSecuredPerson.age=Should be an integer with at most two digits
让我们来看几个示例:
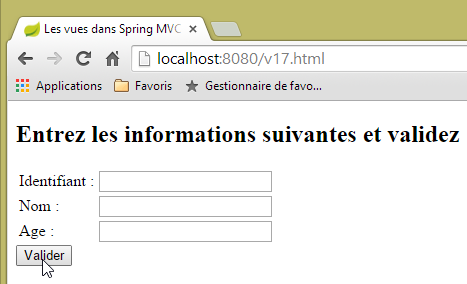 |
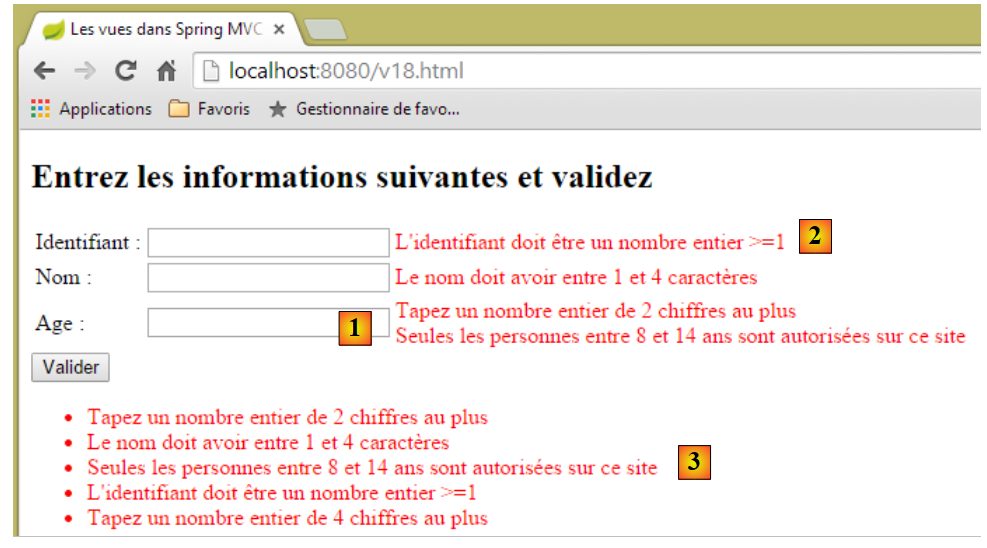 |
从 [1] 可以看出,[age] 字段的两个验证器均已执行:
    @Range(min = 8, max = 14)
    @Digits(fraction = 0, integer = 2)
    private String age;
错误消息是否有执行顺序?对于字段 [age],验证器似乎按 [Digits, Range] 的顺序执行。但如果执行多次查询,会发现该顺序可能会发生变化。因此,不能依赖验证器的执行顺序。 在 [2] 中,[id] 字段的两个错误消息中仅显示一条。而在 [3] 中,则会显示所有错误消息。
5.14. [/v19-/v20]:使用不同的验证器
让我们考虑以下新的操作模型:
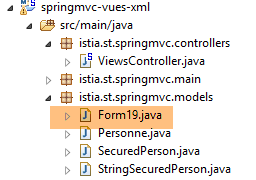 |
package istia.st.springmvc.models;

import java.util.Date;

import javax.validation.constraints.AssertFalse;
import javax.validation.constraints.AssertTrue;
import javax.validation.constraints.Future;
import javax.validation.constraints.Max;
import javax.validation.constraints.Min;
import javax.validation.constraints.NotNull;
import javax.validation.constraints.Past;
import javax.validation.constraints.Pattern;
import javax.validation.constraints.Size;

import org.hibernate.validator.constraints.Email;
import org.hibernate.validator.constraints.Length;
import org.hibernate.validator.constraints.NotBlank;
import org.hibernate.validator.constraints.NotEmpty;
import org.hibernate.validator.constraints.Range;
import org.hibernate.validator.constraints.URL;
import org.springframework.format.annotation.DateTimeFormat;

public class Form19 {

    @NotNull
    @AssertFalse
    private Boolean assertFalse;

    @NotNull
    @AssertTrue
    private Boolean assertTrue;

    @NotNull
    @Future
    @DateTimeFormat(pattern = "yyyy-MM-dd")
    private Date dateInFuture;

    @NotNull
    @Past
    @DateTimeFormat(pattern = "yyyy-MM-dd")
    private Date dateInPast;

    @NotNull
    @Max(value = 100)
    private Integer intMax100;

    @NotNull
    @Min(value = 10)
    private Integer intMin10;

    @NotNull
    @NotEmpty
    private String strNotEmpty;

    @NotNull
    @NotBlank
    private String strNotBlank;

    @NotNull
    @Size(min = 4, max = 6)
    private String strBetween4and6;

    @NotNull
    @Pattern(regexp = "^\\d{2}:\\d{2}:\\d{2}$")
    private String hhmmss;

    @NotNull
    @Email
    @NotBlank
    private String email;

    @NotNull
    @Length(max = 4, min = 4)
    private String str4;

    @Range(min = 10, max = 14)
    @NotNull
    private Integer int1014;

    @URL
    @NotBlank
    private String url;

    // getter 和 setter
...
}
它将由以下操作 [/v19] 显示:
    // ------------------ 表单显示
    @RequestMapping(value = "/v19", method = RequestMethod.GET, produces = "text/html; charset=UTF-8")
    public String v19(Form19 formulaire) {
        return "vue-19";
}
- 第 3 行:该操作接收一个 [Form19 formulaire] 对象作为参数。如果 GET 未接收任何参数,则该对象将使用 Java 的默认值进行初始化;
- 第 4 行:显示视图 [vue-19.xml]。该视图如下:
<!DOCTYPE HTML>
<html xmlns:th="http://www.thymeleaf.org">
    <head>
        <title>Spring 4 MVC</title>
        <meta http-equiv="Content-Type" content="text/html; charset=UTF-8" />
        <link rel="stylesheet" href="/css/form19.css" />
    </head>
    <body>
        <h3>Formulaire - Validations côté serveur</h3>
        <form action="/someURL" th:action="@{/v20.html}" method="post" th:object="${form19}">
            <table>
                <thead>
                    <tr>
                        <th class="col1">Contrainte</th>
                        <th class="col2">Saisie</th>
                        <th class="col3">Erreur</th>
                    </tr>
                </thead>
                <tbody>
                    <tr>
                        <td class="col1">@NotEmpty</td>
                        <td class="col2">
                            <input type="text" th:field="*{strNotEmpty}" />
                        </td>
                        <td class="col3">
                            <span th:if="${#fields.hasErrors('strNotEmpty')}" th:errors="*{strNotEmpty}" class="error">Donnée erronée</span>
                        </td>
                    </tr>
                    <tr>
                        <td class="col1">@NotBlank</td>
                        <td class="col2">
                            <input type="text" th:field="*{strNotBlank}" />
                        </td>
                        <td class="col3">
                            <span th:if="${#fields.hasErrors('strNotBlank')}" th:errors="*{strNotBlank}" class="error">Donnée erronée</span>
                        </td>
                    </tr>
                    <tr>
                        <td class="col1">@assertFalse</td>
                        <td class="col2">
                            <input type="radio" th:field="*{assertFalse}" value="true" />
                            <label th:for="${#ids.prev('assertFalse')}">True</label>
                            <input type="radio" th:field="*{assertFalse}" value="false" />
                            <label th:for="${#ids.prev('assertFalse')}">False</label>
                        </td>
                        <td class="col3">
                            <span th:if="${#fields.hasErrors('assertFalse')}" th:errors="*{assertFalse}" class="error">Donnée erronée</span>
                        </td>
                    </tr>
                    <tr>
                        <td class="col1">@assertTrue</td>
                        <td class="col2">
                            <select th:field="*{assertTrue}">
                                <option value="true">True</option>
                                <option value="false">False</option>
                            </select>
                        </td>
                        <td class="col3">
                            <span th:if="${#fields.hasErrors('assertTrue')}" th:errors="*{assertTrue}" class="error">Donnée erronée</span>
                        </td>
                    </tr>
                    <tr>
                        <td class="col1">@Past</td>
                        <td class="col2">
                            <input type="date" th:field="*{dateInPast}" th:value="*{dateInPast}" />
                        </td>
                        <td class="col3">
                            <span th:if="${#fields.hasErrors('dateInPast')}" th:errors="*{dateInPast}" class="error">Donnée erronée</span>
                        </td>
                    </tr>
                    <tr>
                        <td class="col1">@Future</td>
                        <td class="col2">
                            <input type="date" th:field="*{dateInFuture}" th:value="*{dateInFuture}" />
                        </td>
                        <td class="col3">
                            <span th:if="${#fields.hasErrors('dateInFuture')}" th:errors="*{dateInFuture}" class="error">Donnée erronée</span>
                        </td>
                    </tr>
                    <tr>
                        <td class="col1">@Max</td>
                        <td class="col2">
                            <input type="text" th:field="*{intMax100}" th:value="*{intMax100}" />
                        </td>
                        <td class="col3">
                            <span th:if="${#fields.hasErrors('intMax100')}" th:errors="*{intMax100}" class="error">Donnée erronée</span>
                        </td>
                    </tr>
                    <tr>
                        <td class="col1">@Min</td>
                        <td class="col2">
                            <input type="text" th:field="*{intMin10}" th:value="*{intMin10}" />
                        </td>
                        <td class="col3">
                            <span th:if="${#fields.hasErrors('intMin10')}" th:errors="*{intMin10}" class="error">Donnée erronée</span>
                        </td>
                    </tr>
                    <tr>
                        <td class="col1">@Size</td>
                        <td class="col2">
                            <input type="text" th:field="*{strBetween4and6}" th:value="*{strBetween4and6}" />
                        </td>
                        <td class="col3">
                            <span th:if="${#fields.hasErrors('strBetween4and6')}" th:errors="*{strBetween4and6}" class="error">Donnée erronée</span>
                        </td>
                    </tr>
                    <tr>
                        <td class="col1">@Pattern(hh:mm:ss)</td>
                        <td class="col2">
                            <input type="text" th:field="*{hhmmss}" th:value="*{hhmmss}" />
                        </td>
                        <td class="col3">
                            <span th:if="${#fields.hasErrors('hhmmss')}" th:errors="*{hhmmss}" class="error">Donnée erronée</span>
                        </td>
                    </tr>
                    <tr>
                        <td class="col1">@Email</td>
                        <td class="col2">
                            <input type="text" th:field="*{email}" th:value="*{email}" />
                        </td>
                        <td class="col3">
                            <span th:if="${#fields.hasErrors('email')}" th:errors="*{email}" class="error">Donnée erronée</span>
                        </td>
                    </tr>
                    <tr>
                        <td class="col1">@Length</td>
                        <td class="col2">
                            <input type="text" th:field="*{str4}" th:value="*{str4}" />
                        </td>
                        <td class="col3">
                            <span th:if="${#fields.hasErrors('str4')}" th:errors="*{str4}" class="error">Donnée erronée</span>
                        </td>
                    </tr>
                    <tr>
                        <td class="col1">@Range</td>
                        <td class="col2">
                            <input type="text" th:field="*{int1014}" th:value="*{int1014}" />
                        </td>
                        <td class="col3">
                            <span th:if="${#fields.hasErrors('int1014')}" th:errors="*{int1014}" class="error">Donnée erronée</span>
                        </td>
                    </tr>
                    <tr>
                        <td class="col1">@URL</td>
                        <td class="col2">
                            <input type="text" th:field="*{url}" th:value="*{url}" />
                        </td>
                        <td class="col3">
                            <span th:if="${#fields.hasErrors('url')}" th:errors="*{url}" class="error">Donnée erronée</span>
                        </td>
                    </tr>
                </tbody>
            </table>
            <p>
                <input type="submit" value="Valider" />
            </p>
        </form>
    </body>
</html>
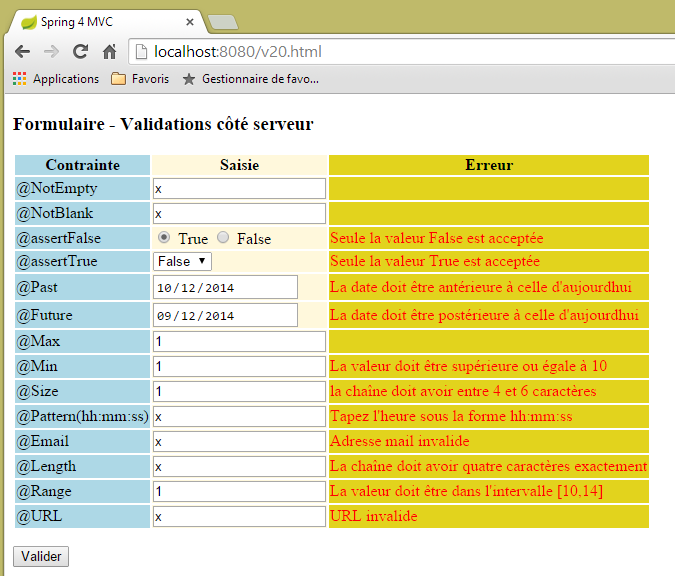
该代码显示以下视图:
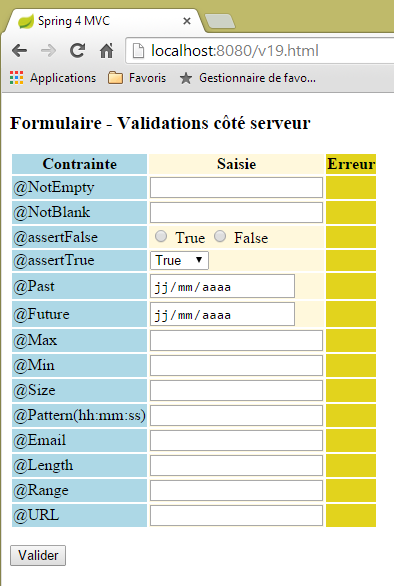 |
该页面包含一个三列表格:
- 第 1 列:输入字段的验证器;
- 第2列:输入字段;
- 第 3 列:输入字段的错误信息;
以视图代码 [/v19.html] 为例,该视图对应验证器 [@Pattern]:
                    <tr>
                        <td class="col1">@Pattern(hh:mm:ss)</td>
                        <td class="col2">
                            <input type="text" th:field="*{hhmmss}" th:value="*{hhmmss}" />
                        </td>
                        <td class="col3">
                            <span th:if="${#fields.hasErrors('hhmmss')}" th:errors="*{hhmmss}" class="error">Donnée erronée</span>
                        </td>
</tr>
这里包含了我们刚才在 [Personne] 类型表单中研究的代码:
- 第 2 行:第一列:被测试验证器的名称;
- 第 4 行:Thymeleaf 属性 [th:field="*{hhmmss}] 将生成属性 HTML、[id="hhmmss"] 和 [name="hhmmss"]。 Thymeleaf 属性 [th:value="*{hhmmss}"] 将生成属性 HTML [value="valeur de [form19.hhmmss]];
- 第 7 行:如果字段 [form19.hhmmss] 输入的值有误,则第 7 行将显示与该字段相关的错误信息;
提交的值由后续操作 [/v20] 处理:
    // ----------------- 表单模型的验证
    @RequestMapping(value = "/v20", method = RequestMethod.POST, produces = "text/html; charset=UTF-8")
    public String v20(@Valid Form19 formulaire, BindingResult result, RedirectAttributes redirectAttributes) {
        if (result.hasErrors()) {
            return "vue-19";
        } else {
            // 重定向至 [vue-19]
            redirectAttributes.addFlashAttribute("form19", formulaire);
            return "redirect:/v19.html";
        }
}
- 第 3 行:如果提交的值有效,则会填充对象 [Form19 formulaire] 的字段;
- 第 4-6 行:如果提交的值无效,则重新显示包含错误消息的表单 [vue-19];
- 第6-10行:如果提交的值有效,则使用这些值构建的对象[Form19 formulaire]将提供给后续请求(此处为重定向请求)。随后该对象将被销毁;
- 第 9 行:将客户端重定向至操作 [/v19.html]。该操作将重新显示表单 [vue-19],其中包含如下代码:
<form action="/someURL" th:action="@{/v20.html}" method="post" th:object="${form19}">
此时,[th:object="${form19}"] 属性将获取与 Flash 属性 [form19] 关联的对象,从而按用户输入的原始状态重新显示表单。
表单代码还需要进一步说明。请看以下代码:
                    <tr>
                        <td class="col1">@assertFalse</td>
                        <td class="col2">
                            <input type="radio" th:field="*{assertFalse}" value="true" />
                            <label th:for="${#ids.prev('assertFalse')}">True</label>
                            <input type="radio" th:field="*{assertFalse}" value="false" />
                            <label th:for="${#ids.prev('assertFalse')}">False</label>
                        </td>
                        <td class="col3">
                            <span th:if="${#fields.hasErrors('assertFalse')}" th:errors="*{assertFalse}" class="error">Donnée erronée</span>
                        </td>
</tr>
这将生成以下 HTML 代码:
<tr>
  <td class="col1">@assertFalse</td>
  <td class="col2">
    <input type="radio" value="true" id="assertFalse1" name="assertFalse" />
    <label for="assertFalse1">True</label>
    <input type="radio" value="false" id="assertFalse2" name="assertFalse" />
    <label for="assertFalse2">False</label>
  </td>
  <td class="col3">
  </td>
</tr>
在代码中
<input type="radio" th:field="*{assertFalse}" value="true" />
<label th:for="${#ids.prev('assertFalse')}">True</label>
<input type="radio" th:field="*{assertFalse}" value="false" />
<label th:for="${#ids.prev('assertFalse')}">False</label>
中,第 1 行和第 3 行的 Thymeleaf 属性 [th:field="*{assertFalse}"] 存在问题。据称该属性会生成 HTML、[id=assertFalse] 和 [name=assertFalse] 这三个属性。 问题在于,由于这些属性在第1行和第3行被生成,导致出现了两个完全相同的[name]属性,以及两个完全相同的[id]属性。 虽然 [name] 属性可以实现,但 [id] 属性却无法实现。 如生成的 HTML 代码所示,Thymeleaf 生成了两个不同的 [id] 属性:[id=asserFalse1] 和 [id=assertFalse2]。这其实是件好事。 问题在于我们并不了解这些标识符,而我们可能需要它们。第 2 行中的 [label] 标签就是这种情况。 HTML标签的[for]属性必须引用一个[id]属性, 即第 1 行中 [input] 标签生成的属性。 Thymeleaf 文档指出,表达式 [${#ids.prev('assertFalse')}"] 可用于获取为字段 [assertFalse] 生成的最后一个属性 [id]。
现在我们来看一下表单下拉列表的代码:
<select th:field="*{assertTrue}">
   <option value="true">True</option>
   <option value="false">False</option>
</select>
该代码生成下拉列表的代码 HTML:
提交的值将以名称 [name="assertTrue"] 进行提交。
视图 [vue-19.xml] 使用了一个样式表:
    <head>
        <title>Spring 4 MVC</title>
        <meta http-equiv="Content-Type" content="text/html; charset=UTF-8" />
        <link rel="stylesheet" href="/css/form19.css" />
</head>
第 4 行,所使用的样式表应放置在项目的 [static] 文件夹中:
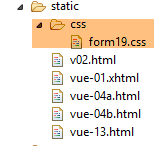 |
其内容如下:
@CHARSET "UTF-8";

.col1 {
    background: lightblue;
}

.col2 {
    background: Cornsilk;
}

.col3 {
    background: #e2d31d;
}

.error {
    color: red;
}
现在,让我们来看一下日期:
    @NotNull
    @Future
    @DateTimeFormat(pattern = "yyyy-MM-dd")
    private Date dateInFuture;

    @NotNull
    @Past
    @DateTimeFormat(pattern = "yyyy-MM-dd")
    private Date dateInPast;
通过 Chrome 开发者工具(Ctrl+Shift+I)查看网络请求可发现,日期以 (yyyy-mm-dd) 格式发送:
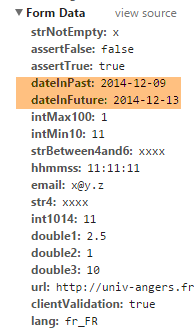 |
这就是为什么这些日期在验证器中被标注的原因:
@DateTimeFormat(pattern = "yyyy-MM-dd")
该验证器规定了日期提交值的预期格式。
最后,法语消息文件 [messages_fr.properties]:
title=Les vues dans Spring MVC
personne.nom=Nom :
personne.age=Age :
personne.id=Identifiant :
personne.mineure=Vous êtes mineur
personne.majeure=Vous êtes majeur
liste.personnes=Liste de personnes
personne.formulaire.titre=Entrez les informations suivantes et validez
personne.formulaire.valider=Valider
personne.formulaire.saisies=Voici vos saisies
NotNull=La donnée est obligatoire
Range.securedPerson.id=L''identifiant doit être un nombre entier >=1
Range.securedPerson.age=Seules les personnes entre 8 et 14 ans sont autorisées sur ce site
Length.securedPerson.nom=Le nom doit avoir entre 1 et 4 caractères
typeMismatch=Donnée invalide
Range.stringSecuredPerson.id=L''identifiant doit être un nombre entier >=1
Range.stringSecuredPerson.age=Seules les personnes entre 8 et 14 ans sont autorisées sur ce site
Length.stringSecuredPerson.nom=Le nom doit avoir entre 1 et 4 caractères
Digits.stringSecuredPerson.id=Tapez un nombre entier de 4 chiffres au plus
Digits.stringSecuredPerson.age=Tapez un nombre entier de 2 chiffres au plus
Future.form19.dateInFuture=La date doit être postérieure à celle d''aujourd'hui
Past.form19.dateInPast=La date doit être antérieure à celle d''aujourd'hui
Size.form19.strBetween4and6=la chaîne doit avoir entre 4 et 6 caractères
Min.form19.intMin10=La valeur doit être supérieure ou égale à 10
Max.form19.intMax100=La valeur doit être inférieure ou égale à 100
Length.form19.str4=La chaîne doit avoir quatre caractères exactement
Email.form19.email=Adresse mail invalide
URL.form19.url=URL invalide
Range.form19.int1014=La valeur doit être dans l''intervalle [10,14]
AssertTrue=Seule la valeur True est acceptée
AssertFalse=Seule la valeur False est acceptée
Pattern.form19.hhmmss=Tapez l''heure sous la forme hh:mm:ss
NotEmpty=La donnée ne peut être vide
NotBlank=La donnée ne peut être vide
让我们来看几个执行示例:
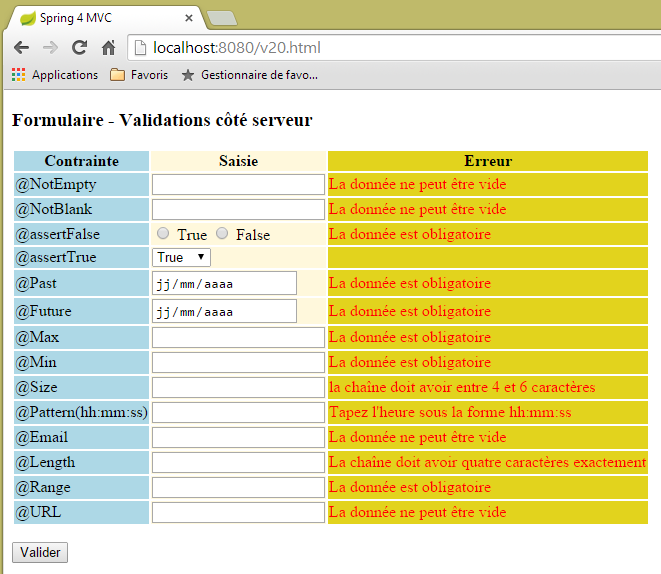 |
 |
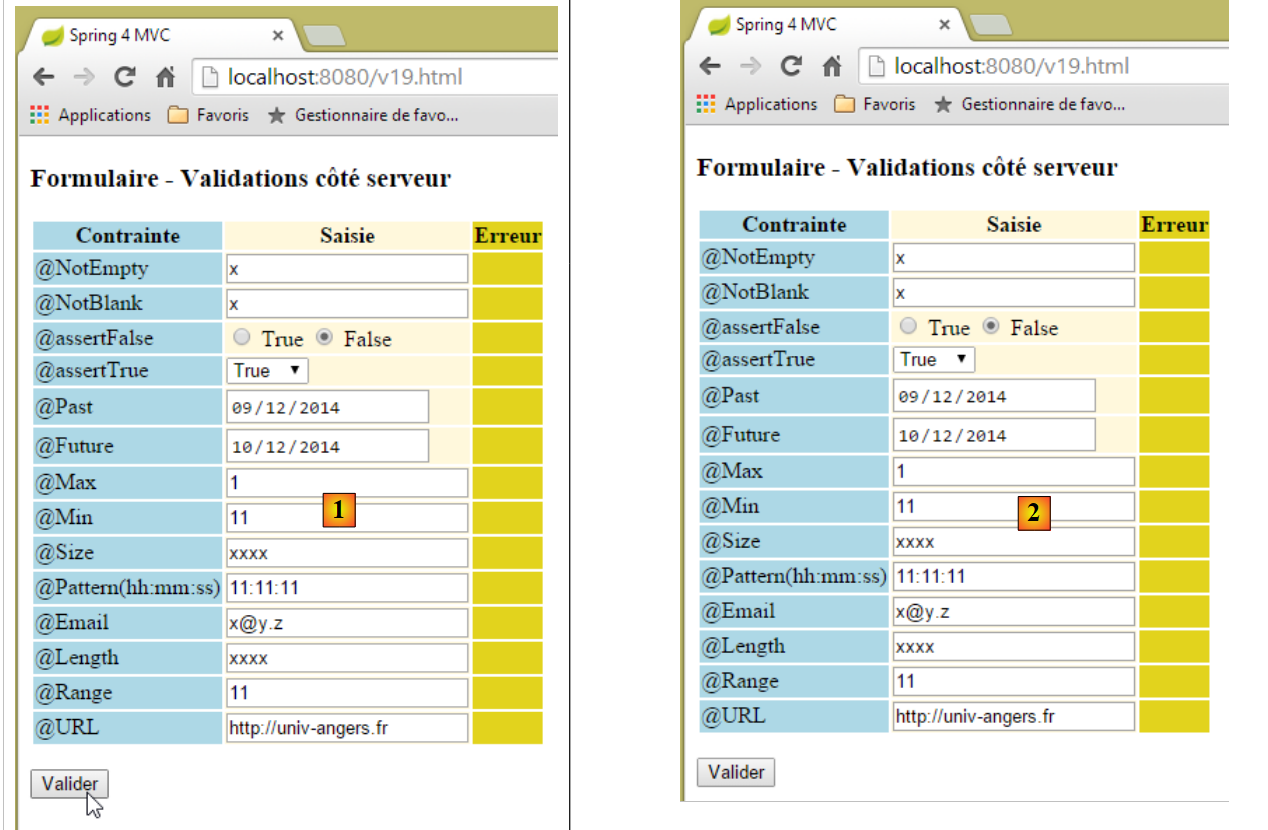 |
在上文中,在 [1] 和 [2] 之间,看起来似乎什么也没发生。但如果查看网络通信(Ctrl-Shift-I),却会发现与服务器进行了两次网络通信:
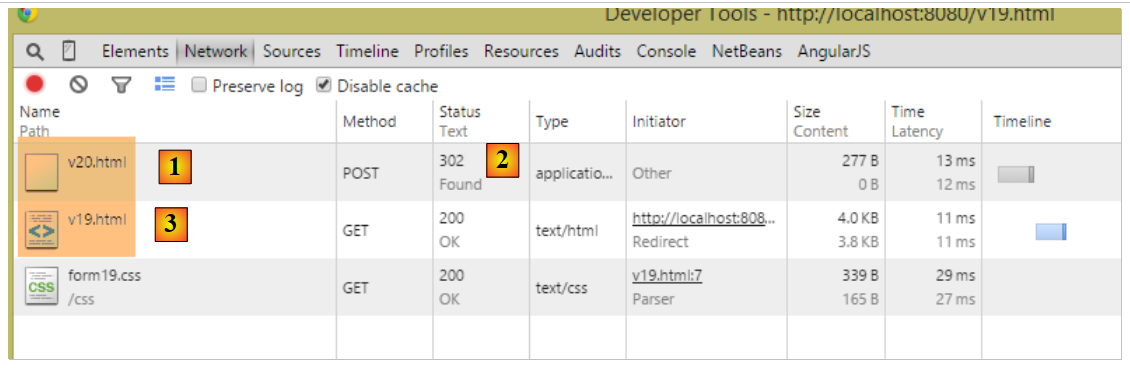 |
- 在 [1] 中,初始的 POST 请求响应为 [/v20];
- 变为 [2],该操作的响应为重定向;
- 在 [3] 中,第二次请求指向 [/v19];
随后执行操作 [/v19]:
    // ------------------ 显示表单
    @RequestMapping(value = "/v19", method = RequestMethod.GET, produces = "text/html; charset=UTF-8")
    public String v19(Form19 formulaire) {
        return "vue-19";
}
- 第3行, 参数 [Form19 formulaire] 被初始化为键 [form19] 的 Flash 属性,该键由前一个操作 [/v19] 创建,是一个类型为 [Form19] 的对象,其值为 提交至操作 [/v19] 的值;
- 第4行:将显示视图[vue-19.xml],其模板中包含一个[Form19 formulaire]对象,该对象已使用提交的值进行初始化。因此,用户看到的表单与提交时完全一致;
为何要进行重定向?为何不直接将数据提交至上述的 [/v19] 操作?结果本应相同,但存在以下差异:
- 浏览器地址栏中显示的会是 [http://localhost:8080/v20.html] 而不是此处的 [http://localhost:8080/v19.html],因为它显示的是最后调用的 URL;
- 如果用户刷新页面(F5),结果则完全不同:
- 在重定向的情况下,显示的 URL 实际上是通过 GET 生成的 [http://localhost:8080/v19.html]。 浏览器将重新执行该命令,从而获得一个全新的表单(Flash属性仅使用一次),
- 在不进行重定向的情况下,显示的 URL 是通过 POST 生成的 [http://localhost:8080/v20.html]。 浏览器将重新执行该最后一条指令,因此会再次生成一个 POST,其中包含与之前相同的提交值。虽然这在此处不会产生后果,但通常是不希望看到的,因此一般更倾向于使用重定向;
5.15. [/v21-/v22]:管理单选按钮
考虑以下 Spring [Listes] 组件:
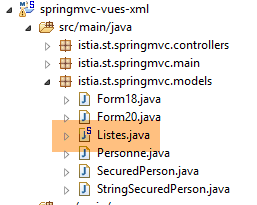 |
package istia.st.springmvc.models;

import org.springframework.stereotype.Component;

@Component
public class Listes {

    private String[] deplacements = new String[] { "0", "1", "2", "3", "4" };
    private String[] libellesDeplacements = new String[] { "vélo", "marche", "train", "avion", "autre" };
    private String[] libellesBijoux = new String[] { "émeraude", "rubis", "diamant", "opaline" };

    // 获取器和设置器
  ...

}
- 第 5 行:类 [Listes] 将作为 Spring 组件;
- 第 8-10 行:用于为单选按钮、复选框和下拉列表提供数据的列表;
在配置类 [Config] 中写道:
@Configuration
@ComponentScan({ "istia.st.springmvc.controllers", "istia.st.springmvc.models" })
@EnableAutoConfiguration
public class Config extends WebMvcConfigurerAdapter {
- 第 2 行:包含组件 [Listes] 的包 [models] 将被 Spring 成功解析;
我们创建以下新操作:
    // ------------------ 带单选按钮的表单
    @Autowired
    private Listes listes;

    @RequestMapping(value = "/v21", method = RequestMethod.GET, produces = "text/html; charset=UTF-8")
    public String v21(@ModelAttribute("form") Form21 formulaire, Model model) {
        model.addAttribute("listes", listes);
        return "vue-21";
    }

    @RequestMapping(value = "/v22", method = RequestMethod.POST, produces = "text/html; charset=UTF-8")
    public String v22(@ModelAttribute("form") Form21 formulaire, RedirectAttributes redirectAttributes) {
        redirectAttributes.addFlashAttribute("form", formulaire);
        return "redirect:/v21.html";
}
- 第2-3行:组件[Listes]被注入到控制器中;
- 第 6 行:我们管理一个类型为 [Form21] 的表单,稍后将对此进行说明。请注意,我们在视图模型中已指定其键为 [form]。需要提醒的是,默认情况下该键应为 [form21];
- 第 7 行:将组件 [Listes] 注入模型。视图将需要该组件;
- 第 8 行:显示视图 [vue-21.xml]。该视图将显示表单 [Form21],提交的值将传递给第 12-15 行中的操作 [/v22];
- 第 12-15 行:操作 [/v22] 仅将收到的 POST 值放入键为 [form] 的 Flash 属性中,并重定向至操作 [/v21]。 该键必须与第 6 行中使用的键相同;
[Form21] 模板如下:
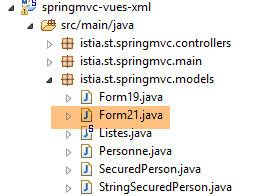 |
package istia.st.springmvc.models;

public class Form21 {

    // 提交的值
    private String marie = "non";
    private String deplacement = "4";
    private String[] couleurs;
    private String strCouleurs;
    private String[] bijoux;
    private String strBijoux;
    private int couleur2;
    private int[] bijoux2;
    private String strBijoux2;

    // getter 和 setter
    ...
}
视图 [vue-21.xml] 如下所示:
<!DOCTYPE HTML>
<html xmlns:th="http://www.thymeleaf.org">
    <head>
        <title>Spring 4 MVC</title>
        <meta http-equiv="Content-Type" content="text/html; charset=UTF-8" />
        <link rel="stylesheet" href="/css/form19.css" />
    </head>
    <body>

        <h3>Formulaire - Boutons radio</h3>
        <form action="/someURL" th:action="@{/v22.html}" method="post" th:object="${form}">
            <table>
                <thead>
                    <tr>
                        <th class="col1">Texte</th>
                        <th class="col2">Saisie</th>
                        <th class="col3">Valeur</th>
                    </tr>
                </thead>
                <tbody>
                    <tr>
                        <td class="col1">Etes-vous marié(e)</td>
                        <td class="col2">
                            <input type="radio" th:field="*{marie}" value="oui" />
                            <label th:for="${#ids.prev('marie')}">Oui</label>
                            <input type="radio" th:field="*{marie}" value="non" />
                            <label th:for="${#ids.prev('marie')}">Non</label>
                        </td>
                        <td class="col3">
                            <span th:text="*{marie}"></span>
                        </td>
                    </tr>
                    <tr>
                        <td class="col1">Mode de déplacement</td>
                        <td class="col2">
                            <span th:each="mode, status : ${listes.deplacements}">
                                <input type="radio" th:field="*{deplacement}" th:value="${mode}" />
                                <label th:for="${#ids.prev('deplacement')}" th:text="${listes.libellesDeplacements[status.index]}">Autre</label>
                            </span>
                        </td>
                        <td class="col3">
                            <span th:text="*{deplacement}"></span>
                        </td>
                    </tr>
                </tbody>
            </table>
            <p>
                <input type="submit" value="Valider" />
            </p>
        </form>
    </body>
</html>
- 第 36-40 行:请注意利用模板中放置的 [Listes] 组件来生成复选框的标签;
- 第3列用于显示POST的提交值,或初始GET表单的初始值;
该代码显示以下页面:
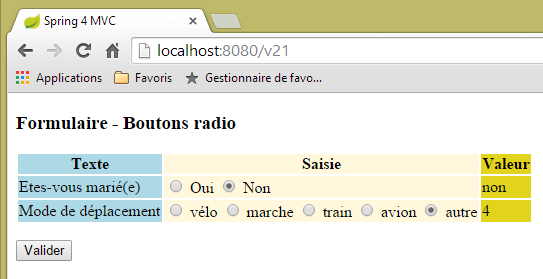 |
对应以下代码 HTML:
<!DOCTYPE HTML>

<html>
    <head>
        <title>Spring 4 MVC</title>
        <meta http-equiv="Content-Type" content="text/html; charset=UTF-8" />
        <link rel="stylesheet" href="/css/form19.css" />
    </head>
    <body>

        <h3>Formulaire - Boutons radio</h3>
        <form action="/v22.html" method="post">
            <table>
                <thead>
                    <tr>
                        <th class="col1">Texte</th>
                        <th class="col2">Saisie</th>
                        <th class="col3">Valeur</th>
                    </tr>
                </thead>
                <tbody>
                    <tr>
                        <td class="col1">Etes-vous marié(e)</td>
                        <td class="col2">
                            <input type="radio" value="oui" id="marie1" name="marie" />
                            <label for="marie1">Oui</label>
                            <input type="radio" value="non" id="marie2" name="marie" checked="checked" />
                            <label for="marie2">Non</label>
                        </td>
                        <td class="col3">
                            <span>non</span>
                        </td>
                    </tr>
                    <tr>
                        <td class="col1">Mode de déplacement</td>
                        <td class="col2">
                            <span>
                                <input type="radio" value="0" id="deplacement1" name="deplacement" />
                                <label for="deplacement1">vélo</label>
                            </span>
                            <span>
                                <input type="radio" value="1" id="deplacement2" name="deplacement" />
                                <label for="deplacement2">marche</label>
                            </span>
                            <span>
                                <input type="radio" value="2" id="deplacement3" name="deplacement" />
                                <label for="deplacement3">train</label>
                            </span>
                            <span>
                                <input type="radio" value="3" id="deplacement4" name="deplacement" />
                                <label for="deplacement4">avion</label>
                            </span>
                            <span>
                                <input type="radio" value="4" id="deplacement5" name="deplacement" checked="checked" />
                                <label for="deplacement5">autre</label>
                            </span>
                        </td>
                        <td class="col3">
                            <span>4</span>
                        </td>
                    </tr>
                </tbody>
            </table>
            <p>
                <input type="submit" value="Valider" />
            </p>
        </form>
    </body>
</html>
可以看到,提交的值(name属性)被填入[Form21]模板的以下字段中:
    private String marie = "non";
    private String deplacement = "4";
建议读者自行进行测试。请注意,被提交的是单选按钮的 [value] 属性。
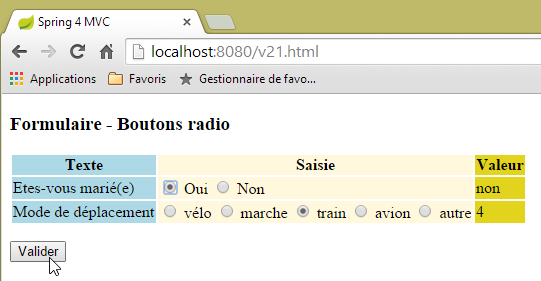 | 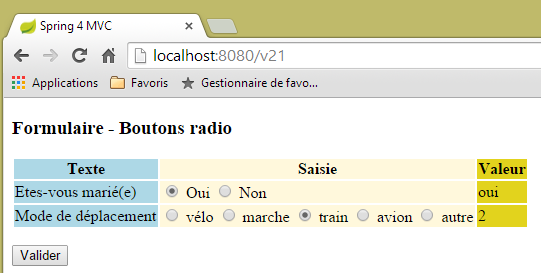 |
5.16. [/v23-/v24]:管理复选框
我们添加以下新操作:
    // ------------------ 带复选框的表单
    @RequestMapping(value = "/v23", method = RequestMethod.GET, produces = "text/html; charset=UTF-8")
    public String av20(@ModelAttribute("form") Form21 formulaire, Model model) {
        model.addAttribute("listes", listes);
        return "vue-23";
}
- 第 3 行:我们继续使用模板 [Form21];
视图 [vue-23.xml] 如下所示:
<!DOCTYPE HTML>
<html xmlns:th="http://www.thymeleaf.org">
    <head>
        <title>Spring 4 MVC</title>
        <meta http-equiv="Content-Type" content="text/html; charset=UTF-8" />
        <link rel="stylesheet" href="/css/form19.css" />
    </head>
    <body>
        <h3>Formulaire - Cases à cocher</h3>
        <form action="/someURL" th:action="@{/v24.html}" method="post" th:object="${form}">
            <table>
                <thead>
                    <tr>
                        <th class="col1">Texte</th>
                        <th class="col2">Saisie</th>
                        <th class="col3">Valeur</th>
                    </tr>
                </thead>
                <tbody>
                    <tr>
                        <td class="col1">Vos couleurs préférées</td>
                        <td class="col2">
                            <input type="checkbox" th:field="*{couleurs}" value="0" />
                            <label th:for="${#ids.prev('couleurs')}">rouge</label>
                            <input type="checkbox" th:field="*{couleurs}" value="1" />
                            <label th:for="${#ids.prev('couleurs')}">vert</label>
                            <input type="checkbox" th:field="*{couleurs}" value="2" />
                            <label th:for="${#ids.prev('couleurs')}">bleu</label>
                        </td>
                        <td class="col3">
                            <span th:text="*{strCouleurs}"></span>
                        </td>
                    </tr>
                    <tr>
                        <td class="col1">Pierres préférées</td>
                        <td class="col2">
                            <span th:each="label, status : ${listes.libellesBijoux}">
                                <input type="checkbox" th:field="*{bijoux}" th:value="${status.index}" />
                                <label th:for="${#ids.prev('bijoux')}" th:text="${label}">Autre</label>
                            </span>
                        </td>
                        <td class="col3">
                            <span th:text="*{strBijoux}"></span>
                        </td>
                    </tr>
                </tbody>
            </table>
            <p>
                <input type="submit" value="Valider" />
            </p>
        </form>
    </body>
</html>
- 第 37-41 行:请注意使用了组件 [Listes] 来生成复选框的标签;
该代码显示如下页面:
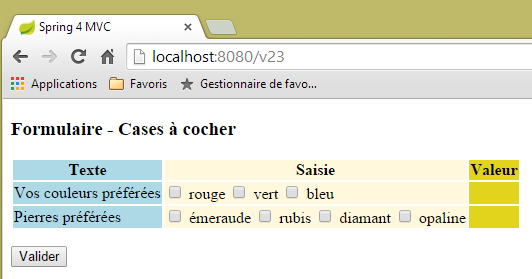 |
该页面源自以下代码 HTML:
<!DOCTYPE HTML>

<html>
    <head>
        <title>Spring 4 MVC</title>
        <meta http-equiv="Content-Type" content="text/html; charset=UTF-8" />
        <link rel="stylesheet" href="/css/form19.css" />
    </head>
    <body>
        <h3>Formulaire - Cases à cocher</h3>
        <form action="/v24.html" method="post">
            <table>
                <thead>
                    <tr>
                        <th class="col1">Texte</th>
                        <th class="col2">Saisie</th>
                        <th class="col3">Valeur</th>
                    </tr>
                </thead>
                <tbody>
                    <tr>
                        <td class="col1">Vos couleurs préférées</td>
                        <td class="col2">
                            <input type="checkbox" value="0" id="couleurs1" name="couleurs" /><input type="hidden" name="_couleurs" value="on" />
                            <label for="couleurs1">rouge</label>
                            <input type="checkbox" value="1" id="couleurs2" name="couleurs" /><input type="hidden" name="_couleurs" value="on" />
                            <label for="couleurs2">vert</label>
                            <input type="checkbox" value="2" id="couleurs3" name="couleurs" /><input type="hidden" name="_couleurs" value="on" />
                            <label for="couleurs3">bleu</label>
                        </td>
                        <td class="col3">
                            <span></span>
                        </td>
                    </tr>
                    <tr>
                        <td class="col1">Pierres préférées</td>
                        <td class="col2">
                            <span>
                                <input type="checkbox" value="0" id="bijoux1" name="bijoux" /><input type="hidden" name="_bijoux" value="on" />
                                <label for="bijoux1">émeraude</label>
                            </span>
                            <span>
                                <input type="checkbox" value="1" id="bijoux2" name="bijoux" /><input type="hidden" name="_bijoux" value="on" />
                                <label for="bijoux2">rubis</label>
                            </span>
                            <span>
                                <input type="checkbox" value="2" id="bijoux3" name="bijoux" /><input type="hidden" name="_bijoux" value="on" />
                                <label for="bijoux3">diamant</label>
                            </span>
                            <span>
                                <input type="checkbox" value="3" id="bijoux4" name="bijoux" /><input type="hidden" name="_bijoux" value="on" />
                                <label for="bijoux4">opaline</label>
                            </span>
                        </td>
                        <td class="col3">
                            <span></span>
                        </td>
                    </tr>
                </tbody>
            </table>
            <p>
                <input type="submit" value="Valider" />
            </p>
        </form>
    </body>
</html>
需要注意的是,提交的值(name属性)被填入[Form21]的以下字段中:
    private String[] couleurs;
    private String[] bijoux;
这些是数组,因为每个字段都有多个带有该字段名称的复选框。因此,可能会有多个提交值具有相同的名称(表单中的 name 属性)。因此需要使用数组来获取它们。
让我们回到页面第3列的Thymeleaf代码:
  <td class="col3">
    <span th:text="*{strCouleurs}"></span>
  </td>
</tr>
<tr>
  <td class="col1">Pierres préférées</td>
  <td class="col2">
    <span th:each="label, status : ${listes.libellesBijoux}">
      <input type="checkbox" th:field="*{bijoux}" th:value="${status.index}" />
      <label th:for="${#ids.prev('bijoux')}" th:text="${label}">Autre</label>
    </span>
  </td>
  <td class="col3">
    <span th:text="*{strBijoux}"></span>
  </td>
</tr>
第 2 行和第 14 行所引用的字段如下:
    private String strCouleurs;
    private String strBijoux;
它们由处理 POST 的操作 [/v24] 计算得出:
    // Jackson 映射器 / jSON
    private ObjectMapper mapper = new ObjectMapper();

    @RequestMapping(value = "/v24", method = RequestMethod.POST, produces = "text/html; charset=UTF-8")
    public String av21(@ModelAttribute("form") Form21 formulaire, RedirectAttributes redirectAttributes) throws JsonProcessingException {
        redirectAttributes.addFlashAttribute("form", formulaire);
        formulaire.setStrCouleurs(mapper.writeValueAsString(formulaire.getCouleurs()));
        formulaire.setStrBijoux(mapper.writeValueAsString(formulaire.getBijoux()));
        return "redirect:/v23.html";
}
需注意,Jackson 库 / jSON 属于该项目的依赖项。
- 第 2 行:创建类型 [ObjectMapper],用于将对象序列化/反序列化为 jSON,
- 第7行:将颜色数组序列化为jSON。结果被存入字段[strCouleurs];
- 第 8 行:将珠宝数组序列化为 jSON。结果被存入字段 [strBijoux];
以下是一个执行示例:
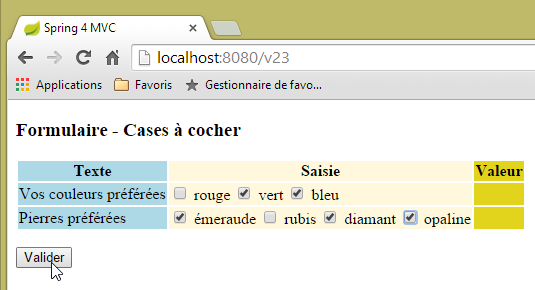 | 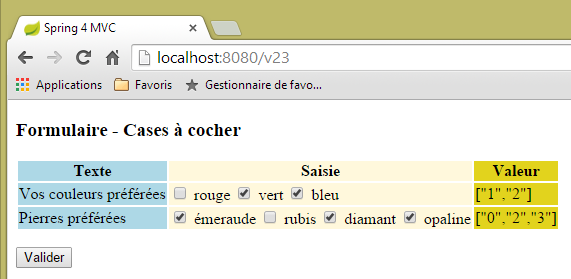 |
请注意,实际提交的是复选框的 [value] 属性。
5.17. [/25-/v26]:管理列表
我们添加以下操作 [/v25]:
  // ------------------ 带下拉列表的表单
  @RequestMapping(value = "/v25", method = RequestMethod.GET, produces = "text/html; charset=UTF-8")
  public String v25(@ModelAttribute("form") Form21 formulaire, Model model) {
        model.addAttribute("listes", listes);
        return "vue-25";
}
视图 [vue-25.xml] 如下所示:
<!DOCTYPE HTML>
<html xmlns:th="http://www.thymeleaf.org">
    <head>
        <title>Spring 4 MVC</title>
        <meta http-equiv="Content-Type" content="text/html; charset=UTF-8" />
        <link rel="stylesheet" href="/css/form19.css" />
    </head>
    <body>

        <h3>Formulaire - Listes</h3>
        <form action="/someURL" th:action="@{/v26.html}" method="post"
            th:object="${form}">
            <table>
                <thead>
                    <tr>
                        <th class="col1">Texte</th>
                        <th class="col2">Saisie</th>
                        <th class="col3">Valeur</th>
                    </tr>
                </thead>
                <tbody>
                    <tr>
                        <td class="col1">Votre couleur préférée</td>
                        <td class="col2">
                            <select th:field="*{couleur2}">
                                <option value="0">rouge</option>
                                <option value="1">bleu</option>
                                <option value="2">vert</option>
                            </select>
                        </td>
                        <td class="col3">
                            <span th:text="*{couleur2}"></span>
                        </td>
                    </tr>
                    <tr>
                        <td class="col1">Pierres préférées (choix multiple)</td>
                        <td class="col2">
                            <select th:field="*{bijoux2}" multiple="multiple" size="3">
                                <option th:each="label, status : ${listes.libellesBijoux}"
                                    th:text="${label}" th:value="${status.index}">
                                </option>
                            </select>
                        </td>
                        <td class="col3">
                            <span th:text="*{strBijoux2}"></span>
                        </td>
                    </tr>

                </tbody>
            </table>
            <input type="submit" value="Valider" />
        </form>
    </body>
</html>
- 第 38-42 行:生成一个多选列表,其中标签取自我们之前已使用的组件 [Listes];
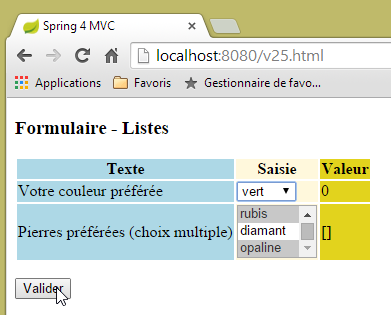
显示的页面如下:
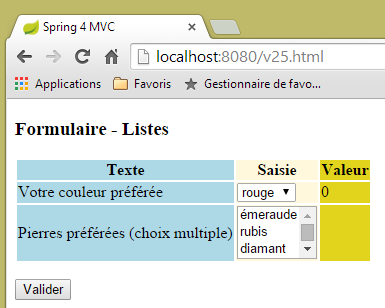 |
由以下代码 HTML 生成:
<!DOCTYPE HTML>

<html>
    <head>
        <title>Spring 4 MVC</title>
        <meta http-equiv="Content-Type" content="text/html; charset=UTF-8" />
        <link rel="stylesheet" href="/css/form19.css" />
    </head>
    <body>

        <h3>Formulaire - Listes</h3>
        <form action="/v26.html" method="post">
            <table>
                <thead>
                    <tr>
                        <th class="col1">Texte</th>
                        <th class="col2">Saisie</th>
                        <th class="col3">Valeur</th>
                    </tr>
                </thead>
                <tbody>
                    <tr>
                        <td class="col1">Votre couleur préférée</td>
                        <td class="col2">
                            <select id="couleur2" name="couleur2">
                                <option value="0" selected="selected">rouge</option>
                                <option value="1">bleu</option>
                                <option value="2">vert</option>
                            </select>
                        </td>
                        <td class="col3">
                            <span>0</span>
                        </td>
                    </tr>
                    <tr>
                        <td class="col1">Pierres préférées (choix multiple)</td>
                        <td class="col2">
                            <select multiple="multiple" size="3" id="bijoux2" name="bijoux2">
                                <option value="0">émeraude</option>
                                <option value="1">rubis</option>
                                <option value="2">diamant</option>
                                <option value="3">opaline</option>
                            </select>
                            <input type="hidden" name="_bijoux2" value="1" />
                        </td>
                        <td class="col3">
                            <span></span>
                        </td>
                    </tr>
                </tbody>
            </table>
            <p>
                <input type="submit" value="Valider" />
            </p>
        </form>
    </body>
</html>
- 第 44 行:可以注意到 Thymeleaf 创建了一个隐藏字段。我不明白它的作用:
- 提交的值(option 标签的 value 属性)将被填入 [Form21] 的以下字段(name 属性)中:
    private int couleur2;
    private int[] bijoux2;
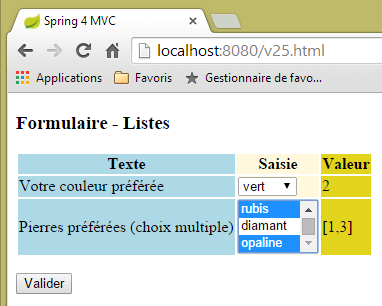
- 第 38 行:列表 [bijoux2] 是多选列表。因此,可以提交多个与名称 [bijoux2] 关联的值。要获取这些值,字段 [bijoux2] 必须是一个数组。 请注意,这是一个整数数组。这是可行的,因为提交的值可以转换为该类型;
这些值将发布到后续的操作 [/v26] 中:
  @RequestMapping(value = "/v26", method = RequestMethod.POST, produces = "text/html; charset=UTF-8")
  public String v26(@ModelAttribute("form") Form21 formulaire, RedirectAttributes redirectAttributes) throws JsonProcessingException {
    redirectAttributes.addFlashAttribute("form", formulaire);
    formulaire.setStrBijoux2(mapper.writeValueAsString(formulaire.getBijoux2()));
    return "redirect:/v25.html";
}
这里的内容我们之前都见过。以下是一个执行示例:
 |  |
5.18. [/v27]:消息配置
让我们来看一下以下操作 [/v27]:
  // ------------------ 参数化消息
  @RequestMapping(value = "/v27", method = RequestMethod.GET, produces = "text/html; charset=UTF-8")
  public String v27(Model model) {
        model.addAttribute("param1","paramètre un");
        model.addAttribute("param2","paramètre deux");
        model.addAttribute("param3","paramètre trois");
        model.addAttribute("param4","messages.param4");
        return "vue-27";
}
该操作仅将四个值填入模板,并显示以下视图 [vue-27.xml]:
<!DOCTYPE html>
<html xmlns:th="http://www.thymeleaf.org">
    <head>
        <title th:text="#{messages.titre}">Spring 4 MVC</title>
        <meta http-equiv="Content-Type" content="text/html; charset=UTF-8" />
    </head>
    <body>
        <h2 th:text="#{messages.titre}">Spring 4 MVC</h2>
        <p th:text="#{messages.msg1(${param1})}"></p>
        <p th:text="#{messages.msg2(${param2},${param3})}"></p>
        <p th:text="#{messages.msg3(#{${param4}})}"></p>
    </body>
</html>
- 第 8 行:一条不带参数的消息;
- 第 9 行:包含一个从模板中获取的参数 [$param1] 的消息;
- 第 10 行:包含两个从模板中提取的参数 [$param2, $param3] 的消息;
- 第 11 行:包含一个参数的消息。该参数本身是一个消息键(存在 # 符号)。该键由 [$param4] 提供;
法语消息文件如下:
[messages_fr.properties]
messages.titre=Messages paramétrés
messages.msg1=Un message avec un paramètre : {0}
messages.msg2=Un message avec deux paramètres : {0}, {1}
messages.msg3=Un message avec une clé de message comme paramètre : {0}
messages.param4=paramètre quatre
为标示消息中存在参数,使用符号 {0}、{1}、...
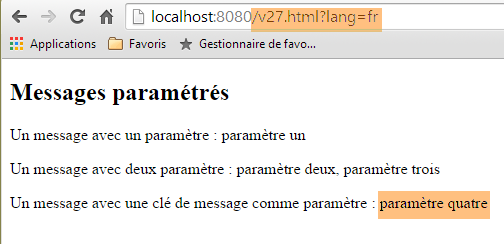
将由操作 [/v27] 构建的模板与视图 [vue-27] 合并,将生成以下代码 HTML:
<!DOCTYPE html>

<html>
    <head>
        <title>Messages paramétrés</title>
        <meta http-equiv="Content-Type" content="text/html; charset=UTF-8" />
    </head>
    <body>
        <h2>Messages paramétrés</h2>
        <p>Un message avec un paramètre : paramètre un</p>
        <p>Un message avec deux paramètre : paramètre deux, paramètre trois</p>
        <p>Un message avec une clé de message comme paramètre : paramètre quatre</p>
    </body>
</html>
这将生成以下视图:
 |
英文消息文件如下:
[messages_fr.properties]
messages.titre=Parameterized messages
messages.msg1=Message with one parameter: {0}
messages.msg2=Message with two parameters: {0}, {1}
messages.msg3=Message with a message key as a parameter: {0}
messages.param4=parameter four
将操作 [/v27] 生成的模板与视图 [vue-27] 合并后,将生成以下代码 HTML:
<!DOCTYPE html>

<html>
    <head>
        <title>Parameterized messages</title>
        <meta http-equiv="Content-Type" content="text/html; charset=UTF-8" />
    </head>
    <body>
        <h2>Parameterized messages</h2>
        <p>Message with one parameter: paramètre un</p>
        <p>Message with two parameters: paramètre deux, paramètre trois</p>
        <p>Message with a message key as a parameter: parameter four</p>
    </body>
</html>
从而生成以下视图:
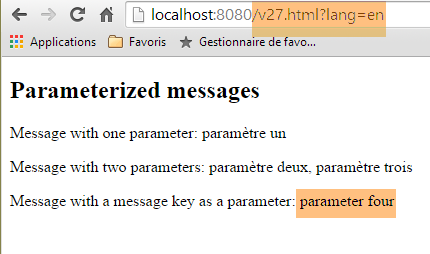 |
可以看出,最后一条消息已实现端到端的国际化,而前两条则未实现。
5.19. 使用母版页
在 Web 应用程序中,视图通常会共享一些元素,这些元素可以提取到主页面中。以下是一个示例:
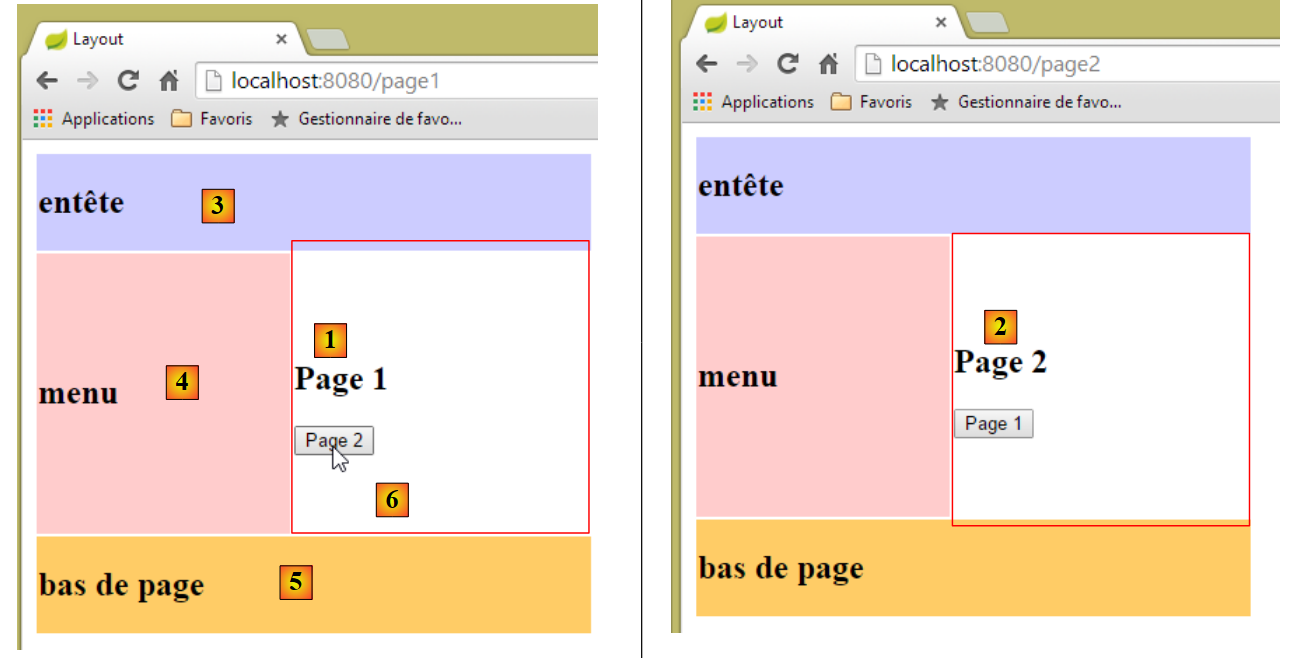 |
上图中有两个相似的页面,其中片段 [1] 已被片段 [2] 替换。 该视图展示了一个母版页,其中包含三个固定片段 [3-5] 和一个可变片段 [6]。
5.19.1. 项目
我们按照第 5.1 节的方法构建一个 [springmvc-masterpage] 项目。
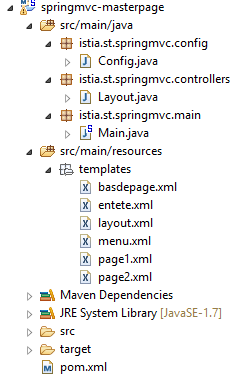 |
文件 [pom.xml] 如下所示:
<?xml version="1.0" encoding="UTF-8"?>
<project xmlns="http://maven.apache.org/POM/4.0.0" xmlns:xsi="http://www.w3.org/2001/XMLSchema-instance"
    xsi:schemaLocation="http://maven.apache.org/POM/4.0.0 http://maven.apache.org/xsd/maven-4.0.0.xsd">
    <modelVersion>4.0.0</modelVersion>

    <groupId>istia.st.springmvc</groupId>
    <artifactId>springmvc-masterpage</artifactId>
    <version>0.0.1-SNAPSHOT</version>
    <packaging>jar</packaging>

    <name>springmvc-masterpage</name>
    <description>Page maître</description>

    <parent>
        <groupId>org.springframework.boot</groupId>
        <artifactId>spring-boot-starter-parent</artifactId>
        <version>1.1.9.RELEASE</version>
        <relativePath/> <!-- 从存储库查找父级 -->
    </parent>

    <dependencies>
        <dependency>
            <groupId>org.springframework.boot</groupId>
            <artifactId>spring-boot-starter-thymeleaf</artifactId>
        </dependency>
        <dependency>
            <groupId>org.springframework.boot</groupId>
            <artifactId>spring-boot-starter-test</artifactId>
            <scope>test</scope>
        </dependency>
    </dependencies>

    <properties>
        <project.build.sourceEncoding>UTF-8</project.build.sourceEncoding>
        <start-class>istia.st.springmvc.main.Main</start-class>
        <java.version>1.7</java.version>
    </properties>

    <build>
        <plugins>
            <plugin>
                <groupId>org.springframework.boot</groupId>
                <artifactId>spring-boot-maven-plugin</artifactId>
            </plugin>
        </plugins>
    </build>

</project>
该文件引入的依赖项之一是主页面所必需的:
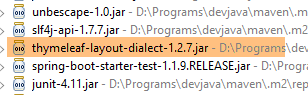 |
[config] 和 [main] 这两个包与前一个项目中同名的包完全相同。
5.19.2. 主页面
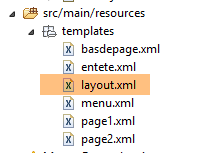 |
主页面是以下视图 [layout.xml]:
<!DOCTYPE html>
<html xmlns:th="http://www.thymeleaf.org" xmlns:layout="http://www.ultraq.net.nz/thymeleaf/layout">
    <head>
        <title>Layout</title>
        <meta http-equiv="Content-Type" content="text/html; charset=UTF-8" />
    </head>
    <body>
        <table style="width: 400px">
            <tr>
                <td colspan="2" bgcolor="#ccccff">
                    <div th:include="entete" />
                </td>
            </tr>
            <tr style="height: 200px">
                <td bgcolor="#ffcccc">
                    <div th:include="menu" />
                </td>
                <td>
                    <section layout:fragment="contenu">
                        <h2>Contenu</h2>
                    </section>
                </td>
            </tr>
            <tr bgcolor="#ffcc66">
                <td colspan="2">
                    <div th:include="basdepage" />
                </td>
            </tr>
        </table>
    </body>
</html>
- 第 2 行:主页面必须定义命名空间 [xmlns:layout="http://www.ultraq.net.nz/thymeleaf/layout"],其中第 19 行使用了一个元素;
- 第10-12行:生成下方的[1]区域。Thymeleaf标签[th:include]允许将定义在另一个文件中的片段包含到当前视图中。这使得可以在多个视图中复用相同的片段;
- 第15-17行:生成下方的[2]字段;
- 第 19-20 行:生成下方的 [3] 区域。 属性 [layout:fragment] 是命名空间 [xmlns:layout="http://www.ultraq.net.nz/thymeleaf/layout"] 下的一个属性。它表示一个在运行时可能被另一个字段替换的字段;
- 第 24-28 行:生成下方的字段 [4];
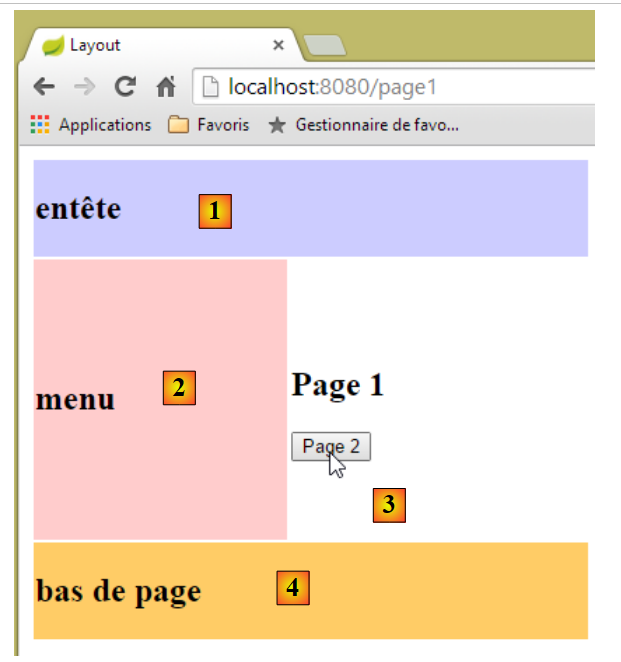 |
5.19.3. 片段
片段 [entete.xml]、[menu.xml] 和 [basdepage.xml] 如下所示:
[entete.xml]
<!DOCTYPE html>
<html>
    <h2>entête</h2>
</html>
[menu.xml]
<!DOCTYPE html>
<html>
    <h2>menu</h2>
</html>
[basdepage.xml]
<!DOCTYPE html>
<html>
    <h2>bas de page</h2>
</html>
片段 [page1.xml] 如下:
<!DOCTYPE html>
<html xmlns:th="http://www.thymeleaf.org" xmlns:layout="http://www.ultraq.net.nz/thymeleaf/layout" layout:decorator="layout">
    <section layout:fragment="contenu">
        <h2>Page 1</h2>
        <form action="/someURL" th:action="@{/page2.html}" method="post">
            <input type="submit" value="Page 2" />
        </form>
    </section>
</html>
- 第 2 行:属性 [layout:decorator="layout"] 表示当前页面 [page1.xml] 已被“装饰”,即它属于一个母版页。 该值即为属性值,此处指视图 [layout.xml];
- 第3行:指定[page1.xml]将插入到主页面的哪个片段中。 属性 [layout:fragment="contenu"] 表示 [page1.xml] 将插入名为 [contenu] 的片段中,即母版页的 [3] 区域;
- 第5-7行:片段内容是一个表单,其中包含一个从POST跳转至操作[/page2.html]的按钮;
片段 [page2.xml] 与此类似:
<!DOCTYPE html>
<html xmlns:th="http://www.thymeleaf.org" xmlns:layout="http://www.ultraq.net.nz/thymeleaf/layout"
    layout:decorator="layout">
    <section layout:fragment="contenu">
        <h2>Page 2</h2>
        <form action="/someURL" th:action="@{/page1.html}" method="post">
            <input type="submit" value="Page 1" />
        </form>
    </section>
</html>
5.19.4. 操作
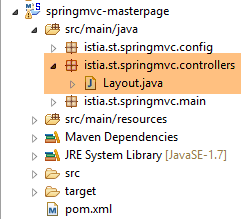 |
控制器 [Layout.java] 如下所示:
package istia.st.springmvc.controllers;

import org.springframework.stereotype.Controller;
import org.springframework.web.bind.annotation.RequestMapping;
import org.springframework.web.bind.annotation.RequestMethod;

@Controller
public class Layout {
    @RequestMapping(value = "/page1")
    public String page1() {
        return "page1";
    }

    @RequestMapping(value = "/page2", method=RequestMethod.POST)
    public String page2() {
        return "page2";
    }
}
- 第10-12行:操作[/page1]仅用于显示视图[page1.xml];
- 第15-17行:[/page2]操作同样仅用于显示视图[page2.xml];