8. 附录
8.1. Web开发工具
本文将说明如何获取并安装Web开发所需的工具。部分工具已更新版本,因此此处的说明可能不再适用于最新版本。读者需据此调整操作……在Web编程课程中,我们将主要使用以下工具,这些工具均可免费获取:
- 一款能够显示 XML 的最新浏览器。本课程的示例已在 Internet Explorer 6 上经过测试。
- 一个最新的 JDK(Java 开发工具包)。本课程的示例已在 JDK 1.4 版本上进行过测试。 该JRE自带适用于浏览器的Java 1.4插件,使浏览器能够显示使用Java 1.4的Java小程序。
- 一个用于编写Java Servlet的Java开发环境。这里使用的是JBuilder 7。
- Web服务器:Apache、PWS(个人Web服务器)、Tomcat。
- Apache将用于开发基于PERL(实用提取与报告语言)或PHP(个人主页)的Web应用程序
- PWS将用于开发基于ASP(Active Server Pages)或PHP的Web应用程序
- Tomcat将用于使用Java Servlet或JSP(Java Server Pages)页面开发Web应用程序
- 一个数据库管理应用程序:MySQL
- EasyPHP:一款将 Apache Web 服务器、PHP 语言和 SGBD MySQL 整合在一起的工具
8.1.1. Web 服务器、浏览器、脚本语言
- 主要 Web 服务器
- Apache(Linux、Windows)
- Interner Information Server IIS (NT)、Personal Web Server PWS (Windows 9x)
- 主要浏览器
- Internet Explorer (Windows)
- Netscape (Linux, Windows)
- 服务器端脚本语言
- VBScript (IIS, PWS)
- JavaScript (IIS, PWS)
- Perl (Apache, IIS, PWS)
- PHP (Apache, IIS, PWS)
- Java(Apache、Tomcat)
- .NET 语言
- 浏览器端脚本语言
- VBScript (IE)
- JavaScript(IE、Netscape)
- PerlScript (IE)
- Java (IE, Netscape)
8.1.2. 在哪里可以找到这些工具
http://www.netscape.com/(下载链接) | |
http://www.microsoft.com/windows/ie/default.asp | |
http://www.php.net http://www.php.net/downloads.php(Windows 二进制文件) | |
http://www.activestate.comhttp://www.activestate.com/Products/ http://www.activestate.com/Products/ActivePerl/ | |
http://msdn.microsoft.com/scripting(点击Windows脚本链接) | |
http://java.sun.com/ http://java.sun.com/downloads.html (JSE) http://java.sun.com/j2se/1.4/download.html | |
http://www.apache.org/ http://www.apache.org/dist/httpd/binaries/win32/ | |
包含在 Windows 95 的 NT 4.0 选件包中 包含在 Windows 98 的 CD 中 http://www.microsoft.com/ntserver/nts/downloads/recommended/NT4OptPk/win95.asp | |
http://www.microsoft.com | |
http://jakarta.apache.org/tomcat/ | |
http://www.borland.com/jbuilder/ http://www.borland.com/products/downloads/download_jbuilder.html | |
http://www.easyphp.org/ http://www.easyphp.org/telechargements.php3 |
8.1.3. EasyPHP
该应用程序非常实用,因为它将以下组件整合到同一个软件包中:
- Apache Web 服务器 (1.3.x)
- PHP 语言(4.x)
- SGBD MySQL(3.23.x)
- MySQL的管理工具:PhpMyAdmin
安装程序的结构如下:

EasyPHP 的安装过程顺利,并在文件系统中创建了一个目录树:
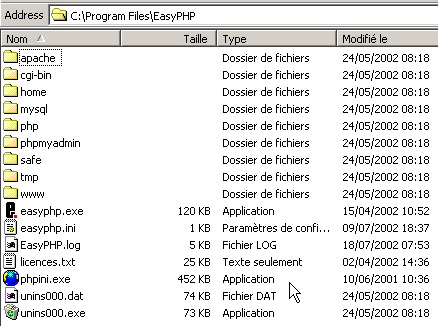
应用程序的可执行文件 | |
Apache 服务器目录结构 | |
SGBD MySQL 目录结构 | |
phpMyAdmin 应用程序的目录结构 | |
php的目录结构 | |
EasyPHP Apache 服务器提供的网页目录根目录 | |
可用于放置 Apache 服务器 CGI 脚本的目录结构 |
EasyPHP的主要优势在于该应用程序已预先配置好。因此,Apache、PHP和MySQL已配置为协同工作。 当通过“程序”菜单中的快捷方式启动 EasyPhp 时,屏幕右下角会出现一个图标。
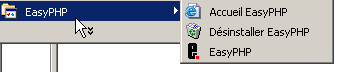 | 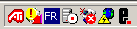 |
如果 Web 服务器 Apache 和数据库 MySQL 处于运行状态,带有红色圆点的“E”图标应会闪烁。右键单击该图标可访问以下菜单选项:
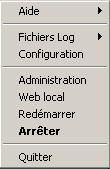
选项 Administration 用于进行设置和运行测试:
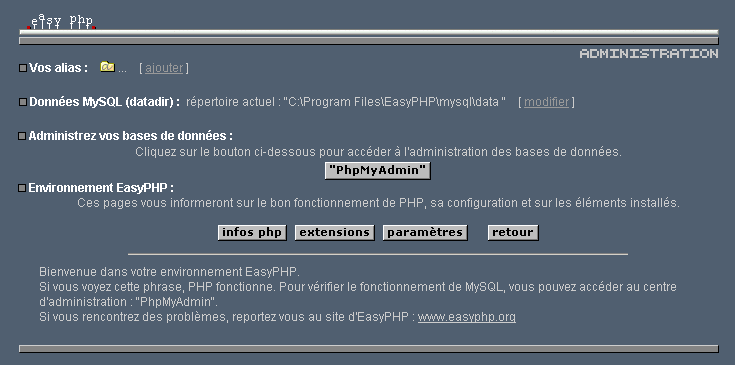
8.1.3.1. 管理 PHP
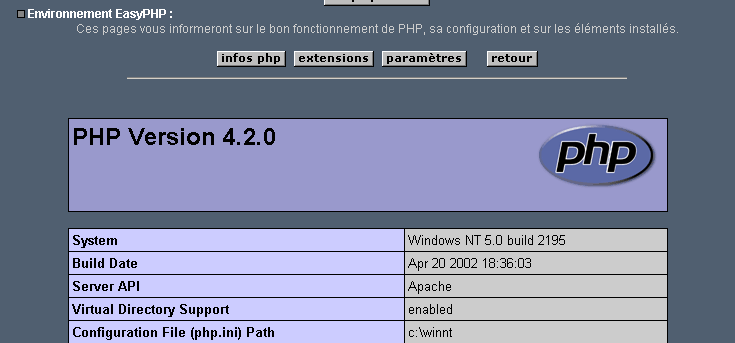
“PHP 信息”按钮可让您验证 Apache-PHP 组合是否正常运行:此时应显示一个信息页面 PHP:
“扩展”按钮会显示已安装的 PHP 扩展列表。这些实际上是函数库。
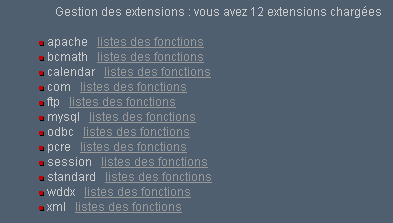
例如,上图显示了使用 MySQL 数据库所需的函数已正确安装。
“参数”按钮显示了数据库管理员 MySQL 的 login/motdepasse。
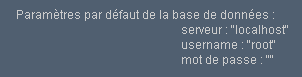
MySQL数据库的使用超出了本次简要介绍的范围,但这里明确指出,应为该数据库的管理员设置密码。
8.1.3.2. Apache 管理
同样在 EasyPHP 的管理页面中,“您的别名”链接可用于为某个目录定义别名。这使得网页可以放置在 easyPhp 目录树的 www 目录之外。
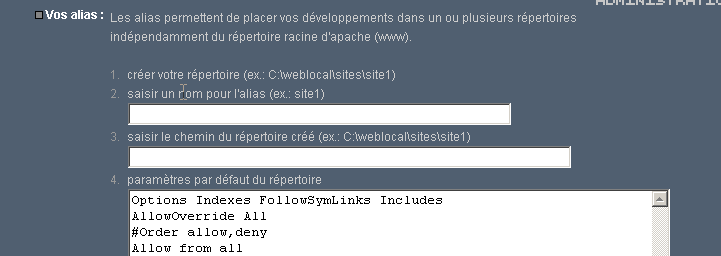
如果在上述页面中输入以下信息:

并使用按钮 valider,则以下行将被添加到文件 <easyphp>\apache\conf\httpd.conf 中:
    Alias /st/ "e:/data/serge/web/"

    <Directory "e:/data/serge/web">
        Options FollowSymLinks Indexes
        AllowOverride None
        Order deny,allow
        allow from 127.0.0.1
        deny from all
    </Directory>
<easyphp> 指代 EasyPHP 的安装目录。httpd.conf 是 Apache 服务器的配置文件。 因此,也可以通过直接编辑该文件来实现相同的效果。对文件 httpd.conf 的修改通常会被 Apache 立即生效。如果未生效,则需通过 easyphp 图标停止并重新启动 Apache:
为了完成本示例,现在可以在 e:\data\serge\web 目录树中放置网页:
并使用别名 st 请求该页面:
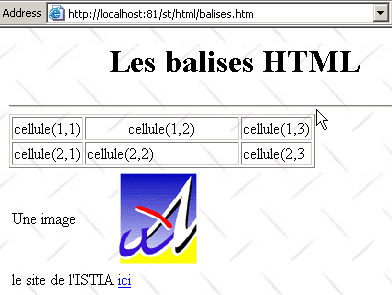
在此示例中,Apache 服务器已配置为在 81 端口上运行。其默认端口为 80。这一点由之前提到的 httpd.conf 文件中的以下行控制:
8.1.3.3. Apache 配置文件 htpd.conf
若需对 Apache 进行更精细的配置,必须“手动”修改位于 <easyphp>\apache\conf 文件夹中的配置文件 httpd.conf:
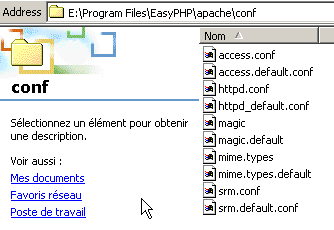
以下是该配置文件中需要注意的几点:
角色 | |
指明Apache目录结构所在的文件夹 | |
指定Web服务器将运行的端口。通常为80。通过修改此行,可让Web服务器在其他端口上运行 | |
Apache服务器管理员的电子邮件地址 | |
运行Apache服务器的机器名称 | |
Apache 服务器的安装目录。当配置文件中出现相对文件名时,它们都是相对于此目录而言的。 | |
服务器提供的网页目录树的根目录。在此,URL http://machine/rep1/fic1.html 对应于文件 E:\Program Files\EasyPHP\www\rep1\fic1.html | |
设置前一个文件夹的属性 | |
日志文件夹,因此实际上是 <ServerRoot>\logs\error.log:E:\Program Files\EasyPHP\apache\logs\error.log。 如果您发现 Apache 服务器无法正常运行,请查看此文件。 | |
E:\Program Files\EasyPHP\cgi-bin 将是树形目录的根目录,您可以在其中放置 CGI 脚本。 因此,URL http://machine/cgi-bin/rep1/script1.pl 将是脚本 CGI 的 URL:E:\Program Files\EasyPHP\cgi-bin\rep1\script1.pl. | |
设置上述文件夹的属性 | |
加载模块的行,使 Apache 能够与 PHP4 配合工作。 | |
确定应视为需由 PHP 处理的文件的后缀 |
8.1.3.4. 使用 PhpMyAdmin 管理 MySQL
在 EasyPhp 的管理页面上,点击 PhpMyAdmin 按钮:
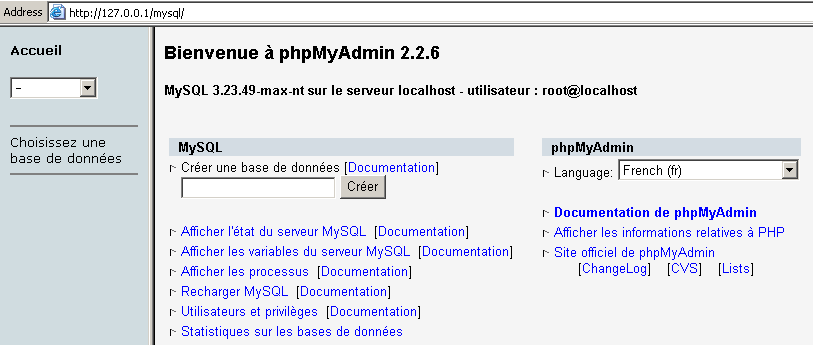
Accueil下方的下拉列表可查看 。 | 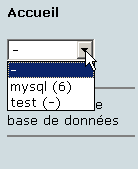 |
括号中的数字表示表的数量。如果 选择一个数据库,其表将显示如下: | 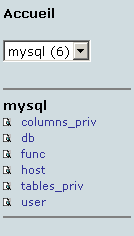 |
该网页提供了针对数据库的若干操作:
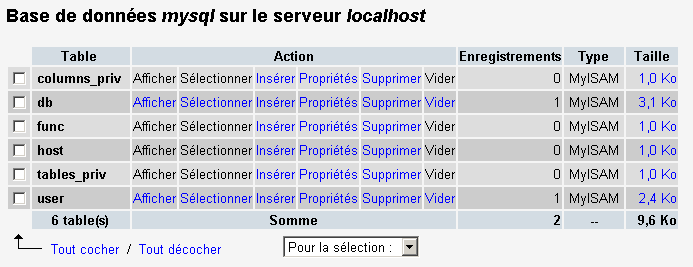
如果点击 user 中的 Afficher 链接:
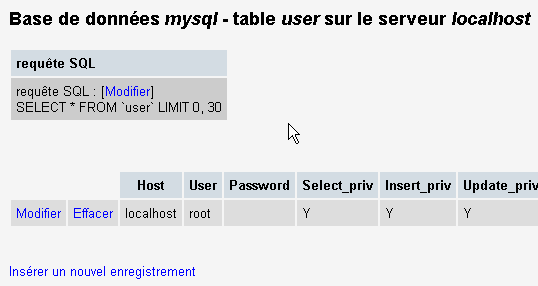
这里只有一个用户:root,他是 MySQL 的管理员。通过点击 Modifier 链接,可以修改其密码(当前为空),但这对于管理员而言并不推荐。
关于PhpMyAdmin,我们不再赘述,这是一款功能丰富的软件,值得用数页篇幅进行详细介绍。
8.1.4. PHP
我们已经了解了如何通过 EasyPhp 应用程序获取 PHP。若要直接获取 PHP,请访问网站 http://www.php.net。
PHP 不仅限于 Web 环境使用。在 Windows 系统中,它也可作为脚本语言使用。请创建以下脚本,并将其保存为 date.php:
在 DOS 窗口中,进入 date.php 的目录并运行它:
E:\data\serge\php\essais>"e:\program files\easyphp\php\php.exe" date.php
X-Powered-By: PHP/4.2.0
Content-type: text/html

Nous sommes le 18/07/02, 09:31:01
8.1.5. PERL
最好已安装 Internet Explorer。如果已安装,Active Perl 将对其进行配置,使其在 PERL 页面中接受 HTML 脚本,这些脚本将由 IE 本身在客户端执行。 Active Perl 的网站位于 http://www.activestate.comA。安装完成后,PERL 将安装在一个我们称为 <perl> 的目录中。该目录包含以下文件结构:
DEISL1   ISU        32 403  23/06/00  17:16 DeIsL1.isu
BIN            <REP>        23/06/00  17:15 bin
LIB            <REP>        23/06/00  17:15 lib
HTML           <REP>        23/06/00  17:15 html
EG             <REP>        23/06/00  17:15 eg
SITE           <REP>        23/06/00  17:15 site
HTMLHELP       <REP>        28/06/00  18:37 htmlhelp
可执行文件 perl.exe 位于 <perl>\bin 目录下。Perl 是一种可在 Windows 和 Unix 系统上运行的脚本语言。此外,它还被用于 WEB 的编程。让我们编写第一个脚本:
# 显示时间的 PERL 脚本

# 模块
use strict;

# 程序
my ($secondes,$minutes,$heure)=localtime(time);
print "Il est $heure:$minutes:$secondes\n";
将此脚本保存为文件 heure.pl。打开一个 DOS 窗口,进入上述脚本所在的目录并运行它:
8.1.6. Vbscript、Javascript、Perlscript
这些语言是 Windows 脚本语言。它们可以在不同的容器中运行,例如
- Windows Scripting Host,可在 Windows 系统下直接使用,特别是用于编写系统管理脚本
- Internet Explorer。此时,它们被用于 HTML 页面中,为页面带来仅靠 HTML 语言无法实现的交互性。
- Internet Information Server (IIS)——微软在 Windows 2000 上的 Web 服务器,以及其在 Win9x 上的对应版本 Personal Web Server (PWS)。 在此情况下,使用vbscript进行Web服务器端编程,微软将该技术称为ASP(Active Server Pages)。
请从 URL 处下载安装文件:http://msdn.microsoft.com/scripting,并点击 Windows Script 链接。安装内容包括:
- Windows Scripting Host 容器,该容器支持多种脚本语言,如 VBScript 和 JavaScript,同时也支持随 Active Perl 一起提供的 PerlScript 等其他语言。
- VBscript解释器
- 一个 JavaScript 解释器
下面进行一些快速测试。编写如下 vbscript 程序:
' 一个类
class personne
  Dim nom
  Dim age
End class

' 创建一个人员对象
Set p1=new personne
With p1
  .nom="dupont"
  .age=18
End With

' 显示人员 p1 的属性
With p1
  wscript.echo "nom=" & .nom
  wscript.echo "age=" & .age
End With
该程序使用对象。将其命名为 objets.vbs(后缀 vbs 表示 VBScript 文件)。进入该程序所在的目录并运行它:
E:\data\serge\windowsScripting\vbscript\poly\objets>cscript objets.vbs
Microsoft (R) Windows Script Host Version 5.6
Copyright (C) Microsoft Corporation 1996-2001. All rights reserved.

nom=dupont
age=18
现在,让我们编写以下使用数组的 JavaScript 程序:
// 变量中的数组
// 空数组
tableau=new Array();
affiche(tableau);
// 数组动态增长
for(i=0;i<3;i++){
  tableau.push(i*10);
}
// 显示数组
affiche(tableau);
// 再次
for(i=3;i<6;i++){
  tableau.push(i*10);
}
affiche(tableau);

// 多维数组
WScript.echo("-----------------------------");

tableau2=new Array();
for(i=0;i<3;i++){
  tableau2.push(new Array());
  for(j=0;j<4;j++){
    tableau2[i].push(i*10+j);
  }//for j
}// for i
affiche2(tableau2);

// 结束
WScript.quit(0);

// ---------------------------------------------------------
function affiche(tableau){
  // 表格显示
  for(i=0;i<tableau.length;i++){
    WScript.echo("tableau[" + i + "]=" + tableau[i]);
  }//for
}//函数

// ---------------------------------------------------------
function affiche2(tableau){
   // 表格显示
  for(i=0;i<tableau.length;i++){
    for(j=0;j<tableau[i].length;j++){
      WScript.echo("tableau[" + i + "," + j + "]=" + tableau[i][j]);
    }// for j
  }//for i
}//函数
该程序使用数组。将其命名为 tableaux.js(后缀 js 表示 JavaScript 文件)。进入该程序所在的目录并运行它:
E:\data\serge\windowsScripting\javascript\poly\tableaux>cscript tableaux.js
Microsoft (R) Windows Script Host Version 5.6
Copyright (C) Microsoft Corporation 1996-2001. Tous droits réservés.

tableau[0]=0
tableau[1]=10
tableau[2]=20
tableau[0]=0
tableau[1]=10
tableau[2]=20
tableau[3]=30
tableau[4]=40
tableau[5]=50
-----------------------------
tableau[0,0]=0
tableau[0,1]=1
tableau[0,2]=2
tableau[0,3]=3
tableau[1,0]=10
tableau[1,1]=11
tableau[1,2]=12
tableau[1,3]=13
tableau[2,0]=20
tableau[2,1]=21
tableau[2,2]=22
tableau[2,3]=23
最后再看一个Perl脚本的示例。要使用Perl脚本,必须先安装Active Perl。
<job id="PERL1">
  <script language="PerlScript">
       # 经典 Perl
    %dico=("maurice"=>"juliette","philippe"=>"marianne");
    @cles= keys %dico;
    for ($i=0;$i<=$#键;$i++){
        $cle=$cles[$i];
      $valeur=$dico{$cle};
        $WScript->echo ("clé=".$cle.", valeur=".$valeur);
    }
     # 使用 Windows Script 对象的 Perl 脚本
    $dico=$WScript->CreateObject("Scripting.Dictionary");
    $dico->add("maurice","juliette");
    $dico->add("philippe","marianne");
    $WScript->echo($dico->item("maurice"));
    $WScript->echo($dico->item("philippe"));
  </script>
</job>
本程序演示了两个字典的创建和使用:一个采用经典的Perl风格,另一个则使用Windows Script的Scripting Dictionary对象。我们将此代码保存到文件dico.wsf中(wsf是Windows Script文件的后缀)。进入该程序所在的文件夹并运行它:
E:\data\serge\windowsScripting\perlscript\essais>cscript dico.wsf
Microsoft (R) Windows Script Host Version 5.6
Copyright (C) Microsoft Corporation 1996-2001. Tous droits réservés.

clé=philippe, valeur=marianne
clé=maurice, valeur=juliette
juliette
marianne
Perl脚本可以使用其运行所在容器的对象。此处是Windows Script容器的对象。在Web编程环境中,VBscript、 JavaScript、PerlScript 脚本既可在 IE 浏览器中执行,也可在 PWS 或 IIS 服务器中执行。 如果脚本稍显复杂,不妨像前文所述那样,在 Windows Script 容器中脱离 Web 环境进行测试。这样只能测试脚本中不使用浏览器或服务器特有对象的功能。尽管存在这一限制,这种方法依然值得关注,因为调试在 Web 服务器或浏览器中运行的脚本通常并不方便。
8.1.7. JAVA
Java可在URL上使用:http://www.sun.com,并安装在名为<java>的目录树中,该目录包含以下组件:
22/05/2002  05:51       <DIR>          .
22/05/2002  05:51       <DIR>          ..
22/05/2002  05:51       <DIR>          bin
22/05/2002  05:51       <DIR>          jre
07/02/2002  12:52                8 277 README.txt
07/02/2002  12:52               13 853 LICENSE
07/02/2002  12:52                4 516 COPYRIGHT
07/02/2002  12:52               15 290 readme.html
22/05/2002  05:51       <DIR>          lib
22/05/2002  05:51       <DIR>          include
22/05/2002  05:51       <DIR>          demo
07/02/2002  12:52           10 377 848 src.zip
11/02/2002  12:55       <DIR>          docs
在 bin 目录下,可以找到 javac.exe(Java 编译器)和 java.exe(Java 虚拟机)。可以进行以下测试:
- 编写以下脚本:
//显示时间的 Java 程序

import java.io.*;
import java.util.*;

public class heure{
  public static void main(String arg[]){
     // 获取日期和时间
     Date maintenant=new Date();
      // 显示
     System.out.println("Il est "+maintenant.getHours()+
        ":"+maintenant.getMinutes()+":"+maintenant.getSeconds());
  }//主函数
}//类
- 将该程序保存为 heure.java。打开 DOS 窗口。进入 heure.java 文件所在的目录并编译:
D:\data\java\essais>c:\jdk1.3\bin\javac heure.java
Note: heure.java uses or overrides a deprecated API.
Note: Recompile with -deprecation for details.
在上述命令中,c:\jdk1.3\bin\javac 应替换为 javac.exe 编译器的确切路径。 您应在与 heure.java 相同的目录下获得一个名为 heure.class 的文件,该文件即为即将由虚拟机 java.exe 执行的程序。
- 运行程序:
8.1.8. Apache 服务器
我们之前提到,可以通过应用程序 EasyPhp 获取 Apache 服务器。若要直接获取,请访问 Apache 官网:http://www.apache.org。 安装过程会生成一个目录树,其中包含服务器所需的所有文件。我们将该目录命名为 <apache>。其目录结构如下所示:
UNINST   ISU       118 805  23/06/00  17:09 Uninst.isu
HTDOCS         <REP>        23/06/00  17:09 htdocs
APACHE~1 DLL       299 008  25/02/00  21:11 ApacheCore.dll
ANNOUN~1             3 000  23/02/00  16:51 Announcement
ABOUT_~1            13 197  31/03/99  18:42 ABOUT_APACHE
APACHE   EXE        20 480  25/02/00  21:04 Apache.exe
KEYS                36 437  20/08/99  11:57 KEYS
LICENSE              2 907  01/01/99  13:04 LICENSE
MAKEFI~1 TMP        27 370  11/01/00  13:47 Makefile.tmpl
README               2 109  01/04/98   6:59 README
README   NT          3 223  19/03/99   9:55 README.NT
WARNIN~1 TXT           339  21/09/98  13:09 WARNING-NT.TXT
BIN            <REP>        23/06/00  17:09 bin
MODULES        <REP>        23/06/00  17:09 modules
ICONS          <REP>        23/06/00  17:09 icons
LOGS           <REP>        23/06/00  17:09 logs
CONF           <REP>        23/06/00  17:09 conf
CGI-BIN        <REP>        23/06/00  17:09 cgi-bin
PROXY          <REP>        23/06/00  17:09 proxy
INSTALL  LOG         3 779  23/06/00  17:09 install.log
Apache 配置文件目录 | |
Apache日志文件目录 | |
Apache可执行文件 |
8.1.8.1. Configuration
在 <Apache>\conf 文件夹中,包含以下文件:httpd.conf、srm.conf、access.conf。 在Apache的最新版本中,这三个文件已被合并为httpd.conf。我们之前已经介绍了该配置文件的重要内容。在接下来的示例中,测试所用的Apache版本是EasyPhp,因此使用的是其配置文件。 其中,DocumentRoot指定的网页目录根路径为 e:\program files\easyphp\www。
8.1.8.2. PHP - Apache 链接
为了进行测试,请创建名为 intro.php 的文件,其中仅包含以下这一行:
<? phpinfo() ?>
并将该文件放置在 Apache 服务器的根目录下(即上文提到的 DocumentRoot)。访问 http://localhost/intro.php。 此时应显示以下信息列表:
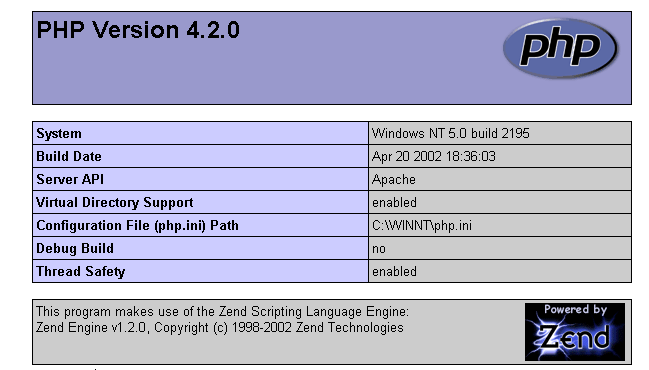
以下脚本 PHP 用于显示时间。我们之前已经见过它:
<?php
   // time:自1970年1月1日以来的毫秒数
   // "日期和时间显示格式
   // d:2位数的日期
   // m:2位数的月份
   // y:2位数的年份
   // H:小时 0,23
   // i:分钟
   // s:秒
  print "Nous sommes le " . date("d/m/y H:i:s",time());
?>
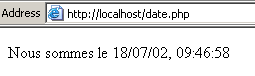
将该文本文件放置在 Apache 服务器根目录下(DocumentRoot),并将其命名为 date.php。 使用浏览器访问 URL http://localhost/date.php。将显示以下页面:
8.1.8.3. 链接 PERL-APACHE
这是通过<apache>\conf\httpd.conf文件中的一行配置实现的,格式为:ScriptAlias /cgi-bin/ "E:/Program Files/EasyPHP/cgi-bin/"。其语法为 ScriptAlias /cgi-bin/ "<cgi-bin>",其中<cgi-bin>是放置CGI脚本的文件夹。 CGI(通用网关接口)是服务器 WEB 与应用程序之间通信的标准。客户端向 Web 服务器请求一个动态页面,即由程序生成的页面。 因此,WEB 服务器必须请求程序生成该页面。CGI 定义了服务器与程序之间的交互,特别是这两个实体之间信息传输的方式。
如有需要,请修改 ScriptAlias /cgi-bin/ "<cgi-bin>" 这一行,并重启 Apache 服务器。随后进行以下测试:
- 编写脚本:
#!c:\perl\bin\perl.exe

# 显示时间的 PERL 脚本

# 模块
use strict;

# 程序
my ($secondes,$minutes,$heure)=localtime(time);
print <<FINHTML
Content-Type: text/html

<html>
 <head>
  <title>heure</title>
 </head>
 <body>
  <h1>Il est $heure:$minutes:$secondes</h1>
 </body>
FINHTML
;
- 将此脚本放置于 <cgi-bin>\heure.pl 目录下,其中 <cgi-bin> 是可接收 CGI 脚本的文件夹(参见 httpd.conf)。 第一行 #!c:\perl\bin\perl.exe 指定了可执行文件 perl.exe 的路径。如有需要,请修改此路径。
- 若尚未启动,请启动 Apache
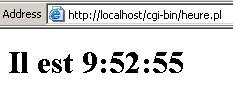
- 使用浏览器访问 URL http://localhost/cgi-bin/heure.pl。将显示以下页面:
8.1.9. PWS 服务器
8.1.9.1. Installation
PWS 服务器(Personal Web Server)是微软 IIS 服务器(Internet Information Server)的个人版。后者可在 NT 和 2000 系统上使用。 在 Win9x 系统上,PWS 通常随 Internet Explorer 安装包提供,但并非默认安装。 必须采用 IE 的自定义安装,并要求安装 PWS。此外,该组件也可在 NT 4.0 Windows 95 选件包中获得。
8.1.9.2. 初步测试
服务器 PWS 的网页根目录为 drive:\inetpub\wwwroot,其中 drive 是指您安装 PWS 的磁盘。 下文中我们假设该驱动器为 D。因此,URL http://machine/rep1/page1.html 对应于文件 d:\inetpub\wwwroot\rep1\page1.html。 PWS 服务器将所有后缀为 .asp(Active Server Pages)的文件视为需要执行的脚本,以生成 HTML 页面。
PWS默认运行在80端口上。Apache Web服务器也是如此……因此,如果您同时拥有这两个服务器,则必须停止Apache才能使用PWS。 另一种解决方案是配置 Apache 使其使用其他端口。因此,在 Apache 的配置文件 httpd.conf 中,将 Port 80 这一行替换为 Port 81,Apache 从此将使用 81 端口,并可与 PWS 同时运行。 如果 PWS 已启动,访问 URL http://localhost 时,将显示类似以下内容的页面:

8.1.9.3. 链接 PHP - PWS
- 下方提供了一个用于修改注册表的 .reg 文件。双击该文件即可修改注册表。此处所需的 dll 位于 d:\php4 中,与 PHP 可执行文件同处。如有需要请进行修改。DLL 路径中的 \ 符号必须双写。
REGEDIT4

[HKEY_LOCAL_MACHINE\SYSTEM\CurrentControlSet\Services\w3svc\parameters\Script Map]
".php"="d:\\php4\\php4isapi.dll"
- 重启计算机以使注册表修改生效。
- 在 d:\inetpub\wwwroot(即服务器 PWS 的根目录)中创建一个 php 文件夹。完成后,启动 PWS 并进入“高级”选项卡。 点击“添加”按钮创建一个虚拟文件夹:
- 确认所有设置并重新运行 PWS。将包含以下唯一一行内容的文件 intro.php 放入 d:\inetpub\wwwroot\php 中:
- 向服务器 PWS 请求 URL http://localhost/php/intro.php。此时应能看到此前通过 Apache 已展示的 PHP 信息列表。
8.1.10. Tomcat:Java Servlet 和 JSP 页面
Tomcat 是一个 Web 服务器,可通过 Servlet(由 Web 服务器执行的 Java 程序)生成 JSP 页面,即混合了 Java 代码和 HTML 代码的页面。 这相当于微软 IIS/PWS 服务器上的 ASP (Active Server Pages),其中混合了 VBScript 或 JavaScript 代码与 HTML 代码。
8.1.10.1. Installation
Tomcat可在以下地址获取:http://jakarta.apache.org。 下载安装用的 .exe 文件。运行该程序时,它会首先提示将使用哪个 JDK。实际上,Tomcat 需要一个 JDK 才能进行安装,并随后编译和运行 Java Servlet。 因此,在安装 Tomcat 之前,您必须先安装一个 JDK Java 版本。建议使用最新的 JD 版本。安装过程将创建一个 <tomcat> 目录结构:
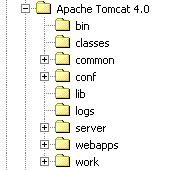
安装过程仅需将该压缩包解压到某个目录中。 请选择路径中仅包含无空格名称的目录(例如不要使用“Program Files”),这是因为 Tomcat 的安装过程中存在一个漏洞。例如,可以使用 C:\tomcat 或 D:\tomcat。我们将该目录称为 <tomcat>。其中包含一个名为 jakarta-tomcat 的文件夹,该文件夹内包含以下目录结构:
LOGS           <REP>        15/11/00   9:04 logs
LICENSE              2 876  18/04/00  15:56 LICENSE
CONF           <REP>        15/11/00   8:53 conf
DOC            <REP>        15/11/00   8:53 doc
LIB            <REP>        15/11/00   8:53 lib
SRC            <REP>        15/11/00   8:53 src
WEBAPPS        <REP>        15/11/00   8:53 webapps
BIN            <REP>        15/11/00   8:53 bin
WORK           <REP>        15/11/00   9:04 work
8.1.10.2. 启动/停止 Tomcat Web 服务器
Tomcat 是一个 Web 服务器,就像 Apache 或 PWS 一样。要启动它,可以在程序菜单中找到相应的链接:
用于启动 Tomcat | |
用于停止 |
启动 Tomcat 时,会显示一个 DOS 窗口,内容如下:
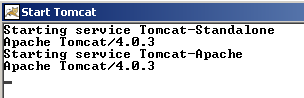
可以将该 DOS 窗口最小化为图标。只要 Tomcat 处于活动状态,该窗口就会一直存在。然后就可以进行初步测试了。Tomcat Web 服务器运行在 8080 端口上。启动 Tomcat 后,打开一个 Web 浏览器,访问 http://localhost:8080。您应该会看到以下页面:
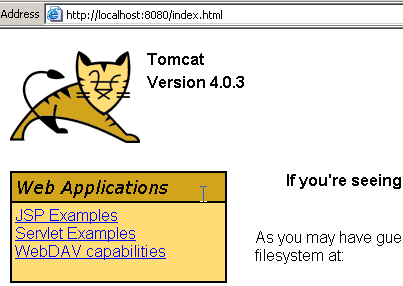
请点击“Servlet Examples”链接:
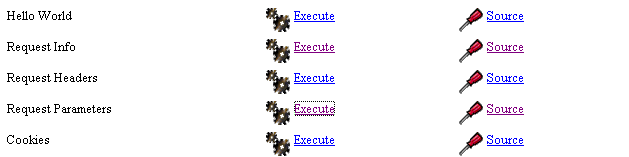
点击 Execute 链接(位于 RequestParameters 页面),然后点击 Source 链接。 您将初步了解什么是 Java Servlet。您也可以对 JSP 页面上的链接进行同样的操作。
要停止 Tomcat,请使用程序菜单中的“停止 Tomcat”链接。
8.1.11. JBuilder
JBuilder 是一个 Java 应用程序开发环境。在构建没有图形界面的 Java Servlet 时,并不一定非要使用此类开发环境。 一个文本编辑器和 JDK 即可胜任。但 JBuilder 相较于前一种方法具有以下优势:
- 调试便捷:编译器会标记程序中的错误行,便于定位
- 代码提示:当使用 Java 对象时,JBuilder 会实时显示该对象的属性与方法列表。考虑到大多数 Java 对象拥有大量难以记忆的属性与方法,这一功能非常实用。
可在 http://www.borland.com/jbuilder 网站上找到 JBuilder。需填写表格以获取该软件。激活密钥将通过电子邮件发送。例如,安装 JBuilder 7 的步骤如下:
- 共获取了三个zip文件:应用程序、文档和示例。JBuilder网站上为每个zip文件提供了单独的下载链接。
- 首先安装应用程序,然后安装文档,最后安装示例
- 首次启动应用程序时,系统会要求输入激活密钥:即通过电子邮件发送给您的密钥。在第7版中,该密钥实际上是一个完整的文本文件,可将其放置在JB7的安装文件夹中。 在系统提示输入密钥时,请指定该文件。完成此操作后,系统将不再要求输入密钥。
若要使用 JBuilder 构建 Java Servlet,需要进行一些有用的配置。实际上,所谓的“个人版 JBuilder”是一个精简版,它并未包含进行 Java Web 开发所需的所有类。 我们可以让 JBuilder 使用 Tomcat 提供的类库。操作步骤如下:
- 运行 JBuilder
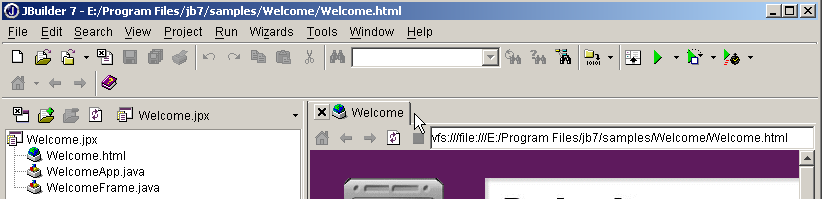
- 启用“工具/配置 JDKs”选项
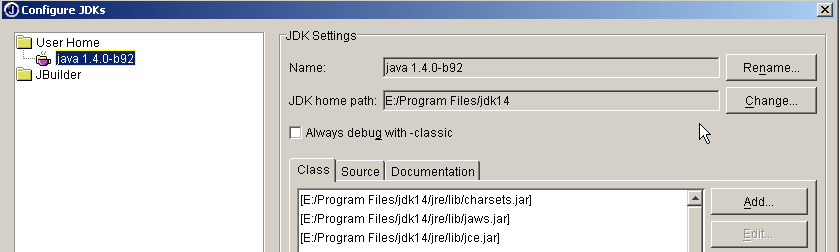
在上述 JDK 设置界面中,Name 字段通常显示为 JDK 1.3.1。若您拥有更新版的 JDK,请点击“Change”按钮指定其安装目录。 上图中,我们指定了 E:\Program Files\jdk14 目录,该目录中已安装了 JDK 1.4。现在,JBuilder 将使用该 JDK 进行编译和运行。 在(类、源代码、文档)部分,列出了 JBuilder 将要探索的所有类库,此处为 JDK 1.4 的类。仅凭这些类不足以进行 Java Web 开发。 若要添加其他类库,请点击“添加”按钮,并指定要使用的额外 .jar 文件。 .jar文件即为类库。Tomcat 4.x自带了Web开发所需的所有类库。这些类库位于<tomcat>\common\lib目录下,其中<tomcat>是Tomcat的安装目录:
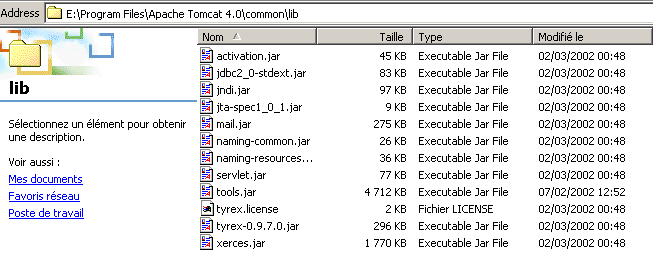
通过“添加”按钮,我们将这些库逐一添加到 JBuilder 所浏览的库列表中:
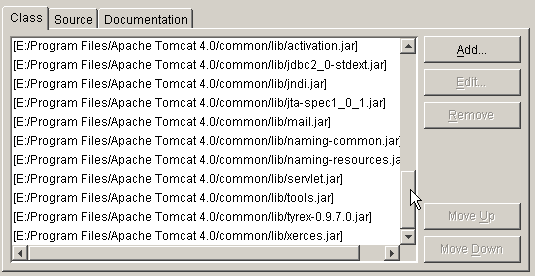
从现在起,我们可以编译符合 J2EE 标准的 Java 程序,特别是 Java Servlet。JBuilder 仅用于编译,后续的运行将由 Tomcat 根据课程中讲解的方式来完成。
8.2. 程序源代码
8.2.1. 通用客户端 TCP
互联网早期创建的许多服务都遵循之前研究的回显服务器模型:客户端与服务器的交互通过文本行交换进行。我们将编写一个通用的 TCP 客户端,其启动方式如下:java cltTCPgenerique 服务器端口
该客户端 TCP 将连接到服务器 serveur 的端口 port。连接成功后,它将创建两个线程:
- 一个线程负责读取键盘输入的命令并将其发送至服务器
- 一个线程负责读取服务器的响应并将其显示在屏幕上
为何需要两个线程?每个 TCP-IP 服务都有其特定的协议,有时会出现以下情况:
- 客户端必须发送多行文本才能获得响应
- 服务器的响应可能包含多行文本
因此,仅发送一行数据给服务器、接收服务器返回一行数据的循环模式并不总是适用。因此,我们将创建两个独立的循环:
- 一个用于读取键盘输入命令并发送至服务器的循环。用户将通过关键字 fin 标记命令结束。
- 一个用于接收并显示服务器响应的循环。这是一个无限循环,仅在服务器关闭网络连接或用户通过键盘输入命令 fin 时才会终止。
为了使这两个循环相互独立,我们需要两个独立的线程。 下面展示一个执行示例:我们的通用 TCP 客户端连接到 SMTP 服务(SendMail 传输协议)。该服务负责将电子邮件转发给收件人。它运行在 25 端口上,采用基于文本行交换的交互协议。
Dos>java clientTCPgenerique istia.univ-angers.fr 25
Commandes :
<-- 220 istia.univ-angers.fr ESMTP Sendmail 8.11.6/8.9.3; Mon, 13 May 2002 08:37:26 +0200
help
<-- 502 5.3.0 Sendmail 8.11.6 -- HELP not implemented
mail from: machin@univ-angers.fr
<-- 250 2.1.0 machin@univ-angers.fr... Sender ok
rcpt to: serge.tahe@istia.univ-angers.fr
<-- 250 2.1.5 serge.tahe@istia.univ-angers.fr... Recipient ok
data
<-- 354 Enter mail, end with "." on a line by itself
Subject: test

ligne1
ligne2
ligne3
.
<-- 250 2.0.0 g4D6bks25951 Message accepted for delivery
quit
<-- 221 2.0.0 istia.univ-angers.fr closing connection
[fin du thread de lecture des réponses du serveur]
fin
[fin du thread d'envoi des commandes au serveur]
让我们来分析一下这些客户端与服务端之间的交互:
- 当客户端连接到 SMTP 服务时,该服务会发送一条欢迎消息:
- 某些服务提供 help 命令,用于说明该服务支持的可用命令。但此处并非如此。示例中使用的 SMTP 命令如下:
- mail from: expéditeur,用于指定消息发件人的电子邮箱地址
- rcpt to: destinataire,用于指定邮件收件人的电子邮箱地址。如果有多个收件人,则需针对每位收件人重复发送 rcpt to: 命令。
- data 用于通知服务器 SMTP 即将发送邮件。如服务器响应所示,邮件内容是一系列行,最后以仅包含一个点字符的行结尾。邮件的标题行通常通过空行与正文分隔。在本例中,我们使用 Subject: 关键字设置了主题:
- 消息发送完成后,可通过 quit 命令告知服务器操作已完成。此时服务器将关闭网络连接。读取线程可检测到此事件并停止运行。
- 用户随后在键盘上输入“fin”以停止读取键盘输入命令的线程。
若检查收到的邮件,我们看到如下内容(Outlook):
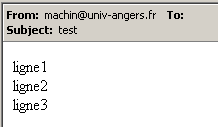
需要注意的是,SMTP服务无法判断发件人是否有效。因此,绝不能信任邮件中的from字段。 此处的发件人 machin@univ-angers.fr 并不存在。
这个通用 TCP 客户端可帮助我们发现互联网服务的通信协议,并据此为这些服务的客户端构建专用类。让我们来探索服务 POP 的通信协议(邮局协议),该协议允许检索存储在服务器上的邮件。它运行在 110 端口上。
Dos> java clientTCPgenerique istia.univ-angers.fr 110
Commandes :
<-- +OK Qpopper (version 4.0.3) at istia.univ-angers.fr starting.
help
<-- -ERR Unknown command: "help".
user st
<-- +OK Password required for st.
pass monpassword
<-- +OK st has 157 visible messages (0 hidden) in 11755927 octets.
list
<-- +OK 157 visible messages (11755927 octets)
<-- 1 892847
<-- 2 171661
...
<-- 156 2843
<-- 157 2796
<-- .
retr 157
<-- +OK 2796 octets
<-- Received: from lagaffe.univ-angers.fr (lagaffe.univ-angers.fr [193.49.144.1])
<--     by istia.univ-angers.fr (8.11.6/8.9.3) with ESMTP id g4D6wZs26600;
<--     Mon, 13 May 2002 08:58:35 +0200
<-- Received: from jaume ([193.49.146.242])
<--     by lagaffe.univ-angers.fr (8.11.1/8.11.2/GeO20000215) with SMTP id g4D6wSd37691;
<--     Mon, 13 May 2002 08:58:28 +0200 (CEST)
...
<-- ------------------------------------------------------------------------
<-- NOC-RENATER2                  Tl.  : 0800 77 47 95
<-- Fax : (+33) 01 40 78 64 00 ,  Email : noc-r2@cssi.renater.fr
<-- ------------------------------------------------------------------------
<--
<-- .
quit
<-- +OK Pop server at istia.univ-angers.fr signing off.
[fin du thread de lecture des réponses du serveur]
fin
[fin du thread d'envoi des commandes au serveur]
主要命令如下:
- user login,在此处输入存储我们邮件的机器上的登录名
- pass password,此处需输入与前一登录名关联的密码
- list,用于获取以编号和字节大小形式显示的邮件列表
- retr i,用于阅读编号为 i 的邮件
- quit,用于结束会话。
现在让我们来了解客户端与通常运行在80端口的Web服务器之间的交互协议:
Dos> java clientTCPgenerique istia.univ-angers.fr 80
Commandes :
GET /index.html HTTP/1.0

<-- HTTP/1.1 200 OK
<-- Date: Mon, 13 May 2002 07:30:58 GMT
<-- Server: Apache/1.3.12 (Unix)  (Red Hat/Linux) PHP/3.0.15 mod_perl/1.21
<-- Last-Modified: Wed, 06 Feb 2002 09:00:58 GMT
<-- ETag: "23432-2bf3-3c60f0ca"
<-- Accept-Ranges: bytes
<-- Content-Length: 11251
<-- Connection: close
<-- Content-Type: text/html
<--
<-- <html>
<--
<-- <head>
<-- <meta http-equiv="Content-Type"
<-- content="text/html; charset=iso-8859-1">
<-- <meta name="GENERATOR" content="Microsoft FrontPage Express 2.0">
<-- <title>Bienvenue a l'ISTIA - Universite d'Angers</title>
<-- </head>
....
<-- face="Verdana"> - Dernire mise  jour le <b>10 janvier 2002</b></font></p>
<-- </body>
<-- </html>
<--
[fin du thread de lecture des réponses du serveur]
fin
[fin du thread d'envoi des commandes au serveur]
Web客户端按照以下模式向服务器发送请求:
只有在收到空行后,Web 服务器才会做出响应。在示例中,我们只使用了一个命令:
该命令向服务器请求URL /index.html,并表明其使用的是HTTP协议的1.0版本。该协议的最新版本为1.1。 该示例显示,服务器响应时返回了文件 index.html 的内容,随后关闭了连接,因为可以看到响应读取线程已结束。在发送文件 index.html 的内容之前,Web 服务器发送了一系列以空行结尾的头部信息:
<-- HTTP/1.1 200 OK
<-- Date: Mon, 13 May 2002 07:30:58 GMT
<-- Server: Apache/1.3.12 (Unix)  (Red Hat/Linux) PHP/3.0.15 mod_perl/1.21
<-- Last-Modified: Wed, 06 Feb 2002 09:00:58 GMT
<-- ETag: "23432-2bf3-3c60f0ca"
<-- Accept-Ranges: bytes
<-- Content-Length: 11251
<-- Connection: close
<-- Content-Type: text/html
<--
<-- <html>
行 <html> 是文件 /index.html 的第一行。上述内容被称为 HTTP 头(HyperText 传输协议)。 我们在此不详细说明这些头部信息,但需注意我们的通用客户端提供了访问这些头部信息的途径,这有助于理解它们。例如第一行:
表明所联系的 Web 服务器支持 HTTP/1.1 协议,并且已成功找到请求的文件(200 OK),其中 200 是 HTTP 响应代码。以下几行
告知客户端,它将接收 11251 个字节,这些数据代表 HTML 文本(HyperText 标记语言),且在传输结束后,连接将被关闭。
因此,这是一个非常实用的 TCP 客户端。虽然它的功能可能不如官方的 telnet 程序,但亲自编写它还是很有趣的。通用 TCP 客户端的程序如下:
// 导入的软件包
import java.io.*;
import java.net.*;
public class clientTCPgenerique{
// 接收服务特征作为参数,格式为
// 服务器端口
// 连接到服务
// 创建一个线程来读取键盘输入的命令
// 将这些命令发送至服务器
// 创建一个线程以读取服务器的响应
// 这些响应将显示在屏幕上
// 整个过程以键盘输入的“fin”命令结束
// 实例变量
private static Socket client;
public static void main(String[] args){
// 语法
final String syntaxe="pg serveur port";
// 参数个数
if(args.length != 2)
erreur(syntaxe,1);
// 记录服务器名称
String serveur=args[0];
// 端口必须是大于0的整数
int port=0;
boolean erreurPort=false;
Exception E=null;
try{
port=Integer.parseInt(args[1]);
}catch(Exception e){
E=e;
erreurPort=true;
}
erreurPort=erreurPort || port <=0;
if(erreurPort)
erreur(syntaxe+"\n"+"Port incorrect ("+E+")",2);
client=null;
// 可能会出现问题
try{
// 连接到服务
client=new Socket(serveur,port);
}catch(Exception ex){
// 错误
erreur("Impossible de se connecter au service ("+ serveur
+","+port+"), erreur : "+ex.getMessage(),3);
// 结束
return;
}//捕获
// 创建读写线程
new ClientSend(client).start();
new ClientReceive(client).start();
// 主线程结束
return;
}// 主线程
// 显示错误
public static void erreur(String msg, int exitCode){
// 显示错误
System.err.println(msg);
// 因错误停止
System.exit(exitCode);
}//错误
}//类
class ClientSend extends Thread {
// 负责读取键盘输入命令的类
// 并通过作为参数传递的 TCP 客户端将其发送至服务器
private Socket client; // 该 TCP 客户端
// 构造函数
public ClientSend(Socket client){
// 注:此处为 TCP 客户端
this.client=client;
}//构造函数
// 线程的 Run 方法
public void run(){
// 本地数据
PrintWriter OUT=null; // 网络写入流
BufferedReader IN=null; // 键盘流
String commande=null; // 键盘读取的命令
// 错误处理
try{
// 创建网络写入流
OUT=new PrintWriter(client.getOutputStream(),true);
// 创建键盘输入流
IN=new BufferedReader(new InputStreamReader(System.in));
// 命令输入-发送循环
System.out.println("Commandes : ");
while(true){
// 读取键盘输入的命令
commande=IN.readLine().trim();
// 结束了吗?
if (commande.toLowerCase().equals("fin")) break;
// 将命令发送至服务器
OUT.println(commande);
// 下一条命令
}//while
}catch(Exception ex){
// 错误
System.err.println("Envoi : L'erreur suivante s'est produite : " + ex.getMessage());
}//catch
// 结束 - 关闭数据流
try{
OUT.close();client.close();
}catch(Exception ex){}
// 报告线程结束
System.out.println("[Envoi : fin du thread d'envoi des commandes au serveur]");
}//运行
}//类
class ClientReceive extends Thread{
// 负责读取发往
// 作为参数传递的 TCP 客户端
private Socket client; // TCP 客户端
// 构造函数
public ClientReceive(Socket client){
// 记录 TCP 客户端
this.client=client;
}//构造函数
// 线程的 Run 方法
public void run(){
// 本地数据
BufferedReader IN=null; // 网络读取流
String réponse=null; // 服务器响应
// 错误处理
try{
// 创建网络读取流
IN=new BufferedReader(new InputStreamReader(client.getInputStream()));
// 读取 IN 流中文本行的循环
while(true){
// 读取网络数据流
réponse=IN.readLine();
// 数据流已关闭?
if(réponse==null) break;
// 显示
System.out.println("<-- "+réponse);
}//while
}catch(Exception ex){
// 错误
System.err.println("Réception : L'erreur suivante s'est produite : " + ex.getMessage());
}//catch
// 结束 - 关闭数据流
try{
IN.close();client.close();
}catch(Exception ex){}
// 报告线程结束
System.out.println("[Réception : fin du thread de lecture des réponses du serveur]");
}//运行
}//类
8.2.2. 通用TCP服务器
现在我们关注一个服务器
- ,它将客户端发送的命令显示在屏幕上
- 并将用户在键盘上输入的文本行作为响应发送给客户端。因此,用户本身充当了服务器。
该程序通过以下命令启动:java serveurTCPgenerique portEcoute,其中 portEcoute 是客户端需要连接的端口。对客户端的服务将由两个线程负责:
- 一个线程专门用于读取客户端发送的文本行
- 另一个线程专门用于读取用户通过键盘输入的响应。该线程将通过 fin 命令通知服务器,表示其已结束与客户端的连接。
服务器为每个客户端创建两个线程。如果有 n 个客户端,则将有 2n 个线程同时处于活动状态。除非用户通过键盘输入 Ctrl-C,否则服务器永远不会停止运行。让我们来看几个示例。
服务器在100端口上运行,我们使用通用客户端与其通信。客户端窗口如下所示:
E:\data\serge\MSNET\c#\网络\通用 TCP 客户端> java clientTCPgenerique localhost 100
Commandes :
commande 1 du client 1
<-- réponse 1 au client 1
commande 2 du client 1
<-- réponse 2 au client 1
fin
L'erreur suivante s'est produite : Impossible de lire les données de la connexion de transport.
[fin du thread de lecture des réponses du serveur]
[fin du thread d'envoi des commandes au serveur]
以 <-- 开头的行是服务器发送给客户端的,其余的是客户端发送给服务器的。服务器窗口如下:
Dos> java serveurTCPgenerique 100
Serveur générique lancé sur le port 100
Thread de lecture des réponses du serveur au client 1 lancé
1 : Thread de lecture des demandes du client 1 lancé
<-- commande 1 du client 1
réponse 1 au client 1
1 : <-- commande 2 du client 1
réponse 2 au client 1
1 : [fin du Thread de lecture des demandes du client 1]
fin
[fin du Thread de lecture des réponses du serveur au client 1]
以 <-- 开头的行是从客户端发送到服务器的。以 N: 开头的行是从服务器发送给第 N 号客户端的。上文中的服务器仍然处于活动状态,而客户端 1 已结束。现在为同一服务器启动第二个客户端:
Dos> java clientTCPgenerique localhost 100
Commandes :
commande 3 du client 2
<-- réponse 3 au client 2
fin
L'erreur suivante s'est produite : Impossible de lire les données de la connexion de transport.
[fin du thread de lecture des réponses du serveur]
[fin du thread d'envoi des commandes au serveur]
此时服务器窗口如下所示:
Dos> java serveurTCPgenerique 100
Serveur générique lancé sur le port 100
Thread de lecture des réponses du serveur au client 1 lancé
1 : Thread de lecture des demandes du client 1 lancé
<-- commande 1 du client 1
réponse 1 au client 1
1 : <-- commande 2 du client 1
réponse 2 au client 1
1 : [fin du Thread de lecture des demandes du client 1]
fin
[fin du Thread de lecture des réponses du serveur au client 1]
Thread de lecture des réponses du serveur au client 2 lancé
2 : Thread de lecture des demandes du client 2 lancé
<-- commande 3 du client 2
réponse 3 au client 2
2 : [fin du Thread de lecture des demandes du client 2]
fin
[fin du Thread de lecture des réponses du serveur au client 2]
^C
现在,让我们通过在 88 端口上启动我们的通用服务器来模拟一个 Web 服务器:
Dos> java serveurTCPgenerique 88
Serveur générique lancé sur le port 88
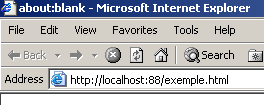
现在打开浏览器,访问 http://localhost:88/exemple.html。 浏览器将连接到 localhost 机器的 88 端口,然后请求 /exemple.html 页面:
现在让我们看看服务器的窗口:
Dos>java serveurTCPgenerique 88
Serveur générique lancé sur le port 88
Thread de lecture des réponses du serveur au client 2 lancé
2 : Thread de lecture des demandes du client 2 lancé
<-- GET /exemple.html HTTP/1.1
<-- Accept: image/gif, image/x-xbitmap, image/jpeg, image/pjpeg, application/msword, */*
<-- Accept-Language: fr
<-- Accept-Encoding: gzip, deflate
<-- User-Agent: Mozilla/4.0 (compatible; MSIE 6.0; Windows NT 5.0; .NET CLR 1.0.3705; .NET CLR 1.0.2
914)
<-- Host: localhost:88
<-- Connection: Keep-Alive
<--
由此,我们发现了浏览器发送的 HTTP 头部信息。这让我们能够逐步了解 HTTP 协议。在之前的示例中,我们创建了一个仅发送 GET 这一条命令的 Web 客户端。 当时仅此便已足够。在此我们看到,浏览器向服务器发送了其他信息。这些信息的目的是告知服务器,其面对的是何种类型的客户端。我们还注意到,HTTP 头部以空行结尾。
现在我们来为客户端编写一个响应。此时,键盘前的用户就是真正的服务器,可以手动编写响应。让我们回顾一下前一个示例中Web服务器生成的响应:
<-- HTTP/1.1 200 OK
<-- Date: Mon, 13 May 2002 07:30:58 GMT
<-- Server: Apache/1.3.12 (Unix) (Red Hat/Linux) PHP/3.0.15 mod_perl/1.21
<-- Last-Modified: Wed, 06 Feb 2002 09:00:58 GMT
<-- ETag: "23432-2bf3-3c60f0ca"
<-- Accept-Ranges: bytes
<-- Content-Length: 11251
<-- Connection: close
<-- Content-Type: text/html
<--
<-- <html>
我们试着给出一个类似的答案:
...
<-- Host: localhost:88
<-- Connection: Keep-Alive
<--
2 : HTTP/1.1 200 OK
2 : Server: serveur tcp generique
2 : Connection: close
2 : Content-Type: text/html
2 :
2 : <html>
2 :   <head><title>Serveur generique</title></head>
2 :   <body>
2 :     <center>
2 :       <h2>Reponse du serveur generique</h2>
2 :     </center>
2 :    </body>
2 : </html>
2 : fin
L'erreur suivante s'est produite : Impossible de lire les données de la connexion de transport.
[fin du Thread de lecture des demandes du client 2]
[fin du Thread de lecture des réponses du serveur au client 2]
以 2: 开头的行是从服务器发送给第 2 号客户端的。命令 fin 结束了服务器与客户端的连接。我们在响应中仅列出了以下 HTTP 头部信息:
HTTP/1.1 200 OK
2 : Server: serveur tcp generique
2 : Connection: close
2 : Content-Type: text/html
2 :
我们不提供即将发送的文件(Content-Length)的大小,而是仅告知在发送该文件后将关闭连接(Connection: close)。这对浏览器来说已经足够。 当浏览器检测到连接已关闭时,便会知道服务器的响应已完成,并显示收到的页面 HTML。该页面内容如下:
2 : <html>
2 :   <head><title>Serveur generique</title></head>
2 :   <body>
2 :     <center>
2 :       <h2>Reponse du serveur generique</h2>
2 :     </center>
2 :    </body>
2 : </html>
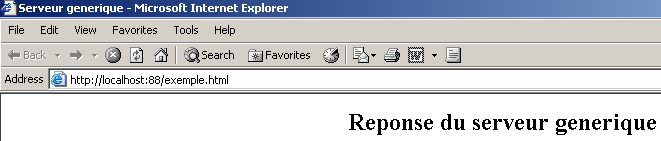
随后,用户通过输入命令 fin 关闭与客户端的连接。此时,浏览器会知道服务器的响应已经结束,并可以显示该响应:
如果在此处执行 View/Source 以查看浏览器接收到的内容,将得到:
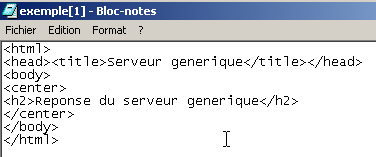
即与从通用服务器发送的内容完全一致。
通用 TCP 服务器的代码如下:
// 包
import java.io.*;
import java.net.*;

public class serveurTCPgenerique{

     // 主程序
    public static void main (String[] args){

    // 监听端口接收客户端请求
     // 创建一个线程来读取客户端请求
     // 这些请求将显示在屏幕上
     // 创建一个线程以读取键盘输入的命令
     // 将这些命令作为响应发送给客户端
     // 整个过程以键盘输入的“end”命令结束

    final String syntaxe="Syntaxe : pg port";
   // 实例变量
         // 是否有参数
     if(args.length != 1)
        erreur(syntaxe,1);

         // 端口必须是大于0的整数
        int port=0;
        boolean erreurPort=false;
        Exception E=null;
        try{
            port=Integer.parseInt(args[0]);
        }catch(Exception e){
            E=e;
            erreurPort=true;
        }
        erreurPort=erreurPort || port <=0;
        if(erreurPort)
            erreur(syntaxe+"\n"+"Port incorrect ("+E+")",2);

     // 创建监听服务
    ServerSocket ecoute=null;
    int nbClients=0;    // 处理的客户端数量
        try{
             // 创建服务
            ecoute=new ServerSocket(port);
             // 跟踪
            System.out.println("Serveur générique lancé sur le port " + port);

             // 客户端服务循环
            Socket client=null;
            while (true){ // 无限循环 - 将通过 Ctrl-C 终止
                 // 等待客户端
                client=ecoute.accept();

                 // 服务由独立线程处理
                nbClients++;

                 // 创建读写线程
        new ServeurSend(client,nbClients).start();
        new ServeurReceive(client,nbClients).start();

                // 返回监听请求
            }// while循环结束
        }catch(Exception ex){
             // 报告错误
            erreur("L'erreur suivante s'est produite : " + ex.getMessage(),3);
        }//catch
    }// main 结束

     // 显示错误
    public static void erreur(String msg, int exitCode){
         // 显示错误
        System.err.println(msg);
         // 带错误停止
        System.exit(exitCode);
    }//错误
}//类

class ServeurSend extends Thread{
    // 负责读取键盘输入的类
     // 并通过传递给构造函数的 TCP 客户端将其发送给客户端

    Socket client;    // TCP 客户端
    int numClient;        // 客户端编号

     // 构造函数
    public ServeurSend(Socket client, int numClient){
         // 记录 TCP 客户端
        this.client=client;
         // 及其编号
        this.numClient=numClient;
    }//构造函数

     // 线程的 Run 方法
    public void run(){

        // 本地数据
        PrintWriter OUT=null;        // 网络写入流
        String réponse=null;        // 键盘读取响应
    BufferedReader IN=null;    // 键盘流

        // 跟踪
        System.out.println("Thread de lecture des réponses du serveur au client "+ numClient + " lancé");
         // 错误处理
        try{
             // 创建网络写入流
            OUT=new PrintWriter(client.getOutputStream(),true);
      // 键盘流创建
      IN=new BufferedReader(new InputStreamReader(System.in));
            // 命令输入-发送循环
            while(true){
                 // 客户身份验证
                System.out.print("--> " + numClient + " : ");
                 // 读取键盘输入的响应
                réponse=IN.readLine().trim();
                // 结束了吗?
                if (réponse.toLowerCase().equals("fin")) break;
                // 将响应发送至服务器
                OUT.println(réponse);
                 // 下一个响应
            }//while
        }catch(Exception ex){
             // 错误
            System.err.println("L'erreur suivante s'est produite : " + ex.getMessage());
        }//catch
         // 结束 - 关闭数据流
        try{
            OUT.close();client.close();
        }catch(Exception ex){}
         // 报告线程结束
        System.out.println("[fin du Thread de lecture des réponses du serveur au client "+ numClient+ "]");
    }//运行
}//类

class ServeurReceive extends Thread{
    // 负责读取发送到服务器的文本行的类
     // 通过传递给构造函数的 TCP 客户端

    Socket client;    // TCP 客户端
    int numClient;        // 客户端编号

     // 构造函数
    public ServeurReceive(Socket client, int numClient){
         // 记录 TCP 客户端
        this.client=client;
         // 及其编号
        this.numClient=numClient;
    }//构造函数

     // 线程的 Run 方法
    public void run(){

        // 本地数据
        BufferedReader IN=null;        // 网络读取流
        String réponse=null;        // 服务器响应

         // 跟踪
        System.out.println("Thread de lecture des demandes du client "+ numClient + " lancé");
         // 错误管理
        try{
             // 创建网络读取流
            IN=new BufferedReader(new InputStreamReader(client.getInputStream()));
            // IN 流中文本行的读取循环
            while(true){
                 // 读取网络流
                réponse=IN.readLine();
                 // 数据流已关闭?
                if(réponse==null) break;
                // 显示
                System.out.println("<-- "+réponse);
            }//while
        }catch(Exception ex){
            // 错误
            System.err.println("L'erreur suivante s'est produite : " + ex.getMessage());
        }//catch
         // 结束 - 关闭数据流
        try{
            IN.close();client.close();
        }catch(Exception ex){}
         // 报告线程结束
        System.out.println("[fin du Thread de lecture des demandes du client "+ numClient+"]");
    }//运行
}//类
8.3. JAVASCRIPT
在本节中,我们将展示三个在WEB页面中使用JavaScript的示例。我们将重点放在表单管理上,但JavaScript的功能远不止于此。
8.3.1. 获取表单信息
下面的示例展示了如何在浏览器中获取用户在表单中输入的数据。这通常允许在将数据发送至服务器之前进行预处理。
8.3.1.1. 表单
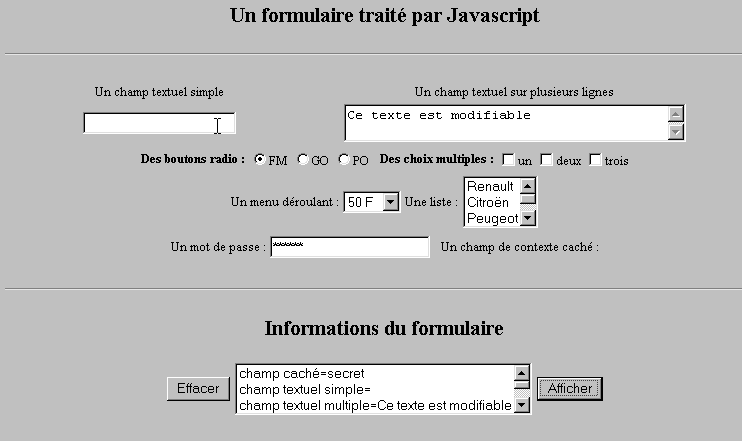
我们有一个包含最常用组件的表单,以及一个“显示”按钮,用于显示用户输入的内容。
8.3.1.2. 代码
<html>
<head>
<title>Un formulaire traité par Javascript</title>
<script language="javascript">
function afficher(){
// 将表单信息显示在列表中
// 先清空
effacerInfos();
// 显示 # 字段的值
with(document.frmExemple){
// 隐藏字段
ecrire("champ caché="+cache.value);
// 单选文本框
ecrire("champ textuel simple="+simple.value);
// 多选文本框
ecrire("champ textuel multiple="+lignes.value);
// 单选按钮
for(i=0;i<radio.length;i++){
texte="radio["+i+"]="+radio[i].value;
if(radio[i].checked) texte+=", coché";
ecrire(texte);
}//for
// 复选框
for(i=0;i<qcm.length;i++){
texte="qcm["+i+"]="+qcm[i].value;
if(qcm[i].checked) texte+=", coché";
ecrire(texte);
}//for
//下拉列表
ecrire("index sélectionné dans le menu="+menu.selectedIndex);
for(i=0;i<menu.length;i++){
texte="menu["+i+"]="+menu.options[i].text;
if(menu.options[i].selected) texte+=",sélectionné";
ecrire(texte);
}//用于
//多选列表
for(i=0;i<lstVoitures.length;i++){
texte="lstVoitures["+i+"]="+lstVoitures.options[i].text;
if(lstVoitures.options[i].selected) texte+=",sélectionné";
ecrire(texte);
}//用于
//密码
ecrire("mot de passe="+passwd.value);
}//带
}//函数
function ecrire(texte){
// 在信息列表中写入文本
frmInfos.lstInfos.options[frmInfos.lstInfos.length]=new Option(texte);
}//写入
function effacerInfos(){
frmInfos.lstInfos.length=0;
}//effacerInfos
</script>
</head>
<body bgcolor="#C0C0C0" onload="afficher()">
<center>
<h2>Un formulaire traité par Javascript</h2>
<hr>
<form method="POST" name="frmExemple">
<input type="hidden" name="cache" value="secret">
<table border="0">
<tr>
<td align="center">Un champ textuel simple</td>
<td align="center" width="100"> </td>
<td align="center">Un champ textuel sur plusieurs lignes</td>
</tr>
<tr>
<td align="center"><input type="text" size="20" name="simple"></td>
<td align="center" width="100"> </td>
<td align="center">
<textarea name="lignes" rows="2" cols="40">Ce texte est modifiable</textarea>
</td>
</tr>
</table>
<table border="0">
<tr>
<td><strong>Des boutons radio :</strong></td>
<td>
<input type="radio" checked name="radio" value="FM">FM
</td>
<td>
<input type="radio" name="radio" value="GO">GO
</td>
<td>
<input type="radio" name="radio" value="PO">PO
</td>
<td> </td>
<td><strong>Des choix multiples :</strong></td>
<td>
<input type="checkbox" name="qcm" value="un">un
</td>
<td>
<input type="checkbox" name="qcm" value="deux">deux
</td>
<td>
<input type="checkbox" name="qcm" value="trois">trois
</td>
</tr>
</table>
<table border="0">
<tr>
<td>Un menu déroulant : </td>
<td>
<select name="menu" size="1">
<option>50 F</option>
<option>60 F</option>
<option>70 F</option>
<option>100 F</option>
</select>
</td>
<td>Une liste :</td>
<td>
<select name="lstVoitures" multiple size="3">
<option>Renault</option>
<option>Citroën</option>
<option>Peugeot</option>
<option>Fiat</option>
<option>Audi</option>
</select>
</td>
</tr>
</table>
<table border="0">
<tr>
<td>Un mot de passe : </td>
<td><input type="password" size="21" name="passwd"></td>
<td> </td>
<td>Un champ de contexte caché : </td>
</tr>
</table>
</form>
<hr>
<h2>Informations du formulaire</h2>
<form name="frmInfos">
<table>
<tr>
<td><input type="button" value="Effacer" onclick="effacerInfos()"></td>
<td>
<select name="lstInfos" multiple size="3">
</select>
</td>
<td>
<input type="button" name="cmdAfficher" value="Afficher" onclick="afficher()">
</td>
</tr>
</form>
</body>
</html>
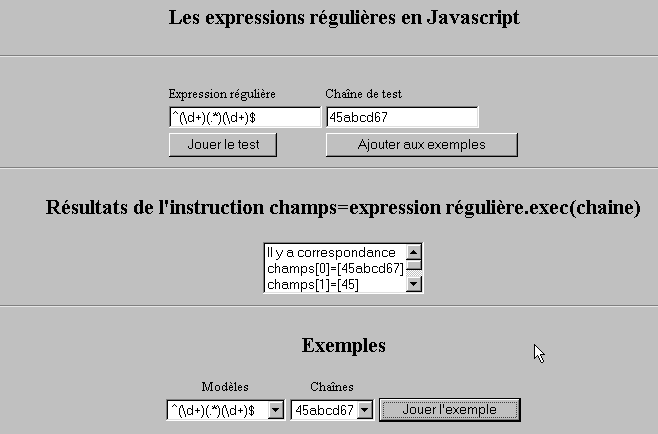
8.3.2. JavaScript 中的正则表达式
在浏览器端,JavaScript 可用于在将用户输入的数据发送至服务器之前验证其有效性。以下是一个用于测试这些正则表达式的程序。
8.3.2.1. 测试页面
8.3.2.2. 页面代码
<html>

  <head>
    <title>Les expressions régulières en Javascript</title>
    <script language="javascript">
      function afficherInfos(){
        with(document.frmRegExp){
           // 有什么需要做的吗?
          if (! verifier()) return;
          // 好了——清除之前的结果
          effacerInfos();
           // 验证模板
          modele=new RegExp(txtModele.value);
          champs=modele.exec(txtChaine.value);
          if(champs==null)
             // 模式与字符串不匹配
            ecrireInfos("pas de correspondance");
          else{
             // 匹配成功 - 显示所得结果
            ecrireInfos("Il y a correspondance");
            for(i=0;i<champs.length;i++)
              ecrireInfos("champs["+i+"]=["+champs[i]+"]");
          }//否则
        }//with
      }//函数

      function ecrireInfos(texte){
        // 将文本写入信息列表
        document.frmRegExp.lstInfos.options[document.frmRegExp.lstInfos.length]=new Option(texte);
      }//写入

      function effacerInfos(){
        frmRegExp.lstInfos.length=0;
      }//effacerInfos

      function jouer(){
         // 根据所选示例中的字符串测试模板
        with(document.frmRegExp){
          txtModele.value=lstModeles.options[lstModeles.selectedIndex].text
          txtChaine.value=lstChaines.options[lstChaines.selectedIndex].text
          afficherInfos();
        }//带
      }//播放

      function ajouter(){
         //将当前测试添加到示例中
        with(document.frmRegExp){
          // 有什么需要做的吗?
          if (! verifier()) return;
           // 添加
          lstModeles.options[lstModeles.length]=new Option(txtModele.value);
          lstChaines.options[lstChaines.length]=new Option(txtChaine.value);
           // 清空输入
          txtModele.value="";
          txtChaine.value="";
        }//带
      }//添加

      function verifier(){
         // 检查输入字段是否为空
        with(document.frmRegExp){
          champs=/^\s*$/.exec(txtModele.value);
          if(champs!=null){
            alert("Vous n'avez pas indiqué de modèle");
            txtModele.focus();
            return false;
          }//if
          champs=/^\s*$/.exec(txtChaine.value);
          if(champs!=null){
            alert("Vous n'avez pas indiqué de chaîne de test");
            txtChaine.focus();
            return false;
          }//如果
           // 没问题
          return true;
        }//with
      }//验证
    </script>
  </head>

  <body bgcolor="#C0C0C0">
    <center>
     <h2>Les expressions régulières en Javascript</h2>
    <hr>
    <form name="frmRegExp">
      <table>
        <tr>
          <td>Expression régulière</td>
          <td>Chaîne de test</td>
        </tr>
        <tr>
          <td><input type="text" name="txtModele" size="20"></td>
          <td><input type="text" name="txtChaine" size="20"></td>
        </tr>
        <tr>
          <td>
            <input type="button" name="cmdAfficher" value="Jouer le test" onclick="afficherInfos()">
          </td>
          <td>
            <input type="button" name="cmdAjouter" value="Ajouter aux exemples" onclick="ajouter()">
          </td>
        </tr>
      </table>
      <hr>
      <h2>Résultats de l'instruction champs=expression régulière.exec(chaine)</h2>
      <table>
        <tr>
          <td>
            <select name="lstInfos" size="3">
            </select>
          </td>
        </tr>
      </table>
      <hr>
      <h2>Exemples</h2>
      <table>
 <tr>
          <td align="center">Modèles</td>
          <td align="center">Chaînes</td>
        </tr>
        <tr>
          <td>
            <select name="lstModeles" size="1">
              <option>^\d+$</option>
              <option>^(\d+) (\d+)$</option>
              <option>^(\d+)(.*)(\d+)$</option>
              <option>^(\d+)(\s+)(\d+)$</option>
            </select>
          </td>
          <td>
            <select name="lstChaines" size="1">
              <option>67</option>
              <option>56 84</option>
              <option>45abcd67</option>
              <option>45   67</option>
            </select>
          </td>
          <td>
            <input type="button" name="cmdJouer" value="Jouer l'exemple" onclick="jouer()">
          </td>
        </tr>
    </form>
  </body>
</html>
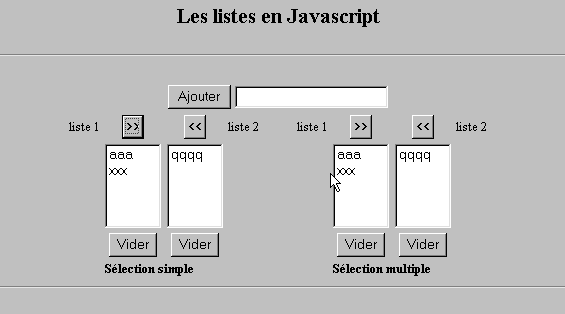
8.3.3. 列表管理(JavaScript)
8.3.3.1. 表单
8.3.3.2. 代码
<html>

  <head>
    <title>Les listes en Javascript</title>

    <script language="javascript">
       // 添加
      function ajouter(L1,L2,T){
         // 将字段 T 的值添加到列表 L1、L2 中
           // 需要做些什么?
          champs=/^\s*$/.exec(T.value);
          if(champs!=null){
            // 字段为空
            alert("Vous n'avez pas indiqué la valeur à ajouter");
            txtElement.focus();
            return;
          }//if
           // 添加该元素
          L1.options[L1.length]=new Option(T.value);
          L2.options[L2.length]=new Option(T.value);
          T.value="";
      }//添加

       //清空
      function vider(L){
         // 清空列表 L
        L.length=0;
      }//清空

      //转移
      function transfert(L1,L2,simple){
        //将列表 L1 中选中的项目转移到 L2

         // 需要做什么?
         // L1 中所选元素的索引
        index1=L1.selectedIndex;
        if(index1==-1){
          alert("Vous n'avez pas sélectionné d'élément");
          return;
        }//if
         // 列表中元素的选中模式是什么
        if(simple){ // 单选
          element1=L1.options[index1].text;
           //在 L2 中添加
          L2.options[L2.length]=new Option(element1);
          //在 L1 中删除
          L1.options[index1]=null;
        }//单选
        if(! simple){ //多重选择
           //反向遍历列表 1
          for(i=L1.length-1;i>=0;i--){
            //是否选中该元素?
            if(L1.options[i].selected){
               //将其添加到 L2
              L2.options[L2.length]=new Option(L1.options[i].text);
              //从 L1 中删除
              L1.options[i]=null;
            }//如果
          }//对于 i
        }//if ! simple
      }//转账
   </script>
  </head>

  <body bgcolor="#C0C0C0">
    <center>
     <h2>Les listes en Javascript</h2>
    <hr>
    <form name="frmListes">
      <table>
        <tr>
          <td>
            <input type="button" name="cmdAjouter" value="Ajouter" onclick="ajouter(lst1A,lst1B,txtElement)">
          </td>
          <td>
            <input type="text" name="txtElement">
          </td>
        </tr>
      </table>
      <table>
        <tr>
          <td align="center">liste 1</td>
          <td align="center"><input type="button" value=">>" onclick="transfert(lst1A,lst2A,true)"</td>
          <td align="center"><input type="button" value="<<" onclick="transfert(lst2A,lst1A,true)"</td>
          <td align="center">liste 2</td>
          <td width="30"></td>
          <td align="center">liste 1</td>
          <td align="center"><input type="button" value=">>" onclick="transfert(lst1B,lst2B,false)"</td>
          <td align="center"><input type="button" value="<<" onclick="transfert(lst2B,lst1B,false)"</td>
          <td align="center">liste 2</td>
        </tr>
         <tr>
          <td></td>
          <td align="center">
            <select name="lst1A" size="5">
            </select>
          </td>
          <td align="center">
            <select name="lst2A" size="5">
            </select>
          </td>
          <td></td>
          <td></td>
          <td></td>
          <td align="center">
            <select name="lst1B" size="5" multiple >
            </select>
          </td>
          <td align="center">
            <select name="lst2B" size="5" multiple>
            </select>
          </td>

        </tr>
        <tr>
          <td></td>
          <td align="center"><input type="button" value="Vider" onclick="vider(lst1A)"</td>
          <td align="center"><input type="button" value="Vider" onclick="vider(lst2A)"</td>
          <td></td>
          <td></td>
          <td></td>
          <td align="center"><input type="button" value="Vider" onclick="vider(lst1B)"</td>
          <td align="center"><input type="button" value="Vider" onclick="vider(lst2B)"</td>
          <td></td>
        </tr>
        <tr>
          <td></td>
          <td colspan="2"><strong>Sélection simple</strong></td>
          <td></td>
          <td></td>
          <td></td>
          <td colspan="2"><strong>Sélection multiple</strong></td>
          <td></td>
        </tr>

      </table>
      <hr>
    </form>
  </body>
</html>