Skip to content

8. 身份验证与授权

每个请求都会引出两个不同的问题:

  • 用户是谁?这是身份验证:用户已经通过用户名和密码表明了身份,此后的每个请求都必须证明它来自该用户;
  • 他是否有权限访问此页面?这是授权:在案例研究中,只有角色为 ADMIN 的用户才能管理医生和客户。

由于服务器是无状态的(参见关于作用域的章节),身份证明必须随每个请求一起发送。这里使用名为 JWT 的令牌 (*JSON Web Token*):登录之后,服务器生成一个包含用户身份的令牌,并用密钥对其进行签名。令牌存储在 Cookie 中;浏览器在每个请求中将其发回;服务器验证签名。用户可以读取自己的令牌,但无法修改它:任何修改都会使签名失效。这与 [Flask] 会话(示例 20)的原理相同,但格式是标准化的(RFC 7519),所有编程语言都能理解,并且令牌中内置了过期时间。

[Flask] 没有内置的安全机制,这与 [Spring] ([Spring Security])或 [ASP.NET Core] 不同。虽然存在一些扩展([Flask-Login]、[Flask-JWT-Extended]……),但这个机制非常简单,完全可以用前几章的工具手工编写,其好处是让整个过程透明:

  • 身份验证由一个 [before_request] 函数(上一章)处理,它从 Cookie 中取出令牌并验证,然后把已验证的用户存储在 [g] 这个请求对象中;
  • 授权由应用于动作的装饰器 ([@login_required]、[@role_required("ADMIN")])处理,它们的构造方式类似于示例 12 中的 [@with_language] 装饰器。

使用了两个库,它们由示例中的 [requirements.txt] 文件安装:[PyJWT],用于生成和验证令牌;以及 [bcrypt],用于对密码进行哈希。

8.1. 示例 25:登录、令牌、受保护页面

25-jwt/
├── app.py
├── auth/
│   ├── security.py
│   ├── service.py
│   └── users.py
├── config.py
├── controllers/
│   ├── auth.py
│   └── profile.py
└── templates/
    ├── auth/
    │   └── login.html
    ├── layout.html
    └── profile/
        └── profile.html

8.1.1. 配置:config.py 和 app.py

令牌使用密钥签名,而密钥不应硬编码。现在是把配置与代码分离的时候了:

1
2
3
4
5
6
# config.py:应用的配置,由 app.config.from_pyfile 读取。
# 只保留大写的变量。

# 为 JWT 令牌签名的密钥(至少 32 个字符),以及令牌的有效期
JWT_SECRET = "a-secret-key-of-at-least-32-characters-for-example-25"
JWT_DURATION_MINUTES = 60

[Flask] 配置文件只是一个 [Python] 模块:其中大写的变量会成为 [app.config] 的键。[JWT_SECRET] 是令牌的签名密钥;对于所使用的算法(HMAC-SHA256),标准要求密钥至少为 256 位,即 32 字节。[JWT_DURATION_MINUTES] 是令牌的有效期。

# app.py:示例 25 的应用
from pathlib import Path

from flask import Blueprint, Flask

from auth import security
from auth.service import AuthService
from auth.users import UsersService
from controllers.auth import auth
from controllers.profile import profile

BOOTSTRAP = Path(__file__).resolve().parent.parent / "common" / "bootstrap"


def create_app():
    app = Flask(__name__)
    app.jinja_env.trim_blocks = True
    app.jinja_env.lstrip_blocks = True
    # 配置:先是 config.py 文件,然后是以 FLASK_ 开头的
    # 环境变量(FLASK_JWT_SECRET 替换 JWT_SECRET)
    app.config.from_pyfile("config.py")
    app.config.from_prefixed_env()
    # 身份验证服务
    users = UsersService()
    app.extensions["auth"] = AuthService(users, app.config["JWT_SECRET"],
                                         app.config["JWT_DURATION_MINUTES"])
    app.register_blueprint(Blueprint("bootstrap", __name__, static_folder=BOOTSTRAP,
                                     static_url_path="/bootstrap"))
    app.register_blueprint(auth)
    app.register_blueprint(profile)
    # 每个请求的用户,从 Cookie 中的令牌读取
    security.register(app)
    return app


if __name__ == "__main__":
    create_app().run(port=5000, debug=True)
  • 第 21 行:读取配置文件,通过相对于应用程序文件夹的路径来指定;
  • 第 22 行:读取环境变量 ,其名称以 [FLASK_] 开头:[FLASK_JWT_SECRET] 会替换文件中的键 [JWT_SECRET] 。变量的值只要可能就会被解释为 JSON([FLASK_JWT_DURATION_MINUTES=30] 得到整数 30)。在生产环境中,密钥由环境提供,而文件中只包含开发用的值;
  • 第 24–26 行:两个身份验证服务,其中第二个接收密钥和令牌有效期;
  • 第 32 行:注册读取令牌的 [before_request] 函数。

在 [Linux] 或 [macOS] 下,应用程序将按如下方式使用不同的密钥启动:

FLASK_JWT_SECRET="another-key-of-at-least-thirty-two-characters" python app.py

在 [Windows] (PowerShell)下:

$env:FLASK_JWT_SECRET="another-key-of-at-least-thirty-two-characters"
python app.py

8.1.2. 用户:auth/users.py

# auth/users.py:用户,存放在内存中(示例 28 和案例
# 研究会把它们放进数据库)
from dataclasses import dataclass

import bcrypt


@dataclass(frozen=True)
class User:
    login: str
    name: str
    role: str
    password_hash: bytes


# 密码的哈希:bcrypt,成本为 10(2^10 轮);
# gensalt 随机生成一个 "盐",它存储在哈希本身之中
def hash_password(password: str) -> bytes:
    return bcrypt.hashpw(password.encode(), bcrypt.gensalt(rounds=10))


class UsersService:

    def __init__(self):
        # 我们绝不保存密码,只保存它的哈希
        self._users = {u.login: u for u in (
            User("marie", "Marie Pélissier", "USER", hash_password("marie")),
            User("admin", "Administrator", "ADMIN", hash_password("admin")),
        )}

    def find(self, login: str) -> User | None:
        return self._users.get(login)
  • 第 9–13 行:一个用户:其登录名、姓名、角色和密码哈希。服务器绝不存储密码,即使是加密形式也不行:如果数据库被盗,密码也会随之泄露(而且很多人在所有地方都使用同一个密码)。它存储的是哈希函数的结果,哈希函数是单向函数:可以计算出密码的哈希,但无法从哈希还原出密码。要验证输入的密码,就计算它的哈希并与存档的哈希进行比较;
  • 第 18–19 行:使用 [bcrypt] 算法进行哈希,该算法专为密码设计。它有两个显著特点。它是有意设计得慢的,慢的程度可以调节(参数 [rounds],即 成本:2^10 个计算周期):几十毫秒,用户察觉不到,但会使黑客尝试数十亿个密码的代价极其高昂。它使用盐:[gensalt] 随机生成一个盐,在哈希之前将其与密码混合,并把它存储在哈希值本身之中;因此,两个密码相同的用户会得到不同的哈希。[bcrypt] 操作的是字节:[encode()] 将字符串转换为字节([UTF-8])。它只考虑密码的前 72 个字节,而该库的第 5 版会拒绝更长的密码(案例研究考虑了这一点);
  • 第 26–28 行:两个测试用户,存储在内存中,组织成在处理过程中构建的字典([{key: value for ...}])。示例 28 和案例研究将把它们存储在数据库中。

8.1.3. 身份验证服务:auth/service.py

# auth/service.py:密码和 JWT 令牌的检查
from datetime import datetime, timedelta, timezone

import bcrypt
import jwt
from flask import current_app

from auth.users import User, UsersService

# 携带令牌的 Cookie 的名称
COOKIE = "token"


class AuthService:

    def __init__(self, users: UsersService, secret: str, duration_minutes: int):
        self._users = users
        self._secret = secret
        self.duration = timedelta(minutes=duration_minutes)

    # 用户;如果登录名未知或密码错误则为 None。
    # checkpw 用已存储哈希中的盐对输入的密码进行哈希,
    # 然后比较两个结果
    def validate(self, login: str | None, password: str | None) -> User | None:
        if not login or password is None:
            return None
        user = self._users.find(login)
        if user is None or not bcrypt.checkpw(password.encode(),
                                              user.password_hash):
            return None
        return user

    # 用户的 JWT 令牌,使用密钥签名(HMAC-SHA256)
    def create_token(self, user: User) -> str:
        now = datetime.now(timezone.utc)
        # 令牌的内容:"声明"(claims,关于用户的陈述)
        claims = {
            "sub": user.login,
            "name": user.name,
            "role": user.role,
            "iat": now,
            "exp": now + self.duration,
        }
        return jwt.encode(claims, self._secret, algorithm="HS256")

    # 签名和过期日期均有效的令牌的
    # 声明;否则为 None(伪造、过期或无法读取的令牌)
    def check(self, token: str) -> dict | None:
        try:
            return jwt.decode(token, self._secret, algorithms=["HS256"])
        except jwt.InvalidTokenError:
            return None


def auth_service() -> AuthService:
    return current_app.extensions["auth"]
  • 第 24–31 行:验证用户名和密码。[bcrypt.checkpw] 使用存储的哈希中的盐对输入的密码进行哈希,并比较两个哈希值。未知的用户名和错误的密码会产生相同的结果,即 [None];
  • 第 34–44 行:生成令牌。其内容是关于用户的声明(claim)字典。其中一些具有标准化的名称:[sub] (*subject*),用户的标识符;[iat] (*issued at*),创建日期;[exp] (*expiration*),过期日期。其余的可以任意定义:这里是姓名和角色。[jwt.encode] 生成令牌,并使用算法 [HS256] (HMAC-SHA256,一种使用共享密钥的签名)对其签名。日期必须是带时区的日期:[datetime.now(timezone.utc)];
  • 第 48–30 行:令牌验证。[jwt.decode] 验证签名和过期日期,然后返回声明。任何异常情况(伪造、过期或格式错误的令牌)都会引发 [InvalidTokenError] 系列的异常。[algorithms] 参数指定接受的算法:如果没有它,攻击者就可以创建一个声明使用其他算法的令牌(甚至根本不使用算法,[none])。

8.1.4. 安全:auth/security.py

# auth/security.py:每个请求的用户,以及对动作的保护
from functools import wraps

from flask import g, redirect, request, url_for

from auth.service import COOKIE, auth_service


def register(app):

    # 在每个动作之前:Cookie 中的令牌 -> g.user(其声明),或 None
    @app.before_request
    def read_token():
        token = request.cookies.get(COOKIE)
        g.user = auth_service().check(token) if token else None


# 一个装饰器:只有已通过身份验证的用户才会执行该动作;
# 否则,转到登录页面
def login_required(action):
    @wraps(action)
    def protected_action(*args, **kwargs):
        if g.user is None:
            response = redirect(url_for("auth.form"))
            # Cookie 存在但无效(过期、伪造的令牌):我们将其删除
            if COOKIE in request.cookies:
                response.delete_cookie(COOKIE)
            return response
        return action(*args, **kwargs)

    return protected_action
  • 第 13–15 行:在每个动作之前,都会验证 Cookie 中的令牌;[g.user] 包含有效令牌的声明,否则为 [None]。这个函数不会拒绝任何请求:它只是确定用户是谁。这就是身份验证;
  • 第 20–31 行:要求用户已通过身份验证的装饰器。对于匿名访问者,它不会返回该动作,而是重定向到登录页面。如果浏览器发送了 Cookie,则意味着令牌无效(已过期或被伪造):我们借此机会将其删除([delete_cookie] 会发送一个已经过期的空 Cookie)。

8.1.5. 控制器

# controllers/auth.py:登录和注销
from flask import Blueprint, redirect, render_template, request, url_for

from auth.service import COOKIE, auth_service

auth = Blueprint("auth", __name__)


@auth.get("/")
def home():
    return redirect(url_for("profile.display"))


@auth.get("/login")
def form():
    return render_template("auth/login.html")


@auth.post("/login")
def login():
    login = request.form.get("login")
    user = auth_service().validate(login, request.form.get("password"))
    if user is None:
        # 故意含糊的消息:我们不说明是登录名还是密码有误
        return render_template("auth/login.html", login=login,
                               error="Incorrect login or password.")
    response = redirect(url_for("profile.display"))
    # 令牌放在 Cookie 中:页面的 JavaScript 无法读取它
    # (httponly);来自其他站点的 POST 请求不会携带它
    # (samesite);它与令牌同时失效(max_age)
    response.set_cookie(COOKIE, auth_service().create_token(user), httponly=True,
                        samesite="Lax", max_age=auth_service().duration)
    return response


# 注销:仅限 POST(放在另一个站点上的普通链接,无法
# 在用户不知情的情况下使其注销);我们删除该 Cookie
@auth.post("/logout")
def logout():
    response = redirect(url_for("auth.form"))
    response.delete_cookie(COOKIE)
    return response
  • 第 20–26 行:登录。如果登录失败,表单会连同输入的用户名一起重新显示,并附带一条有意含糊的消息:如果提示“用户名未知”,就会向黑客透露哪些用户名是存在的;
  • 第 27–32 行:如果成功,令牌存储在 Cookie 中,并重定向到受保护的页面(PRG 模式)。该 Cookie 是 [httponly] 的:页面的 [JavaScript] 无法读取它,这可以保护令牌免受脚本注入(XSS);它是 [samesite="Lax"] 的:浏览器不会在来自其他站点的 POST 请求中发送它,这可以保护应用程序免受 CSRF 攻击(示例 18);它的有效期([max_age],接受 [timedelta])与令牌的有效期相同。在生产环境中,对于 HTTPS,我们会添加 [secure=True]:这样 Cookie 绝不会通过未加密的连接发送;
  • 第 38–41 行:注销会删除 Cookie。这是一个 POST 动作:放在其他站点上或图片中的指向 [/logout] 的简单链接,无法在用户不知情的情况下让其注销。请注意令牌的一个局限:令牌本身在过期之前一直有效。复制了令牌的人仍然可以使用它。这就是要限制其有效期的原因。
# controllers/profile.py:仅限已通过身份验证的用户访问的页面
from flask import Blueprint, g, render_template

from auth.security import login_required

profile = Blueprint("profile", __name__)


@profile.get("/profile")
@login_required
def display():
    # g.user:令牌的声明,已经过检查(见 auth/security.py)
    return render_template("profile/profile.html", name=g.user["name"],
                           admin=g.user["role"] == "ADMIN", claims=g.user)
  • 第 10 行:该页面受到保护;
  • 第 13 行:该动作使用 [g.user],确保它不是 [None]。

8.1.6. 视图

{% extends "layout.html" %}

{% block content %}
  <h1 class="h3">Login</h1>
  <form method="post" action="/login">
    <div class="mb-2">
      <label class="form-label" for="login">Login</label>
      <input class="form-control" id="login" name="login" value="{{ login or '' }}" required>
    </div>
    <div class="mb-3">
      <label class="form-label" for="password">Password</label>
      <input class="form-control" type="password" id="password" name="password" required>
    </div>
    <button class="btn btn-primary" type="submit">Log in</button>
  </form>
  {% if error %}
  <div class="alert alert-danger mt-3">{{ error }}</div>
  {% endif %}
  <p class="text-muted small mt-3">Test accounts (password = login): marie (USER), admin (ADMIN).</p>
{% endblock %}
  • 第 8 行:登录失败后重新显示输入的登录名;表达式 [login or ''] 在 [login] 为 [None] (或不存在)时求值为空字符串。
{% extends "layout.html" %}

{% block content %}
  <h1 class="h3">Hello {{ name }}</h1>
  <p>Your role: <b>{{ "administrator" if admin else "user" }}</b>.</p>
  <p>The content of your token:</p>
  <table class="table table-sm w-auto">
    {# 遍历字典:items() 给出(键, 值)对 #}
    {% for key, value in claims.items() %}
    <tr><td><code>{{ key }}</code></td><td>{{ value }}</td></tr>
    {% endfor %}
  </table>
  {# 退出登录:一个只有按钮的 POST 表单 #}
  <form method="post" action="/logout">
    <button class="btn btn-outline-secondary" type="submit">Log out</button>
  </form>
{% endblock %}
  • 第 9–11 行:令牌的内容,仅作说明之用而显示;
  • 第 14–16 行:注销,通过只有一个按钮的表单实现。

8.1.7. 执行

我们在未登录的情况下请求受保护的页面 [/profile] :

curl -i http://localhost:5000/profile
1
2
3
4
5
HTTP/1.1 302 FOUND
Content-Type: text/html; charset=utf-8
Content-Length: 199
Location: /login
...

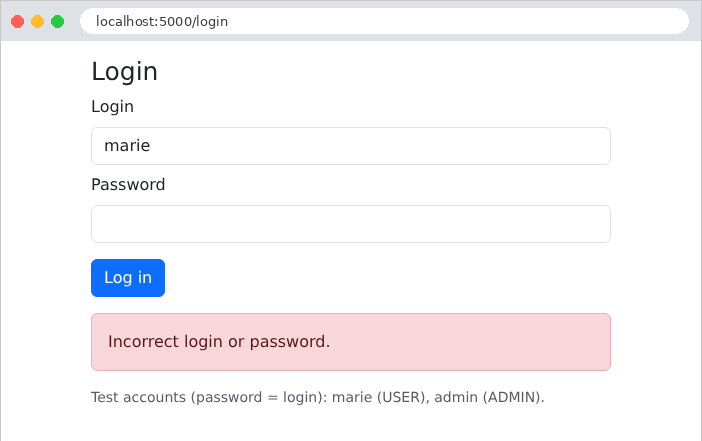
错误的密码:

Image

登录成功。使用 [curl],我们把收到的 Cookie 保存到文件中:

curl -i -c token.txt -d "login=marie&password=marie" http://localhost:5000/login
1
2
3
4
5
6
HTTP/1.1 302 FOUND
Content-Type: text/html; charset=utf-8
Content-Length: 203
Location: /profile
Set-Cookie: token=eyJhbGciOiJIUzI1NiIsInR5cCI6IkpXVCJ9.eyJzdWIiOiJtYXJpZSIsIm5hbWUiOiJNYXJpZSBQXHUwMGU5bGlzc2llciIsInJvbGUiOiJVU0VSIiwiaWF0IjoxNzkwNDMwMDE4LCJleHAiOjE3OTA0MzM2MTh9.5jkKhOHitXj6dsXqgVx85QQIovkt2YB_oygSS-68jiE; Expires=Sat, 26 Sep 2026 14:40:18 GMT; Max-Age=3600; HttpOnly; Path=/; SameSite=Lax
...

令牌由三部分组成,以点号分隔,每部分都经过 Base64 编码:头部、内容和签名。前两部分无需任何密钥即可解码:

{"alg":"HS256","typ":"JWT"}
{"sub":"marie","name":"Marie Pélissier","role":"USER","iat":1790430018,"exp":1790433618}

日期以自 1970 年 1 月 1 日以来经过的秒数表示;过期时间是创建之后一小时。在浏览器中,个人资料页面显示的正是这同一内容:
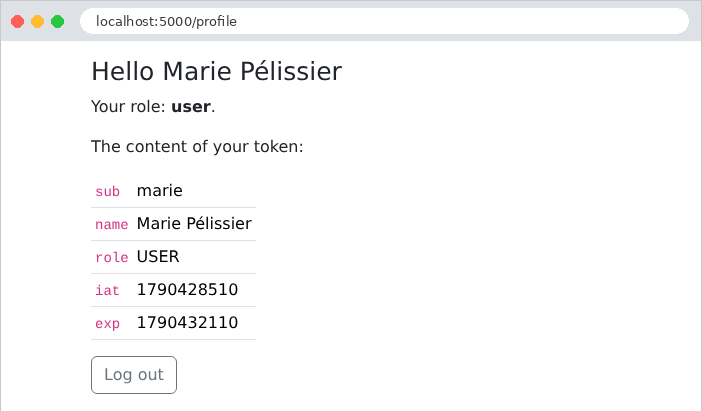
Image

一个恶意用户修改了自己的令牌:他把内容中的角色 ***[USER]*** 替换为 ***[ADMIN]***,将这部分重新进行 Base64 编码,并保留原来的签名。服务器重新计算被修改内容的签名,结果与之不再匹配:

curl -i -b "token=eyJhbGciOiJIUzI1NiIsInR5cCI6IkpXVCJ9.<modified content>.5jkKhOHitXj6dsXqgVx85QQIovkt2YB_oygSS-68jiE" http://localhost:5000/profile
1
2
3
4
5
6
HTTP/1.1 302 FOUND
Content-Type: text/html; charset=utf-8
Content-Length: 199
Location: /login
Set-Cookie: token=; Expires=Thu, 01 Jan 1970 00:00:00 GMT; Max-Age=0; Path=/
...

伪造的令牌被拒绝并删除。要生成有效的签名,就必须知道密钥——因此保守密钥的秘密并选择足够长的随机密钥非常重要。

8.2. 示例 26:角色

示例 26 添加了一个仅限角色 ADMIN 访问的管理页面。这里只显示新增或修改的文件。

8.2.1. 带参数的装饰器:auth/security.py

# auth/security.py:每个请求的用户,以及对动作的保护
from functools import wraps

from flask import abort, g, redirect, request, url_for

from auth.service import COOKIE, auth_service


def register(app):

    # 在每个动作之前:Cookie 中的令牌 -> g.user(其声明),或 None
    @app.before_request
    def read_token():
        token = request.cookies.get(COOKIE)
        g.user = auth_service().check(token) if token else None


# 一个装饰器:只有已通过身份验证的用户才会执行该动作;
# 否则,转到登录页面
def login_required(action):
    @wraps(action)
    def protected_action(*args, **kwargs):
        if g.user is None:
            response = redirect(url_for("auth.form"))
            # Cookie 存在但无效(过期、伪造的令牌):我们将其删除
            if COOKIE in request.cookies:
                response.delete_cookie(COOKIE)
            return response
        return action(*args, **kwargs)

    return protected_action


# 带参数的装饰器:@role_required("ADMIN")。role_required("ADMIN") 返回
# 真正的装饰器,由它接收动作。它用在 @login_required 之后
# (之下):此时用户必然已通过身份验证
def role_required(role: str):
    def decorator(action):
        @wraps(action)
        def protected_action(*args, **kwargs):
            if g.user["role"] != role:
                abort(403)  # 拒绝访问
            return action(*args, **kwargs)

        return protected_action

    return decorator
  • 第 37–47 行:[@role_required("ADMIN")] 带有一个参数。紧跟在 [@] 之后的表达式会先被求值:[role_required("ADMIN")] 返回一个函数 [decorator],它才是真正的装饰器,应用于动作。因此我们有三层嵌套的函数:[role_required] 接收角色,[decorator] 接收动作,[protected_action] 接收请求参数并完成实际工作。每一层都可以访问包含它的那些函数的变量([role]、[action]);
  • 第 42 行:已通过身份验证但不具备所需角色的用户会收到 403 错误(*Forbidden*)。这与被重定向到登录页面的匿名用户有明显区别:登录没有任何意义,因为该用户已经通过了身份验证。

8.2.2. 控制器:controllers/admin.py

# controllers/admin.py:为 ADMIN 角色保留的页面
from flask import Blueprint, g, render_template

from auth.security import login_required, role_required

admin = Blueprint("admin", __name__)


# 装饰器自下而上应用:role_required 包装动作,
# 然后 login_required 包装整体。因此在执行时,
# 首先由 login_required 检查用户是否已通过身份验证
@admin.get("/admin")
@login_required
@role_required("ADMIN")
def display():
    return render_template("admin/admin.html", name=g.user["name"])
  • 第 12–14 行:装饰器自下而上应用:[role_required] 包装动作,然后 [login_required] 包装整个结构。在运行时,顺序则相反:最外层的包装器 [login_required] 最先执行。因此,当 [role_required] 运行时,用户必然已通过身份验证,并且 [g.user] 不是 [None]。

8.2.3. 错误页面:app.py

# app.py:示例 26 的应用
from pathlib import Path

from flask import Blueprint, Flask, render_template

from auth import security
from auth.service import AuthService
from auth.users import UsersService
from controllers.admin import admin
from controllers.auth import auth
from controllers.profile import profile

BOOTSTRAP = Path(__file__).resolve().parent.parent / "common" / "bootstrap"


def create_app():
    app = Flask(__name__)
    app.jinja_env.trim_blocks = True
    app.jinja_env.lstrip_blocks = True
    # 配置:先是 config.py 文件,然后是以 FLASK_ 开头的
    # 环境变量(FLASK_JWT_SECRET 替换 JWT_SECRET)
    app.config.from_pyfile("config.py")
    app.config.from_prefixed_env()
    # 身份验证服务
    users = UsersService()
    app.extensions["auth"] = AuthService(users, app.config["JWT_SECRET"],
                                         app.config["JWT_DURATION_MINUTES"])
    app.register_blueprint(Blueprint("bootstrap", __name__, static_folder=BOOTSTRAP,
                                     static_url_path="/bootstrap"))
    app.register_blueprint(auth)
    app.register_blueprint(profile)
    app.register_blueprint(admin)
    # 每个请求的用户,从 Cookie 中的令牌读取
    security.register(app)

    # 角色不足:abort(403)(见 auth/security.py)-> 我们的错误页面
    @app.errorhandler(403)
    def access_denied(e):
        return render_template("error.html", code=403), 403

    return app


if __name__ == "__main__":
    create_app().run(port=5000, debug=True)
  • 第 37–39 行:为特定的状态码——403 错误——注册的错误处理器会显示我们自己的页面。
1
2
3
4
5
6
7
8
9
{% extends "layout.html" %}

{% block content %}
  <div class="alert alert-danger">
    <h1 class="h4">Error {{ code }}</h1>
    <p class="mb-0">{{ "Access denied: this page is reserved for administrators." if code == 403 else "An error occurred." }}</p>
  </div>
  <p><a href="/profile">Back to the profile</a></p>
{% endblock %}

8.2.4. 执行

角色为 USER 的 Marie 点击链接进入管理页面:
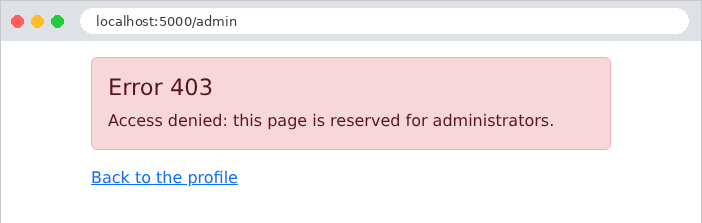
Image

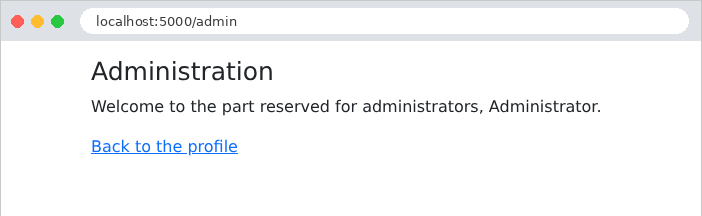
而管理员则可以访问该页面:

Image

使用 [curl]:先是角色为 USER 的用户,然后是匿名访问者:

curl -i -b token.txt http://localhost:5000/admin
curl -i http://localhost:5000/admin
HTTP/1.1 403 FORBIDDEN
Content-Type: text/html; charset=utf-8
Content-Length: 492
...
  <div class="alert alert-danger">
    <h1 class="h4">Error 403</h1>
    <p class="mb-0">Access denied: this page is reserved for administrators.</p>
  </div>
...
HTTP/1.1 302 FOUND
Content-Type: text/html; charset=utf-8
Content-Length: 199
Location: /login

逐个保护动作有一个缺陷:只要疏忽一处,就会向所有人开放一个页面。案例研究将反转这一逻辑:所有动作都默认受到保护,而由装饰器 [@public] 指明少数例外(登录页面、注册页面)。

8.3. 示例 27:验证码与尝试次数限制

登录表单是一个攻击目标:程序每分钟可以尝试数千个密码(暴力破解攻击)。两种保护措施相辅相成:

  • 验证码 (*Completely Automated Public Turing test to tell Computers and Humans Apart*):一张包含扭曲代码的图片,人类很容易辨认,而程序却很难;
  • 尝试次数限制:连续三次失败之后,客户端的 IP 地址会被封锁一分钟。

示例 27 以示例 25 为基础(不含管理页面),并添加了这两项安全措施。

8.3.1. 验证码图片:auth/captcha_drawing.py

# auth/captcha_drawing.py:验证码的绘制,一幅 SVG 图像(XML 文本)
# 手工构建
import math
import secrets

WIDTH = 150
HEIGHT = 50

# secrets:一个 "密码学" 级别的随机数生成器,不可预测
# (不像 random 模块,其序列可能被猜出)
_random = secrets.SystemRandom()

# "字体":每个字符是一组笔画的列表,每个笔画是
# 4 x 6 网格中的点序列 (x, y)(y 轴向下)。
# 过于容易相互混淆的字符:予以排除(0 O、1 I L)。
FONT = {
    "A": [[0, 6, 2, 0, 4, 6], [0.8, 3.8, 3.2, 3.8]],
    "B": [[0, 0, 0, 6, 3, 6, 4, 5, 4, 4, 3, 3, 0, 3], [0, 0, 3, 0, 4, 1, 4, 2, 3, 3]],
    "C": [[4, 1, 3, 0, 1, 0, 0, 1, 0, 5, 1, 6, 3, 6, 4, 5]],
    "D": [[0, 0, 0, 6, 2.5, 6, 4, 4.5, 4, 1.5, 2.5, 0, 0, 0]],
    "E": [[4, 0, 0, 0, 0, 6, 4, 6], [0, 3, 3, 3]],
    "F": [[4, 0, 0, 0, 0, 6], [0, 3, 3, 3]],
    "G": [[4, 1, 3, 0, 1, 0, 0, 1, 0, 5, 1, 6, 3, 6, 4, 5, 4, 3.5, 2.5, 3.5]],
    "H": [[0, 0, 0, 6], [4, 0, 4, 6], [0, 3, 4, 3]],
    "J": [[4, 0, 4, 5, 3, 6, 1, 6, 0, 5]],
    "K": [[0, 0, 0, 6], [4, 0, 0, 3.5], [1.3, 2.6, 4, 6]],
    "M": [[0, 6, 0, 0, 2, 3.5, 4, 0, 4, 6]],
    "N": [[0, 6, 0, 0, 4, 6, 4, 0]],
    "P": [[0, 6, 0, 0, 3, 0, 4, 1, 4, 2, 3, 3, 0, 3]],
    "Q": [[1, 0, 3, 0, 4, 1, 4, 5, 3, 6, 1, 6, 0, 5, 0, 1, 1, 0], [2.5, 4.5, 4, 6.3]],
    "R": [[0, 6, 0, 0, 3, 0, 4, 1, 4, 2, 3, 3, 0, 3], [2, 3, 4, 6]],
    "S": [[4, 1, 3, 0, 1, 0, 0, 1, 0, 2, 1, 3, 3, 3, 4, 4, 4, 5, 3, 6, 1, 6, 0, 5]],
    "T": [[0, 0, 4, 0], [2, 0, 2, 6]],
    "U": [[0, 0, 0, 5, 1, 6, 3, 6, 4, 5, 4, 0]],
    "V": [[0, 0, 2, 6, 4, 0]],
    "W": [[0, 0, 1, 6, 2, 2.5, 3, 6, 4, 0]],
    "X": [[0, 0, 4, 6], [4, 0, 0, 6]],
    "Y": [[0, 0, 2, 3, 4, 0], [2, 3, 2, 6]],
    "Z": [[0, 0, 4, 0, 0, 6, 4, 6]],
    "2": [[0, 1, 1, 0, 3, 0, 4, 1, 4, 2, 0, 6, 4, 6]],
    "3": [[0, 1, 1, 0, 3, 0, 4, 1, 4, 2, 3, 3, 1.5, 3], [3, 3, 4, 4, 4, 5, 3, 6, 1, 6, 0, 5]],
    "4": [[3, 6, 3, 0, 0, 4, 4, 4]],
    "5": [[4, 0, 0, 0, 0, 3, 3, 3, 4, 4, 4, 5, 3, 6, 1, 6, 0, 5]],
    "6": [[4, 1, 3, 0, 1, 0, 0, 1, 0, 5, 1, 6, 3, 6, 4, 5, 4, 4, 3, 3, 0, 3]],
    "7": [[0, 0, 4, 0, 1.5, 6]],
    "8": [[1, 3, 0, 2, 0, 1, 1, 0, 3, 0, 4, 1, 4, 2, 3, 3, 1, 3, 0, 4, 0, 5, 1, 6, 3, 6, 4, 5,
           4, 4, 3, 3]],
    "9": [[4, 3, 1, 3, 0, 2, 0, 1, 1, 0, 3, 0, 4, 1, 4, 5, 3, 6, 1, 6, 0, 5]],
}

ALPHABET = "".join(FONT)

# 几种深色,在浅色背景上易于辨认
COLORS = ["#1f4e79", "#7b2d26", "#2e6b30", "#5b2c83", "#8a5a00", "#23395d", "#9c2a5b"]


def random_text(length: int) -> str:
    return "".join(_random.choice(ALPHABET) for _ in range(length))


def random(minimum: float, maximum: float) -> float:
    return _random.uniform(minimum, maximum)


def color() -> str:
    return _random.choice(COLORS)


def svg(text: str) -> str:
    parts = [f'<svg xmlns="http://www.w3.org/2000/svg" width="{WIDTH}" height="{HEIGHT}" '
             f'viewBox="0 0 {WIDTH} {HEIGHT}">',
             '<rect width="100%" height="100%" fill="#f5f7fa"/>']

    # 字符:每个都经过放大、倾斜、位移,并且每个点
    # 都被随机地轻微移动
    step = (WIDTH - 20) / len(text)
    for i, character in enumerate(text):
        scale = random(4.6, 5.6)  # 网格单元的大小,以像素为单位
        angle = random(-0.35, 0.35)  # 旋转角度,以弧度为单位(约 ±20°)
        cx = 10 + step * (i + 0.5) + random(-3, 3)  # 字符的中心
        cy = HEIGHT / 2 + random(-4, 4)
        d = []
        for stroke in FONT[character]:
            for k in range(0, len(stroke), 2):
                # 网格中的点,以 (2, 3) 为中心,经扭曲、旋转、放置
                x = (stroke[k] - 2 + random(-0.2, 0.2)) * scale
                y = (stroke[k + 1] - 3 + random(-0.2, 0.2)) * scale
                px = cx + x * math.cos(angle) - y * math.sin(angle)
                py = cy + x * math.sin(angle) + y * math.cos(angle)
                d.append(f"{'M' if k == 0 else 'L'}{px:.1f} {py:.1f}")
        parts.append(f'<path d="{" ".join(d)}" fill="none" stroke="{color()}" '
                     f'stroke-width="{random(2.2, 3):.1f}" stroke-linecap="round" '
                     f'stroke-linejoin="round"/>')

    # 3 条干扰笔画:穿过图像的曲线
    for _ in range(3):
        parts.append(
            f'<path d="M{random(0, 20):.1f} {random(5, 45):.1f} '
            f'C{random(30, 60):.1f} {random(0, 50):.1f} {random(90, 120):.1f} {random(0, 50):.1f} '
            f'{random(130, 150):.1f} {random(5, 45):.1f}" fill="none" stroke="{color()}" '
            f'stroke-width="1.3"/>')
    parts.append("</svg>")
    return "".join(parts)

该图片采用 SVG 格式(*Scalable Vector Graphics*):一种用 XML(也就是文本)描述的矢量图形,服务器无需图形库即可生成它,浏览器可以直接在页面上显示它。

  • 第 11 行:[random] 模块(来自 [Python])生成的数字序列是可预测的(知道几个值的人就能猜出后面的值):它适用于模拟,不适用于安全场景。[secrets] 模块提供一个不可预测的密码学生成器;
  • 第 16–48 行:一种极简的“字体”:每个字符是一组笔画的列表,每个笔画是 4 × 6 网格中的坐标 [x, y] 的列表。容易混淆的字符([0] 和 [O]、[1]、[I]以及 [L])已被排除;
  • 第 51 行:["".join(FONT)] 将字典的键组合起来:即可用字符;
  • 第 57–58 行:随机文本。[_] 是未使用变量的惯用名称;
  • 第 69–103 行:绘制。每个字符都被随机放大、旋转和移动,并且它的每个点都有轻微偏移;每条线成为 SVG 的一个 [<path>] 元素([M]:移动,[L]:画线)。三条曲线([C]:贝塞尔曲线)穿过图像,以干扰识别程序。[:.1f] 格式将数字写成保留一位小数。

8.3.2. 验证码服务:auth/captcha.py

# auth/captcha.py:待验证的验证码,由服务器保存在内存中
import secrets
from dataclasses import dataclass
from datetime import datetime, timedelta
from threading import Lock

from flask import current_app

from auth import captcha_drawing

LIFETIME = timedelta(minutes=10)


# 一个验证码:它的标识符及其图像(SVG)
@dataclass(frozen=True)
class Captcha:
    id: str
    svg: str


class CaptchaService:

    def __init__(self):
        # 标识符 -> (期望的答案,过期日期)
        self._pending: dict[str, tuple[str, datetime]] = {}
        self._lock = Lock()

    def generate(self) -> Captcha:
        text = captcha_drawing.random_text(5)
        id = secrets.token_urlsafe(16)  # 一个随机标识符,无法猜测
        with self._lock:
            self._pending[id] = (text, datetime.now() + LIFETIME)
        return Captcha(id, captcha_drawing.svg(text))

    # 验证码在任何情况下都会被消耗:一幅图像只使用一次
    def check(self, id: str | None, answer: str | None) -> bool:
        with self._lock:
            expected = self._pending.pop(id, None) if id else None
        if expected is None or answer is None:
            return False
        text, expires = expected
        return expires > datetime.now() and text.lower() == answer.strip().lower()


def captcha_service() -> CaptchaService:
    return current_app.extensions["captchas"]
  • 第 28–33 行:新的验证码:随机文本、随机且无法猜测的标识符([secrets.token_urlsafe])以及图片。对于每个标识符,服务器都会存储预期的答案和过期日期。页面只接收标识符和图片:答案绝不会离开服务器;
  • 第 36–42 行:验证。[pop] 从字典中移除该条目并返回它:无论成功与否,验证码在任何情况下都会被消耗 。否则,程序就可以对同一张图片尝试所有可能的答案。比较时会忽略大小写以及输入内容前后的空格。

该服务将数据保存在服务器内存中:这偏离了无状态服务器原则(参见关于作用域的章节),但对于短期数据是可以接受的。如果有多台服务器,数据就需要存储在共享的存储系统中(数据库、[Redis]……)。还要注意,从未被使用过的验证码不会被删除:案例研究会定期清理已过期的验证码。

8.3.3. 尝试次数限制:auth/limiter.py

# auth/limiter.py:统计每个 IP 地址的登录失败次数
import math
from datetime import datetime, timedelta
from threading import Lock

from flask import current_app

MAX_FAILURES = 3
BLOCK_DURATION = timedelta(minutes=1)


class Counter:
    def __init__(self):
        self.failures = 0
        self.blocked_until = datetime.min


class LimiterService:

    def __init__(self):
        self._counters: dict[str, Counter] = {}
        # 多个同时到达的请求,同一时刻只允许一个访问
        self._lock = Lock()

    # 剩余的封锁秒数(0:未被封锁)
    def blocked_seconds(self, ip: str) -> int:
        with self._lock:
            counter = self._counters.get(ip)
            if counter is None:
                return 0
            remaining = (counter.blocked_until - datetime.now()).total_seconds()
            return max(0, math.ceil(remaining))

    def failure(self, ip: str):
        with self._lock:
            counter = self._counters.setdefault(ip, Counter())
            counter.failures += 1
            if counter.failures >= MAX_FAILURES:
                counter.blocked_until = datetime.now() + BLOCK_DURATION
                counter.failures = 0  # 封锁结束后,从零重新开始

    def success(self, ip: str):
        with self._lock:
            self._counters.pop(ip, None)


def limiter_service() -> LimiterService:
    return current_app.extensions["limiter"]
  • 第 12–15 行:对于每个 IP 地址,记录失败尝试的次数和封锁结束的日期([datetime.min],即最早的可能日期,表示“未被封锁”);
  • 第 26–32 行:封锁剩余的秒数,向上取整为最接近的整数([math.ceil]);
  • 第 34–40 行:再记一次失败。[setdefault] 会重置该地址的计数器,如果不存在则创建它。第三次失败时,该地址被封锁一分钟,计数器归零;
  • 第 42–44 行:连接成功会清除计数器。

8.3.4. 控制器:controllers/auth.py

# controllers/auth.py:登录(带验证码和尝试次数限制)与注销
from flask import Blueprint, redirect, render_template, request, url_for

from auth.captcha import captcha_service
from auth.limiter import limiter_service
from auth.service import COOKIE, auth_service

auth = Blueprint("auth", __name__)


@auth.get("/")
def home():
    return redirect(url_for("profile.display"))


@auth.get("/login")
def form():
    return login_page()


@auth.post("/login")
def login():
    login = request.form.get("login")
    # 客户端的 IP 地址
    ip = request.remote_addr

    # 1. 被封锁的地址甚至不予理会
    seconds = limiter_service().blocked_seconds(ip)
    if seconds > 0:
        return login_page(login, f"Too many attempts: try again in {seconds} s.")
    # 2. 先检查验证码(开销小),之后再检查密码(bcrypt,开销大)
    if not captcha_service().check(request.form.get("captchaId"), request.form.get("captcha")):
        limiter_service().failure(ip)
        return login_page(login, "The image code is incorrect.")
    user = auth_service().validate(login, request.form.get("password"))
    if user is None:
        limiter_service().failure(ip)
        return login_page(login, "Incorrect login or password.")
    limiter_service().success(ip)
    response = redirect(url_for("profile.display"))
    response.set_cookie(COOKIE, auth_service().create_token(user), httponly=True,
                        samesite="Lax", max_age=auth_service().duration)
    return response


@auth.post("/logout")
def logout():
    response = redirect(url_for("auth.form"))
    response.delete_cookie(COOKIE)
    return response


# 每次显示表单都会生成一个新的验证码
def login_page(login: str | None = None, error: str | None = None):
    return render_template("auth/login.html", login=login, error=error,
                           captcha=captcha_service().generate())
  • 第 25 行:客户端的 IP 地址;
  • 第 28–30 行:被封锁的地址根本不会被理会;
  • 第 32–34 行:验证码在密码之前验证:验证它几乎没有成本,而 [bcrypt] 是有意设计得很慢的。因此,输入错误验证码的程序不会触发 [bcrypt]。每一次失败——无论是验证码错误还是密码错误——都会被计数;
  • 第 39 行:登录成功会清除失败计数;
  • 第 54–56 行:每次显示表单时都会生成新的验证码,即使在失败之后也是如此。

8.3.5. 视图:templates/auth/login.html

{% extends "layout.html" %}

{% block content %}
  <h1 class="h3">Login</h1>
  <form method="post" action="/login">
    <div class="mb-2">
      <label class="form-label" for="login">Login</label>
      <input class="form-control" id="login" name="login" value="{{ login or '' }}" required>
    </div>
    <div class="mb-2">
      <label class="form-label" for="password">Password</label>
      <input class="form-control" type="password" id="password" name="password" required>
    </div>
    <div class="mb-3">
      <label class="form-label" for="captcha">Copy the code of the image</label>
      {# SVG 图像,由服务器构建:不经转义直接插入(safe) #}
      <div class="mb-1">{{ captcha.svg | safe }}</div>
      {# 验证码标识符通过隐藏字段传递;答案保留在服务器上 #}
      <input type="hidden" name="captchaId" value="{{ captcha.id }}">
      <input class="form-control" id="captcha" name="captcha" autocomplete="off" required>
    </div>
    <button class="btn btn-primary" type="submit">Log in</button>
  </form>
  {% if error %}
  <div class="alert alert-danger mt-3">{{ error }}</div>
  {% endif %}
  <p class="text-muted small mt-3">Test accounts (password = login): marie (USER), admin (ADMIN).</p>
{% endblock %}
  • 第 17 行:SVG 图片使用过滤器 [safe] (示例 14)原样插入页面。这是合理的:这段 HTML 由服务器生成,不包含任何用户输入;
  • 第 19 行:验证码标识符,放在隐藏字段中;
  • 第 20 行:浏览器不会为该字段提示任何先前的输入。

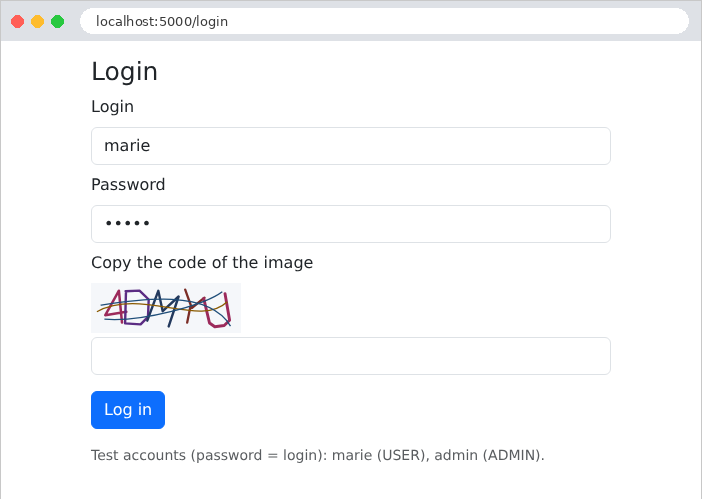
8.3.6. 执行

Image

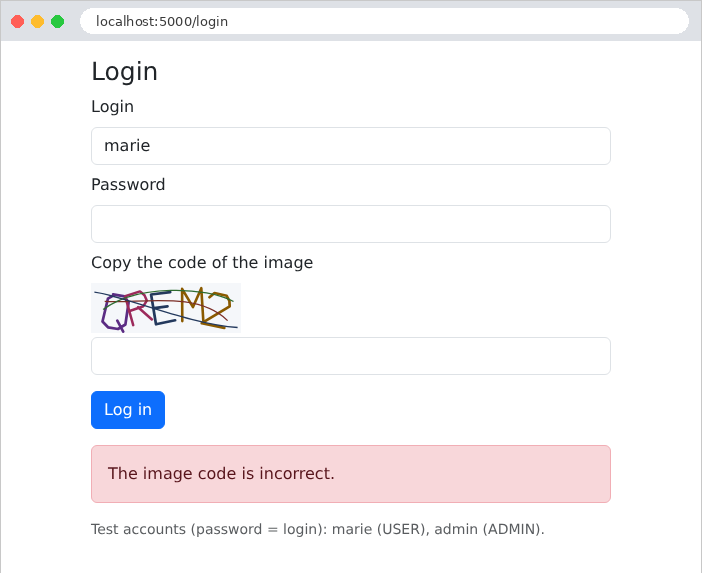
验证码抄错了:

Image

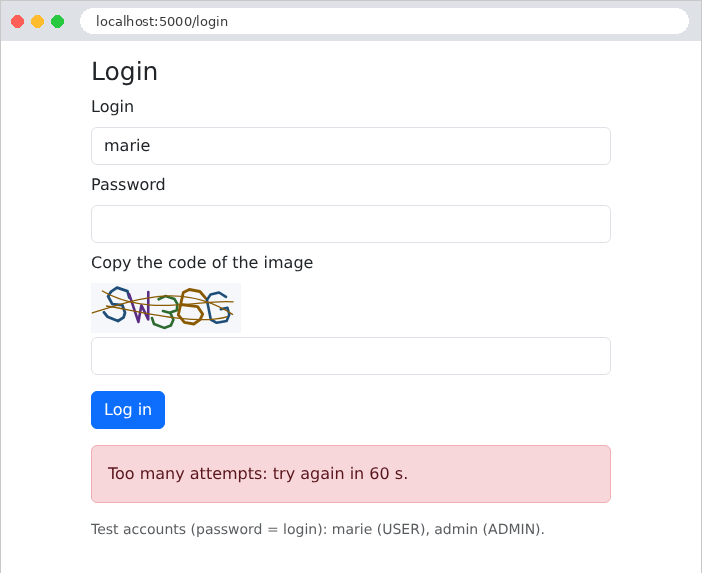
第三次尝试失败后,该地址被封锁:

Image

使用 [curl],用一个编造的验证码标识符尝试四次:

curl -d "login=marie&password=marie&captchaId=abc&captcha=XXXXX" http://localhost:5000/login
1
2
3
4
  <div class="alert alert-danger mt-3">The image code is incorrect.</div>
  <div class="alert alert-danger mt-3">The image code is incorrect.</div>
  <div class="alert alert-danger mt-3">The image code is incorrect.</div>
  <div class="alert alert-danger mt-3">Too many attempts: try again in 60 s.</div>

即使密码正确,第四次尝试也会不经验证就被拒绝。