Skip to content

4. 第 3 章 - [RdvMedecins] 应用的 [NestJS] 服务器

本章逐个文件详细介绍本文档附带的 [rdvmedecins-nestjs-server] 文件夹的内容。它沿用本课程一贯的格式:源代码逐行编号,随后是标题为“我们来评注这段代码”的部分,解释需要进一步说明的行。每个项目文件夹还包含自己的 README.md 文件,其中有这些解释的精简版本。

4.1. 数据库

数据库 [dbrdvmedecins] 的结构与原始文档(2014 年,Spring 4 / [MySQL] 5)一致:表相同——[doctors]、[clients]、[slots]、[appointments]——外键相同,唯一性约束也相同。唯一新增的是本次移植的“身份验证”步骤引入的表 [users]。

4.1.1. [database/dbrdvmedecins.sql]

  -- =========================================================================
  -- Database [dbrdvmedecins] - MySQL 8
  --
  -- This script reproduces EXACTLY the relational schema of the original document
  -- (2014, Spring 4 / Spring Data / MySQL 5): same tables, same columns,
  -- same foreign keys, same uniqueness constraint. Only the database engine
  -- changes its name (MySQL 5 -> MySQL 8), not the structure.
  --
  -- The [users] table now appears ("authentication" step of this
 -- port). The original document used THREE tables (users, roles,
 -- users_roles) to allow a user to have SEVERAL roles.
 -- Since this application only knows two mutually exclusive roles
 -- (ADMIN, USER), we simplify here to a single [role] column
 -- on the [users] table rather than rebuilding the original many-to-
 -- many relation - a deliberate teaching simplification, documented
 -- in the "Authentication" chapter of the course.
 -- =========================================================================

 -- we start again from an empty database on each run of the script (handy in development)
 DROP TABLE IF EXISTS appointments;
 DROP TABLE IF EXISTS slots;
 DROP TABLE IF EXISTS clients;
 DROP TABLE IF EXISTS doctors;
 DROP TABLE IF EXISTS users;

 CREATE DATABASE IF NOT EXISTS dbrdvmedecins CHARACTER SET utf8mb4 COLLATE utf8mb4_unicode_ci;
 USE dbrdvmedecins;

 CREATE TABLE doctors (
   id         INT AUTO_INCREMENT PRIMARY KEY,
   version    INT NOT NULL DEFAULT 0,
   title      VARCHAR(5)  NOT NULL,
   last_name  VARCHAR(20) NOT NULL,
   first_name VARCHAR(20) NOT NULL
 );

 CREATE TABLE clients (
   id         INT AUTO_INCREMENT PRIMARY KEY,
   version    INT NOT NULL DEFAULT 0,
   title      VARCHAR(5)  NOT NULL,
   last_name  VARCHAR(20) NOT NULL,
   first_name VARCHAR(20) NOT NULL
 );

 CREATE TABLE slots (
   id           INT AUTO_INCREMENT PRIMARY KEY,
   version      INT NOT NULL DEFAULT 0,
   doctor_id    INT NOT NULL,
   start_hour   INT NOT NULL,
   start_minute INT NOT NULL,
   end_hour     INT NOT NULL,
   end_minute   INT NOT NULL,
   CONSTRAINT fk_slots_doctor FOREIGN KEY (doctor_id) REFERENCES doctors(id)
 );

 CREATE TABLE appointments (
   id         INT AUTO_INCREMENT PRIMARY KEY,
   version    INT NOT NULL DEFAULT 0,
   day        DATE NOT NULL,
   slot_id    INT NOT NULL,
   client_id  INT NOT NULL,
   CONSTRAINT fk_appointments_slot   FOREIGN KEY (slot_id)   REFERENCES slots(id),
   CONSTRAINT fk_appointments_client FOREIGN KEY (client_id) REFERENCES clients(id),
   CONSTRAINT unq1_appointments UNIQUE (day, slot_id)
 );

 CREATE TABLE users (
   id       INT AUTO_INCREMENT PRIMARY KEY,
   version  INT NOT NULL DEFAULT 0,
   login    VARCHAR(30) NOT NULL UNIQUE,
   password VARCHAR(100) NOT NULL,
   name     VARCHAR(40) NOT NULL,
   role     VARCHAR(10) NOT NULL
 );

 INSERT INTO doctors (title, last_name, first_name) VALUES
   ('Mme', 'PELISSIER', 'Marie'), ('Mr', 'TATOU', 'Paul'), ('Melle','DUPONT', 'Sophie');

 INSERT INTO clients (title, last_name, first_name) VALUES
   ('Mr', 'MARTIN', 'Jean'), ('Mme', 'DURAND', 'Alice'),
   ('Melle','BISTROU', 'Brigitte'), ('Mr', 'GERMAN', 'Luc');

 INSERT INTO slots (doctor_id, start_hour, start_minute, end_hour, end_minute) VALUES
   (1, 8, 0, 8, 20), (1, 8, 20, 8, 40), /* ... */ (1, 11, 40, 12, 0);

 INSERT INTO slots (doctor_id, start_hour, start_minute, end_hour, end_minute) VALUES
   (2, 14, 0, 14, 20), (2, 14, 20, 14, 40), /* ... */ (2, 17, 40, 18, 0);

 INSERT INTO appointments (day, slot_id, client_id) VALUES (CURDATE(), 2, 3);

 INSERT INTO users (login, password, name, role) VALUES
   ('admin', '$2b$10$YSNBJXXHX9mp13nPZb6YGu8M1jR6uvPwO1s2X73z0QAqBR7TOQjoq', 'Administrator', 'ADMIN'),
   ('user',  '$2b$10$6Cvoion7AgJkpYHw5N0jMuWPf8T90J28En56kWBL9PT0bXt7lwW7.', 'User',          'USER');

我们来评注这段代码:

  • 第 20–24 行:[DROP TABLE IF EXISTS …] ——脚本每次执行时都从空数据库开始,按依赖关系的相反顺序删除(从引用 `[slots]` 和 `clients` 的 `appointments` 开始,一直到没有任何表引用的 `users`):[MySQL] 会拒绝删除仍被外键引用的表;
  • 第 48 行:[doctor_id INT NOT NULL],然后是第 53 行:[CONSTRAINT fk_slots_doctor FOREIGN KEY …] ——一个时间段总是属于某位医生;
  • 第 64 行:[CONSTRAINT unq1_appointments UNIQUE (day, slot_id)] ——应用的核心业务规则:同一天的同一个时间段只能被预约一次。防止重复预约的正是这个约束,而且只有这个约束——验证器和业务层都不会显式地再次检查它(见下文 addAppointment);
  • 第 67–74 行:[CREATE TABLE users (…)] ——本步骤新增的表。`login` 是 UNIQUE 的(两个用户不能共用同一个登录名);`password` 存放使用 bcrypt 哈希后的 密码(绝不存明文);role 为 'ADMIN' 或 'USER'——一个简单的文本列,而原始文档使用三张表(users、roles、users_roles)以允许每个用户拥有多个角色。由于本应用只需要两个互斥的角色,原来的多对多关系就显得过度了;
  • 第 91–93 行:[INSERT INTO users …] ——两个演示账户,admin/admin(角色 ADMIN)和 user/user(角色 USER),其密码已用 bcrypt 哈希(10 轮加盐)——绝不存明文,在这个演示脚本中也是如此。

4.2. 分层组织

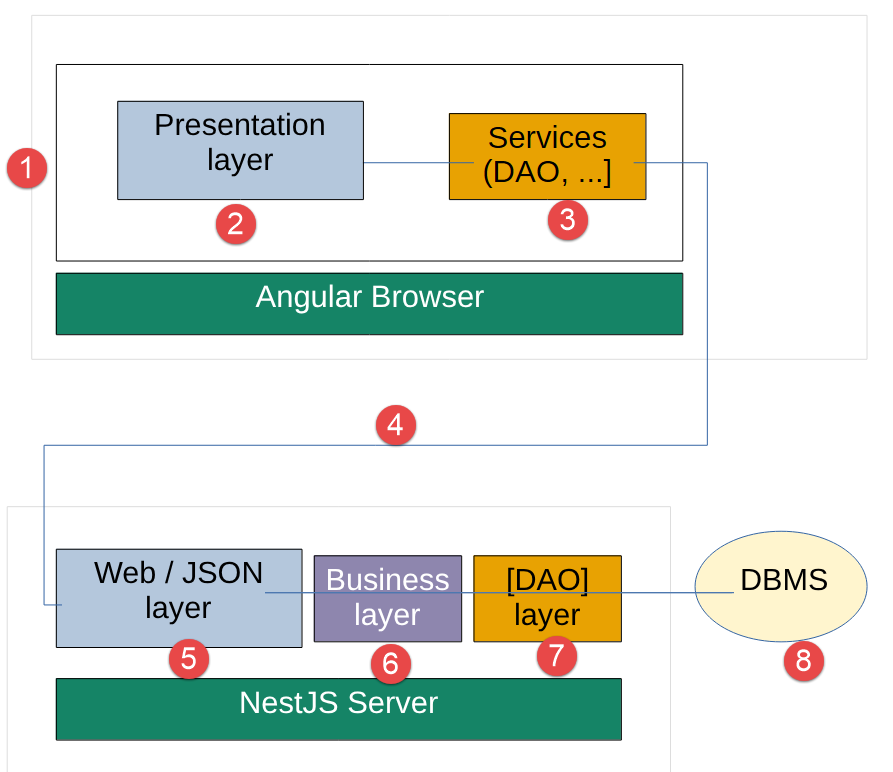
服务器遵循原始项目的分层结构:
Image

每一层只与其紧邻右侧的层通信,[5-8]:因此,例如控制器 [5] 绝不会直接与 [7] 层通信。这与原始 Spring 项目遵循相同的设计原则,使每一层都可以独立于其他层被替换。

4.3. [TypeORM] 实体(src/entities/)

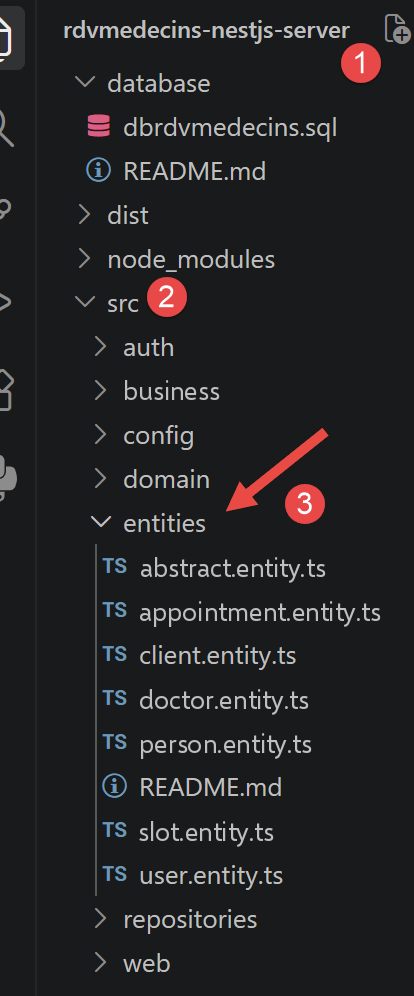
实体 是把数据库表的行表示为 TypeScript 对象的类——直接对应原始项目中的 JPA 实体(包 rdvmedecins.entities)。

4.3.1. src/entities/abstract.entity.ts
Image

1
2
3
4
5
6
7
8
9
  import { [PrimaryGeneratedColumn], [VersionColumn] } from 'typeorm';

  export abstract class AbstractEntity {
    @PrimaryGeneratedColumn()
    id: number;

    @VersionColumn()
    version: number;
  }

我们来评注这段代码:

  • 第 4 行:[@PrimaryGeneratedColumn()] ——通过 DBMS 声明一个自增主键——完全等同于 JPA 中的 @Id + @GeneratedValue(strategy = GenerationType.AUTO);
  • 第 7 行:[@VersionColumn()] ——[TypeORM] 原生的 乐观锁机制:[TypeORM] 在每次修改时自动递增该列,如果您试图保存一个版本与数据库中不一致的实体(说明其间有人修改过它),就会抛出错误——完全等同于 JPA/Hibernate 中的 @Version;
  • 第 3 行:[export abstract class AbstractEntity {] ——这个类 没有 被 [@Entity] 装饰:它本身不对应任何表。[TypeORM] 将这种技术称为“具体表继承”:每个被 [@Entity] 装饰的子类都有自己的表,包含所有继承的列——完全等同于 JPA 中的 @MappedSuperclass。

4.3.2. src/entities/person.entity.ts

  import { [Column] } from 'typeorm';
  import { AbstractEntity } from './abstract.entity';

  export abstract class Person extends AbstractEntity {
    @Column({ length: 5 })
    title: string;

    @Column({ name: 'last_name', length: 20 })
    lastName: string;

   @Column({ name: 'first_name', length: 20 })
   firstName: string;
 }

我们来评注这段代码:

  • 第 4 行:[export abstract class Person extends AbstractEntity {] ——归并医生和患者共有的字段(称谓、姓、名),同时继承 id/version([AbstractEntity])。与其父类一样,它不被 [@Entity] 装饰:它是原始项目中 [Personne] 类的 [TypeORM] 对应物——后者同样是 @MappedSuperclass;
  • 第 5、8、11 行:[@Column({ length: N })] / [@Column({ name: '...', length: N })]——三个长度有限的文本列(后两个被显式映射到 snake_case 的列 last_name 和 first_name), 等同于 JPA 中的 [@Column](length = N) private String ...。

4.3.3. src/entities/doctor.entity.ts

1
2
3
4
5
6
7
8
9
  import { [Entity], [OneToMany] } from 'typeorm';
  import { Person } from './person.entity';
  import { Slot } from './slot.entity';

  @Entity({ name: 'doctors' })
  export class Doctor extends Person {
    @OneToMany(() => Slot, (slot) => slot.doctor)
    slots: Slot[];
  }

我们来评注这段代码:

  • 第 5 行:[@Entity({ name: 'doctors' })] ——将该类声明为 [TypeORM] 实体,存储在表 [doctors] 中——完全等同于 JPA 中的 [@Entity] + @Table(name = "[doctors]");
  • 第 6 行:[export class Doctor extends Person {] ——继承 title/last name/first name(来自 [Person])和 id/version(来自 [AbstractEntity]),无需重新声明;
  • 第 7 行:[@OneToMany(() => Slot, (slot) => slot.doctor)] ——声明反向关系“一位医生有多个时间段”:这是一个便于导航的功能,原始项目中没有(它只在另一个方向,即 [Creneau] 一侧声明),但用 TypeORM 很容易添加。

4.3.4. src/entities/client.entity.ts

1
2
3
4
5
  import { [Entity] } from 'typeorm';
  import { Person } from './person.entity';

  @Entity({ name: 'clients' })
  export class Client extends Person {}

我们来评注这段代码:

  • 第 4–5 行:[@Entity({ name: 'clients' }) export class Client extends Person {}] ——与 [Doctor] 的原理完全相同,没有额外的关系:一个表 [clients],带有从 Person 继承的同样三列。词汇提醒:这里的 [Client] 指医疗诊所的 患者 (原始业务领域的词汇),不要与“HTTP 客户端”混淆。

4.3.5. src/entities/slot.entity.ts

  import { [Column], [Entity], [JoinColumn], [ManyToOne], [RelationId] } from 'typeorm';
  import { AbstractEntity } from './abstract.entity';
  import { Doctor } from './doctor.entity';

  @Entity({ name: 'slots' })
  export class Slot extends AbstractEntity {
    @Column({ name: 'start_hour' }) startHour: number;
    @Column({ name: 'start_minute' }) startMinute: number;
    @Column({ name: 'end_hour' }) endHour: number;
   @Column({ name: 'end_minute' }) endMinute: number;

   @ManyToOne(() => Doctor, (doctor) => doctor.slots)
   @JoinColumn({ name: 'doctor_id' })
   doctor: Doctor;

   @RelationId((slot: Slot) => slot.doctor)
   doctorId: number;
 }

我们来剖析这段代码:

  • 第 7–10 行:[@Column({ name: 'start_hour' }) startHour: number; …] — 预约时间段的四个时间边界(开始和结束的小时/分钟),四个单独的整数,每个都被显式映射到其 snake_case 列(start_hour、start_minute、end_hour、end_minute);
  • 第 12 行:[@ManyToOne(() => Doctor, (doctor) => doctor.slots)] ——多个时间段属于同一位医生。默认情况下,[TypeORM] 在读取时间段时 不会 加载“doctor”关系(默认的“懒”行为):您必须显式请求它(在查询中使用 relations 选项:[...])——正如在 JPA 一侧,FetchType.LAZY 要求在 JPQL 查询中显式使用 `left join fetch` 才能获取医生一样;
  • 第 13 行:[@JoinColumn({ name: 'doctor_id' })] ——指定表 [slots] 中外键列的名称;
  • 第 16 行:[@RelationId((slot: Slot) => slot.doctor)] ——在 [TypeORM] 一侧,完全对应且符合惯用法地替代了原始项目中的只读字段 idMedecin([@Column](name = "id_medecin", insertable = false, updatable = false)):它直接公开外键的值,而无需加载整个 [Doctor] 实体——这对于构建轻量级的 JSON 响应很有用(见下文 Web 层)。

注意:[@RelationId] 字段是一个 虚拟列,由 [TypeORM] 事后计算——它不是真正的 SQL 列,不能用在“查询构建器”的 WHERE 子句中(见下文 [SlotRepository])。它仅用于在实体加载之后 获取 外键的值。

4.3.6. src/entities/appointment.entity.ts

  import { [Column], [Entity], [JoinColumn], [ManyToOne], [RelationId], [Unique] } from 'typeorm';
  import { AbstractEntity } from './abstract.entity';
  import { Client } from './client.entity';
  import { Slot } from './slot.entity';

  @Entity({ name: 'appointments' })
  @Unique('unq1_appointments', ['day', 'slot'])
  export class Appointment extends AbstractEntity {
    @Column({ type: 'date' })
   day: string;

   @ManyToOne(() => Client)
   @JoinColumn({ name: 'client_id' })
   client: Client;

   @ManyToOne(() => Slot)
   @JoinColumn({ name: 'slot_id' })
   slot: Slot;

   @RelationId((appointment: Appointment) => appointment.client)
   clientId: number;

   @RelationId((appointment: Appointment) => appointment.slot)
   slotId: number;
 }

我们来评注这段代码:

  • 第 7 行:[@Unique('unq1_appointments', ['day', 'slot'])] ——在 [TypeORM] 一侧引用数据库脚本中的 SQL 约束。注意:这里引用的是 关系 的名称(“slot”),而不是 [@RelationId] 字段(“slotId”)——后者是虚拟列,[TypeORM] 不接受它出现在 @Unique 约束中。[TypeORM] 自己会把 'slot' 映射到其实际的外键列(slot_id);
  • 第 9 行:[@Column({ type: 'date' })] ——类型为 'date'(而不是 'datetime'):只保留日期,不保留时间——完全如同 JPA 一侧指定的 TemporalType.DATE;
  • 第 12–18 行:[@ManyToOne(...) / @JoinColumn(...)] ——两个关系,分别指向 [Client] 和 [Slot],原理与 [slot.entity.ts] 相同;
  • 第 20–24 行:[@RelationId(...)] ——相当于原始项目中 idClient/idCreneau 字段的只读版本(机制与 Slot.doctorId 相同,见上文)。

4.3.7. src/entities/user.entity.ts

  import { [Column], [Entity] } from 'typeorm';
  import { AbstractEntity } from './abstract.entity';

  export type Role = 'ADMIN' | 'USER';

  @Entity({ name: 'users' })
  export class User extends AbstractEntity {
    @Column()
    login: string;

   @Column()
   password: string;

   @Column()
   name: string;

   @Column()
   role: Role;
 }

我们来评注这段代码:

  • 第 4 行:[export type Role = ‘ADMIN’ | ‘USER’;] ——两个字符串的简单联合,TypeScript:应用管理的仅有的两个角色。这个类型在其他所有处理角色的地方都会复用(roles.decorator.ts、jwt.strategy.ts、[Angular] 客户端……);
  • 第 6 行:[@Entity({ name: 'users' })] ——与其他实体一样,对应一张专用的表;
  • 第 11 行:[password: string;] ——存放 哈希后的 (bcrypt)密码,绝不存明文——见 auth.service.ts;
  • 第 17 行:[role: Role;] ——一个单独的列,而不是原始 Spring 项目中的多对多关系(users/roles/users_roles)。本应用只识别两个互斥的角色(用户要么是 ADMIN,要么是 USER,绝不会两者兼有):重建原有的关系只会增加复杂度,而没有任何实际好处。这是出于教学目的有意做的简化,就像本章前面遇到的枚举 `[ResponseStatus]` 一样。

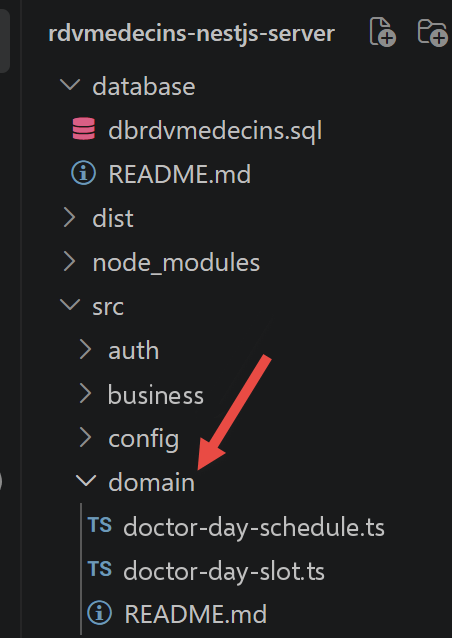
4.4. 业务对象(src/domain/)
Image

这些类不对应任何数据库表:它们是通过组合多个实体即时构造出来的,用来表示应用中有用的某个概念(“Pelissier 医生 2026 年 9 月 13 日的日程”),但无需原样存储。相当于原始项目中同样的“domain”子文件夹(或包)。

4.4.1. src/domain/doctor-day-slot.ts

1
2
3
4
5
6
7
8
9
  import { [Slot] } from '[../entities/slot.entity]';
  import { Appointment } from '../entities/appointment.entity';

  export class DoctorDaySlot {
    constructor(
      public slot: Slot,
      public appointment: Appointment | null, // 如果该时间段当天空闲,则为 null
    ) {}
  }

我们来剖析这段代码:

  • 第 4 行:[export class DoctorDaySlot {] ——把一个时间段与某一天在该时间段内可能安排的预约关联起来;
  • 第 5–8 行:[constructor(public slot: Slot, public appointment: Appointment | null) {}] ——在构造函数参数中直接使用 [public] 语法是 TypeScript 的一种简写:它在每行中同时声明并初始化这两个属性,而无需另外写 [this.slot = slot]。当时间段空闲时,[appointment] 为 null。

4.4.2. src/domain/doctor-day-schedule.ts

  import { [Doctor] } from '[../entities/doctor.entity]';
  import { DoctorDaySlot } from './doctor-day-slot';

  export class DoctorDaySchedule {
    constructor(
      public doctor: Doctor,
      public day: string, // 格式 "yyyy-MM-dd"
      public doctorDaySlots: DoctorDaySlot[],
    ) {}
 }

我们来评注这段代码:

  • 第 4 行:[export class DoctorDaySchedule {] ——某位医生在某一天的完整日程:相关的医生、日期,以及其时间段列表(每个时间段标记为空闲或已预约;见上文 [DoctorDaySlot]);
  • 第 8 行:[public doctorDaySlots: DoctorDaySlot[],] ——由 [BusinessService.getDoctorDaySchedule] 计算(见下文);控制器把这个列表转换为 JSON,供 Angular 客户端使用。

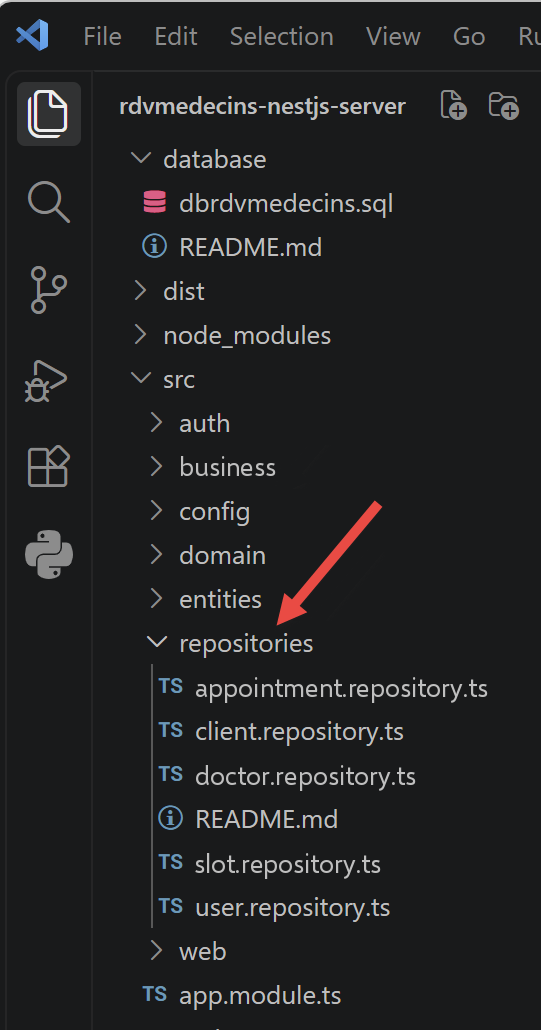
4.5. DAO 层(src/repositories/)

DAO 层(数据访问对象)是项目中唯一直接与 TypeORM/MySQL 通信的部分——相当于原始项目中的 Spring Data 接口(包 rdvmedecins.repositories)。
Image

理解 Spring Data 与 [TypeORM] 之间最重要的区别:使用 Spring Data 时,您只需 声明一个接口 (extends CrudRepository<...>)就能自动获得基本方法(findAll、findOne、save、delete……)——Spring 自己会在启动时生成实现它的类。而使用 [TypeORM] 时,不会根据接口自动生成实现:我们直接注入 [TypeORM] 提供的泛型 Repository<Entity>(通过 [@InjectRepository]),然后自己编写想要公开的方法,或基于该 Repository 预定义的方法,或使用 查询构建器 来完成更特定的查询。

4.5.1. src/repositories/doctor.repository.ts

  import { Injectable } from '@nestjs/common';
  import { InjectRepository } from '@nestjs/typeorm';
  import { Repository } from 'typeorm';
  import { Doctor } from '../entities/doctor.entity';

  @Injectable()
  export class DoctorRepository {
    constructor(
      @InjectRepository(Doctor)
     private readonly repository: Repository<Doctor>,
   ) {}

   findAll(): Promise<Doctor[]> {
     return this.repository.find();
   }

   findById(id: number): Promise<Doctor | null> {
     return this.repository.findOneBy({ id });
   }
 }

我们来解释这段代码:

  • 第 9 行:[@InjectRepository(Doctor)] ——要求 [NestJS] 自动提供由 [TypeORM] 为 Doctor 实体生成的 Repository<[Doctor]>。这相当于自动注入(@Autowired)由 Spring Data 生成的实现;
  • 第 14 行:[return this.repository.find();] ——相当于从 CrudRepository 继承而来的 medecinRepository.findAll();
  • 第 18 行:[return this.repository.findOneBy({ id });] ——相当于 medecinRepository.findOne(id);如果没有医生具有该 ID,则返回 null(与 Spring Data 中的 findOne 一样,而不是抛出异常)。

4.5.2. src/repositories/client.repository.ts

import { Injectable } from '@nestjs/common';
import { InjectRepository } from '@nestjs/typeorm';
import { Repository } from 'typeorm';
import { Client } from '../entities/client.entity';

@Injectable()
export class ClientRepository {
  constructor(
    @InjectRepository(Client)
    private readonly repository: Repository<Client>,
  ) {}

  findAll(): Promise<Client[]> {
    return this.repository.find();
  }

  findById(id: number): Promise<Client | null> {
    return this.repository.findOneBy({ id });
  }
}

该文件在原理上与 [DoctorRepository] 完全相同(见上文的说明),只是应用于实体 [Client](患者)。

4.5.3. src/repositories/slot.repository.ts

  import { Injectable } from '@nestjs/common';
  import { InjectRepository } from '@nestjs/typeorm';
  import { Repository } from 'typeorm';
  import { Slot } from '../entities/slot.entity';

  @Injectable()
  export class SlotRepository {
    constructor(
      @InjectRepository(Slot)
     private readonly repository: Repository<Slot>,
   ) {}

   findAll(): Promise<Slot[]> {
     return this.repository.find();
   }

   findById(id: number): Promise<Slot | null> {
     return this.repository.findOneBy({ id });
   }

   getAllSlots(doctorId: number): Promise<Slot[]> {
     return this.repository
       .createQueryBuilder('s')
       .where('s.doctor = :doctorId', { doctorId })
       .orderBy('s.startHour', 'ASC')
       .addOrderBy('s.startMinute', 'ASC')
       .getMany();
   }
 }

我们来解释这段代码:

  • 第 13–19 行:[findAll() / findById(id)] ——与 [DoctorRepository] 中已经看到的原理相同;
  • 第 21 行:[getAllSlots(doctorId: number): Promise<Slot[]> {] ——一个“自定义”查询,相当于原始的 JPQL 查询 select c from [Creneau] c where c.medecin.[id]=?1;
  • 第 23 行:[.createQueryBuilder(‘s’)] ——SQL 别名命名为 s,就像在 JPQL 中 [Creneau] 命名为 c 一样;
  • 第 24 行:[.where(‘s.doctor = :doctorId’, { doctorId })] ——这里我们比较的是关系本身(s.doctor),而不是 [@RelationId] 字段(s.doctorId):如前所述(slot.entity.ts),后者不是可用于 WHERE 的列。通过将关系与一个数字进行比较,[TypeORM] 能够识别出针对的是其外键,并生成正确的 SQL,而无需联接;
  • 第 25–26 行:[.orderBy(‘s.startHour’, ‘ASC’).addOrderBy(‘s.startMinute’, ‘ASC’)] ——按时间先后顺序对时间段排序,这是一个有用的补充,在原始的 Spring 版本中并没有明确存在。

4.5.4. src/repositories/appointment.repository.ts

  import { Injectable } from '@nestjs/common';
  import { InjectRepository } from '@nestjs/typeorm';
  import { Repository } from 'typeorm';
  import { Appointment } from '../entities/appointment.entity';

  @Injectable()
  export class AppointmentRepository {
    constructor(
      @InjectRepository(Appointment)
     private readonly repository: Repository<Appointment>,
   ) {}

   findById(id: number): Promise<Appointment | null> {
     return this.repository.findOne({
       where: { id },
       relations: ['client', 'slot'],
     });
   }

   save(appointment: Appointment): Promise<Appointment> {
     return this.repository.save(appointment);
   }

   async deleteById(id: number): Promise<void> {
     await this.repository.delete(id);
   }

   getDoctorDayAppointments(doctorId: number, day: string): Promise<Appointment[]> {
     return this.repository
       .createQueryBuilder('appointment')
       .leftJoinAndSelect('appointment.client', 'client')
       .leftJoinAndSelect('appointment.slot', 'slot')
       .where('slot.doctor = :doctorId', { doctorId })
       .andWhere('appointment.day = :day', { day })
       .getMany();
   }
 }

我们来解释这段代码:

  • 第 13–18 行:[findById(id) { … relations: [‘client’, ‘slot’] }] ——relationships: [...] 明确指示 [TypeORM] 同时加载关联的客户和时间段(提醒:这些关系默认是“懒加载”模式;见 slot.entity.ts)——这对于构造响应 JSON 很有用(见下文的 getMapForAppointment);
  • 第 21 行:[return this.repository.save(appointment);] ——相当于 rvRepository.save(new Rv(jour, client, creneau));
  • 第 25 行:[await this.repository.delete(id);] ——相当于 rvRepository.delete(rv.getId());
  • 第 28 行:[getDoctorDayAppointments(doctorId: number, day: string): Promise<Appointment[]> {] ——相当于原始的 JPQL 查询:select rv from Rv rv left join fetch rv.client c left join fetch rv.creneau cr where cr.medecin.[id]=?1 and rv.[jour]=?2;
  • 第 31–32 行:[.leftJoinAndSelect(‘appointment.client’, ‘client’) / .leftJoinAndSelect(‘appointment.slot’, ‘slot’)] ——相当于原始 JPQL 中的 LEFT JOIN FETCH:通过一次 SQL 查询,取回与每个预约相关联的客户和时间段;
  • 第 33 行:[.where(‘slot.doctor = :doctorId’, { doctorId })] ——针对医生的条件,通过时间段的联接获得(JPQL 中的 rv.creneau.medecin.[id]=?1)——同样,我们比较的是“医生”关系,而不是对应的 [@RelationId] 字段。

4.5.5. src/repositories/user.repository.ts

  import { Injectable } from '@nestjs/common';
  import { InjectRepository } from '@nestjs/typeorm';
  import { Repository } from 'typeorm';
  import { User } from '../entities/user.entity';

  @Injectable()
  export class UserRepository {
    constructor(
      @InjectRepository(User)
     private readonly repository: Repository<User>,
   ) {}

   findByLogin(login: string): Promise<User | null> {
     return this.repository.findOneBy({ login });
   }
 }

我们来解释这段代码:

  • 第 13 行:[findByLogin(login: string): Promise<User | null> {] ——这里唯一需要的查询方法,用于登录(见 auth.service.ts):它取代了原始项目中跨三张表按角色进行的查询,由于简化为单一的 [role] 列(见 user.entity.ts),这种查询已不再必要。

4.6. 业务层(src/business/)

应用程序的业务规则就位于这里,且只位于这里——相当于原始项目中的 rdvmedecins.metier 包。

4.6.1. src/business/business.interface.ts

  import { Client } from '../entities/client.entity';
  import { Slot } from '../entities/slot.entity';
  import { Doctor } from '../entities/doctor.entity';
  import { Appointment } from '../entities/appointment.entity';
  import { DoctorDaySchedule } from '../domain/doctor-day-schedule';

  export interface IBusiness {
    getAllClients(): Promise<Client[]>;
    getAllDoctors(): Promise<Doctor[]>;
   getAllSlots(doctorId: number): Promise<Slot[]>;
   getDoctorDayAppointments(doctorId: number, day: string): Promise<Appointment[]>;
   getClientById(id: number): Promise<Client | null>;
   getDoctorById(id: number): Promise<Doctor | null>;
   getAppointmentById(id: number): Promise<Appointment | null>;
   getSlotById(id: number): Promise<Slot | null>;
   addAppointment(day: string, slot: Slot, client: Client): Promise<Appointment>;
   deleteAppointment(appointment: Appointment): Promise<void>;
   getDoctorDaySchedule(doctorId: number, day: string): Promise<DoctorDaySchedule | null>;
 }

 export const BUSINESS_TOKEN = 'IBusiness';

我们来解释这段代码:

  • 第 7 行:[export interface IBusiness {] ——业务层的契约,独立于其实现——完全等同于原始项目中的 Java 接口 [IMetier];
  • 第 8–18 行:十一个方法,分别对应应用程序的每一项需求(列表、按 ID 查询、添加/删除预约、计算日程表);
  • 第 21 行:[export const BUSINESS_TOKEN = ‘IBusiness’;] ——我们定义了一个注入“令牌”(InjectionToken),以便能够将该接口注入到控制器中,这与 Spring 在不知道具体实现类 [Metier] 的情况下注入业务引用 [IMetier] 完全一样。在 TypeScript 中,接口在编译时会被消除:因此它们不能直接用作注入令牌([NestJS]);这种变通方法是必需的(见其在 app.module.ts 和 application-model.service.ts 中的使用)。

4.6.2. src/business/business.service.ts

  import { Injectable } from '@nestjs/common';
  import { IBusiness } from './business.interface';
  import { DoctorRepository } from '../repositories/doctor.repository';
  import { ClientRepository } from '../repositories/client.repository';
  import { SlotRepository } from '../repositories/slot.repository';
  import { AppointmentRepository } from '../repositories/appointment.repository';
  // ……导入的实体和业务对象(见上文)

  @Injectable()
 export class BusinessService implements IBusiness {
   constructor(
     private readonly doctorRepository: DoctorRepository,
     private readonly clientRepository: ClientRepository,
     private readonly slotRepository: SlotRepository,
     private readonly appointmentRepository: AppointmentRepository,
   ) {}

   getAllClients(): Promise<Client[]> { return this.clientRepository.findAll(); }
   getAllDoctors(): Promise<Doctor[]> { return this.doctorRepository.findAll(); }
   getAllSlots(doctorId: number): Promise<Slot[]> {
     return this.slotRepository.getAllSlots(doctorId);
   }
   // ……另外 5 个简单的委托方法(原理相同)

   addAppointment(day: string, slot: Slot, client: Client): Promise<Appointment> {
     const appointment = new Appointment();
     appointment.day = day;
     appointment.slot = slot;
     appointment.client = client;
     return this.appointmentRepository.save(appointment);
   }

   async deleteAppointment(appointment: Appointment): Promise<void> {
     await this.appointmentRepository.deleteById(appointment.id);
   }

   async getDoctorDaySchedule(doctorId: number, day: string): Promise<DoctorDaySchedule | null> {
     const doctor = await this.getDoctorById(doctorId);
     if (doctor === null) {
       return null;
     }
     const timeSlots = await this.getAllSlots(doctorId);
     const bookings = await this.getDoctorDayAppointments(doctorId, day);

     const hBookings = new Map<number, Appointment>();
     for (const booking of bookings) {
       hBookings.set(booking.slotId, booking);
     }

     const doctorDaySlots = timeSlots.map((slot) => {
       const appointment = hBookings.get(slot.id) ?? null;
       return new DoctorDaySlot(slot, appointment);
     });

     return new DoctorDaySchedule(doctor, day, doctorDaySlots);
   }
 }

我们来解释这段代码:

  • 第 10 行:[export class BusinessService implements IBusiness {] ——[@Injectable]() 相当于 @Service("business"):该类成为一个“提供者”([NestJS]),[NestJS] 可以在需要的地方构造并注入它;
  • 第 11–16 行:[constructor(private readonly doctorRepository: …, …) {}] ——注入四个 DAO,相当于原始项目中的四个 @Autowired 字段。[NestJS] 在这里选择构造函数注入,而不是字段注入(如 @Autowired 对 Java 字段所做的那样):这是 TypeScript 中推荐的做法;它使依赖关系显式化,并便于测试;
  • 第 18–23 行:大多数方法只是简单地委托给 DAO 层——没有自定义的业务逻辑;
  • 第 25–31 行:[addAppointment(…) { const appointment = new Appointment(); … }]——创建一个新的 Appointment 实体并保存它;防止重复预订的正是 SQL 约束 unq1_appointments(见上文的数据库脚本),而且仅靠它——这里不执行任何显式检查;重复的尝试会触发一个 SQL 异常,由 DAO 层向上传播;
  • 第 37 行:[async getDoctorDaySchedule(doctorId: number, day: string): Promise<DoctorDaySchedule | null> {] ——业务层中唯一执行真正业务逻辑的方法(其他方法只是委托):它计算某位医生在给定日期的完整日程。该算法与原始文档中的完全一致,分为三个步骤;
  • 第 42 行:[const timeSlots = await this.getAllSlots(doctorId);] ——1. 取回该医生所有可用的时间段;
  • 第 43 行:[const bookings = await this.getDoctorDayAppointments(doctorId, day);] ——2. 取回该医生在所请求日期的所有预约;
  • 第 45–48 行:[const hBookings = new Map<number, Appointment>(); …] ——这些预约存储在以时间段 ID 为索引的字典中,以便在下一步中快速取回——相当于原始代码中的 `Map<Long, Rv> hReservations`;
  • 第 50–53 行:[const doctorDaySlots = timeSlots.map((slot) => { … })] ——3. 对于每个时间段,我们检查它是否与找到的某个预订相匹配:如果是,则该时间段“已占用”(我们将找到的预约与之关联);否则为“空闲”(appointment = null)。

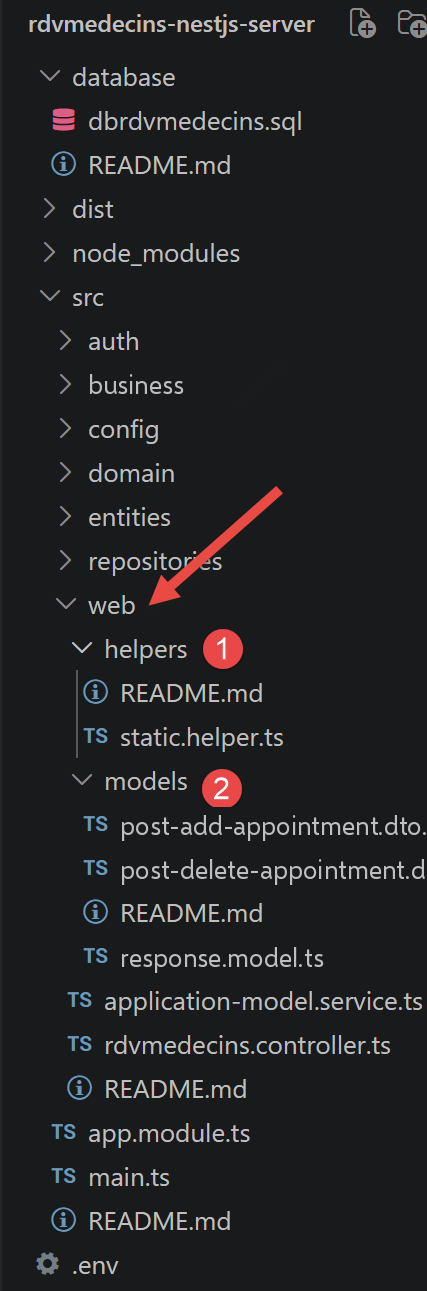
4.7. Web 层(src/web/)

这是应用程序的 HTTP 入口点——相当于原始项目中的 [rdvmedecins.web] 包。
Image

4.7.1. src/web/models/response.model.ts

  export enum ResponseStatus {
    OK = 0,
    RESOURCE_NOT_FOUND = 1,
    INVALID_DATE = 2,
    SERVER_ERROR = 3,
  }

  export class ServerResponse<T = unknown> {
    status: ResponseStatus;
   data: T | null;

   constructor(status: ResponseStatus, data: T | null) {
     this.status = status;
     this.data = data;
   }

   static ok<T>(data: T): ServerResponse<T> {
     return new ServerResponse<T>(ResponseStatus.OK, data);
   }

   static error<T = unknown>(status: ResponseStatus, data: T | null = null): ServerResponse<T> {
     return new ServerResponse<T>(status, data);
   }
 }

我们来解释这段代码:

  • 第 1–6 行:[export enum ResponseStatus { … }] ——原始的 Spring 项目使用“临时的”数字(0、1、2、3、4……),其含义因控制器方法而异。此次移植借机将所有可能的代码合并为单一的枚举,这样更易于学习和维护:客户端可观察到的行为(0 = 成功,其他任何值 = 失败)保持完全不变;
  • 第 8 行:[export class ServerResponse<T = unknown> {] ——Web 服务所有JSON 响应的通用包装:{ "status": 0, "data": ... }。与原版相比的新特性:得益于 TypeScript,该类是泛型([ServerResponse]<T>),因此数据类型在编译时就是已知的(例如 [ServerResponse]<[Doctor][]>)——原始项目的 Java 语言使用 `Object` 类型无法如此轻松地做到这一点;
  • 第 17–19 行:[static ok<T>(data: T): ServerResponse<T> {] ——一个小型静态“工厂”方法,使控制器代码更易读(ServerResponse.ok([doctors]) 而不是 new [ServerResponse](ResponseStatus.OK, [doctors]));
  • 第 21–23 行:[static error<T = unknown>(status: ResponseStatus, data: T | null = null): ServerResponse<T> {] ——它对应用于错误响应的方法。

4.7.2. src/web/models/post-add-appointment.dto.ts

  import { IsDateString, IsInt } from 'class-validator';

  export class PostAddAppointmentDto {
    @IsDateString()
    day: string;

    @IsInt()
    clientId: number;

   @IsInt()
   slotId: number;
 }

我们来解释这段代码:

  • 第 3 行:[export class PostAddAppointmentDto {] ——描述 /addAppointment 路由所期望的 JSON 请求体格式({ day, clientId, slotId })——一个“DTO”(数据传输对象),其唯一目的是描述所交换数据的格式的类,不包含任何逻辑;
  • 第 4 行:[@IsDateString()] ——验证接收到的字符串确实是 ISO 格式的有效日期。如果不是,[NestJS] 会自动返回 HTTP 400 错误(Bad [Request])在执行控制器之前——这要归功于在 [main.ts] 中声明的全局 [ValidationPipe](见下文);
  • 第 7、10 行:[@IsInt()] ——检查接收到的值确实是整数。这些装饰器与 [ValidationPipe] 结合使用,相当于 Spring MVC 通过 @RequestBody 执行的自动类型转换在 [NestJS] 中的对应实现。

4.7.3. src/web/models/post-delete-appointment.dto.ts

1
2
3
4
5
6
import { IsInt } from 'class-validator';

export class PostDeleteAppointmentDto {
  @IsInt()
  appointmentId: number;
}

原理与上面的 [PostAddAppointmentDto] 相同,用于 /deleteAppointment 所期望的 JSON 请求体({ appointmentId })。

4.7.4. src/web/helpers/static.helper.ts

  import { Slot } from '../../entities/slot.entity';
  import { Appointment } from '../../entities/appointment.entity';

  export function getErrorsForException(exception: unknown): string[] {
    const errors: string[] = [];
    let cause: unknown = exception;
    while (cause instanceof Error) {
      errors.push(cause.message);
      cause = cause.cause;
   }
   if (errors.length === 0) {
     errors.push(String(exception));
   }
   return errors;
 }

 export interface SlotJson {
   id: number; startHour: number; startMinute: number; endHour: number; endMinute: number;
 }

 export function getMapForSlot(slot: Slot | null | undefined): SlotJson | null {
   if (!slot) { return null; }
   return {
     id: slot.id, startHour: slot.startHour, startMinute: slot.startMinute,
     endHour: slot.endHour, endMinute: slot.endMinute,
   };
 }

 export function getListMapForSlots(slots: Slot[]): SlotJson[] {
   return slots.map((slot) => getMapForSlot(slot) as SlotJson);
 }

 export interface AppointmentJson {
   id: number;
   day: string;
   client: { id: number; title: string; lastName: string; firstName: string } | null;
   slot: SlotJson | null;
 }

 export function getMapForAppointment(appointment: Appointment | null | undefined): AppointmentJson | null {
   if (!appointment) { return null; }
   return {
     id: appointment.id,
     day: appointment.day,
     client: appointment.client
       ? { id: appointment.client.id, title: appointment.client.title, lastName: appointment.client.lastName, firstName: appointment.client.firstName }
       : null,
     slot: getMapForSlot(appointment.slot),
   };
 }

 export function getListMapForAppointments(appointments: Appointment[]): AppointmentJson[] {
   return appointments.map((appointment) => getMapForAppointment(appointment) as AppointmentJson);
 }

我们来解释这段代码:

  • 第 4 行:[export function getErrorsForException(exception: unknown): string[] {] ——相当于 Static.getErreursForException (Exception exception)。Java 可以链接异常(exception.getCause())来解释异常发生的“原因”;在现代 JavaScript/TypeScript(ES2022)中,错误同样具有原因链,通过 `cause` 属性实现;
  • 第 6–10 行:[while (cause instanceof Error) { … cause = cause.cause; }] ——其处理方式与原始 Java 代码相同,即把遇到的每条消息依次堆叠起来;
  • 第 17–19 行:[export interface SlotJson { … }] ——实体 [Slot]不会以原样作为 JSON 返回:它包含一个指向“医生”的关系,如果被加载,就会重复客户端已经知道的信息(客户端已经知道所指的是哪位医生;见 URL 中的 {doctorId} 参数)。因此我们构造一个“自定义”对象,只包含显示所需的字段;
  • 第 21 行:[export function getMapForSlot(slot: Slot | null | undefined): SlotJson | null {] ——相当于 Static.getMapForCreneau([Creneau] 时间段):将实体转换为轻量级的 JSON 对象;
  • 第 29 行:[export function getListMapForSlots(slots: Slot[]): SlotJson[] {] ——它对应用于整个列表的方法(相当于 Static.getListMapForCreneaux);
  • 第 33–38、40–50、52–54 行:[AppointmentJson / getMapForAppointment / getListMapForAppointments] ——原理相同,应用于预约:内嵌的客户(appointment.client)同样被精简为仅包含显示所需的字段。

4.7.5. src/web/application-model.service.ts

  import { Inject, Injectable, OnModuleInit } from '@nestjs/common';
  import { IBusiness, BUSINESS_TOKEN } from '../business/business.interface';
  // ……实体、DoctorDaySchedule、getErrorsForException(见上文)

  @Injectable()
  export class ApplicationModelService implements IBusiness, OnModuleInit {
    private doctors: Doctor[] = [];
    private clients: Client[] = [];
    private messages: string[] | null = null;

   constructor(@Inject(BUSINESS_TOKEN) private readonly business: IBusiness) {}

   async onModuleInit(): Promise<void> {
     try {
       this.doctors = await this.business.getAllDoctors();
       this.clients = await this.business.getAllClients();
     } catch (ex) {
       this.messages = getErrorsForException(ex);
     }
   }

   getMessages(): string[] | null {
     return this.messages;
   }

   async getAllClients(): Promise<Client[]> { return this.clients; }
   async getAllDoctors(): Promise<Doctor[]> { return this.doctors; }

   getAllSlots(doctorId: number): Promise<Slot[]> {
     return this.business.getAllSlots(doctorId);
   }
   // ……另外 6 个方法,简单地委托给 this.business
 }

我们来解释这段代码:

  • 第 6 行:[export class ApplicationModelService implements IBusiness, OnModuleInit {] ——相当于原始项目中的 ApplicationModel 类:一个在服务器启动时构建一次的缓存,将医生和客户的列表存储在内存中(这些列表很短且很少变化,因此无需在每次请求时都去查询数据库)。与原版一样,该类有两个作用:一方面是缓存,另一方面是从控制器到业务层的唯一入口点——如果将来更改缓存策略,只需修改这一个文件;
  • 第 11 行:[constructor(@Inject(BUSINESS_TOKEN) private readonly business: IBusiness) {}]——这里我们注入的是接口 [IBusiness](通过令牌 [BUSINESS_TOKEN],见 app.module.ts),而不是具体类 [BusinessService]——这与原始 Java 代码写 `@Autowired private [IMetier] métier;` 而从不提及 `Metier` 类完全一样;
  • 第 13 行:[async onModuleInit(): Promise<void> {] ——[OnModuleInit] 是 [NestJS] 的“生命周期”接口,其作用与 Spring 中的 @PostConstruct 完全相同:在该类的所有依赖项注入完毕后,[NestJS] 会立即自动调用 onModuleInit();
  • 第 17–18 行:[catch (ex) { this.messages = getErrorsForException(ex); }]——如果启动时数据库不可用,错误会被捕获并存储在 `messages` 中,而不是导致服务器崩溃——这与原始项目的行为完全一致;
  • 第 26 行:[async getAllClients(): Promise<Client[]> { return this.clients; }] ——医生和客户的列表来自缓存;其余所有内容(第 29 行及之后)都只是委托给业务层。

4.7.6. src/web/rdvmedecins.controller.ts

RdvMedecinsController 声明了应用程序的十一个路由,这些路由有意与原始文档中的路由保持一致,只是翻译成了英文(用 /getAllDoctors 对应 /getAllMedecins,用 /addAppointment 对应 /ajouterRv……)而不是按 REST 风格“现代化”(/doctors、/clients/:id……)——本文档的目的是比较两种实现,而不是使 API 现代化。

  import { Body, Controller, Get, Param, Post, UseGuards } from '@nestjs/common';
  import { ApplicationModelService } from './application-model.service';
  import { ServerResponse, ResponseStatus } from './models/response.model';
  import { PostAddAppointmentDto } from './models/post-add-appointment.dto';
  import { PostDeleteAppointmentDto } from './models/post-delete-appointment.dto';
  import { getErrorsForException, getListMapForSlots, getListMapForAppointments, getMapForAppointment } from './helpers/static.helper';
  // ……实体
  import { JwtAuthGuard } from '../auth/jwt-auth.guard';
  import { RolesGuard } from '../auth/roles.guard';
 import { Roles } from '../auth/roles.decorator';

 @UseGuards(JwtAuthGuard)
 @Controller()
 export class RdvMedecinsController {
   constructor(private readonly application: ApplicationModelService) {}

   @Get('getAllDoctors')
   async getAllDoctors(): Promise<ServerResponse<Doctor[]>> {
     const messages = this.application.getMessages();
     if (messages !== null) {
       return new ServerResponse(ResponseStatus.SERVER_ERROR, messages as unknown as Doctor[]);
     }
     try {
       return ServerResponse.ok(await this.application.getAllDoctors());
     } catch (e) {
       return ServerResponse.error(ResponseStatus.SERVER_ERROR, getErrorsForException(e) as unknown as Doctor[]);
     }
   }

   // ……getAllClients:原理相同,针对 Client

   @Get('getAllSlots/:doctorId')
   async getAllSlots(@Param('doctorId') doctorId: string) {
     const id = Number(doctorId);
     const doctor = await this.application.getDoctorById(id);
     if (doctor === null) {
       return ServerResponse.error(ResponseStatus.RESOURCE_NOT_FOUND);
     }
     try {
       const slots = await this.application.getAllSlots(doctor.id);
       return ServerResponse.ok(getListMapForSlots(slots));
     } catch (e) {
       return ServerResponse.error(ResponseStatus.SERVER_ERROR, getErrorsForException(e));
     }
   }

   // ……getDoctorAppointmentsOfDay/:doctorId/:day:检查 isValidDate(day),然后原理相同

   @Get('getDoctorScheduleOfDay/:doctorId/:day')
   async getDoctorScheduleOfDay(@Param('doctorId') doctorId: string, @Param('day') day: string) {
     if (!isValidDate(day)) {
       return ServerResponse.error(ResponseStatus.INVALID_DATE);
     }
     try {
       const schedule = await this.application.getDoctorDaySchedule(Number(doctorId), day);
       if (schedule === null) {
         return ServerResponse.error(ResponseStatus.RESOURCE_NOT_FOUND);
       }
       return ServerResponse.ok({
         doctor: schedule.doctor,
         day: schedule.day,
         slots: schedule.doctorDaySlots.map((s) => ({
           slot: { id: s.slot.id, startHour: s.slot.startHour, startMinute: s.slot.startMinute, endHour: s.slot.endHour, endMinute: s.slot.endMinute },
           appointment: getMapForAppointment(s.appointment),
         })),
       });
     } catch (e) {
       return ServerResponse.error(ResponseStatus.SERVER_ERROR, getErrorsForException(e));
     }
   }

   // ……getDoctorById/:id、getClientById/:id、getSlotById/:id、getAppointmentById/:id:
   // 四个相似的方法,按 id 查找一个实体,否则返回 RESOURCE_NOT_FOUND

   @UseGuards(RolesGuard)
   @Roles('ADMIN')
   @Post('addAppointment')
   async addAppointment(@Body() post: PostAddAppointmentDto) {
     const client = await this.application.getClientById(post.clientId);
     if (client === null) {
       return ServerResponse.error(ResponseStatus.RESOURCE_NOT_FOUND);
     }
     const slot = await this.application.getSlotById(post.slotId);
     if (slot === null) {
       return ServerResponse.error(ResponseStatus.RESOURCE_NOT_FOUND);
     }
     try {
       const appointment = await this.application.addAppointment(post.day, slot, client);
       return ServerResponse.ok(getMapForAppointment(appointment));
     } catch (e) {
       return ServerResponse.error(ResponseStatus.SERVER_ERROR, getErrorsForException(e));
     }
   }

   @UseGuards(RolesGuard)
   @Roles('ADMIN')
   @Post('deleteAppointment')
   async deleteAppointment(@Body() post: PostDeleteAppointmentDto) {
     const appointment = await this.application.getAppointmentById(post.appointmentId);
    if (appointment === null) {
      return ServerResponse.error(ResponseStatus.RESOURCE_NOT_FOUND);
    }
    try {
      await this.application.deleteAppointment(appointment);
      return ServerResponse.ok(null);
    } catch (e) {
      return ServerResponse.error(ResponseStatus.SERVER_ERROR, getErrorsForException(e));
    }
  }
 }

 function isValidDate(day: string): boolean {
   if (!/^\d{4}-\d{2}-\d{2}$/.test(day)) {
     return false;
   }
   const date = new Date(`${day}T00:00:00Z`);
   return date.toISOString().slice(0, 10) === day;
 }

我们来解释这段代码:

  • 第 12 行:[@UseGuards(JwtAuthGuard)] ——应用于类,一次性保护该控制器的全部十一个路由:没有有效的 JWT 令牌,任何路由都无法访问(见下文“身份验证”一章)。这相当于原始 Spring Security 规则 .antMatchers("/**").hasRole("ADMIN"),不同之处在于,这里只要求已通过身份验证(任何角色)——对 ADMIN 角色的限制仅适用于两个修改数据的路由(第 75–76 行和第 95–96 行);
  • 第 13 行:[@Controller()] ——没有前缀:因此路由恰好就是 /getAllDoctors、/getAllClients 等。这相当于 Spring 中的 @RestController:方法返回的每个值都会被自动序列化为 JSON;
  • 第 15 行:[constructor(private readonly application: ApplicationModelService) {}] ——缓存/外观的注入,相当于 @Autowired private ApplicationModel application;;
  • 第 19–22 行:[const messages = this.application.getMessages(); if (messages !== null) { … }] ——首先,我们验证应用程序已正确初始化(见 ApplicationModelService.onModuleInit),相当于 `if (messages != null) { return new [Reponse](-1, messages); }`;
  • 第 33 行:[async getAllSlots(@Param('doctorId') doctorId: string) {] —— [@Param]('doctorId') 以字符串形式取回 URL 中的 {doctorId} 段(类似于 Spring 中的 @PathVariable(String));我们自己将其转换为数字(第 34 行),而 Spring 会对声明为 `long` 的参数自动完成这一转换;
  • 第 35–38 行:[const doctor = await this.application.getDoctorById(id); if (doctor === null) { … }] ——我们首先取回医生,以验证其存在,然后再继续往下处理(相当于原始控制器中的私有方法 getMedecin(id));
  • 第 41 行:[return ServerResponse.ok(getListMapForSlots(slots));] ——将实体 [Slot] 的列表转换为“轻量级”JavaScript 对象的列表(见 static.helper.ts);
  • 第 59 行:[return ServerResponse.ok({ doctor: …, day: …, slots: … });] ——日程表以“轻量”模式格式化为 JSON,遵循与 getMapForSlot/getMapForAppointment 相同的原则;
  • 第 75 行:[@UseGuards(RolesGuard)],然后是第 76 行:[@Roles('ADMIN')] ——除了需要通过身份验证(类上的 [@UseGuards]([JwtAuthGuard])已经要求这一点)之外,这里还必须具有 ADMIN 角色——USER 角色会收到 403 Forbidden 响应(见 roles.guard.ts)。[RolesGuard] 读取 request.user(由 JwtAuthGuard/JwtStrategy 提交):因此它必须在[JwtAuthGuard] 之后运行([NestJS] 先应用类守卫,再按出现的顺序应用方法守卫);
  • 第 87–92 行:[try { const appointment = await this.application.addAppointment(…); … } catch (e) { … }] ——此时,class-validator(见 [PostAddAppointmentDto])已经验证 post.[day] 是有效日期,且 post.clientId/post.slotId 确实是整数。SQL 约束 unq1_appointments (day, slot_id) 防止在同一天为同一时间段进行两次预订:重复的尝试会抛出异常,在这里被捕获,这与原始 JDBC 驱动程序抛出的 SQLException 完全一样;
  • 第 95 行:与第 75 行的限制相同,针对 deleteAppointment:只有 ADMIN 角色才能取消预约;
  • 第 112 行:[function isValidDate(day: string): boolean {] ——一个小型本地工具函数,相当于原始代码中的 SimpleDateFormat("yyyy-MM-dd") + setLenient(false) 组合,它会拒绝例如“2026-13-40”(月份和日期无效):Date.toISOString() 根据接收到的字符串重建日期——如果结果与输入不同,就说明该日期不存在。

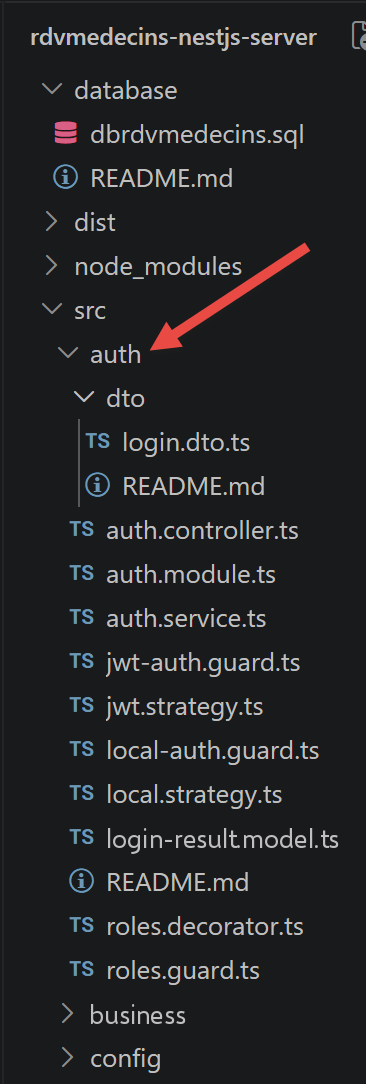
4.8. 身份验证(src/auth/)
Image

本节记录在课程这一阶段新增的基于令牌的身份验证(JWT)和基于角色的访问控制(ADMIN/USER)——它在功能上等同于原始文档中的 Spring Security 层,使用 [NestJS] 生态系统的标准工具重写:[@nestjs/passport] 和 @nestjs/jwt。

与原始项目的两处有意差异,在此一次性说明:

  1. 使用 JWT 而不是 HTTP Basic。原始的 Spring 项目在每个请求中都发送 Authorization: Basic <login:password in Base64> 头:因此密码(经过编码,而非加密)在每次调用时都会通过网络传输。此次移植改用令牌:JWT (JSON Web Token)。密码仅在登录时提交一次(POST /login);服务器随后返回一个签名令牌,客户端在之后的每个请求中都携带该令牌(Authorization: Bearer <token> 头)。这是此类 API 当前的通行做法,正如上一章的结论中已经提到的那样。
  2. 每个用户一个角色,仅占数据库中的一列,而不是原始项目中的多对多关系(users/roles/users_roles)——见上文的 user.entity.ts。

在阅读后面的代码之前需要理解的一个架构要点:当守卫拒绝一个请求(401 Unauthorized、403 Forbidden)时,响应绝不会经过常规的 [ServerResponse]<T> 封装({ status, data }):[NestJS] 直接以其原生 JSON 格式响应,即 { statusCode, message, error }。这是一个深思熟虑的选择:安全错误由守卫在进入控制器之前处理,而 [ServerResponse]<T> 则是由控制器针对业务错误(资源未找到、日期无效等)生成的。因此,[Angular] 客户端必须区分这两种类型的错误响应(见下一章的 auth.interceptor.ts)。

4.8.1. src/auth/dto/login.dto.ts

import { IsNotEmpty, IsString } from 'class-validator';

export class LoginDto {
  @IsString()
  @IsNotEmpty()
  login: string;

  @IsString()
  @IsNotEmpty()
  password: string;
}

我们来解释这段代码:

  • 第 3 行:[export class LoginDto {] ——描述 POST /login 所期望的 JSON 请求体格式({ login, password }),使用与 src/web/models 中已遇到的 DTO 相同的机制;
  • 第 4–5、8–9 行:[@IsString() @IsNotEmpty()] ——验证这两个字段都是非空字符串。

该 DTO 在这里纯粹起说明作用:实际从请求体中读取 {login, password} 的是 [LocalStrategy](见下文),而不是控制器的 @Body 参数——尽管如此,[LoginDto] 为读者描述了该路由所期望的确切格式。

4.8.2. src/auth/login-result.model.ts

1
2
3
4
5
6
7
8
  import { Role } from '../entities/user.entity';

  export interface LoginResult {
    accessToken: string;
    login: string;
    name: string;
    role: Role;
  }

我们来解释这段代码:

  • 第 3 行:[export interface LoginResult {] ——POST /login 成功时返回的数据格式,位于标准的 [ServerResponse]<T> 封装中:{ "status": 0, "data": { accessToken, login, name, role } };
  • 第 4 行:[accessToken: string;] ——JWT 令牌,需包含在之后的每个请求中;
  • 第 7 行:[role: Role;] ——已登录用户的角色,以便 [Angular] 客户端可以调整其界面(见下一章,对 USER 角色隐藏“Book”/“Cancel”按钮)。

4.8.3. src/auth/local.strategy.ts

Passport 的“策略”描述如何对请求进行身份验证。[LocalStrategy] 可以从 POST 请求的请求体中读取一对 {login, password},并将验证委托给 AuthService。它只使用一次,即由路由 POST /login 使用(通过 [LocalAuthGuard]):之后所有其他受保护的路由都将使用 [JwtStrategy](见下文),而不是它。

  import { Injectable, UnauthorizedException } from '@nestjs/common';
  import { PassportStrategy } from '@nestjs/passport';
  import { Strategy } from 'passport-local';
  import { AuthService } from './auth.service';
  import { User } from '../entities/user.entity';

  @Injectable()
  export class LocalStrategy extends PassportStrategy(Strategy) {
    constructor(private readonly authService: AuthService) {
     super({ usernameField: 'login', passwordField: 'password' });
   }

   async validate(login: string, password: string): Promise<User> {
     const user = await this.authService.validateUser(login, password);
     if (user === null) {
       throw new UnauthorizedException('incorrect login or password');
     }
     return user;
   }
 }

我们来剖析这段代码:

  • 第 8 行:[export class LocalStrategy extends PassportStrategy(Strategy) {] ——在概念上相当于原始 Spring Security 项目中的 AppUserDetailsService 类:“给定凭据,告诉我这个用户是谁”;
  • 第 10 行:[super({ usernameField: ‘login’, passwordField: ‘password’ });] ——默认情况下,passport-local 期望请求体中的字段名为“username”和“password”;我们在这里对它们重命名,以匹配我们的 DTO([LoginDto]),它使用的是“login”而不是“username”;
  • 第 13 行:[async validate(login: string, password: string): Promise<User> {] ——由 Passport 使用从请求中提取的两个字段自动调用。它的返回值会成为控制器中的 request.user(见 auth.controller.ts);
  • 第 16 行:[throw new UnauthorizedException(‘incorrect login or password’);] ——Passport 会自动将此异常转换为 HTTP 401 Unauthorized 响应,在请求甚至到达控制器之前。

4.8.4. src/auth/jwt.strategy.ts

第二个 Passport 策略:它可以从每个请求的 HTTP Authorization: Bearer <token> 头中读取 JWT 令牌,验证其签名,并提取用户的身份——全程无需查询数据库(令牌中已经包含所需的一切)。这就是保护 RdvMedecinsController 的十一个路由的机制。

  import { Injectable } from '@nestjs/common';
  import { PassportStrategy } from '@nestjs/passport';
  import { ExtractJwt, Strategy } from 'passport-jwt';

  export interface JwtPayload {
    sub: number;
    login: string;
    role: 'ADMIN' | 'USER';
  }

 export interface ConnectedUser {
   userId: number;
   login: string;
   role: 'ADMIN' | 'USER';
 }

 @Injectable()
 export class JwtStrategy extends PassportStrategy(Strategy, 'jwt') {
   constructor() {
     super({
       jwtFromRequest: ExtractJwt.fromAuthHeaderAsBearerToken(),
       ignoreExpiration: false,
       secretOrKey: process.env.JWT_SECRET ?? 'dev-secret-to-change-in-production',
     });
   }

   validate(payload: JwtPayload): ConnectedUser {
     return { userId: payload.sub, login: payload.login, role: payload.role };
   }
 }

我们来解释这段代码:

  • 第 5–9 行:[export interface JwtPayload { sub: number; login: string; role: … }] ——我们选择在生成 JWT 令牌时存储在令牌中的信息的格式(见 auth.service.ts);sub(“subject”,主题)是 JWT 中约定俗成的字段名,用于存放用户的标识符;
  • 第 11–15 行:[export interface ConnectedUser { … }] ——令牌验证通过后,request.user 在控制器中将包含的内容;
  • 第 18 行:[export class JwtStrategy extends PassportStrategy(Strategy, ‘jwt’) {] ——第二个参数 'jwt' 为该策略命名(与未指定名称的 [LocalStrategy] 不同):[JwtAuthGuard]([AuthGuard]('jwt'),见下文)正是通过这个名称来表示“使用这个策略”;
  • 第 21 行:[jwtFromRequest: ExtractJwt.fromAuthHeaderAsBearerToken(),] ——令牌应位于 Authorization: Bearer xxx 头中;
  • 第 22 行:[ignoreExpiration: false,] ——如果令牌已过期,Passport 会在调用 validate() 之前就拒绝它(401);
  • 第 23 行:[secretOrKey: process.env.JWT_SECRET ?? ‘…’] ——用于验证令牌签名的密钥——与用于签名的密钥相同(见 auth.module.ts,它从同一个环境变量 JWT_SECRET 中读取);
  • 第 27 行:[validate(payload: JwtPayload): ConnectedUser {] ——在令牌签名验证通过后由 Passport 自动调用;将令牌的内容转换为 request.user。

4.8.5. src/auth/local-auth.guard.ts

1
2
3
4
5
import { Injectable } from '@nestjs/common';
import { AuthGuard } from '@nestjs/passport';

@Injectable()
export class LocalAuthGuard extends AuthGuard('local') {}

我们来解释这段代码:

  • 第 5 行:[export class LocalAuthGuard extends AuthGuard(‘local’) {}] ——[NestJS] 的“守卫”(Guard)在控制器方法执行之前,判断请求是否有权访问该方法。[AuthGuard]('local') 是 [@nestjs/passport] 提供的一个工厂,它基于名为 'local' 的 Passport 策略构造守卫(隐含指的是 [LocalStrategy],它在自己的构造函数中没有被赋予显式名称)。该守卫仅由路由 POST /login 使用(见 auth.controller.ts)。

4.8.6. src/auth/jwt-auth.guard.ts

1
2
3
4
5
import { Injectable } from '@nestjs/common';
import { AuthGuard } from '@nestjs/passport';

@Injectable()
export class JwtAuthGuard extends AuthGuard('jwt') {}

我们来解释这段代码:

  • 第 5 行:[export class JwtAuthGuard extends AuthGuard(‘jwt’) {}] ——保护 RdvMedecinsController 十一个路由的守卫:它要求提供有效的 JWT 令牌(“jwt”指的是 [JwtStrategy];见上文)。如果没有令牌,或者令牌无效或已过期,[NestJS] 会自动返回 401 Unauthorized 错误——甚至在到达控制器之前。

4.8.7. src/auth/roles.decorator.ts

1
2
3
4
5
import { SetMetadata } from '@nestjs/common';
import { Role } from '../entities/user.entity';

export const ROLES_KEY = 'roles';
export const Roles = (...roles: Role[]) => SetMetadata(ROLES_KEY, roles);

我们来解释这段代码:

  • 第 5 行:[export const Roles = (…roles: Role[]) => SetMetadata(ROLES_KEY, roles);] ——[@Roles]('ADMIN') 是一个自定义装饰器(由我们自己编写,不同于由 [NestJS] 提供的 @Get、@Post 和 @Injectable):它只是把元数据(“此方法需要某某角色”)附加到它所装饰的方法上,自身并不执行任何检查——真正读取该元数据并执行检查的是 [RolesGuard](见下文)。[SetMetadata](key, value) 是 [NestJS] 的底层函数,可让你编写这类“自己的”装饰器。

4.8.8. src/auth/roles.guard.ts

第二级验证,紧随[JwtAuthGuard] 之后:后者只验证用户已正确通过身份验证(有效的 JWT 令牌);[RolesGuard] 还会进一步验证已登录用户的角色是否在目标方法上由 @Roles 所要求的角色之中。

  import { CanActivate, ExecutionContext, ForbiddenException, Injectable } from '@nestjs/common';
  import { Reflector } from '@nestjs/core';
  import { ROLES_KEY } from './roles.decorator';
  import { Role } from '../entities/user.entity';
  import { ConnectedUser } from './jwt.strategy';

  @Injectable()
  export class RolesGuard implements CanActivate {
    constructor(private readonly reflector: Reflector) {}

   canActivate(context: ExecutionContext): boolean {
     const requiredRoles = this.reflector.getAllAndOverride<Role[]>(ROLES_KEY, [
       context.getHandler(),
       context.getClass(),
     ]);

     if (!requiredRoles || requiredRoles.length === 0) {
       return true;
     }

     const request = context.switchToHttp().getRequest<{ user: ConnectedUser }>();
     const user = request.user;

     if (!requiredRoles.includes(user.role)) {
       throw new ForbiddenException(
         `role [${user.role}] does not allow this action (required role: ${requiredRoles.join(', ')})`,
       );
     }
     return true;
   }
 }

我们来解释这段代码:

  • 第 8 行:[export class RolesGuard implements CanActivate {] ——在概念上相当于 Spring Security 规则 http.authorizeRequests().antMatchers(...).hasRole("ADMIN"),但这里是逐个方法应用,而不是逐个 URL 应用,这得益于装饰器 ([@Roles]) 与 [Reflector](可重新读取由装饰器设置的元数据)的搭配;
  • 第 12 行:[const requiredRoles = this.reflector.getAllAndOverride<Role[]>(ROLES_KEY, […])] ——读回由 [@Roles](...) 在目标方法上设置的元数据——getAllAndOverride 先搜索方法(第 13 行),再搜索类(第 14 行);
  • 第 17–19 行:[if (!requiredRoles || requiredRoles.length === 0) { return true; }] ——此方法没有 [@Roles](...) 元数据:没有额外的角色限制(而 [JwtAuthGuard] 则已经要求了有效的身份验证,无论角色如何);
  • 第 21 行:[const request = context.switchToHttp().getRequest<{ user: ConnectedUser }>();] ——request.user 由 JwtStrategy.validate() 提交:因此 [RolesGuard] 总是在 [JwtAuthGuard] 之后执行(见它们在 [@UseGuards](...) 中的顺序,rdvmedecins.controller.ts);
  • 第 24–28 行:[if (!requiredRoles.includes(user.role)) { throw new ForbiddenException(…); }] ——如果已登录用户的角色不在所要求的角色之中,就会抛出 403 Forbidden 异常,并附带一条消息,说明收到的角色和期望的角色。

4.8.9. src/auth/auth.service.ts

该服务处理所有身份验证逻辑:验证用户名/密码对,并在用户通过验证后生成发回客户端的 JWT 令牌。

  import { Injectable } from '@nestjs/common';
  import { JwtService } from '@nestjs/jwt';
  import * as bcrypt from 'bcryptjs';
  import { UserRepository } from '../repositories/user.repository';
  import { User } from '../entities/user.entity';
  import { LoginResult } from './login-result.model';
  import { JwtPayload } from './jwt.strategy';

  @Injectable()
 export class AuthService {
   constructor(
     private readonly userRepository: UserRepository,
     private readonly jwtService: JwtService,
   ) {}

   async validateUser(login: string, password: string): Promise<User | null> {
     const user = await this.userRepository.findByLogin(login);
     if (user === null) {
       return null;
     }
     const passwordCorrect = await bcrypt.compare(password, user.password);
     return passwordCorrect ? user : null;
   }

   login(user: User): LoginResult {
     const payload: JwtPayload = { sub: user.id, login: user.login, role: user.role };
     return {
       accessToken: this.jwtService.sign(payload),
       login: user.login,
       name: user.name,
       role: user.role,
     };
   }
 }

我们来解释这段代码:

  • 第 10 行:[export class AuthService {] ——在概念上相当于原始 Spring Security 项目中的 AppUserDetailsService 类,这里再加上了令牌的生成;
  • 第 16 行:[async validateUser(login: string, password: string): Promise<User | null> {] ——验证存在具有此登录名的用户,并且所提供的密码与之匹配;如果一切正确则返回该用户,否则返回 null;
  • 第 21 行:[const passwordCorrect = await bcrypt.compare(password, user.password);] ——bcrypt.compare() 使用与 user.[password] 中存储的相同的盐值对密码进行哈希,然后比较两个结果——存储的密码从不会被解密(哈希是不可逆的);
  • 第 25 行:[login(user: User): LoginResult {] ——为已通过身份验证的用户生成 JWT 令牌(在 LocalAuthGuard/LocalStrategy 成功完成后,由 [AuthController] 调用);
  • 第 28 行:[accessToken: this.jwtService.sign(payload),] ——jwtService.sign() 使用在 auth.module.ts(JwtModule.register)中配置的密钥和过期时间对载荷进行签名。

4.8.10. src/auth/auth.controller.ts

只有一个路由:POST /login。这是整个应用程序中唯一不要求已有 JWT 令牌的路由(因为它恰恰就是签发令牌的路由)。

  import { Controller, Post, Request, UseGuards } from '@nestjs/common';
  import { LocalAuthGuard } from './local-auth.guard';
  import { AuthService } from './auth.service';
  import { ServerResponse } from '../web/models/response.model';
  import { LoginResult } from './login-result.model';
  import { User } from '../entities/user.entity';

  @Controller()
  export class AuthController {
   constructor(private readonly authService: AuthService) {}

   @UseGuards(LocalAuthGuard)
   @Post('login')
   login(@Request() req: { user: User }): ServerResponse<LoginResult> {
     return ServerResponse.ok<LoginResult>(this.authService.login(req.user));
   }
 }

我们来解释这段代码:

  • 第 12 行:[@UseGuards(LocalAuthGuard)] ——将该守卫置于方法之前:它会触发 LocalStrategy.validate(),由后者验证登录名/密码对。如果验证失败,[NestJS] 会在甚至尚未执行此方法的方法体之前就返回 401 Unauthorized 响应;
  • 第 14 行:[login(@Request() req: { user: User }): ServerResponse<LoginResult> {] ——如果执行到这里,说明 [LocalAuthGuard] 已成功:req.user 包含由 LocalStrategy.validate() 返回的用户。请注意这里没有 [@Body]([LoginDto]) 参数:从请求体中读取 {login, password} 的是守卫,而不是此方法;
  • 第 15 行:[return ServerResponse.ok<LoginResult>(this.authService.login(req.user));] ——生成 JWT 令牌并将其包装在标准的 [ServerResponse]<T> 响应中——与守卫产生的 401/403 响应(见上文)不同,成功的登录会经过这个包装。

4.8.11. src/auth/auth.module.ts

该模块处理与身份验证相关的一切。仅由 AppModule 导入一次。

  import { Module } from '@nestjs/common';
  import { JwtModule } from '@nestjs/jwt';
  import { PassportModule } from '@nestjs/passport';
  import { TypeOrmModule } from '@nestjs/typeorm';
  import { User } from '../entities/user.entity';
  import { UserRepository } from '../repositories/user.repository';
  import { AuthService } from './auth.service';
  import { AuthController } from './auth.controller';
  import { LocalStrategy } from './local.strategy';
 import { JwtStrategy } from './jwt.strategy';

 @Module({
   imports: [
     TypeOrmModule.forFeature([User]),
     PassportModule,
     JwtModule.register({
       secret: process.env.JWT_SECRET ?? 'dev-secret-to-change-in-production',
       signOptions: { expiresIn: process.env.JWT_EXPIRES_IN ?? '2h' },
     }),
   ],
   controllers: [AuthController],
   providers: [
     AuthService,
     UserRepository,
     LocalStrategy,
     JwtStrategy,
   ],
 })
 export class AuthModule {}

我们来解释这段代码:

  • 第 14 行:[TypeOrmModule.forFeature([User]),] ——使 Repository<[User]> 可被注入(见 repositories/user.repository.ts);
  • 第 15 行:[PassportModule,] ——将 'jwt' 声明为不带参数的 [AuthGuard]() 的默认策略;我们的守卫仍然显式指定 [AuthGuard]('local')/AuthGuard('jwt'),以保持可读性;
  • 第 16–19 行:[JwtModule.register({ secret: …, signOptions: { expiresIn: … } }),] ——配置令牌的生成和验证:用于签名的密钥(JWT_SECRET,见 .env)及其有效期(JWT_EXPIRES_IN,例如 "2h");
  • 第 25–26 行:[LocalStrategy, JwtStrategy,] ——分别向 Passport 注册 'local' 策略和 'jwt' 策略;如果没有在 `providers` 中进行这一声明,[NestJS] 将无法构造这两个类。

4.9. 配置与启动

4.9.1. package.json

{
  "name": "rdvmedecins-nestjs-server",
  "version": "1.0.0",
  "description": "NestJS server of the medical appointment booking application [RdvMedecins] - port of the original Spring 4 / Spring Data server",
  "private": true,
  "license": "UNLICENSED",
  "scripts": {
    "build": "nest build",
    "start": "nest start",
    "start:dev": "nest start --watch",
    "start:debug": "nest start --debug --watch",
    "start:prod": "node dist/main"
  },
  "dependencies": {
    "@nestjs/common": "^10.4.0",
    "@nestjs/core": "^10.4.0",
    "@nestjs/jwt": "^10.2.0",
    "@nestjs/passport": "^10.0.3",
    "@nestjs/platform-express": "^10.4.0",
    "@nestjs/typeorm": "^10.0.2",
    "bcryptjs": "^3.0.3",
    "class-transformer": "^0.5.1",
    "class-validator": "^0.14.1",
    "dotenv": "^17.4.2",
    "mysql2": "^3.11.0",
    "passport-jwt": "^4.0.1",
    "passport-local": "^1.0.0",
    "reflect-metadata": "^0.2.2",
    "rxjs": "^7.8.1",
    "typeorm": "^0.3.20"
  },
  "devDependencies": {
    "@nestjs/cli": "^10.4.5",
    "@types/bcryptjs": "^2.4.6",
    "@types/node": "^20.14.0",
    "@types/passport-jwt": "^4.0.1",
    "@types/passport-local": "^1.0.38",
    "typescript": "^5.5.0"
  }
}

我们来解释这段代码:

  • 第 7–13 行:[“scripts”: { … }] ——可用的 `npm run <name>` 命令。start:dev(本文档全程使用)会在任何 .ts 文件被修改时自动重新编译并重启服务器([NestJS] CLI 的 --watch 选项,相当于 Spring Boot 的 devtools)。start:prod 直接启动预先编译好的 JavaScript(dist/main.js),无需经过 CLI,也无需重新编译——这是生产环境中会使用的模式;
  • 第 14–31 行:[“dependencies”: { … }]——运行服务器所需的包。其中包含 [NestJS] 的核心([@nestjs/common]、[@nestjs/core]、[@nestjs/platform-express])、[TypeORM] 的集成包([@nestjs/typeorm]、typeorm、mysql2——[TypeORM] 使用的 [MySQL] 驱动程序)、DTO 验证(class-validator、class-transformer)、读取 .env 文件(dotenv),以及——由身份验证提供的(见下一章)——[@nestjs/jwt] 和 [@nestjs/passport](Passport.js 的 [NestJS] 集成)、passport-jwt/passport-local(所使用的两个 Passport 策略),以及 bcryptjs(密码哈希);
  • 第 32–39 行:[“devDependencies”: { … }] ——仅在开发期间需要的包(编译、类型检查),永远不会包含在 dist/ 中:[NestJS] CLI 本身([@nestjs/cli])、TypeScript 编译器,以及那些没有原生提供类型定义的 JavaScript 包的类型定义(@types/...)(bcryptjs、passport-jwt、passport-local)。

与 [Angular] 客户端一样(见下一章),[npm install] 会读取这个文件(第 1 章)来确定要将哪些内容下载到 node_modules/ 中——它在 Node/TypeScript 生态系统中的地位相当于原始 Spring 项目中的 pom.xml。

4.9.2. [tsconfig.json]

{
  "compilerOptions": {
    "module": "commonjs",
    "declaration": false,
    "removeComments": true,
    "emitDecoratorMetadata": true,
    "experimentalDecorators": true,
    "allowSyntheticDefaultImports": true,
    "target": "ES2022",
    "lib": ["ES2022"],
    "sourceMap": true,
    "outDir": "./dist",
    "baseUrl": "./",
    "incremental": true,
    "skipLibCheck": true,
    "strictNullChecks": true,
    "noImplicitAny": false,
    "strictBindCallApply": false,
    "forceConsistentCasingInFileNames": true,
    "noFallthroughCasesInSwitch": false
  }
}

我们来解释这段代码:

  • 第 3 行:[“module”: “commonjs”,] ——编译所产生的 JavaScript 模块的格式;对于这类服务器端项目,commonjs(require/module.exports)仍然是 Node.js 所期望的格式,与客户端([Angular])所采用的 ESM 格式(原生 import/export)相对;
  • 第 6–7 行:[“emitDecoratorMetadata”: true, “experimentalDecorators”: true,] ——这两个选项对于 [NestJS](以及 [TypeORM])的运行至关重要:它们启用对装饰器([@Controller]()、[@Injectable]()、[@Entity]() 等)的支持,更重要的是,确保编译器在运行时保留每个构造函数参数的类型——[NestJS] 正是读取这一信息,才能自行判断要注入什么(见第 2 章中关于依赖注入的小节)。没有这两行,构造函数注入就根本无法工作;
  • 第 9 行:[“target”: “ES2022”,]——编译所产生的 JavaScript 版本;本课程使用的 Node.js 版本(20+)广泛支持 ES2022,并允许在源代码中直接使用较新的 JavaScript 特性(类的私有字段 #x、Array.at()……);
  • 第 16 行:[“strictNullChecks”: true,] ——要求显式处理 null/undefined 值(使用 ?、??、if 语句……)——这是 TypeScript 严格模式中的选项之一,这里单独启用,而不是启用完整的严格模式(第 17 行:noImplicitAny 仍设置为 false,限制更宽松):这是出于教学考虑的折中,既保留类型安全的精髓,又不要求为每个变量都添加类型注解。

4.9.3. nest-cli.json

1
2
3
4
5
6
7
8
{
  "$schema": "https://json.schemastore.org/nest-cli",
  "collection": "@nestjs/schematics",
  "sourceRoot": "src",
  "compilerOptions": {
    "deleteOutDir": true
  }
}

我们来解释这段代码:

  • 第 3 行:[“collection”: “@nestjs/schematics”,] ——`nest generate ...` 命令所使用的代码生成器(本文档中未使用,因为所有文件都是手工编写的,但在课程的后续部分可以使用);
  • 第 4 行:[“sourceRoot”: “src”,] ——告诉 [NestJS] CLI 待编译的源代码位于何处——这使它能够得知,例如入口点是 [src/main.ts];
  • 第 6 行:[“deleteOutDir”: true] ——每次编译之前,dist/ 文件夹([tsconfig.json] 中的 outDir 行)都会被完全清空:这可以避免由已被删除的 .ts 文件编译而来的 .js 文件一直残留在 dist/ 中。

该文件是 [NestJS] 生态系统特有的:在 [Angular] 项目中没有与之直接对应的文件(见下一章),不过 angular.json 起着相当类似的作用。

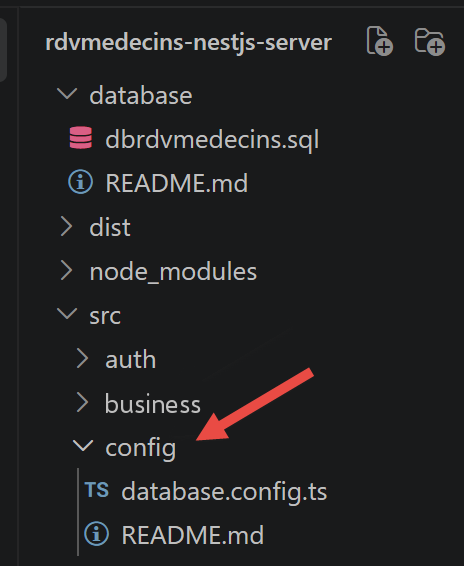
4.9.4. src/config/database.config.ts
Image

  import { TypeOrmModuleOptions } from '@nestjs/typeorm';
  import { Doctor } from '../entities/doctor.entity';
  import { Client } from '../entities/client.entity';
  import { Slot } from '../entities/slot.entity';
  import { Appointment } from '../entities/appointment.entity';
  import { User } from '../entities/user.entity';

  export function getDatabaseConfig(): TypeOrmModuleOptions {
    return {
     type: 'mysql',
     host: process.env.DB_HOST ?? 'localhost',
     port: process.env.DB_PORT ? parseInt(process.env.DB_PORT, 10) : 3306,
     username: process.env.DB_USERNAME ?? 'root',
     password: process.env.DB_PASSWORD ?? '',
     database: process.env.DB_DATABASE ?? 'dbrdvmedecins',
     entities: [Doctor, Client, Slot, Appointment, User],
     synchronize: false,
     logging: process.env.NODE_ENV !== 'production',
   };
 }

我们来解释这段代码:

  • 第 8 行:[export function getDatabaseConfig(): TypeOrmModuleOptions {] ——相当于原始 Spring 项目中的 DomainAndPersitenceConfig 类,该类定义了一个 DataSource(@Bean 块)。这里没有类:只有一个简单的函数,它返回一个配置对象,该对象读取自环境变量(.env 文件;见下文);
  • 第 16 行:[entities: [Doctor, Client, Slot, Appointment, User],] ——[TypeORM] 必须管理的实体列表——相当于 Spring Boot 对 [@Entity] 类执行的自动“扫描”。在实现身份验证时,[User] 被添加到了此列表中:如果遗漏它,启动时会出现“no metadata found for [User]”错误;
  • 第 17 行:[synchronize: false,] ——在本课程中始终使用:如果将 `synchronize` 设置为 `true`,[TypeORM] 会根据实体自动修改数据库架构——这对一次性的原型很有用,但在处理真实数据时很危险(有数据丢失的风险)。我们通过脚本 [database/dbrdvmedecins.sql] 保持对架构的控制;
  • 第 18 行:[logging: process.env.NODE_ENV !== ‘production’,] ——在控制台中显示由 [TypeORM] 生成的 SQL 查询,与原始 Spring 项目中的 Hibernate 日志完全一样。

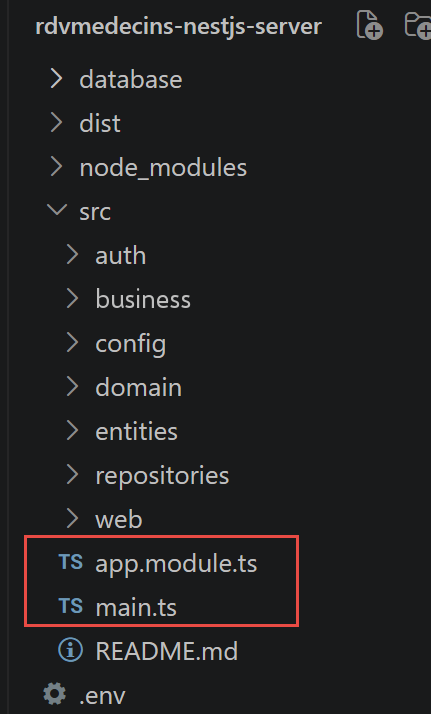
4.9.5. [src/main.ts]
Image

  import 'dotenv/config';
  import 'reflect-metadata';
  import { NestFactory } from '@nestjs/core';
  import { ValidationPipe } from '@nestjs/common';
  import { AppModule } from './app.module';

  async function bootstrap() {
    const app = await NestFactory.create(AppModule);
    app.enableCors();
   app.useGlobalPipes(
     new ValidationPipe({
       transform: true,
       whitelist: true,
     }),
   );
   const port = process.env.PORT ? parseInt(process.env.PORT, 10) : 8080;
   await app.listen(port);
   console.log(`[RdvMedecins] NestJS server started on http://localhost:${port}`);
 }

 bootstrap();

我们来解释这段代码:

  • 第 1 行:[import ‘dotenv/config’;] ——必须是该文件中的第一个导入:它的唯一目的是读取 .env 文件,并在其他任何内容被求值之前,将其内容复制到 process.env 中——具体来说,是在 app.module.ts(在第 5 行导入)之前,因为 app.module.ts 又会加载 database.config.ts 和 auth/auth.module.ts,这两者在被加载时就会立即读取 process.env(DB_HOST、JWT_SECRET……)。如果没有这一行,或者它不在这个特定位置,磁盘上的 .env 文件就毫无用处:当这些模块需要这些变量时,它们在 process.env 中根本不存在;
  • 第 8 行:[const app = await NestFactory.create(AppModule);] ——从根模块构建应用程序——相当于 SpringApplication.run(Boot.class, args);
  • 第 9 行:[app.enableCors();] ——授权 [Angular] 客户端(运行在不同的端口上)调用此服务器。没有它,浏览器出于安全原因会阻止这些请求;
  • 第 10–15 行:[app.useGlobalPipes(new ValidationPipe({ transform: true, whitelist: true }));] ——对每个传入的请求自动验证 JSON 请求体是否符合期望的格式(见用 `class-validator` 装饰的类);`transform: true` 自动转换类型(例如字符串 "3" → 数字 3),而 `whitelist: true` 会从接收到的数据中移除未在 `DTO` 格式中声明的字段;
  • 第 16 行:[const port = process.env.PORT ? parseInt(process.env.PORT, 10) : 8080;] ——默认端口 8080 与原始 Spring Boot 服务器的端口相同。

4.9.6. src/app.module.ts

  import { Module } from '@nestjs/common';
  import { TypeOrmModule } from '@nestjs/typeorm';
  import { getDatabaseConfig } from './config/database.config';
  // ……实体、仓库、BUSINESS_TOKEN/BusinessService、ApplicationModelService、RdvMedecinsController
  import { AuthModule } from './auth/auth.module';

  @Module({
    imports: [
      TypeOrmModule.forRoot(getDatabaseConfig()),
     TypeOrmModule.forFeature([Doctor, Client, Slot, Appointment]),
     AuthModule,
   ],
   controllers: [
     RdvMedecinsController,
   ],
   providers: [
     DoctorRepository,
     ClientRepository,
     SlotRepository,
     AppointmentRepository,
     { provide: BUSINESS_TOKEN, useClass: BusinessService },
     ApplicationModelService,
   ],
 })
 export class AppModule {}

我们来解释这段代码:

  • 第 9 行:[TypeOrmModule.forRoot(getDatabaseConfig()),] ——配置全局数据库连接——相当于原始 Spring 项目中的 @Bean DataSource;
  • 第 10 行:[TypeOrmModule.forFeature([Doctor, Client, Slot, Appointment]),] ——声明在此模块中使用的实体,使其 Repository<T> 可以(通过 [@InjectRepository])注入到 src/repositories/ 中的类里。[User] 没有列在这里:由 [AuthModule](第 11 行)声明它自己的 TypeOrmModule.forFeature([User])(见 auth/auth.module.ts);
  • 第 11 行:[AuthModule,] ——提供它自己的路由(POST /login)和它自己的提供者(Passport 策略、JWT 守卫……)——这是一个完整的 [NestJS] 模块,而不是直接添加到 [AppModule] 中的文件,以使身份验证保持独立,并且易于移除或替换;
  • 第 21 行:[{ provide: BUSINESS_TOKEN, useClass: BusinessService },] ——[BusinessService] 以令牌 [BUSINESS_TOKEN] 注册,这样任何请求 [IBusiness](通过 [@Inject]([BUSINESS_TOKEN]))的类都会收到一个 [BusinessService] 实例——这完全符合 Spring 接口注入的精神(@Autowired [IMetier] business)。

4.9.7. .env.example

  PORT=8080

  DB_HOST=localhost
  DB_PORT=3306
  DB_USERNAME=root
  DB_PASSWORD=
  DB_DATABASE=dbrdvmedecins

  DB_SYNCHRONIZE=false

 JWT_SECRET=change-me-to-a-long-random-string
 JWT_EXPIRES_IN=2h

我们来解释这段代码:

  • 第 1 行:[PORT=8080] ——使用原始 Spring Boot 服务器的端口;
  • 第 11–12 行:[JWT_SECRET=… / JWT_EXPIRES_IN=2h] ——身份验证引入的两个新变量:用于令牌签名的密钥(在生产环境中必须更改——一个很长的随机字符串,切勿提交到版本库)及其有效期。

该文件只是一个示例:将其复制为 .env(切勿提交它,因为它可能包含机密信息),然后根据你的机器调整其中的值。

4.10. 端到端验证

这一步使用大约十个 curl 场景,针对服务器的一份测试副本(内存数据库,预先填充了 admin/admin 和 user/user 两个账户)进行了验证:

  • 使用正确的凭据执行 POST /login,会正确返回 { "status": 0, "data": { "accessToken": "...", "login": "admin", "name": "Administrator", "role": "ADMIN" } };
  • 使用错误的密码执行 POST /login,返回 401 Unauthorized([NestJS] 的原生 JSON 格式,而不是 [ServerResponse]<T> 封装);
  • 不带 Authorization 头执行 GET /getAllDoctors,返回 401 Unauthorized 响应;
  • 使用有效的 JWT 令牌(admin 或 user)执行 GET /getAllDoctors,会在常规的 [ServerResponse]<T> 封装中正常返回医生列表;
  • 使用 admin 令牌执行 POST /addAppointment,会正常预订一个可用的时间段;
  • 使用 user 令牌执行 POST /addAppointment,返回 403 Forbidden 错误,并附带消息说明角色 [USER] 不允许执行此操作(所需角色:ADMIN);
  • POST /deleteAppointment 的行为与 /addAppointment 对称,取决于所出示令牌的角色。