2. Angular 入门
2.1. 示例 01:Angular 应用程序的结构
2.1.1. package.json 文件
文件 [package.json] 位于 examples 文件夹中,声明了所使用的库和项目命令:
| {
"name": "examples-angular",
"version": "1.0.0",
"description": "The small examples of the course [Step-by-step introduction to the Angular framework] - a single installation for all",
"private": true,
"scripts": {
"ng": "ng",
"start": "ng serve",
"build": "ng build"
},
"dependencies": {
"@angular/common": "^22.2.0",
"@angular/compiler": "^22.2.0",
"@angular/core": "^22.2.0",
"@angular/forms": "^22.2.0",
"@angular/platform-browser": "^22.2.0",
"@angular/router": "^22.2.0",
"@ngx-translate/core": "^18.0.0",
"bootstrap": "^5.3.8",
"rxjs": "~7.8.0",
"tslib": "^2.8.0"
},
"devDependencies": {
"@angular/build": "^22.2.0",
"@angular/cli": "^22.2.0",
"@angular/compiler-cli": "^22.2.0",
"typescript": "~6.0.2"
}
}
|
我们来逐部分分析这个文件:
- 第 6–10 行:项目命令,使用 [npm run <name>] (或 [npm start] ,针对命令 [start])来运行:
- [npm start 05-ngmodel] 会启动 [ng serve 05-ngmodel]:示例 05 的开发服务器;
- [npm run build 05-ngmodel] 会启动 [ng build 05-ngmodel]:示例 05 的生产版本,位于 [dist/05-ngmodel/] 文件夹中;
- [npm run ng -- <arguments>] 可访问 [ng] 工具的所有命令;
- 第 11–22 行:应用程序在浏览器中所需的库:[Angular] 包([@angular/core],核心;[@angular/common],通用工具,包括 HTTP 客户端;[@angular/forms],表单;[@angular/router],路由器;[@angular/platform-browser],浏览器初始化;[@angular/compiler],模板编译器;[ngx-translate] 用于语言,[Bootstrap] 用于样式,[RxJS] 用于可观察对象,以及 [tslib],这是一个小型辅助库,供 [TypeScript] 生成的代码使用;
- 第 23–28 行:开发工具:命令行工具 [ng] ([@angular/cli])、[Angular] 编译器([@angular/compiler-cli])、构建工具([@angular/build],它依赖于 [esbuild] 和 [Vite])以及 [TypeScript] 编译器。这些不属于交付给用户的应用程序。
版本前缀 [^] ([^22.2.0])允许 [npm] 安装同一主版本(22.x.y)的更新版本;前缀 [~] ([~6.0.2])只允许修复版本(6.0.x)。所有 [@angular/...] 包必须使用相同的版本。
在标准项目中,此文件由 [ng new project-name] 命令创建,该命令会生成一个完整的、可直接运行的 [Angular] 应用程序。本课程中的示例是手工编写的,以便将二十五个示例放在同一个文件夹中。
2.1.2. angular.json 文件
[angular.json] 描述了 工作区:它包含的应用程序,以及如何构建和提供服务。下面是它的开头部分,描述示例 01:
| {
"$schema": "./node_modules/@angular/cli/lib/config/schema.json",
"version": 1,
"cli": {
"packageManager": "npm",
"analytics": false
},
"projects": {
"01-first-application": {
"projectType": "application",
"root": "01-first-application",
"sourceRoot": "01-first-application/src",
"prefix": "app",
"architect": {
"build": {
"builder": "@angular/build:application",
"options": {
"outputPath": "dist/01-first-application",
"index": "01-first-application/src/index.html",
"browser": "01-first-application/src/main.ts",
"tsConfig": "01-first-application/tsconfig.app.json",
"styles": [
"node_modules/bootstrap/dist/css/bootstrap.min.css"
]
},
"configurations": {
"production": {
"outputHashing": "all"
},
"development": {
"optimization": false,
"extractLicenses": false,
"sourceMap": true
}
},
"defaultConfiguration": "production"
},
"serve": {
"builder": "@angular/build:dev-server",
"options": {
"proxyConfig": "proxy.conf.json"
},
"configurations": {
"production": {
"buildTarget": "01-first-application:build:production"
},
"development": {
"buildTarget": "01-first-application:build:development"
}
},
"defaultConfiguration": "development"
}
}
},
|
- 第 4–7 行:[ng] 工具的设置(包管理器,不收集使用统计数据);
- 第 9 行:项目名称,即传给 [ng serve] 或 [npm start] 的名称;
- 第 11–12 行:项目目录和源代码目录;
- 第 13 行:组件选择器的前缀([app-root]、[app-doctor-card]……);
- 第 15–37 行:应用程序的构建 ([ng build]):
- 第 16 行:构建工具;
- 第 18 行:输出文件夹;
- 第 19–20 行:应用程序的 HTML 页面及其 [TypeScript] 入口点;
- 第 21 行:项目的 [TypeScript] 配置;
- 第 22–24 行:应用程序的全局样式表:这里是 [Bootstrap] 的样式表;
- 第 26–36 行:两种配置:[production](优化后的代码;[outputHashing] 会在每个文件名中包含内容哈希)和 [development] (可读的代码,带有“source maps”,可在浏览器中调试 [TypeScript] )。[ng build] 默认使用第一种(第 36 行);
- 第 38–52 行:开发服务器 ([ng serve]):
- 第 41 行:代理文件,仅从示例 22 开始使用:浏览器发往以 [/api] 开头的地址的任何请求都会转发到 [RdvMedecins] JSON 服务器。我们稍后会再讲到;
- 第 51 行:[ng serve] 使用 [development] 配置构建应用程序。
其余二十四个示例在文件后面以同样的方式描述(总共超过一千行)。由 [ng new] 创建的标准项目只包含一个示例。
2.1.3. tsconfig.json 和 tsconfig.app.json 文件
所有示例共用的 [TypeScript] 配置:
| {
"compilerOptions": {
"strict": true,
"noImplicitOverride": true,
"noPropertyAccessFromIndexSignature": true,
"noImplicitReturns": true,
"noFallthroughCasesInSwitch": true,
"noUnusedLocals": true,
"noUnusedParameters": true,
"skipLibCheck": true,
"isolatedModules": true,
"experimentalDecorators": true,
"importHelpers": true,
"resolveJsonModule": true,
"target": "ES2022",
"module": "preserve"
},
"angularCompilerOptions": {
"strictInjectionParameters": true,
"strictInputAccessModifiers": true,
"strictTemplates": true
},
"include": ["*/src/**/*.ts", "common/**/*.ts"]
}
|
- 第 3 行:[TypeScript] 的严格模式(严格检查类型,包括 [null] 和 [undefined]);
- 第 4–9 行:附加检查;特别是,未使用的变量或参数会被报告为错误;
- 第 12 行:[Angular] 使用 [TypeScript] 的装饰器([@Component]、[@Injectable]……);
- 第 14 行:JSON 文件可以作为模块导入(示例 21);
- 第 15–16 行:现代 [JavaScript] 代码(ES2022)以及由构建工具处理的模块;
- 第 18–22 行:[Angular] 编译器特有的检查。最重要的是第 21 行:模板 会按 [TypeScript] 的方式检查。模板中的拼写错误([{{ titl }}] 而不是 [{{ title }}])会导致编译错误,由 [ng serve] 和编辑器报告;
- 第 23 行:编辑器([VS Code])显示的文件:所有示例的文件。
每个示例还有各自的 [tsconfig.app.json] 文件,它使用此配置,并且只编译它自己的文件:
| {
"extends": "../tsconfig.json",
"include": ["src/**/*.ts"]
}
|
因此,一个示例中的错误不会妨碍其他示例正常运行。
2.1.4. index.html 页面
每个示例都有自己的 HTML 页面。示例 01 的页面如下:
| <!doctype html>
<html lang="en">
<head>
<meta charset="utf-8">
<title>Example 01 - a first application</title>
<!-- base href:相对路径的起始地址(参见路由器) -->
<base href="/">
<meta name="viewport" content="width=device-width, initial-scale=1">
</head>
<body>
<!-- Angular 应用程序显示在此元素中(参见 src/main.ts) -->
<app-root></app-root>
</body>
</html>
|
这是浏览器将加载的唯一页面。它几乎是空的:
- 第 7 行:页面相对路径的基准地址;路由器(示例 17)会用到它;
- 第 12 行:该元素,[Angular] 将在其中显示应用程序。这不是已知的 HTML 标签:它是应用程序根组件的 选择器。
这里没有 [<script>] 或 [<link>] 标签:构建工具会自动添加它们(编译后的程序、[Bootstrap] 样式表)。
2.1.5. 入口点:main.ts
| // =========================================================================
// 01-first-application/src/main.ts - 应用程序的入口点
// -------------------------------------------------------------------------
// angular.json 将此文件指定为入口点("browser")。它
// 从根组件(App)启动 Angular 应用程序:
// Angular 在 index.html 中查找 <app-root> 元素(App 的 "selector"),
// 并把该组件的 HTML 显示在其中。
// =========================================================================
import { bootstrapApplication } from '@angular/platform-browser';
import { App } from './app/app';
// bootstrapApplication(App) 返回一个 promise:我们在浏览器控制台中
// 显示可能出现的启动错误
bootstrapApplication(App).catch((error) => console.error(error));
|
- 第 10 行:[Angular] 中在浏览器里启动应用程序的函数;
- 第 11 行:应用程序的根组件,即 [App] 类,来自 [app/app.ts] 文件;
- 第 15 行:应用程序从该组件启动:[Angular] 在页面中查找元素 [<app-root>] ,并在其中显示 [App] 的 HTML。
2.1.6. 根组件:app.ts、app.html、app.css
一个 [Angular] 组件是一个 [TypeScript] 类,由 [@Component] 装饰:
| // =========================================================================
// 01-first-application/src/app/app.ts - 第一个组件
// -------------------------------------------------------------------------
// Angular 组件是一个由 @Component 装饰的 TypeScript 类:
// - selector :表示它的 HTML 标签(<app-root>);
// - templateUrl :其 HTML 文件(app.html);
// - styleUrl :其 CSS 文件(app.css),仅作用于
// 此组件。
// 类的属性和方法可以在模板中使用。
// =========================================================================
import { Component, signal } from '@angular/core';
@Component({
selector: 'app-root',
templateUrl: './app.html',
styleUrl: './app.css',
})
export class App {
// "普通"数据:模板可以显示它
protected readonly title = 'Welcome to Angular';
protected readonly languages = ['TypeScript', 'HTML', 'CSS'];
// signal(...):一个响应式数据。通过调用它来读取其值
// (counter()),用 set() 或 update() 修改。Angular 随后会
// 自动更新页面中显示它的位置。
protected readonly counter = signal(0);
protected readonly time = signal(new Date().toLocaleTimeString());
// 由模板中的按钮调用的方法
protected increment(): void {
this.counter.update((n) => n + 1);
this.time.set(new Date().toLocaleTimeString());
}
}
|
- 第 14–18 行:[@Component] 装饰器将该类变成组件:
- 第 15 行:它的 选择器,即在模板或 [index.html] 中代表它的标签;
- 第 16 行:它的模板文件,HTML;
- 第 17 行:它的样式文件,CSS;
- 第 21–22 行:两个普通数据项。[protected]:它们仅由组件及其模板使用;[readonly]:它们不会被替换;
- 第 27 行:[signal(0)] 创建一个响应式数据点,初始值为 0。信号是一个函数:通过调用它([this.counter()])来读取其值,并通过 [set(value)] 或 [update(function)]来修改它。当它变化时,[Angular] 会更新页面上所有显示它的位置;
- 第 31–34 行:一个修改两个信号的方法。它不会改动页面:[Angular] 会更新页面。[update((n) => n + 1)] 根据旧值计算新值。
组件的模板:
| <!-- 01-first-application/src/app/app.html - App 组件的模板 -->
<div class="container py-4">
<!-- {{ expression }}:表达式的值,插入到页面中 -->
<h1 class="h3">{{ title }}</h1>
<p>This page is built in the browser, by Angular, from index.html, main.ts and the App component.</p>
<p>It is written in {{ languages.join(', ') }} ({{ languages.length }} languages).</p>
<!-- (click):点击时要调用的方法(参见示例 04) -->
<button class="btn btn-primary" (click)="increment()">Click me</button>
<!-- signal 通过调用来读取:counter(),而不是 counter -->
<p class="mt-3 counter">You clicked {{ counter() }} times (last click: {{ time() }}).</p>
</div>
|
- 第 4 行:语法 [{{ expression }}] (插值)会将 [TypeScript] 表达式的值插入页面,该表达式在组件上求值([title] 指的是 [this.title])。它会被转义:如果 [title] 包含 [<b>],则会原样显示 [<b>],该标签不会被解释;
- 第 6 行:表达式可以是任何内容:方法调用、计算;
- 第 9 行:点击按钮会调用方法 [increment] (见示例 04);
- 第 11 行:调用该方法时会显示一个信号:[{{ counter() }}]。[Angular] 注意到模板读取了这个信号:当它变化时,页面的这一部分将被更新。
以及它的样式:
| /* 此规则仅适用于 App 组件的元素 */
.counter {
font-weight: bold;
color: #dd0031;
}
|
此规则仅适用于本组件的元素:[Angular] 会为其元素添加一个唯一属性([_ngcontent-xxx]),并将其传递给 CSS 选择器。这就是样式封装:两个组件可以使用同一个 CSS 类而互不干扰。
组件也可以直接在装饰器中编写其模板和样式,使用属性[template] 和[styles] 代替[templateUrl] 和[styleUrl]。后面的示例将针对小型组件演示这种写法。
2.1.7. 执行
在控制台中打开[examples-angular] 文件夹:
npm start 01-first-application
控制台显示(节选):
| Initial chunk files | Names | Raw size
styles.css | styles | 276.99 kB |
main.js | main | 4.91 kB |
Application bundle generation complete. [2.520 seconds]
Watch mode enabled. Watching for file changes...
➜ Local: http://localhost:4200/
|
打开 URL http://localhost:4200/ 并点击按钮三次:
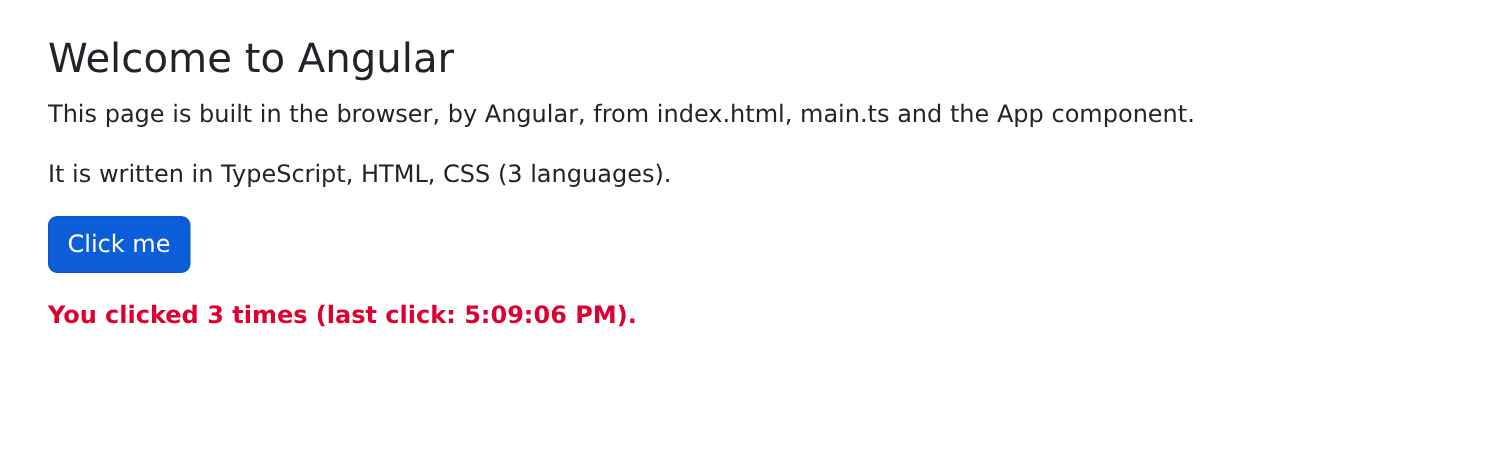
可以尝试两个实验:
- 修改[app.ts] 中的标题文本并保存文件:页面会立即更新,无需重新加载。开发服务器会监视文件、重新编译更改,并通知浏览器;
- 查看页面的源代码(Ctrl-U):你只会看到[index.html] 页面,它几乎是空的。显示出来的 HTML 页面是由[Angular] 在浏览器中生成的。要查看它,请使用开发者工具的检查器(F12,Elements 选项卡)或[Angular DevTools] 扩展,后者还会显示组件及其数据。
2.2. 示例 02:信号
信号是[Angular] 响应性的核心。本示例计算一件商品的含税价格:
| // =========================================================================
// 02-signals/src/app/app.ts - signal、computed、effect、linkedSignal
// -------------------------------------------------------------------------
// 一个含增值税价格的小型计算器:
// - signal :响应式的值,通过调用来读取,
// 通过 set() / update() 修改;
// - computed :由其他 signal 计算得出的值,
// 当它们变化时自动重新计算;
// - effect :在其读取的 signal 每次变化时
// 执行的代码("副作用");
// - linkedSignal :可写的 signal,但当另一个 signal 变化时,
// 会被重置为一个计算得出的值。
// =========================================================================
import { Component, computed, effect, linkedSignal, signal, untracked } from '@angular/core';
// FormsModule 提供 [(ngModel)],用于将字段与 signal 绑定(参见示例 05)
import { FormsModule } from '@angular/forms';
@Component({
selector: 'app-root',
imports: [FormsModule],
templateUrl: './app.html',
})
export class App {
protected readonly label = signal('Pen');
protected readonly priceExclVat = signal(2.5);
protected readonly vatRate = signal(20); // 单位为 %
// linkedSignal:每当商品改变时数量恢复为 1,
// 但在此期间用户可以修改它
protected readonly quantity = linkedSignal({ source: this.label, computation: () => 1 });
// computed:从不直接赋值,总是重新计算。Angular 知道
// 它依赖哪些 signal(即它所读取的那些):当其中任何一个
// 变化时才重新计算,且仅在此时重新计算
protected readonly totalExclVat = computed(() => this.quantity() * this.priceExclVat());
protected readonly vatAmount = computed(() => (this.totalExclVat() * this.vatRate()) / 100);
protected readonly totalInclVat = computed(() => this.totalExclVat() + this.vatAmount());
// 欧元金额格式化器,英语格式(€1,234.50)
private readonly euros = new Intl.NumberFormat('en-US', { style: 'currency', currency: 'EUR' });
// 含增值税总额的历史记录,由下面的 effect 填充
protected readonly history = signal<string[]>([]);
private oldTotal: number | null = null;
constructor() {
// effect:首次执行一次,之后每当
// totalInclVat(它读取的唯一 signal)变化时再执行
effect(() => {
const total = this.totalInclVat();
document.title = `Incl. VAT: ${this.format(total)}`;
if (this.oldTotal !== null) {
const line = `${this.format(this.oldTotal)} -> ${this.format(total)}`;
// untracked:修改 history 而不使其成为该 effect 的依赖
untracked(() => this.history.update((h) => [line, ...h].slice(0, 5)));
}
this.oldTotal = total;
});
}
protected format(amount: number): string {
return this.euros.format(amount);
}
protected reset(): void {
this.label.set('Pen');
this.priceExclVat.set(2.5);
this.vatRate.set(20);
this.quantity.set(1);
}
}
|
- 第 15 行:响应性函数,全部由[@angular/core]提供;
- 第 21 行和第 17 行:模板使用了[[(ngModel)]],它来自[FormsModule] 模块。组件必须导入(数组[imports])其模板使用的所有内容:其他组件、指令和管道。如果遗漏,编译器会报错;
- 第 25–27 行:三个信号,[signal(initial value)]。它们的类型由初始值推断:[signal('Pen')] 是字符串信号,[signal(2.5)] 是数值信号;
- 第 31 行:[linkedSignal] 是一个可修改的信号(可以像普通信号一样被写入),但它与另一个信号(即其源)相关联:每当源发生变化(此处为商品描述),其值就会被重置为由[computation] 计算出的值(此处为 1)。当商品改变时,数量重置为 1;
- 第 36–38 行:[computed] 是一个由其他信号计算得出的值。它从不被写入,只作为信号被读取([this.totalExclVat()])。[Angular] 知道它依赖哪些信号,因为它会记录函数在计算期间读取了哪些信号。当其中一个发生变化时才会重新计算,且仅在这种情况下:读取[totalInclVat()] 十次而没有任何变化,只会产生一次计算。[computed] 可以依赖其他[computed] 值(第 38 行);
- 第 41 行:英式风格的金额格式化器(€1,234.50)。示例 09 将展示如何使用[Angular]的管道来实现这一点;
- 第 50–59 行:[effect] 是一个函数,先执行一次,之后每当它读取的信号发生变化时再次执行(此处为唯一的[totalInclVat])。它用于副作用:对页面以外的内容执行操作(标签页标题,第 52 行;浏览器的本地存储;日志);
- 第 56 行:该 effect 向历史记录添加一条条目。[untracked(...)] 执行此更新时不会让[history] 成为该 effect 的依赖;否则,该 effect 会读取[history] (在[update]中),并在每次历史记录变化时被重新触发……而这正是它自己造成的;
- [effect] 是在组件的构造函数中(或在初始化属性时)创建的:这就是[Angular] 所称的注入上下文,我们将在讲解服务时(示例 14)进一步讨论。它会在组件销毁时自动停止;
- 第 66–71 行:[set()] 替换信号的值。数量是一个[linkedSignal]:它可以像其他信号一样被写入。
当[effect] 使用[computed] 就足够时,应避免通过 effect 写入信号:[computed] 描述的是一个值,而[effect] 描述的是一个动作。在这里,历史记录依赖于总额的连续取值,而这是[computed] 无法表达的。
模板:
| <div class="container py-4">
<h1 class="h3 mb-3">Example 02 - signals</h1>
<div class="row g-4">
<div class="col-md-6">
<div class="card p-3">
<!-- [(ngModel)]="signal":字段读取该 signal 并修改它(参见示例 05) -->
<label class="form-label" for="label">Item</label>
<input id="label" class="form-control mb-2" [(ngModel)]="label">
<label class="form-label" for="price">Unit price excl. VAT</label>
<input id="price" type="number" step="0.1" min="0" class="form-control mb-2" [(ngModel)]="priceExclVat">
<label class="form-label" for="quantity">Quantity (back to 1 if the item changes)</label>
<input id="quantity" type="number" min="0" class="form-control mb-2" [(ngModel)]="quantity">
<label class="form-label" for="vat">VAT rate</label>
<select id="vat" class="form-select mb-3" [(ngModel)]="vatRate">
<!-- [ngValue]:传递的值是数字 5.5,而不是字符串 "5.5" -->
<option [ngValue]="5.5">5.5 %</option>
<option [ngValue]="10">10 %</option>
<option [ngValue]="20">20 %</option>
</select>
<button class="btn btn-outline-secondary" (click)="reset()">Reset</button>
</div>
</div>
<div class="col-md-6">
<div class="card p-3">
<h2 class="h5">{{ quantity() }} x {{ label() }}</h2>
<table class="table mb-0">
<tbody>
<tr><td>Total excl. VAT</td><td class="text-end">{{ format(totalExclVat()) }}</td></tr>
<tr><td>VAT ({{ vatRate() }} %)</td><td class="text-end">{{ format(vatAmount()) }}</td></tr>
<tr class="fw-bold"><td>Total incl. VAT</td><td class="text-end">{{ format(totalInclVat()) }}</td></tr>
</tbody>
</table>
</div>
<div class="card p-3 mt-3">
<h2 class="h6">History of the total incl. VAT (effect)</h2>
<ul class="mb-0">
@for (line of history(); track $index) {
<li>{{ line }}</li>
}
</ul>
</div>
</div>
</div>
</div>
|
- 第 8–18 行:[[(ngModel)]="label"] 将字段与信号[label] 双向链接:在字段中输入会改变信号,改变信号(通过“Reset”按钮)会改变字段。我们指定的是信号本身,不带括号:[ngModel] 需要信号本身才能写入它。示例 05 将详细介绍[ngModel] ;
- 第 10 行和第 12 行:使用[type="number"]时,信号接收的是数字,而不是字符串;
- 第 16–18 行:[[ngValue]] 提供选项的值:在本例中是数字 5.5,而不是字符串["5.5"];
- 第 25–30 行:信号和[computed]的显示。[format(...)] 是组件的一个方法;
- 第 37–39 行:[@for] 为列表中的每个条目重复该块(参见示例 03)。
在开发服务器运行时([npm start 02-signals]),我们修改商品、价格、数量和税率:
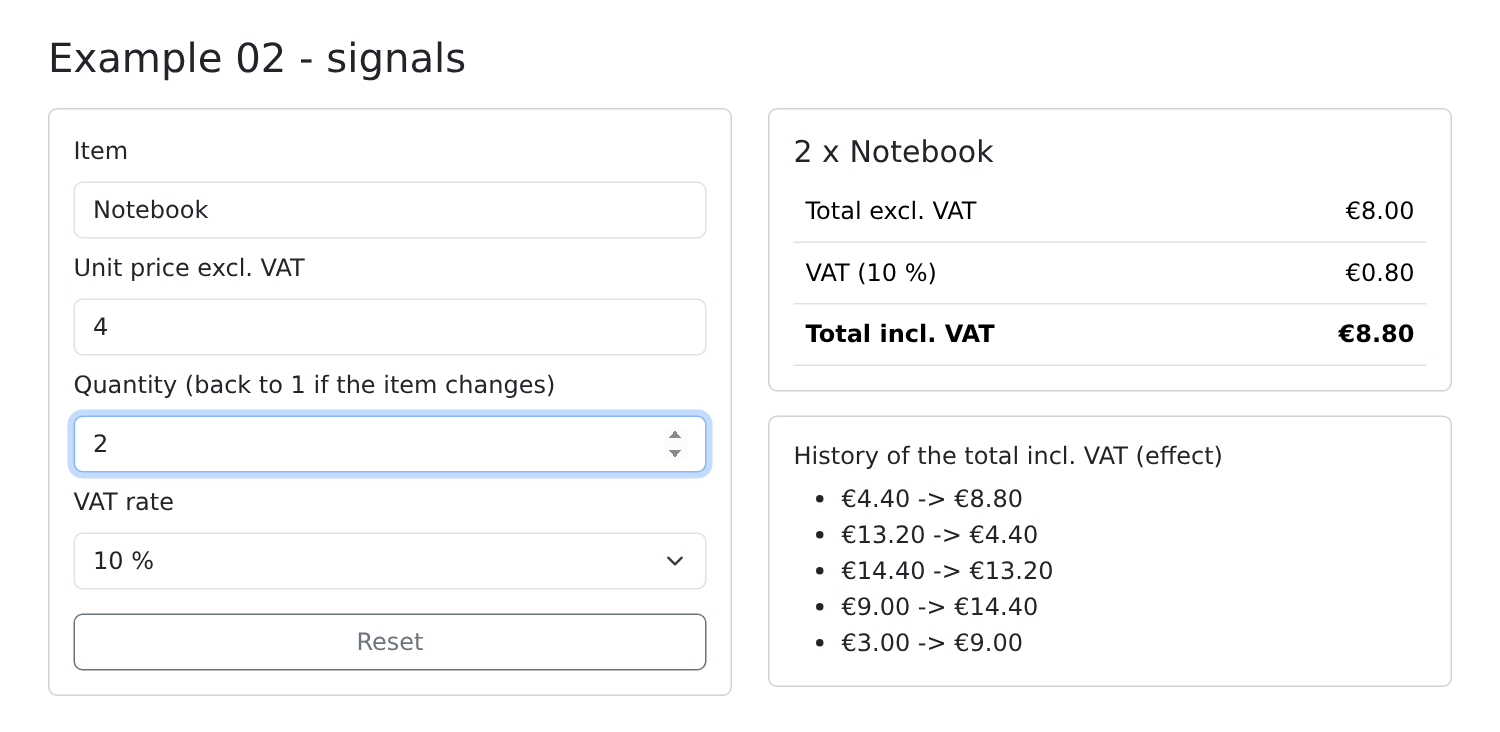
每当含税总额发生变化时,effect 就会向历史记录添加一行并更改标签页标题。更改商品会将数量重置为 1。
这些信号并非[Angular]所独有:在[SolidJS]、[Preact]、[Vue.js] (其中[ref] 起相同作用)中也能找到它们,并且有一份标准草案提议将其加入[JavaScript] 本身。在信号出现之前(于 2023 年在[Angular] 16 中引入),[Angular] 会借助[zone.js] 库定期检查整个组件树,以确定哪些内容发生了变化。有了信号,它就能确切知道要更新什么:这就是“zoneless” 模式,它是[Angular] 22 的默认模式,并用于本课程的所有示例。
2.3. 示例 03:模板语法
[Angular] 模板是添加了少量语法元素的 HTML。本示例显示一个可以过滤的医生列表:
| // =========================================================================
// 03-templates/src/app/app.ts - 模板语法
// -------------------------------------------------------------------------
// 在 Angular 模板中:
// - [property]="expr" :元素的属性,由表达式
// 计算得出([src]、[disabled]、[hidden]...);
// - [class.name]="expr" :表达式为真时应用 CSS 类 "name";
// [style.prop]="expr" :一个 CSS 属性;
// - @if / @else if / @else:仅当条件
// 为真时才存在的块;
// - @for (x of list; track x.id):对每个元素重复的块;
// track 给出每个元素的标识;@empty,列表
// 为空时显示的块;
// - @switch / @case :根据某个值在多个块中选择一个;
// - @let name = expr; :模板的局部变量。
// =========================================================================
import { Component, computed, signal } from '@angular/core';
import { FormsModule } from '@angular/forms';
// TypeScript 接口描述列表中对象的形状
interface Doctor {
id: number;
title: string;
firstName: string;
lastName: string;
specialty: 'general practitioner' | 'pediatrician' | 'cardiologist';
available: boolean;
}
@Component({
selector: 'app-root',
imports: [FormsModule],
templateUrl: './app.html',
})
export class App {
// 图片位于示例的 public/ 文件夹中:按原样提供
protected readonly logoUrl = 'doctor.svg';
protected readonly doctors = signal<Doctor[]>([
{ id: 1, title: 'Mme', firstName: 'Marie', lastName: 'PELISSIER', specialty: 'general practitioner', available: true },
{ id: 2, title: 'Mr', firstName: 'Paul', lastName: 'TATOU', specialty: 'pediatrician', available: false },
{ id: 3, title: 'Melle', firstName: 'Sophie', lastName: 'DUPONT', specialty: 'cardiologist', available: true },
]);
protected readonly filter = signal(''); // 搜索的文本
protected readonly onlyAvailable = signal(false);
protected readonly showHelp = signal(true);
// 显示的列表:一个 computed,在筛选条件改变时重新计算
protected readonly displayedDoctors = computed(() => {
const text = this.filter().trim().toLowerCase();
return this.doctors().filter(
(m) =>
(!this.onlyAvailable() || m.available) &&
`${m.firstName} ${m.lastName} ${m.specialty}`.toLowerCase().includes(text),
);
});
protected toggleHelp(): void {
this.showHelp.update((a) => !a);
}
}
|
- 第 22–29 行:一个[TypeScript] 接口描述了列表中对象的格式。专业只能取三个值(第 27 行);
- 第 38 行:图片的地址。示例的[public/] 文件夹中的文件会按原样提供,位于站点根目录:[doctor.svg] 指向文件[03-templates/public/doctor.svg]。为此,必须在[angular.json]中声明它:
| "assets": [
{
"glob": "**/*",
"input": "03-templates/public"
}
]
|
- 第 40–44 行:[signal<Doctor[]>(...)]:一个指定了类型的信号,即医生列表;
- 第 46–48 行:三个与页面字段相链接的信号;
- 第 51–58 行:显示的列表,一个[computed] ,它依赖于三个信号([filter]、[doctors]、[onlyAvailable]);
- 第 61 行:[update] 对布尔值取反。
模板:
| <div class="container py-4">
<h1 class="h3 mb-3">
<!-- [src]:src 属性的值就是 logoUrl 的值 -->
<img [src]="logoUrl" alt="logo" width="32" height="32">
Example 03 - the template syntax
</h1>
<div class="d-flex flex-wrap gap-3 align-items-center mb-3">
<input class="form-control w-auto" placeholder="search..." [(ngModel)]="filter">
<label class="form-check-label">
<input type="checkbox" class="form-check-input" [(ngModel)]="onlyAvailable"> available only
</label>
<button class="btn btn-sm btn-outline-secondary" (click)="toggleHelp()">
{{ showHelp() ? "Hide the help" : "Show the help" }}
</button>
</div>
<!-- [hidden]:该段落仍保留在页面中,只是被隐藏 -->
<p class="alert alert-info" [hidden]="!showHelp()">
Type a name or a specialty. Unavailable doctors are greyed out.
</p>
<!-- @let:模板变量,以免重复调用 -->
@let displayed = displayedDoctors();
<!-- @if / @else if / @else:同一时间只存在三个块中的一个 -->
@if (doctors().length === 0) {
<p class="text-muted">No doctor.</p>
} @else if (displayed.length === 0) {
<p class="text-warning">No doctor matches "{{ filter() }}".</p>
} @else {
<table class="table">
<thead>
<tr><th>#</th><th>Doctor</th><th>Specialty</th><th>Status</th></tr>
</thead>
<tbody>
<!-- @for:每位医生一行;$index 给出序号。
track m.id:每一行的标识,使 Angular 知道
列表变化时应添加、移动还是删除哪一行 -->
@for (m of displayed; track m.id; let i = $index) {
<tr [class.opacity-50]="!m.available">
<td>{{ i + 1 }}</td>
<td>{{ m.title }} {{ m.firstName }} {{ m.lastName }}</td>
<td>
<!-- @switch:根据专业的值显示一个块 -->
@switch (m.specialty) {
@case ('pediatrician') { <span title="children">🧸</span> }
@case ('cardiologist') { <span title="heart">❤️</span> }
@default { <span title="all patients">🩺</span> }
}
{{ m.specialty }}
</td>
<td>
<!-- [class] 搭配字符串:计算出的类会添加到 "badge" 上 -->
<span class="badge" [class]="m.available ? 'text-bg-success' : 'text-bg-secondary'">
{{ m.available ? 'available' : 'unavailable' }}
</span>
</td>
</tr>
}
</tbody>
</table>
}
<!-- [style.font-size.px]:一个带单位的 CSS 属性 -->
<p [style.font-size.px]="12 + displayed.length * 2">
{{ displayed.length }} doctor(s) displayed - the size of this text depends on it.
</p>
</div>
|
- 第 4 行:[[src]="logoUrl"] 是一个属性绑定:元素的属性[src] 被赋予表达式[logoUrl]的值。如果没有方括号,[src="logoUrl"] 得到的将是字符串["logoUrl"]。元素的任何属性都可以这样绑定:[[disabled]]、[[value]]、[[hidden]]、[[title]]……;
- 第 9 行和第 11 行:两个通过[[(ngModel)]] 与信号链接的字段(参见示例 05);
- 第 14 行:插值支持三元运算符[? :];
- 第 19 行:[[hidden]]:该段落仍保留在页面上,只是被隐藏(HTML 属性[hidden]);
- 第 24 行:[@let] 声明一个模板变量,它在模板的其余部分都可见。这样就避免了重复书写[displayedDoctors()];
- 第 27–63 行:[@if (condition) { ... } @else if (...) { ... } @else { ... }]:三个块中同一时间只有一个存在于页面上。与[[hidden]]不同,未被选中的块中的元素不会被创建(或会被移除);
- 第 40 行:[@for (m of displayed; track m.id)] 为每位医生重复该块:
- [track m.id] 是必需的:它标识每一行。当列表变化时,[Angular] 通过比较标识符来确定要添加、移动或删除哪一行,而不是全部重新创建。对于没有标识符的简单值列表,请写成[track $index] (示例 02);
- [let i = $index]:元素的序号。[@for] 还提供[$first]、[$last]、[$even]、[$odd]和[$count];
- 紧跟在[@empty { ... }]块之后的、标记为[@for]的块,在列表为空时显示(示例 16);
- 第 41 行:[[class.opacity-50]="condition"]:如果条件为真,则对该元素应用类[opacity-50] (来自[Bootstrap]);
- 第 46–50 行:[@switch] 根据一个值选择一个块:每个值对应一个[@case] ,其余情况使用[@default];
- 第 55 行:[[class]="expression"]:表达式返回一个或多个类,这些类会被添加到硬编码的类([badge])之上;
- 第 66 行:[[style.font-size.px]="expression"]:一个带单位的 CSS 属性。
模板表达式类似于[TypeScript],但受到限制:不允许赋值(事件处理程序中除外,示例 04),不允许使用[new],不能访问全局变量([window]、[document])。它只能访问组件的属性和方法。
[npm start 03-templates]:
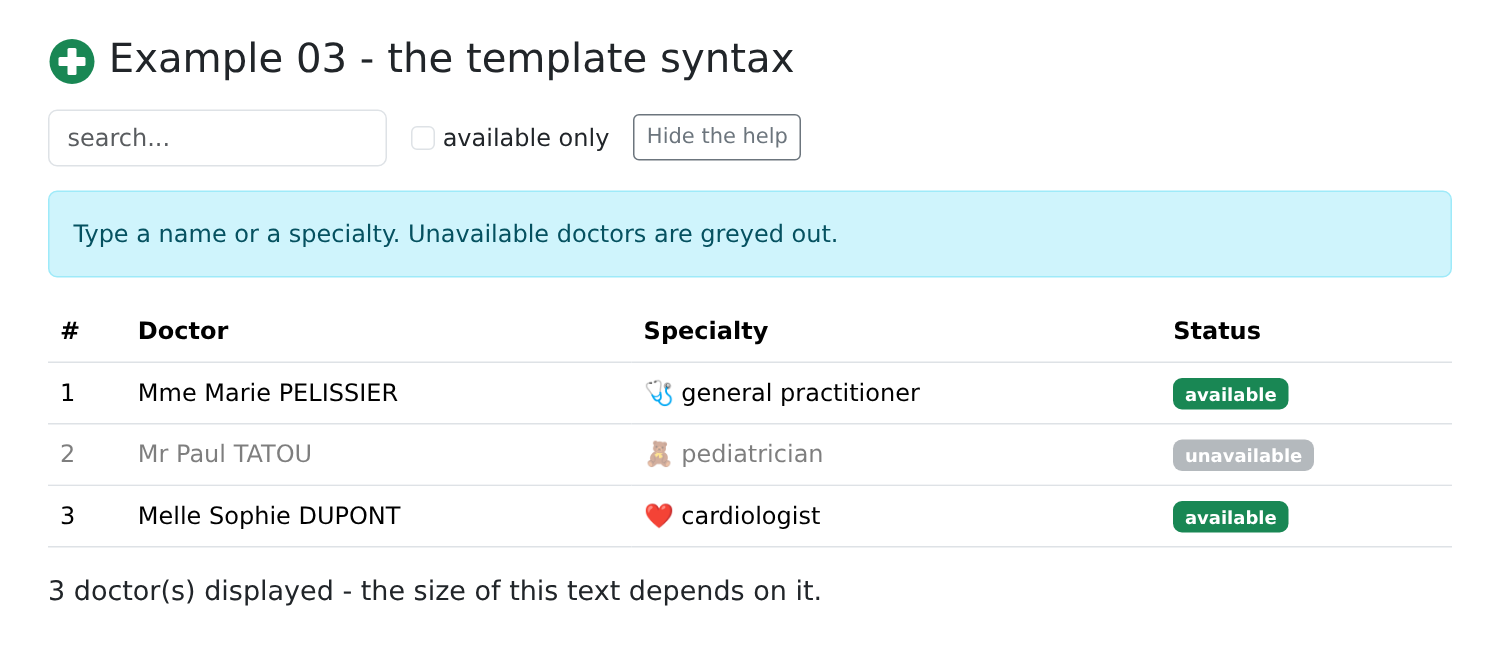
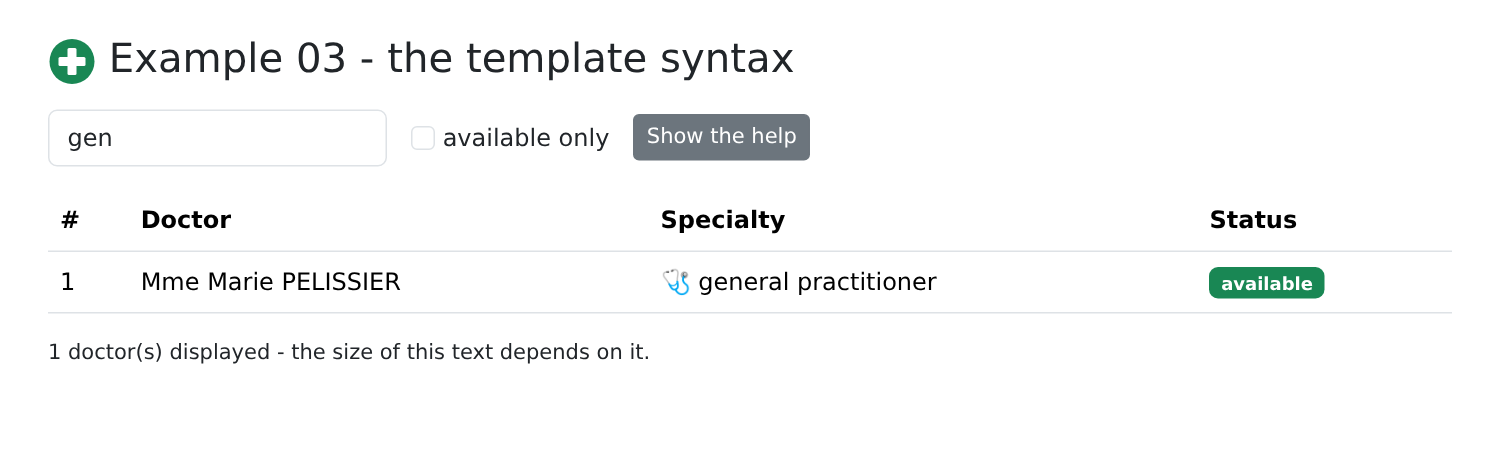
输入“gen”并隐藏帮助:
早期版本的[Angular] 使用结构型指令来编写这些块:[*ngIf]、[*ngFor]、[[ngSwitch]]。它们仍然存在于许多项目中;随[Angular] 17 引入的[@if] / [@for] / [@switch]语法如今是推荐的写法。
2.4. 示例 04:事件
一个响应用户操作的任务列表。组件:
| // =========================================================================
// 04-events/src/app/app.ts - 响应用户的操作
// -------------------------------------------------------------------------
// (event)="statement":当元素发出该事件时
// 执行此语句:
// - (click)="f()" 调用 f;
// - (click)="f(3, $event)" 带参数调用 f;$event 是
// 浏览器的原生事件;
// - (keyup.enter)、(keydown.escape):仅针对该按键;
// - 元素上的 #name:模板的"引用变量",它
// 指向 HTML 元素本身(name.value、name.focus()...)。
// 这里没有 FormsModule,也没有 ngModel:由我们自己读取字段。
// =========================================================================
import { Component, signal } from '@angular/core';
interface Task {
id: number;
label: string;
done: boolean;
}
@Component({
selector: 'app-root',
templateUrl: './app.html',
styles: `
.area {
background: #e9f2ff;
height: 80px;
cursor: crosshair;
}
`,
})
export class App {
protected readonly tasks = signal<Task[]>([
{ id: 1, label: 'Install Node.js', done: true },
{ id: 2, label: 'Read the chapter on events', done: false },
]);
protected readonly log = signal<string[]>([]);
private nextId = 3;
private trace(message: string): void {
this.log.update((j) => [`${new Date().toLocaleTimeString()} ${message}`, ...j]);
}
// 由 (submit) 调用:$event.preventDefault() 阻止浏览器
// 将表单发送到服务器(以及重新加载页面)
protected add(event: SubmitEvent, field: HTMLInputElement): void {
event.preventDefault();
const label = field.value.trim();
if (label === '') {
return;
}
// 包含数组的 signal:我们用一个新数组来替换它
this.tasks.update((t) => [...t, { id: this.nextId++, label, done: false }]);
this.trace(`added "${label}"`);
field.value = '';
field.focus();
}
protected toggle(task: Task, done: boolean): void {
this.tasks.update((t) => t.map((x) => (x.id === task.id ? { ...x, done } : x)));
this.trace(`"${task.label}": ${done ? 'done' : 'to do'}`);
}
protected remove(task: Task): void {
this.tasks.update((t) => t.filter((x) => x.id !== task.id));
this.trace(`deleted "${task.label}"`);
}
// $event:原生事件(此处为 MouseEvent),带有其坐标
protected position(event: MouseEvent): void {
this.trace(`click at (${event.offsetX}, ${event.offsetY})`);
}
}
|
- 第 26–32 行:组件的样式,直接写在装饰器中([styles]),而不是写在[.css] 文件中;
- 第 35–38 行:一个包含对象列表的信号;
- 第 40 行:一个普通属性,它不会被显示:不必是信号;
- 第 48–59 行:添加任务。该方法接收来自浏览器的事件以及[<input>] 元素本身(参见模板):
- 第 49 行:[preventDefault()] 阻止浏览器将表单提交到服务器,否则会重新加载页面;
- 第 55 行:信号中包含的数组([push])不会被修改,而是被替换为一个新数组。信号只有在其值发生变化时才会通知变化,也就是只有被赋予另一个不同的对象时才算变化。如果只修改数组的内容而不替换它,页面将保持不变;
- 第 57–58 行:字段被清空并保持焦点;
- 第 62 行:修改任务遵循同样的原则:[map] 创建一个新数组,其中相关任务被替换为修改后的副本([{ ...x, done }]);
- 第 67 行:而要删除一个任务,使用[filter];
- 第 72–74 行:[MouseEvent]:点击事件,带有指针位置。
模板:
| <div class="container py-4">
<h1 class="h3 mb-3">Example 04 - events</h1>
<!-- (submit):在字段中按回车键,或点击按钮。
#newTask:对 <input> 元素的引用,
可在模板的任何位置使用 -->
<form class="d-flex gap-2 mb-3" (submit)="add($event, newTask)">
<input #newTask class="form-control" placeholder="new task (Escape to clear)"
(keydown.escape)="newTask.value = ''">
<button type="submit" class="btn btn-primary">Add</button>
</form>
<ul class="list-group mb-3">
@for (t of tasks(); track t.id) {
<li class="list-group-item d-flex align-items-center gap-2">
<!-- #box:当前这一行的复选框;box.checked:其状态 -->
<input #box type="checkbox" class="form-check-input" [checked]="t.done"
(change)="toggle(t, box.checked)">
<span class="flex-grow-1" [class.text-decoration-line-through]="t.done" [class.text-muted]="t.done">
{{ t.label }}
</span>
<!-- 带参数的处理函数:当前这一行的任务 -->
<button class="btn btn-sm btn-outline-danger" (click)="remove(t)">Delete</button>
</li>
}
</ul>
<div class="area p-3 mb-3 rounded" (click)="position($event)">Click in this area</div>
<h2 class="h6">Log</h2>
<ul class="small">
@for (line of log(); track $index) {
<li>{{ line }}</li>
}
</ul>
</div>
|
- 第 7 行:[(submit)="instruction"] 是一个事件绑定:当元素触发事件[submit] (在字段中输入或点击按钮)时,执行该指令。[$event] 指代浏览器事件;
- 第 8 行:[#newTask] 是一个模板引用变量:它在整个模板中指代[<input>] 元素本身。在第 7 行,它被传递给[add] 方法;
- 第 9 行:[(keydown.escape)]:[keydown] 事件,但仅限 Esc 键。类似地,我们可以写[(keyup.enter)]、[(keydown.control.s)]……在事件绑定中允许赋值:[newTask.value = ''] 会清空字段;
- 第 17–18 行:[#box] 指向 [@for] 中当前这一行的复选框;[[checked]] 根据任务来勾选复选框;[(change)] 在用户更改它时通知组件;
- 第 23 行:带参数的处理程序:该行对应的任务;
- 第 28 行:在字段中点击:[$event] 是一个[MouseEvent]。
在这里,我们自己读取字段([field.value], [box.checked])。后面的示例会把这项工作交给[ngModel] ,然后再交给基于信号的表单。
[npm start 04-events];添加一个任务(Enter),勾选第二个任务,并在字段中点击:
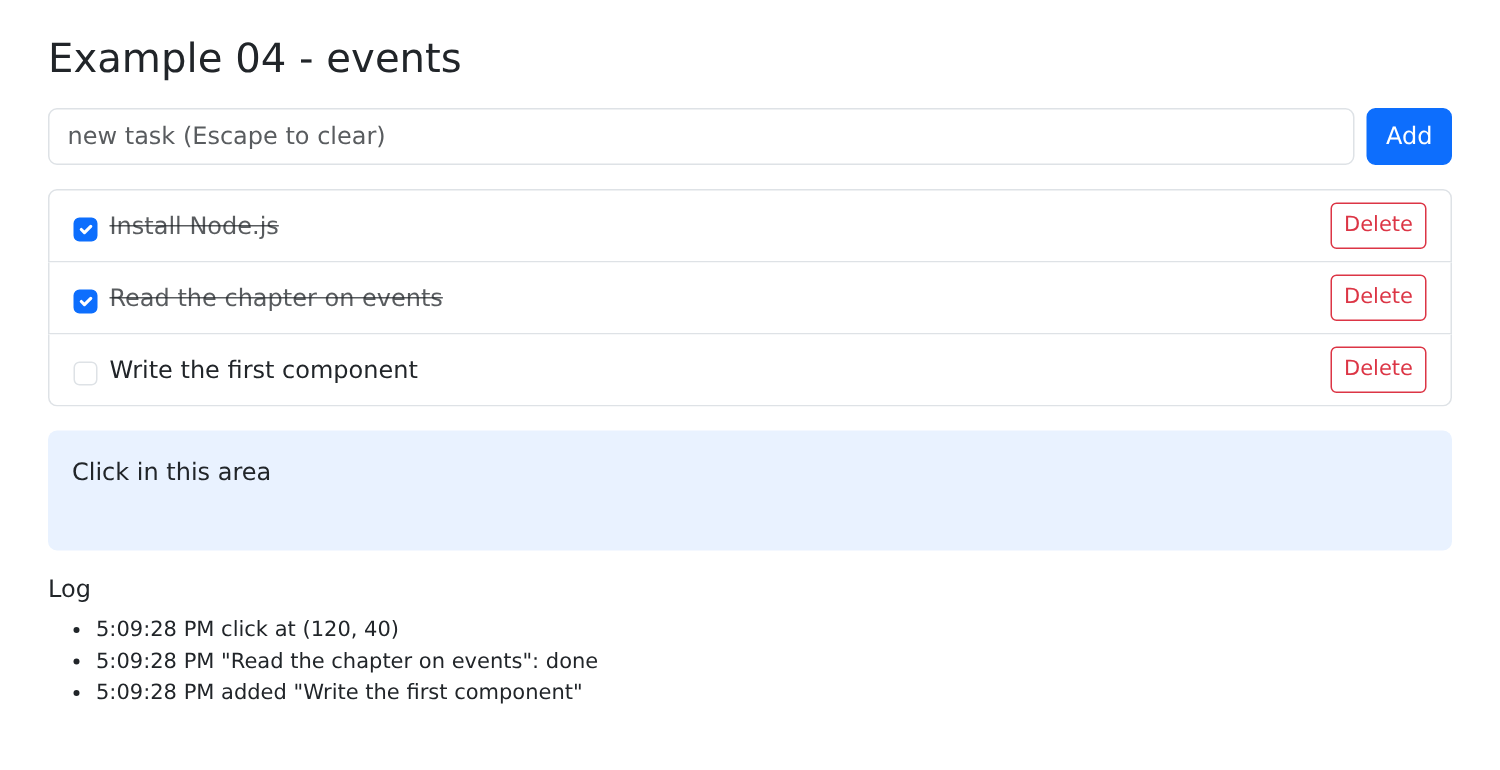
[Angular] 仅在响应事件或信号变化时更新页面。由模板处理的事件((click)、(submit) 等)足以触发对组件的检查;然而,之后被修改的数据——在事件之外(例如响应服务器或定时器触发时)——只有当它是信号时才会显示。因此,本课程始终遵循这条规则:模板显示的任何数据都是信号。
2.5. 示例 05:表单字段与 ngModel
与[NestJS] 课程中示例 18 相同的表单(所有字段类型),但没有服务器:一切都在浏览器中完成。字段通过[ngModel] 指令与信号链接:
| // =========================================================================
// 05-ngmodel/src/app/app.ts - 所有字段类型,通过 ngModel 绑定
// -------------------------------------------------------------------------
// [(ngModel)]="signal"(FormsModule 模块)将表单字段与
// signal 双向绑定:在字段中输入会修改 signal,
// 而修改 signal(通过代码)也会修改字段。[( )] 语法被称为
// "盒子里的香蕉",它结合了 [ngModel](signal 到字段)和
// (ngModelChange)(字段到 signal)。收到的值取决于字段:
// - text input、textarea -> string
// - input type="number" -> number(字段为空时为 null)
// - 单个复选框 -> boolean
// - 单选按钮 -> 所选按钮的值
// - select / 多选 select -> 值 / 值的数组
// - input type="date" -> 字符串 "yyyy-MM-dd"
// 在 <form> 中,每个由 ngModel 绑定的字段都必须有 name 属性。
// 与 NestJS 课程中的示例 18 是同一个表单;但这里没有
// 服务器:一切都在浏览器中完成。
// =========================================================================
import { Component, computed, signal } from '@angular/core';
import { JsonPipe } from '@angular/common';
import { FormsModule } from '@angular/forms';
@Component({
selector: 'app-root',
// JsonPipe:json "管道",以 JSON 格式显示对象(参见示例 09)
imports: [FormsModule, JsonPipe],
templateUrl: './app.html',
})
export class App {
protected readonly titles = ['Mr', 'Mme', 'Melle'];
protected readonly possibleHobbies = ['sport', 'music', 'reading', 'cinema'];
protected readonly countries = [
{ code: 'fr', name: 'France' },
{ code: 'be', name: 'Belgium' },
{ code: 'ch', name: 'Switzerland' },
];
// 表单的每个字段对应一个 signal
protected readonly title = signal('Mme');
protected readonly name = signal('');
protected readonly age = signal<number | null>(30);
protected readonly presentation = signal('');
protected readonly newsletter = signal(false);
protected readonly hobbies = signal<string[]>(['reading']);
protected readonly country = signal('fr');
protected readonly languages = signal<string[]>([]);
protected readonly birthDate = signal('');
// 所有的值汇集成一个对象(即将发送到服务器的内容)
protected readonly model = computed(() => ({
title: this.title(),
name: this.name().trim(), // ngModel 不会去除空格:我们在这里处理
age: this.age(),
presentation: this.presentation(),
newsletter: this.newsletter(),
hobbies: this.hobbies(),
country: this.country(),
languages: this.languages(),
birthDate: this.birthDate(),
}));
protected readonly sent = signal<string | null>(null);
// 多个复选框对应一个数组:ngModel 做不到,由我们自己处理
protected toggleHobby(hobby: string, checked: boolean): void {
this.hobbies.update((l) => (checked ? [...l, hobby] : l.filter((x) => x !== hobby)));
}
// (ngSubmit):提交表单,不重新加载页面
protected send(): void {
this.sent.set(JSON.stringify(this.model()));
}
}
|
- 第 22 行:[FormsModule] 包含[ngModel] 指令(以及[ngSubmit]、[ngModelOptions]等):这就是所谓的“模板驱动”表单([template-driven forms]);
- 第 27 行:组件还导入了[json] 管道,它以 JSON 格式显示对象(参见示例 09);
- 第 40–48 行:每个字段一个信号,其类型与该字段将提供的值的类型一致:字符串、数字(如果字段为空则为[null] )、布尔值,或字符串列表;
- 第 51–61 行:所有值,使用[computed]合并为单个对象:这就是将要发送给服务器的内容。[ngModel] 不会去除输入内容两侧的空格:我们在这里处理(第 53 行);
- 第 66–68 行:同一列表对应多个复选框:[ngModel] 无法处理这种情况,所以由我们自己来处理;
- 第 71–73 行:提交。
模板:
| <div class="container py-4">
<h1 class="h3 mb-3">Example 05 - the fields of a form and ngModel</h1>
<div class="row g-4">
<!-- (ngSubmit):使用 FormsModule 时,浏览器从不
将表单发送到服务器;而是调用我们的方法 -->
<form class="col-md-7" (ngSubmit)="send()">
<div class="mb-3">
<span class="form-label d-block">Title</span>
<!-- 单选按钮:相同的 ngModel,每个按钮一个值 -->
@for (t of titles; track t) {
<div class="form-check form-check-inline">
<input type="radio" class="form-check-input" name="title" [id]="'title-' + t" [value]="t"
[(ngModel)]="title">
<label class="form-check-label" [for]="'title-' + t">{{ t }}</label>
</div>
}
</div>
<div class="row g-3 mb-3">
<div class="col-8">
<label class="form-label" for="name">Name</label>
<input id="name" name="name" class="form-control" [(ngModel)]="name">
</div>
<div class="col-4">
<label class="form-label" for="age">Age</label>
<!-- type="number":signal 接收的是数字,而不是字符串 "30" -->
<input id="age" name="age" type="number" class="form-control" [(ngModel)]="age">
</div>
</div>
<div class="mb-3">
<label class="form-label" for="presentation">Presentation (updated when leaving the field)</label>
<!-- updateOn: 'blur':仅在离开字段时才更新 signal -->
<textarea id="presentation" name="presentation" rows="2" class="form-control"
[(ngModel)]="presentation" [ngModelOptions]="{ updateOn: 'blur' }"></textarea>
</div>
<div class="mb-3 form-check">
<!-- 单个复选框:true / false -->
<input id="newsletter" name="newsletter" type="checkbox" class="form-check-input" [(ngModel)]="newsletter">
<label for="newsletter" class="form-check-label">Receive the newsletter</label>
</div>
<div class="mb-3">
<span class="form-label d-block">Hobbies</span>
<!-- 多个复选框对应一个数组:[checked] + (change) -->
@for (h of possibleHobbies; track h) {
<div class="form-check form-check-inline">
<input #hobbyBox type="checkbox" class="form-check-input" [id]="'hobby-' + h"
[checked]="hobbies().includes(h)" (change)="toggleHobby(h, hobbyBox.checked)">
<label class="form-check-label" [for]="'hobby-' + h">{{ h }}</label>
</div>
}
</div>
<div class="row g-3 mb-3">
<div class="col-6">
<label class="form-label" for="country">Country</label>
<select id="country" name="country" class="form-select" [(ngModel)]="country">
<!-- [value]:传递的值(代码),显示的文本是名称 -->
@for (c of countries; track c.code) {
<option [value]="c.code">{{ c.name }}</option>
}
</select>
</div>
<div class="col-6">
<label class="form-label" for="languages">Spoken languages</label>
<select id="languages" name="languages" multiple size="3" class="form-select" [(ngModel)]="languages">
<option value="fr">French</option>
<option value="en">English</option>
<option value="es">Spanish</option>
</select>
</div>
</div>
<div class="mb-3">
<label class="form-label" for="birthDate">Date of birth</label>
<input id="birthDate" name="birthDate" type="date" class="form-control w-auto" [(ngModel)]="birthDate">
</div>
<button type="submit" class="btn btn-primary">Send</button>
</form>
<div class="col-md-5">
<h2 class="h6">The model, live</h2>
<pre class="bg-light p-2 rounded small">{{ model() | json }}</pre>
@if (sent(); as text) {
<h2 class="h6">Last submission</h2>
<pre class="bg-success-subtle p-2 rounded small">{{ text }}</pre>
}
</div>
</div>
</div>
|
- 第 6 行:[(ngSubmit)]:使用[FormsModule] 时,表单永远不会由浏览器提交(不会重新加载页面);而是调用[send] 方法。[preventDefault()] 不再需要(参见示例 04);
- 第 12–13 行:单选按钮:每个按钮上使用相同的[ngModel] ,并且每个按钮一个值([[value]])。信号接收所选按钮的值;
- 第 21 行:[[(ngModel)]="name"] 将字段与信号[name]绑定,且为双向。语法[[( )]],被称为“盒子里的香蕉”,它结合了属性绑定[[ngModel]] (从信号到字段)和事件绑定[(ngModelChange)] (从字段到信号)。在[<form>]中,每个通过[ngModel] 链接的字段都必须有一个[name] 属性;
- 第 26 行:使用[type="number"]时,信号接收的是数字;
- 第 33 行:[[ngModelOptions]="{ updateOn: 'blur' }"]:信号仅在离开字段时更新,而不是每次按键都更新;
- 第 37 行:单个字段:[true] / [false];
- 第 45–46 行:休闲爱好字段,手动管理:[[checked]] 和[(change)],与示例 04 相同;
- 第 54–59 行:下拉列表:信号接收所选选项的值([[value]],即国家代码);
- 第 63 行:多选列表([multiple]):信号接收所选值的列表;
- 第 72 行:日期:信号接收字符串["yyyy-MM-dd"];
- 第 79 行:[{{ model() | json }}]:模型,以 JSON 格式实时显示;
- 第 80 行:[@if (sent(); as text)]:如果该值为“真”(此处为非空字符串),则显示该块,并且[as text] 使其成为该块的一个变量。
[npm start 05-ngmodel];填写表单,然后提交:
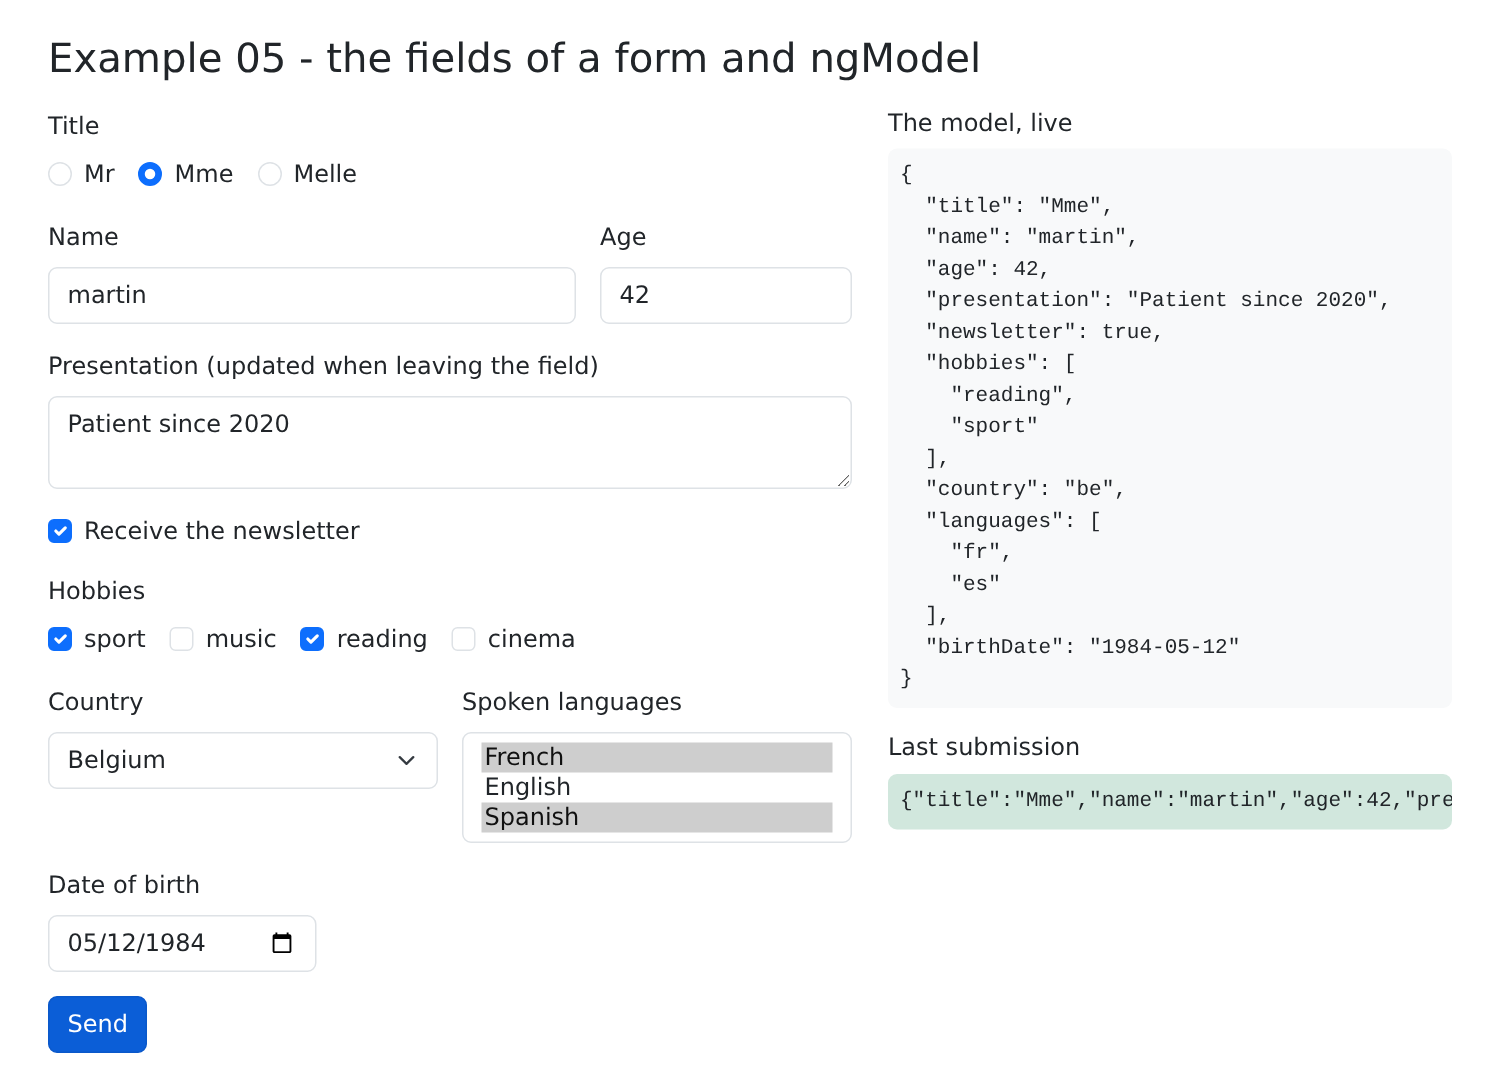
[ngModel] 自[Angular] 的第一个版本起就已存在,并且从[Angular] 17 起接受信号。它存在于无数应用中。然而,除了值的简单来回传递之外,其他一切都留给组件自己处理:合并字段、判断哪些字段被修改过、验证它们……下一个示例展示了编写表单的最新方式。
2.6. 示例 06:基于信号的表单
[Angular] 22 引入了一种完全基于信号的编写表单的新方式:基于信号的表单([Signal Forms],包[@angular/forms/signals])。其原理是:
- 表单模型是一个信号,它包含一个对象,每个字段对应一个属性;
- 函数[form(model)]构建一个与模型结构相同的字段树([FieldTree]):[f.lastName]、[f.age]、[f.newsletter]……;
- 在模板中,[[formField]="f.lastName"]将一个字段(HTML)与树中的一个字段关联起来。
表单从模型读取数据并向模型写入数据;每个字段都知道自己的状态:是否被访问过、是否被修改过、是否被禁用、是否有效?
| // =========================================================================
// 06-signal-forms/src/app/app.ts - 信号表单
// -------------------------------------------------------------------------
// 编写表单的现代方式(Angular 22):
// 1. 模型:一个包含对象的 signal,每个字段对应
// 一个属性(表单在此 signal 中读写);
// 2. form(model, schema):构建一棵字段树(FieldTree),它
// 与模型具有相同的形状:f.lastName、f.age、f.newsletter...。
// schema(可选)描述字段的规则(参见示例 07);
// 3. [formField]="f.lastName" 将 HTML 字段与树中的一个字段绑定。
// 每个字段都有一个状态,通过调用它获得:f.lastName() 给出其值
// (value())、是否已被触碰(touched())、是否已修改(dirty())、是否
// 被禁用(disabled())...
// =========================================================================
import { Component, signal } from '@angular/core';
import { JsonPipe } from '@angular/common';
import { disabled, form, FormField } from '@angular/forms/signals';
// 表单数据的形状
interface Profile {
title: string;
firstName: string;
lastName: string;
age: number;
newsletter: boolean;
email: string;
country: string;
birthDate: string;
presentation: string;
}
const INITIAL: Profile = {
title: 'Mme',
firstName: 'Marie',
lastName: 'PELISSIER',
age: 30,
newsletter: false,
email: '',
country: 'fr',
birthDate: '',
presentation: '',
};
@Component({
selector: 'app-root',
imports: [FormField, JsonPipe],
templateUrl: './app.html',
})
export class App {
protected readonly titles = ['Mr', 'Mme', 'Melle'];
// 1. 模型
protected readonly model = signal<Profile>({ ...INITIAL });
// 2. 字段树;一条规则:只有勾选 "newsletter" 复选框时,
// 才能修改电子邮件(valueOf 读取另一个字段的值)
protected readonly f = form(this.model, (p) => {
disabled(p.email, ({ valueOf }) => !valueOf(p.newsletter));
});
// 显示其状态的字段,在右侧的表格中
protected readonly fields = ['firstName', 'lastName', 'age', 'email'] as const;
protected reset(): void {
// 模型恢复为初始值,字段的状态归零
this.model.set({ ...INITIAL });
this.f().reset();
}
protected upperCase(): void {
// 通过代码修改模型:字段随之变化
this.model.update((m) => ({ ...m, lastName: m.lastName.toUpperCase(), firstName: m.firstName.toUpperCase() }));
}
}
|
- 第 18 行:基于信号的表单所用的函数和指令;
- 第 21–31 行:表单数据的格式;
- 第 47 行:组件导入 [FormField] 指令,也就是 [[formField]] 所对应的指令;
- 第 54 行:模型——一个包含 [Profile] 对象的信号;
- 第 58–60 行:字段树。[form]的第二个参数是表单模式(schema):一个接收字段路径([p.email]、[p.newsletter]……)并为其附加规则的函数。这里只有一条规则:[disabled(p.email, logic)]禁用字段[email],条件是函数[logic]返回[true]。[valueOf(p.newsletter)]读取另一个字段的值:只有选中“newsletter”复选框时,才能编辑电子邮件地址。该规则是响应式的:复选框一变化就会重新计算。示例 07 将添加验证规则;
- 第 63 行:模板显示其状态的字段名称;[as const]创建一个精确名称的列表(['firstName' | 'lastName' | ...]),而不是任意字符串;
- 第 65–69 行:重置。模型被重置为初始值(字段随之变化),然后字段状态被清零([touched]、[dirty]):[f()](字段树,被调用)返回整个表单的状态,其中包括[reset()]方法;
- 第 71–74 行:通过代码修改模型;页面字段随之变化。
模板:
| <div class="container py-4">
<h1 class="h3 mb-3">Example 06 - signal forms</h1>
<div class="row g-4">
<form class="col-md-7" (submit)="$event.preventDefault()">
<div class="mb-3">
<span class="form-label d-block">Title</span>
<!-- 单选按钮:同一个字段,每个按钮一个值 -->
@for (t of titles; track t) {
<div class="form-check form-check-inline">
<input type="radio" class="form-check-input" [id]="'title-' + t" [value]="t" [formField]="f.title">
<label class="form-check-label" [for]="'title-' + t">{{ t }}</label>
</div>
}
</div>
<div class="row g-3 mb-3">
<div class="col-5">
<label class="form-label" for="firstName">First name</label>
<!-- [formField]:此 HTML 字段编辑表单的 f.firstName 字段 -->
<input id="firstName" class="form-control" [formField]="f.firstName">
</div>
<div class="col-5">
<label class="form-label" for="lastName">Last name</label>
<input id="lastName" class="form-control" [formField]="f.lastName">
</div>
<div class="col-2">
<label class="form-label" for="age">Age</label>
<!-- type="number" 与 number 类型的模型:数值 -->
<input id="age" type="number" class="form-control" [formField]="f.age">
</div>
</div>
<div class="row g-3 mb-3 align-items-end">
<div class="col-5">
<div class="form-check">
<input id="newsletter" type="checkbox" class="form-check-input" [formField]="f.newsletter">
<label for="newsletter" class="form-check-label">Receive the newsletter</label>
</div>
</div>
<div class="col-7">
<label class="form-label" for="email">E-mail (if newsletter)</label>
<!-- disabled 由表单管理:此处无需写该属性 -->
<input id="email" type="email" class="form-control" [formField]="f.email">
</div>
</div>
<div class="row g-3 mb-3">
<div class="col-6">
<label class="form-label" for="country">Country</label>
<select id="country" class="form-select" [formField]="f.country">
<option value="fr">France</option>
<option value="be">Belgium</option>
<option value="ch">Switzerland</option>
</select>
</div>
<div class="col-6">
<label class="form-label" for="birthDate">Date of birth</label>
<input id="birthDate" type="date" class="form-control" [formField]="f.birthDate">
</div>
</div>
<div class="mb-3">
<label class="form-label" for="presentation">Presentation</label>
<textarea id="presentation" rows="2" class="form-control" [formField]="f.presentation"></textarea>
</div>
<div class="d-flex gap-2">
<button type="button" class="btn btn-outline-primary" (click)="upperCase()">Name in upper case</button>
<button type="button" class="btn btn-outline-secondary" (click)="reset()">Reset</button>
</div>
</form>
<div class="col-md-5">
<h2 class="h6">The model, live</h2>
<!-- f().value():整个表单的值,也就是模型 -->
<pre class="bg-light p-2 rounded small">{{ f().value() | json }}</pre>
<h2 class="h6">The state of the fields</h2>
<table class="table table-sm small">
<thead><tr><th>field</th><th>touched</th><th>dirty</th><th>disabled</th></tr></thead>
<tbody>
@for (c of fields; track c) {
<tr>
<td>{{ c }}</td>
<td>{{ f[c]().touched() }}</td>
<td>{{ f[c]().dirty() }}</td>
<td>{{ f[c]().disabled() }}</td>
</tr>
}
</tbody>
</table>
<p class="small mb-0">form modified (dirty): <strong>{{ f().dirty() }}</strong></p>
</div>
</div>
</div>
|
- 第 4 行:表单不会被提交(本示例中没有提交按钮);我们只阻止通过回车键提交;
- 第 10 行:单选按钮:每个按钮上使用同一个字段[f.title],每个按钮对应一个值;
- 第 19 行:[[formField]="f.firstName"]将 HTML 字段与表单中的字段[firstName]双向关联,就像示例 05 中的[ngModel]一样;
- 第 28 行:一个数字字段,对应模型的数值属性:模型接收到的是一个数字;
- 第 34 行:一个复选框,对应布尔值;
- 第 41 行:字段[email]。不要指定属性[disabled]:指令[[formField]]会根据模式规则自动设置和移除该属性;
- 第 47、55、60 行:一个下拉列表、一个日期、一个文本框;
- 第 71 行:[f().value()]:整个表单的值,即模型;
- 第 76–83 行:四个字段的状态。[f[c]]是名称为[c]的字段;[fc] 是它的状态;[touched()](用户进入过该字段然后离开)、[dirty()](用户修改过它的值)、[disabled()]:它们都是信号;
- 第 86 行:整个表单的状态——只要其中任何字段被修改,它就会更新。
[npm start 06-signal-forms];选择称谓,输入名、姓和年龄,勾选复选框(电子邮件字段变为可编辑),输入电子邮件地址,然后点击“Name in upper case”:
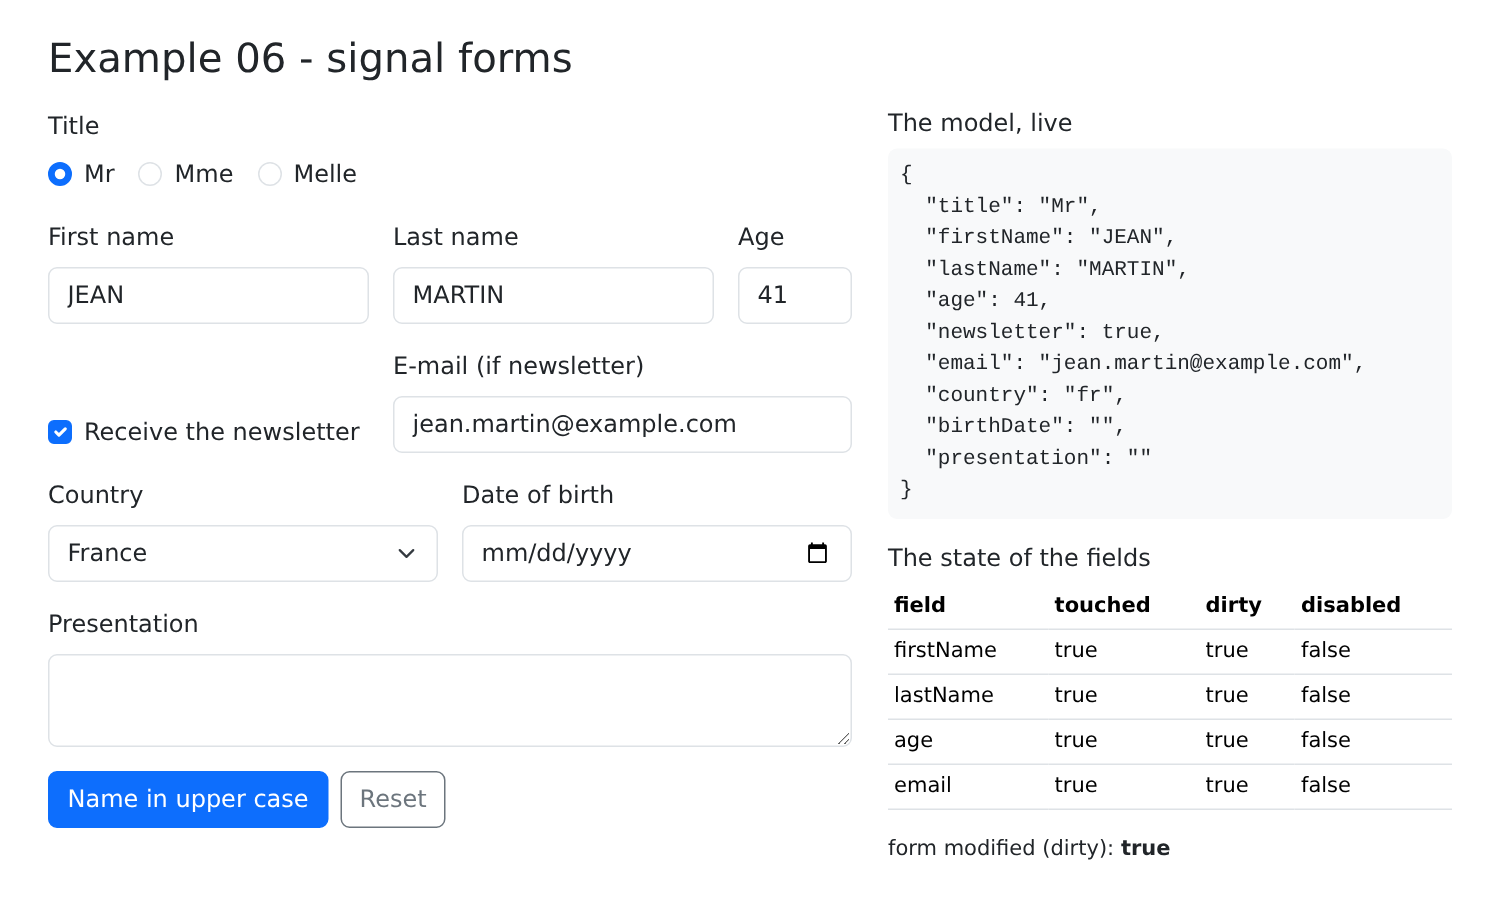
与[ngModel]相比:整个表单只有一个信号,每个字段的状态无需编写任何代码即可获得。基于信号的表单无法将多个复选框关联到同一个列表,也无法关联到多选列表:对于这些字段,请使用示例 05 中的技术。
2.7. 示例 07:表单验证
来自[RdvMedecins]应用程序的“创建账户”表单,在浏览器中使用与服务器相同的规则进行验证:称谓在列表中,名和姓必填(最多 20 个字符),用户名为小写,密码至少 6 个字符,确认密码。
注意:这种验证只是为了方便用户(即时反馈,无需与服务器往返通信)。它不提供任何安全性:任何人都可以向服务器发送手工构造的请求([curl]……)。因此服务器始终也要进行验证(见示例 25)。
2.7.1. 应用程序配置
| import { bootstrapApplication } from '@angular/platform-browser';
import { provideSignalFormsConfig } from '@angular/forms/signals';
import { App } from './app/app';
bootstrapApplication(App, {
providers: [
provideSignalFormsConfig({
classes: {
// 出错的字段只有在被"触碰"(离开)后才会标记
'is-invalid': (field) => field.state().touched() && field.state().invalid(),
'is-valid': (field) => field.state().touched() && field.state().valid(),
},
}),
],
}).catch((error) => console.error(error));
|
- 第 15 行:[bootstrapApplication]的第二个参数是应用程序配置:一个提供者([providers])列表,它们使服务和设置对整个应用程序可用(见示例 14);
- 第 17–23 行:[provideSignalFormsConfig]配置基于信号的表单。[classes]将一个 CSS 类与基于字段状态的条件关联起来:当条件为真时,指令[[formField]]会把该类应用到 HTML 字段上。这里使用了[Bootstrap]的以下类:
- 第 20 行:[is-invalid](红色边框),如果字段已被输入过但无效(两个条件同时满足)。错误不会立即显示:一个满是红色的空表单并不美观;
- 第 21 行:[is-valid](绿色边框),如果字段已被输入过且有效。
2.7.2. 组件
| // =========================================================================
// 07-validation/src/app/app.ts - 在浏览器中验证表单
// -------------------------------------------------------------------------
// 字段的规则写在表单的 SCHEMA 中(form() 的第二个
// 参数):required、maxLength、minLength、pattern... 以及
// 用于"自制"规则的 validate()。随后每个字段都知道自己的
// 错误(f.lastName().errors()),每次按键都会重新计算。
// 这些错误不会立即显示(满是红色的空表单
// 令人不快):只对已离开("touched")的字段显示。submit()
// 将所有字段标记为已触碰,然后只有在
// 表单有效时才执行操作。
//
// 与 RdvMedecins 服务器的规则相同("Create an account" 表单)。
// 警告:这种验证只是为用户提供的便利(即时
// 响应,无需往返服务器)。它不保护
// 任何东西:任何人都可以向服务器发送手工
// 构造的请求(curl...)。因此服务器始终会重新验证一切(参见示例 25)。
// =========================================================================
import { Component, signal } from '@angular/core';
import { form, FormField, maxLength, minLength, pattern, required, submit, validate } from '@angular/forms/signals';
interface Account {
title: string;
firstName: string;
lastName: string;
login: string;
password: string;
confirmation: string;
}
const TITLES = ['Mr', 'Mme', 'Melle'];
const LOGIN_FORMAT = /^[a-z0-9._-]{1,30}$/;
const PASSWORD_MIN = 6;
@Component({
selector: 'app-root',
imports: [FormField],
templateUrl: './app.html',
})
export class App {
protected readonly titles = TITLES;
protected readonly model = signal<Account>({
title: 'Mr',
firstName: '',
lastName: '',
login: '',
password: '',
confirmation: '',
});
// schema:p 指代各字段的路径(p.lastName、p.login...)
protected readonly f = form(this.model, (p) => {
validate(p.title, ({ value }) =>
TITLES.includes(value()) ? null : { kind: 'title', message: 'Choose a title from the list.' },
);
required(p.firstName, { message: 'The first name is required.' });
maxLength(p.firstName, 20, { message: 'The first name must not exceed 20 characters.' });
required(p.lastName, { message: 'The last name is required.' });
maxLength(p.lastName, 20, { message: 'The last name must not exceed 20 characters.' });
required(p.login, { message: 'The login is required.' });
pattern(p.login, LOGIN_FORMAT, { message: 'Unaccented lower-case letters, digits, dot, hyphen, underscore.' });
required(p.password, { message: 'The password is required.' });
minLength(p.password, PASSWORD_MIN, { message: `At least ${PASSWORD_MIN} characters.` });
// 一条"自制"规则,比较两个字段(valueOf 读取另一个字段)
validate(p.confirmation, ({ value, valueOf }) =>
value() === valueOf(p.password)
? null
: { kind: 'confirmation', message: 'The confirmation does not match the password.' },
);
});
protected readonly submitAttempted = signal(false);
protected readonly success = signal(false);
// 表单的 (submit)
protected async send(event: SubmitEvent): Promise<void> {
event.preventDefault();
this.submitAttempted.set(true);
// submit() 将所有字段标记为已触碰(其错误
// 随之出现),然后只有在全部有效时才执行操作
const valid = await submit(this.f, async () => {
// 此处我们会把模型发送到服务器(参见示例 25)
return null; // null:无错误
});
this.success.set(valid);
}
}
|
- 第 21 行:信号表单的验证函数;
- 第 53–71 行:表单模式:每个函数将一条规则与一个字段(由其路径标识,[p.firstName])关联起来,同时附带验证失败时显示的消息:
- [required]:字段必须填写;
- [maxLength]、[minLength]:最大或最小长度;
- [pattern]:值必须匹配某个正则表达式;
- [validate(path, function)]:“自定义”规则。该函数接收字段的上下文(它的值[value()]、另一个字段的值[valueOf(...)]),并返回[null](无错误)或一个错误:一个对象[{ kind, message }],其中[kind]表示错误类型(第 54–56 行和第 66–70 行)。确认规则比较两个字段:当其中任何一个变化时都会重新计算;
- [Angular]还提供[email]、[min]、[max]以及异步规则([validateHttp]),后者会向服务器发起查询;
- 第 77–87 行:发送。[submit(form, action)]:
- 将所有字段标记为受影响:它们的错误会显示出来,即使是用户从未访问过的字段;
- 仅当表单有效时才执行该动作;
- 如果提交成功,返回[true]。一切顺利时,动作返回[null],否则返回错误代码,示例 25 将从服务器获取这些错误代码。
2.7.3. 模板
| <div class="container py-4" style="max-width: 640px">
<h1 class="h3 mb-3">Example 07 - validating a form</h1>
<!-- novalidate:我们禁用浏览器自带的验证,以便
以我们自己的样式显示我们自己的消息 -->
<form class="card p-4" novalidate (submit)="send($event)">
<div class="mb-3">
<label class="form-label" for="title">Title</label>
<select id="title" class="form-select" [formField]="f.title">
@for (t of titles; track t) {
<option [value]="t">{{ t }}</option>
}
</select>
<div class="invalid-feedback">{{ f.title().errors()[0]?.message }}</div>
</div>
<div class="row g-3 mb-3">
<div class="col-sm-6">
<label class="form-label" for="firstName">First name</label>
<!-- is-invalid 类(由配置设置,参见 main.ts)
为字段添加红色边框,并显示紧随其后的 .invalid-feedback:
我们在其中写入该字段的第一个错误 -->
<input id="firstName" class="form-control" [formField]="f.firstName">
<div class="invalid-feedback">{{ f.firstName().errors()[0]?.message }}</div>
</div>
<div class="col-sm-6">
<label class="form-label" for="lastName">Last name</label>
<input id="lastName" class="form-control" [formField]="f.lastName">
<div class="invalid-feedback">{{ f.lastName().errors()[0]?.message }}</div>
</div>
</div>
<div class="mb-3">
<label class="form-label" for="login">Login</label>
<input id="login" class="form-control" autocomplete="username" [formField]="f.login">
<div class="invalid-feedback">{{ f.login().errors()[0]?.message }}</div>
</div>
<div class="row g-3 mb-4">
<div class="col-sm-6">
<label class="form-label" for="password">Password</label>
<input id="password" type="password" class="form-control" autocomplete="new-password" [formField]="f.password">
<div class="invalid-feedback">{{ f.password().errors()[0]?.message }}</div>
</div>
<div class="col-sm-6">
<label class="form-label" for="confirmation">Confirmation</label>
<input id="confirmation" type="password" class="form-control" autocomplete="new-password"
[formField]="f.confirmation">
<div class="invalid-feedback">{{ f.confirmation().errors()[0]?.message }}</div>
</div>
</div>
<button type="submit" class="btn btn-primary">Create the account</button>
@if (submitAttempted() && f().invalid()) {
<div class="alert alert-danger mt-3 mb-0">The form contains {{ f().errorSummary().length }} error(s).</div>
}
@if (success()) {
<div class="alert alert-success mt-3 mb-0">Valid form: it could be sent to the server.</div>
}
</form>
</div>
|
- 第 5 行:[novalidate]禁用浏览器自带的验证(“请填写此字段”提示):显示的是我们自己的消息,采用我们自己的样式;
- 第 13 行:[f.title().errors()]:该字段的错误列表,每次变化时重新计算。显示其中第一条错误的消息。[?.]:如果没有错误,[[0]]等于[undefined],整个表达式也是如此;
- 第 21–22 行:字段及其消息区域。类[invalid-feedback]来自[Bootstrap],它是隐藏的,除非它紧跟在具有类[is-invalid]的字段之后:因此,无需任何代码就能让它在合适的时机出现;
- 第 49 行:[f().invalid()]:只要有任何字段无效,表单就是无效的;[f().errorSummary()](第 50 行):其所有字段的错误。
[npm start 07-validation];输入名,转到姓,将其留空,输入一个不正确的用户名:
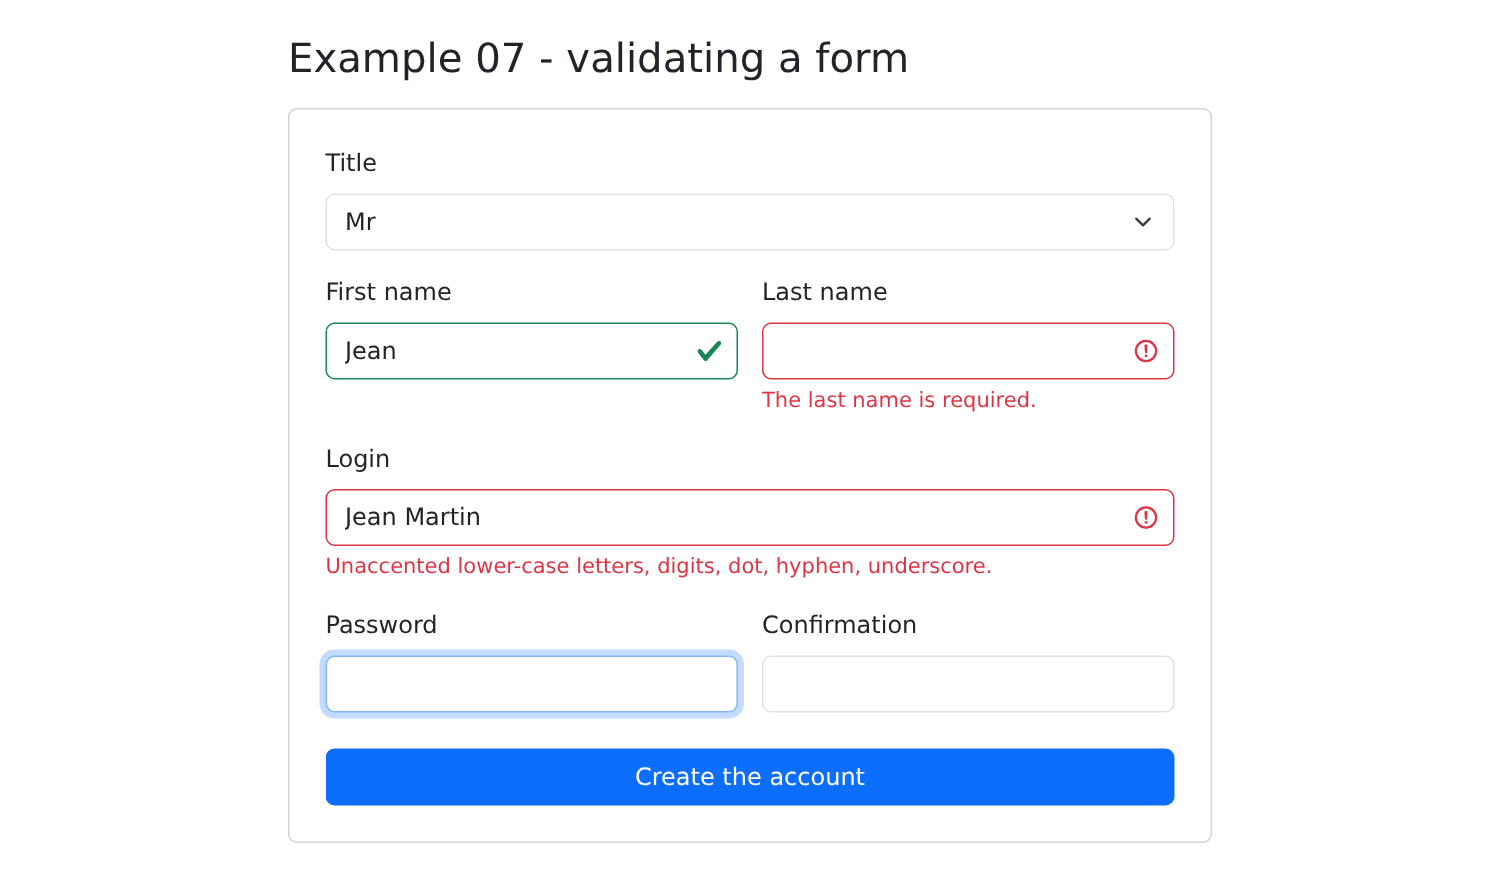
只有已填写过的字段才会以绿色或红色高亮显示。在表单为空时点击“Create the account”:所有字段都会高亮显示:
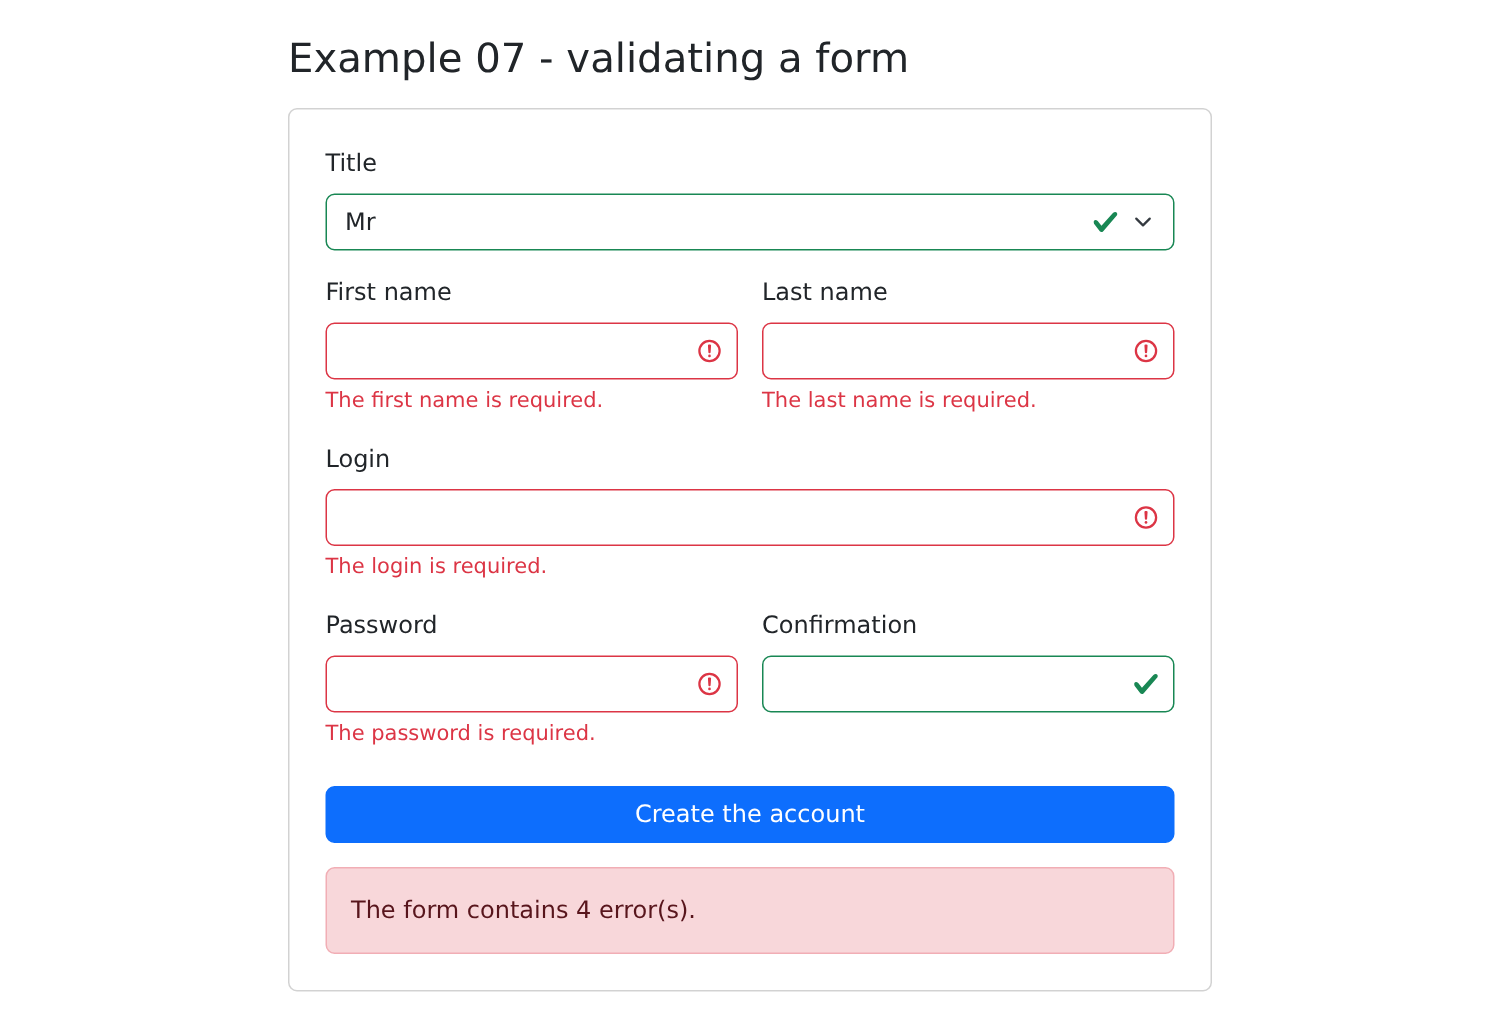
空的确认字段是“有效的”:它与同样为空的密码相匹配。一个有效的表单:
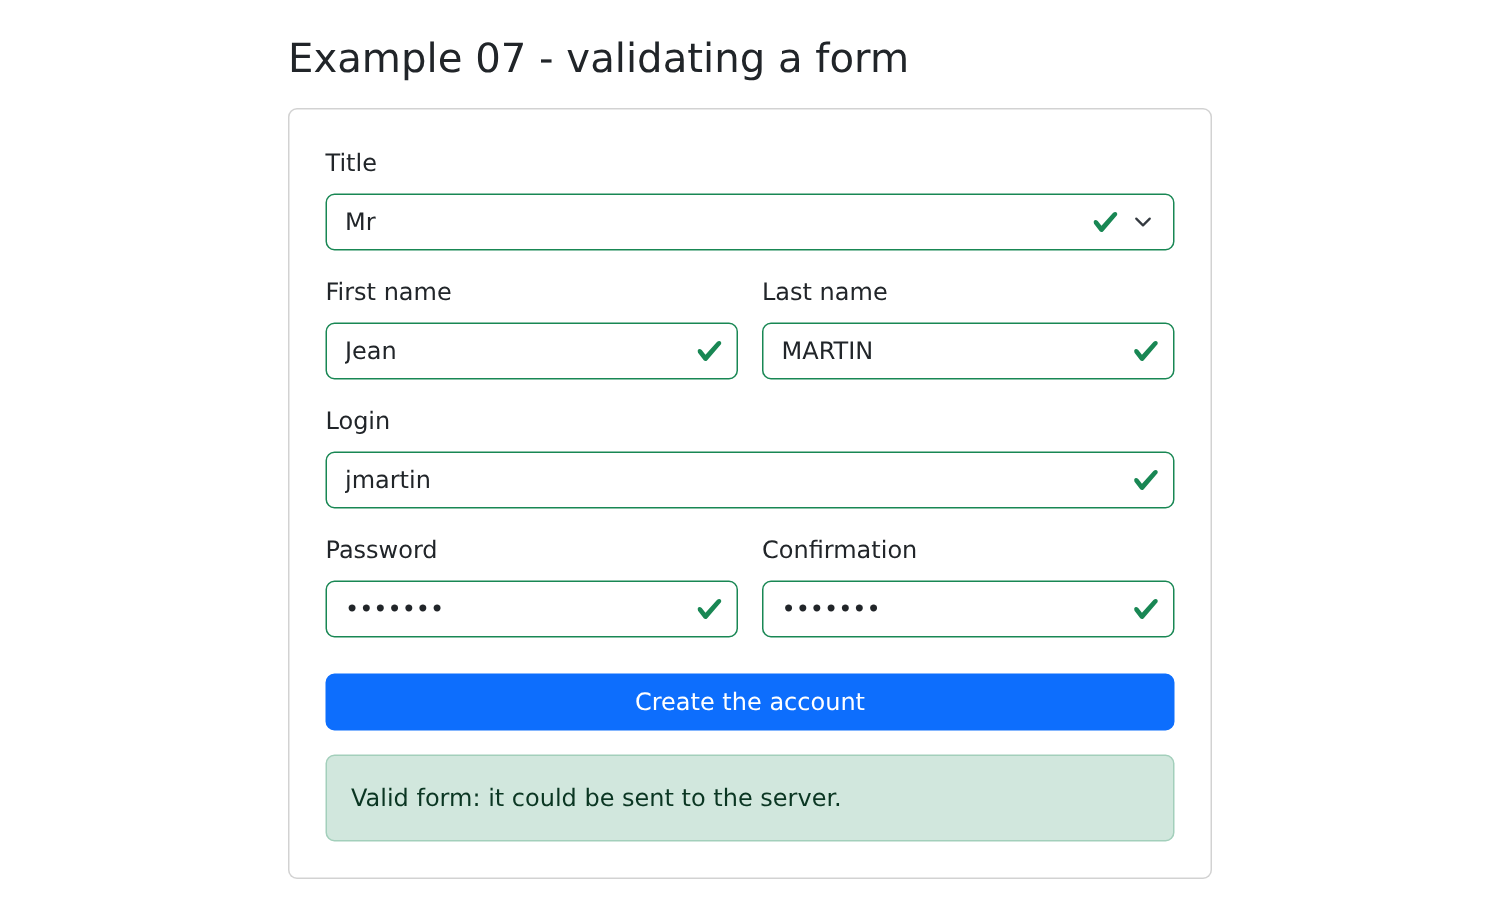
2.8. 示例 08:响应式表单
在信号表单出现之前,[Angular]表单是使用[ngModel](示例 05)或响应式表单([ReactiveFormsModule])编写的,后一种 API 在现有应用程序中最为常用。你一定会遇到它:下面是用它重写的示例 07 中的表单。
| // =========================================================================
// 08-reactive-forms/src/app/app.ts - "历史"表单 API
// -------------------------------------------------------------------------
// 在信号表单(Angular 22)之前,表单是用
// 响应式表单(ReactiveFormsModule)编写的。它们存在于
// 大多数现有应用中:这里是示例
// 07 的表单,用它们重写。
// - FormGroup 汇集多个 FormControl,每个字段一个;
// - 每个 FormControl 有一个初始值和验证器
// (Validators.required、Validators.maxLength(20)...);
// - 在模板中,[formGroup] 将 <form> 与该组绑定,而
// formControlName="lastName" 将 HTML 字段与一个控件绑定;
// - 控件的状态(value、errors、touched、invalid...)是
// 普通属性,而不是 signal。
// =========================================================================
import { Component, inject, signal } from '@angular/core';
import { AbstractControl, FormBuilder, ReactiveFormsModule, ValidationErrors, Validators } from '@angular/forms';
const TITLES = ['Mr', 'Mme', 'Melle'];
// "自制"验证器作用于整个组:它比较组中的两个字段。
// 它返回 null(无错误)或描述该错误的对象。
function sameConfirmation(group: AbstractControl): ValidationErrors | null {
const password = group.get('password')?.value;
const confirmation = group.get('confirmation')?.value;
return password === confirmation ? null : { confirmation: true };
}
@Component({
selector: 'app-root',
imports: [ReactiveFormsModule],
templateUrl: './app.html',
})
export class App {
protected readonly titles = TITLES;
private readonly fb = inject(FormBuilder).nonNullable;
// 组:{ name: [初始值, 验证器] }
protected readonly form = this.fb.group(
{
title: ['Mr', [Validators.required]],
firstName: ['', [Validators.required, Validators.maxLength(20)]],
lastName: ['', [Validators.required, Validators.maxLength(20)]],
login: ['', [Validators.required, Validators.pattern(/^[a-z0-9._-]{1,30}$/)]],
password: ['', [Validators.required, Validators.minLength(6)]],
confirmation: [''],
},
{ validators: sameConfirmation },
);
protected readonly success = signal(false);
protected readonly value = signal('');
// 如果字段已被触碰且无效,则标记为出错
protected inError(name: string): boolean {
const control = this.form.get(name);
return !!control && control.touched && control.invalid;
}
// (ngSubmit):所有字段变为"已触碰",其错误随之出现
protected send(): void {
this.form.markAllAsTouched();
this.success.set(this.form.valid);
// getRawValue():整个组的值,带类型
this.value.set(JSON.stringify(this.form.getRawValue()));
}
}
|
- 第 18 行:响应式表单的类,位于 [@angular/forms];
- 第 24–28 行:一个“自定义”验证器。它是一个接收控件(这里是整个组,以便比较其中的两个字段)并返回[null](无错误)或描述错误的对象的函数;
- 第 32 行:组件导入[ReactiveFormsModule],它提供指令[[formGroup]]和[formControlName];
- 第 37 行:[inject(FormBuilder)]:组件向[Angular]请求一个服务(依赖注入;见示例 14)。[FormBuilder]帮助生成表单;[nonNullable]:被重置的字段会恢复为其初始值,而不是[null];
- 第 40–50 行:表单是由多个控件([FormControl])组成的组([FormGroup]),每个字段一个控件。每个控件由其初始值和验证器列表来描述:[Validators.required]、[Validators.maxLength(20)]、[Validators.pattern(...)]……第 49 行:组的验证器;
- 第 56–59 行:如果字段已被修改且无效,则将其标记为错误。控件的状态([touched]、[invalid]、[errors]、[value])是普通属性,而不是信号;
- 第 62–67 行:命令。[markAllAsTouched()]显示所有错误;[valid]表示整个组是否有效;[getRawValue()]返回组的值,其类型由组的描述确定。
模板:
| <div class="container py-4" style="max-width: 640px">
<h1 class="h3 mb-3">Example 08 - reactive forms</h1>
<!-- [formGroup]:此 <form> 由 "form" 组驱动 -->
<form class="card p-4" novalidate [formGroup]="form" (ngSubmit)="send()">
<div class="mb-3">
<label class="form-label" for="title">Title</label>
<!-- formControlName:此字段是组中的 "title" 控件 -->
<select id="title" class="form-select" formControlName="title">
@for (t of titles; track t) {
<option [value]="t">{{ t }}</option>
}
</select>
</div>
<div class="row g-3 mb-3">
<div class="col-sm-6">
<label class="form-label" for="firstName">First name</label>
<input id="firstName" class="form-control" formControlName="firstName" [class.is-invalid]="inError('firstName')">
<!-- errors:一个对象,其每个键是未通过的验证器的名称 -->
<div class="invalid-feedback">
@if (form.controls.firstName.errors?.['required']) { The first name is required. }
@if (form.controls.firstName.errors?.['maxlength']) { 20 characters at most. }
</div>
</div>
<div class="col-sm-6">
<label class="form-label" for="lastName">Last name</label>
<input id="lastName" class="form-control" formControlName="lastName" [class.is-invalid]="inError('lastName')">
<div class="invalid-feedback">
@if (form.controls.lastName.errors?.['required']) { The last name is required. }
@if (form.controls.lastName.errors?.['maxlength']) { 20 characters at most. }
</div>
</div>
</div>
<div class="mb-3">
<label class="form-label" for="login">Login</label>
<input id="login" class="form-control" formControlName="login" [class.is-invalid]="inError('login')">
<div class="invalid-feedback">
@if (form.controls.login.errors?.['required']) { The login is required. }
@if (form.controls.login.errors?.['pattern']) { Unaccented lower-case letters, digits, dot, hyphen, underscore. }
</div>
</div>
<div class="row g-3 mb-4">
<div class="col-sm-6">
<label class="form-label" for="password">Password</label>
<input id="password" type="password" class="form-control" formControlName="password"
[class.is-invalid]="inError('password')">
<div class="invalid-feedback">
@if (form.controls.password.errors?.['required']) { The password is required. }
<!-- 这些错误还携带信息:所需的长度 -->
@if (form.controls.password.errors?.['minlength']; as e) { At least {{ e.requiredLength }} characters. }
</div>
</div>
<div class="col-sm-6">
<label class="form-label" for="confirmation">Confirmation</label>
<!-- "confirmation" 错误属于组(自制验证器) -->
<input id="confirmation" type="password" class="form-control" formControlName="confirmation"
[class.is-invalid]="form.controls.confirmation.touched && form.hasError('confirmation')">
<div class="invalid-feedback">The confirmation does not match the password.</div>
</div>
</div>
<button type="submit" class="btn btn-primary">Create the account</button>
@if (value()) {
<div class="alert mt-3 mb-0" [class]="success() ? 'alert-success' : 'alert-danger'">
{{ success() ? 'Valid form' : 'Invalid form' }}: <code>{{ value() }}</code>
</div>
}
</form>
</div>
|
- 第 4 行:[[formGroup]]将 HTML 表单与组关联起来;[(ngSubmit)]调用提交方法;
- 第 8 行:[formControlName="title"]将字段与组的[title] 控件关联起来;
- 第 17 行:类[is-invalid]由模板通过方法[inError]设置;
- 第 20–21 行:[errors]是一个对象,其属性以验证失败的验证器命名([required]、[maxlength]……)。为每种可能的错误都编写了一条消息;
- 第 49 行:错误还包含信息:在这里是要求的长度;
- 第 56 行:确认错误属于组:[form.hasError('confirmation')]。
[npm start 08-reactive-forms];出现几处错误,然后点击“Create the account”:
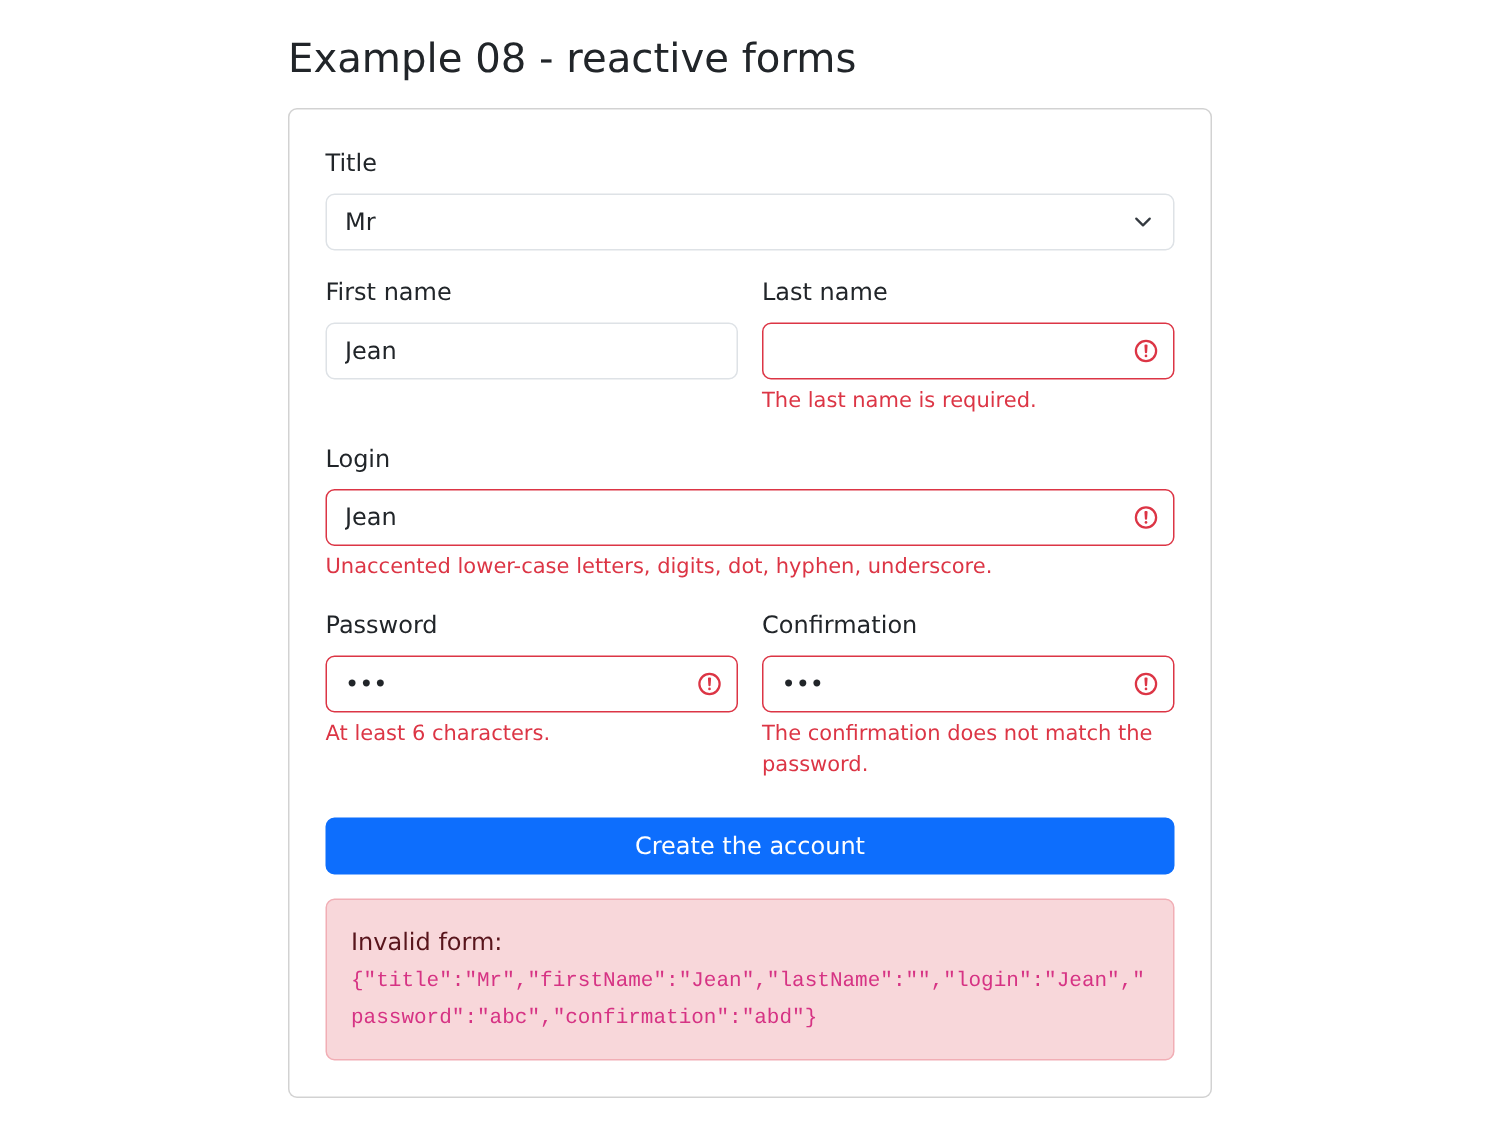
这两种 API 的功能相同。响应式表单在代码中描述表单(控件同时保存值和状态),而信号驱动的表单则从数据出发(一个附加了规则的模型),并与应用程序其余部分的信号自然地集成。在本课程的后续部分和案例研究中,我们将使用后者。
2.9. 示例 09:管道
管道在不修改值的前提下格式化要显示的值:[{{ value | pipe }}],或者带参数的形式[{{ value | pipe: parameter1 : parameter2 }}]。[Angular]提供了十几个管道;你也可以编写自己的管道。
2.9.1. 管道的语言
日期和数字管道根据语言([locale])格式化值。默认情况下,[Angular]只支持美式英语。对于英式英语:
| import { LOCALE_ID } from '@angular/core';
import { registerLocaleData } from '@angular/common';
import localeEnGb from '@angular/common/locales/en-GB';
import { bootstrapApplication } from '@angular/platform-browser';
import { App } from './app/app';
registerLocaleData(localeEnGb);
bootstrapApplication(App, {
providers: [{ provide: LOCALE_ID, useValue: 'en-GB' }],
}).catch((error) => console.error(error));
|
- 第 18 行:[registerLocaleData(localeEnGb)] 加载英式规则:星期和月份的名称、日和月的顺序、日期格式等;
- 第 21 行:一个提供者,为令牌[LOCALE_ID]赋值:即管道使用的默认语言。[{ provide: token, useValue: value }]是提供者最简单的形式;示例 14 将再次讨论它。
2.9.2. 两个自定义管道
管道是一个由[@Pipe]装饰的类,其方法[transform]接收放在竖线之前的值以及所有参数:
| // =========================================================================
// 09-pipes/src/app/pipes/time-range.pipe.ts - 一个"自制"管道
// -------------------------------------------------------------------------
// 管道是一个由 @Pipe 装饰的类,其 transform() 方法
// 接收放在竖线之前的值(以及可能的
// 参数),并返回要显示的内容:
// {{ slot | timeRange }} -> "8:00 - 8:20"
// {{ slot | timeRange: 'start' }} -> "8:00"
// 管道默认是"纯"的:只有当值或参数发生变化时,Angular 才会
// 再次调用 transform()(同一个对象 = 同一个结果)。
// =========================================================================
import { Pipe, PipeTransform } from '@angular/core';
export interface Slot {
startHour: number;
startMinute: number;
endHour: number;
endMinute: number;
}
// "8:05" 而不是 "8:5"
function time(h: number, m: number): string {
return `${h}:${String(m).padStart(2, '0')}`;
}
@Pipe({ name: 'timeRange' })
export class TimeRangePipe implements PipeTransform {
transform(c: Slot, part: 'all' | 'start' | 'end' = 'all'): string {
switch (part) {
case 'start':
return time(c.startHour, c.startMinute);
case 'end':
return time(c.endHour, c.endMinute);
default:
return `${time(c.startHour, c.startMinute)} - ${time(c.endHour, c.endMinute)}`;
}
}
}
|
- 第 27 行:管道的名称,即在模板中书写的名称;
- 第 29 行:[transform(value, part)]返回应该显示的内容。参数是可选的(默认值['all']):[{{ slot | timeRange }}]显示[8:00 - 8:20],[{{ slot | timeRange: 'start' }}]显示[8:00]。
管道默认是纯(pure)的:[Angular]只会调用[transform],前提是值或其中某个参数发生了变化(不同的对象、不同的字符串)。这使它比在模板中调用组件方法(例如示例 02 中的[format(...)])更高效,后者在每次检查组件时都会执行。
第二个管道,用于计算首字母:
| // 09-pipes/src/app/pipes/initials.pipe.ts - "Marie PELISSIER" -> "MP"
import { Pipe, PipeTransform } from '@angular/core';
@Pipe({ name: 'initials' })
export class InitialsPipe implements PipeTransform {
transform(fullName: string): string {
return fullName
.split(/\s+/)
.filter((word) => word !== '')
.map((word) => word[0].toUpperCase())
.join('');
}
}
|
2.9.3. 组件及其模板
| // =========================================================================
// 09-pipes/src/app/app.ts - 在模板中格式化值
// -------------------------------------------------------------------------
// {{ value | pipe }} 或 {{ value | pipe: parameter1 : parameter2 }}:
// 管道在不修改值的前提下转换值以供显示。Angular
// 提供了十几个管道(@angular/common 模块);你也可以编写
// 自己的管道(参见 pipes/)。组件需导入它所使用的管道。
// =========================================================================
import { Component, signal } from '@angular/core';
import {
CurrencyPipe,
DatePipe,
DecimalPipe,
JsonPipe,
KeyValuePipe,
LowerCasePipe,
PercentPipe,
SlicePipe,
TitleCasePipe,
UpperCasePipe,
} from '@angular/common';
import { Slot, TimeRangePipe } from './pipes/time-range.pipe';
import { InitialsPipe } from './pipes/initials.pipe';
@Component({
selector: 'app-root',
imports: [
CurrencyPipe,
DatePipe,
DecimalPipe,
JsonPipe,
KeyValuePipe,
LowerCasePipe,
PercentPipe,
SlicePipe,
TitleCasePipe,
UpperCasePipe,
TimeRangePipe,
InitialsPipe,
],
templateUrl: './app.html',
})
export class App {
protected readonly now = signal(new Date());
protected readonly day = '2026-10-05'; // RdvMedecins API 格式的日期
protected readonly price = 1234.5;
protected readonly rate = 0.055;
protected readonly name = 'marie pelissier';
protected readonly doctor = { title: 'Mme', firstName: 'Marie', lastName: 'PELISSIER' };
protected readonly slots: Slot[] = [
{ startHour: 8, startMinute: 0, endHour: 8, endMinute: 20 },
{ startHour: 8, startMinute: 20, endHour: 8, endMinute: 40 },
{ startHour: 14, startMinute: 5, endHour: 14, endMinute: 25 },
];
protected readonly languages = ['TypeScript', 'HTML', 'CSS', 'JavaScript', 'SQL'];
protected refresh(): void {
this.now.set(new Date());
}
}
|
- 第 11–22 行和第 28–41 行:组件导入它所使用的管道——来自[Angular]([@angular/common])的管道——作为自己的管道;
- 第 46 行:采用[RdvMedecins]API 格式的日期:[date]管道接受[Date]对象、数字(毫秒)或 ISO 字符串。
| <div class="container py-4" style="max-width: 820px">
<h1 class="h3 mb-3">Example 09 - pipes</h1>
<table class="table table-sm align-middle">
<thead><tr><th>In the template</th><th>Displayed</th></tr></thead>
<tbody>
<tr><td><code>{{ '{{' }} now() | date {{ '}}' }}</code></td><td>{{ now() | date }}</td></tr>
<tr><td><code>{{ '{{' }} now() | date: 'fullDate' {{ '}}' }}</code></td><td>{{ now() | date: 'fullDate' }}</td></tr>
<tr><td><code>{{ '{{' }} now() | date: 'HH:mm:ss' {{ '}}' }}</code></td><td>{{ now() | date: 'HH:mm:ss' }}</td></tr>
<tr><td><code>{{ '{{' }} day | date: 'EEEE d MMMM y' {{ '}}' }}</code></td><td>{{ day | date: 'EEEE d MMMM y' }}</td></tr>
<tr><td><code>{{ '{{' }} day | date: 'longDate' : '' : 'en-US' {{ '}}' }}</code></td><td>{{ day | date: 'longDate' : '' : 'en-US' }}</td></tr>
<tr><td><code>{{ '{{' }} price | currency: 'EUR' {{ '}}' }}</code></td><td>{{ price | currency: 'EUR' }}</td></tr>
<tr><td><code>{{ '{{' }} price | number: '1.0-0' {{ '}}' }}</code></td><td>{{ price | number: '1.0-0' }}</td></tr>
<tr><td><code>{{ '{{' }} rate | percent: '1.1-1' {{ '}}' }}</code></td><td>{{ rate | percent: '1.1-1' }}</td></tr>
<tr><td><code>{{ '{{' }} name | uppercase {{ '}}' }}</code></td><td>{{ name | uppercase }}</td></tr>
<tr><td><code>{{ '{{' }} name | titlecase {{ '}}' }}</code></td><td>{{ name | titlecase }}</td></tr>
<tr><td><code>{{ '{{' }} 'APPOINTMENT' | lowercase {{ '}}' }}</code></td><td>{{ 'APPOINTMENT' | lowercase }}</td></tr>
<tr><td><code>{{ '{{' }} languages | slice: 0 : 3 {{ '}}' }}</code></td><td>{{ languages | slice: 0 : 3 }}</td></tr>
<tr><td><code>{{ '{{' }} doctor | json {{ '}}' }}</code></td><td><code>{{ doctor | json }}</code></td></tr>
<!-- 连续两个管道:第一个的结果传给第二个 -->
<tr><td><code>{{ '{{' }} name | titlecase | initials {{ '}}' }}</code></td><td>{{ name | titlecase | initials }}</td></tr>
</tbody>
</table>
<h2 class="h6">keyvalue: iterating over the properties of an object</h2>
<ul>
@for (p of doctor | keyvalue; track p.key) {
<li>{{ p.key }} = {{ p.value }}</li>
}
</ul>
<h2 class="h6">A home-made pipe: timeRange</h2>
<ul>
@for (c of slots; track $index) {
<li>{{ c | timeRange }} (start: {{ c | timeRange: 'start' }})</li>
}
</ul>
<button class="btn btn-sm btn-outline-primary" (click)="refresh()">Refresh the time</button>
</div>
|
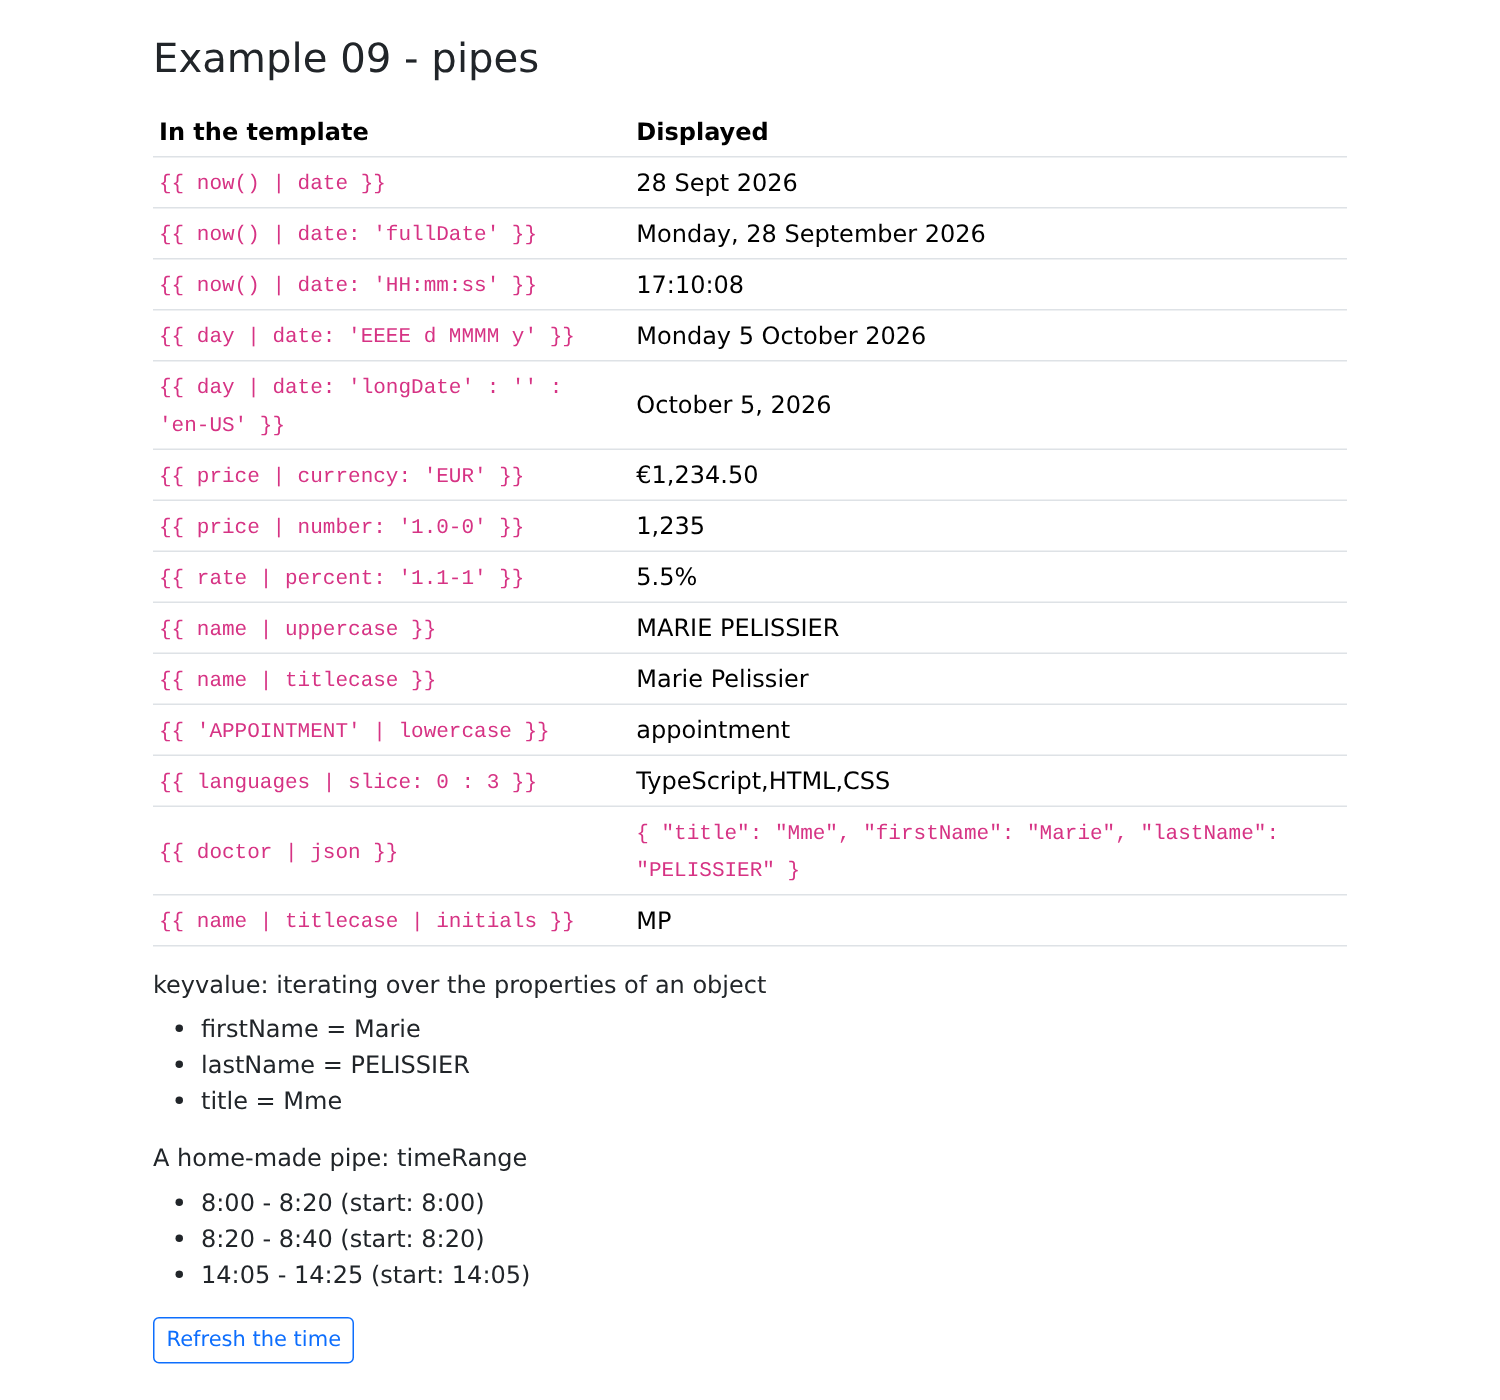
- 第 6–20 行:每个管道一行:表达式及其结果。[{{ '{{' }}]显示字符[{{],它不能在模板中直接按原样书写;
- 第 6–10 行:管道[date],使用预定义格式([fullDate]、[longDate]……)或组合格式([EEEE d MMMM y]、[HH:mm:ss])。第 10 行:它的第二和第三个参数是时区和语言:这里是美式英语([en-US]),仅针对这一个日期;
- 第 11 行:[currency],某种货币的金额;
- 第 12 行:[number: '1.0-0']:小数点前至少 1 位数字,小数点后 0 到 0 位数字:四舍五入为最接近的整数;
- 第 13 行:[percent],百分比;
- 第 14–16 行:大写字母、大写首字母、小写字母;
- 第 17 行:[slice],列表或字符串的一部分;
- 第 18 行:[json],JSON 格式的对象(对调试非常有用);
- 第 20 行:连续两个管道:第一个的结果传给第二个;
- 第 26 行:[keyvalue]将对象转换为[{ key, value }]键值对列表,[@for]可以遍历该列表;
- 第 34 行:我们的管道[timeRange],先不带参数,再带参数。
[npm start 09-pipes]:
[Angular]还提供管道[async],用于显示可观察对象的最新值(见示例 19),以及用于复数形式的[i18nPlural]。[ngx-translate]提供管道[translate],用于翻译文本(示例 21)。