5. Le viste Thymeleaf
Torniamo all’architettura di un’applicazione Spring MVC.
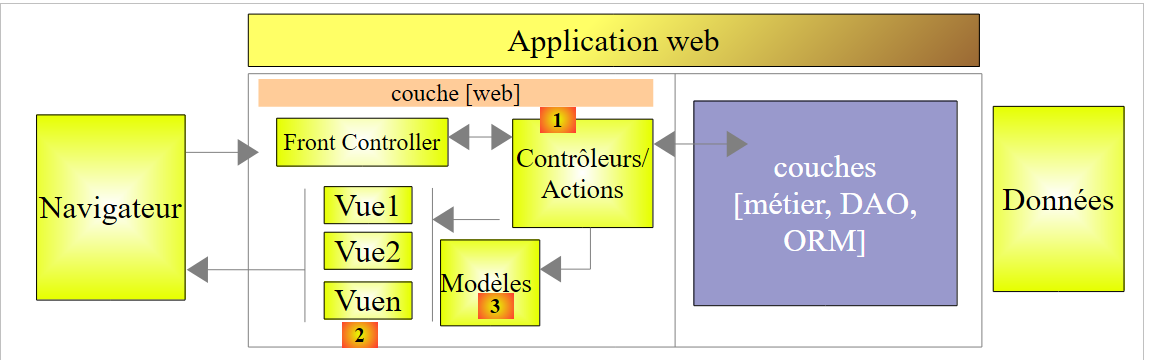 |
I due capitoli precedenti hanno descritto vari aspetti del blocco [1], ovvero le azioni. Passiamo ora a:
- il blocco [2] delle viste V;
- il blocco [3] del modello M visualizzato da queste viste;
Sin dalla creazione di Spring MVC, la tecnologia utilizzata per generare le pagine HTML inviate ai browser client era quella delle pagine JSP (Java Server Pages). Da alcuni anni è possibile utilizzare anche la tecnologia [Thymeleaf] [http://www.thymeleaf.org/]. È proprio questa che vi presentiamo ora.
5.1. Il progetto STS
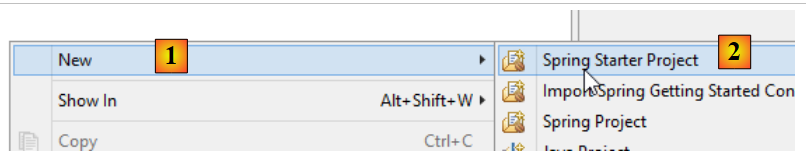
Creiamo un nuovo progetto:
 |
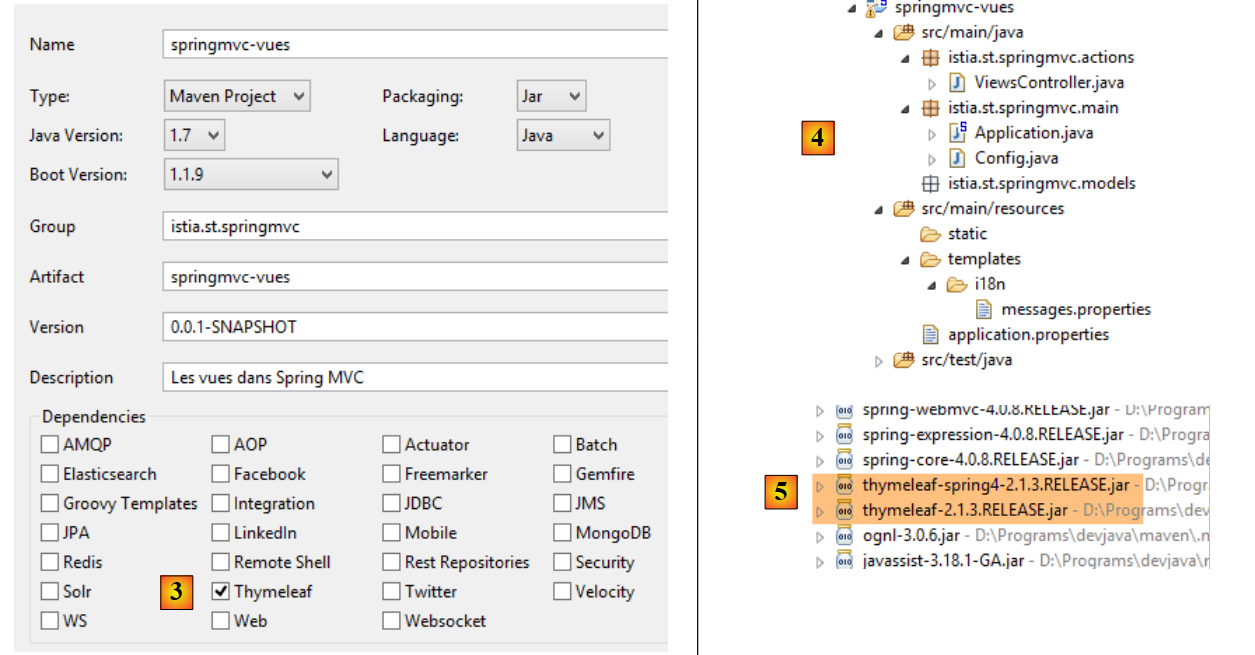 |
- In [3], indicare che il progetto necessita delle dipendenze [Thymeleaf]. In questo modo, oltre alle dipendenze [Spring MVC] del progetto precedente, verranno aggiunte quelle del framework [Thymeleaf] e [5];
Ora modifichiamo questo progetto nel modo seguente:
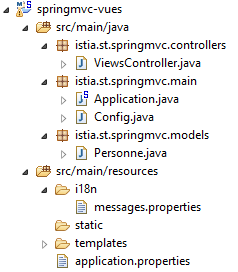 |
Prendiamo spunto dal progetto precedente:
- [istia.st.springmvc.controllers] conterrà i controller;
- [istia.st.springmvc.models] conterrà i modelli delle azioni e delle viste;
- [istia.st.springmvc.main] è il pacchetto della classe eseguibile Spring Boot;
- [templates] conterrà le viste Thymeleaf;
- [i18n] conterrà i messaggi internazionalizzati visualizzati dalle viste;
La classe [Application] è la seguente:
package istia.st.springmvc.main;

import org.springframework.boot.SpringApplication;

public class Application {

    public static void main(String[] args) {
        SpringApplication.run(Config.class, args);
    }
}
La classe [Config] è la seguente:
package istia.st.springmvc.main;

import java.util.Locale;

import org.springframework.boot.autoconfigure.EnableAutoConfiguration;
import org.springframework.context.MessageSource;
import org.springframework.context.annotation.Bean;
import org.springframework.context.annotation.ComponentScan;
import org.springframework.context.annotation.Configuration;
import org.springframework.context.support.ResourceBundleMessageSource;
import org.springframework.web.servlet.config.annotation.InterceptorRegistry;
import org.springframework.web.servlet.config.annotation.WebMvcConfigurerAdapter;
import org.springframework.web.servlet.i18n.CookieLocaleResolver;
import org.springframework.web.servlet.i18n.LocaleChangeInterceptor;

@Configuration
@ComponentScan({ "istia.st.springmvc.controllers", "istia.st.springmvc.models" })
@EnableAutoConfiguration
public class Config extends WebMvcConfigurerAdapter {
    @Bean
    public MessageSource messageSource() {
        ResourceBundleMessageSource messageSource = new ResourceBundleMessageSource();
        messageSource.setBasename("i18n/messages");
        return messageSource;
    }

    @Bean
    public LocaleChangeInterceptor localeChangeInterceptor() {
        LocaleChangeInterceptor localeChangeInterceptor = new LocaleChangeInterceptor();
        localeChangeInterceptor.setParamName("lang");
        return localeChangeInterceptor;
    }

    @Override
    public void addInterceptors(InterceptorRegistry registry) {
        registry.addInterceptor(localeChangeInterceptor());
    }

    @Bean
    public CookieLocaleResolver localeResolver() {
        CookieLocaleResolver localeResolver = new CookieLocaleResolver();
        localeResolver.setCookieName("lang");
        localeResolver.setDefaultLocale(new Locale("fr"));
        return localeResolver;
    }
}
Questa configurazione consente, per il momento, la gestione delle impostazioni locali.
Il controller [ViewController] è il seguente:
package istia.st.springmvc.actions;

import org.springframework.stereotype.Controller;

@Controller
public class ViewsController {

}
- alla riga 5, l'annotazione [@Controller] ha sostituito l'annotazione [@RestController] poiché, d'ora in poi, le azioni non genereranno la risposta al client. Esse:
- costruire un modello M
- restituire un tipo [String] che sarà il nome della vista [Thymeleaf] incaricata di visualizzare tale modello. È la combinazione di questa vista V e di questo modello M che genererà il flusso HTML inviato al cliente;
Il file [messages.properties] è per ora vuoto.
5.2. [/v01]: le basi di Thymeleaf
Consideriamo la prima azione successiva in [ViewsController]:
    // Nozioni di base su Thymeleaf - 1
    @RequestMapping(value = "/v01", method = RequestMethod.GET)
    public String v01() {
        return "v01";
}
- riga 3: l’azione restituisce un tipo [String]. Questo sarà il nome dell’azione;
- riga 4: questa vista sarà [v01]. Per impostazione predefinita, deve trovarsi nella cartella [templates] e chiamarsi [v01.html];
La vista [v01.html] è la seguente:
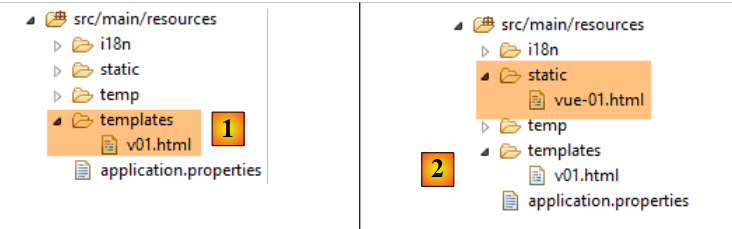 |
<!DOCTYPE html>
<html xmlns:th="http://www.thymeleaf.org">
<head>
<title th:text="'Les vues'">Spring 4 MVC</title>
<meta http-equiv="Content-Type" content="text/html; charset=UTF-8" />
</head>
<body>
    <h2 th:text="'Les vues dans Spring MVC'">Spring 4 MVC</h2>
</body>
</html>
Si tratta di un file HTML. La presenza di Thymeleaf è evidente:
- nello spazio dei nomi [th] alla riga 2;
- dagli attributi [th:text] alle righe 4 e 8;
Abbiamo qui un file HTML valido che può essere visualizzato. Lo inseriamo nella cartella [static] [2] con il nome [vue-01.html] e lo apriamo direttamente con un browser:
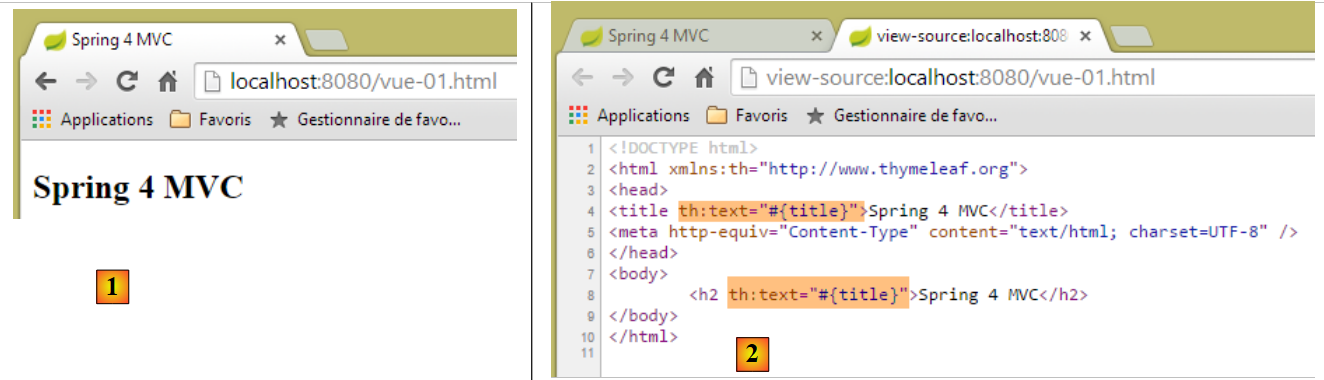 |
Se esaminiamo il codice sorgente della pagina in [2], possiamo notare che gli attributi [th:text] sono stati inviati dal server e ignorati dal browser. Quando una vista è il risultato di un'azione, Thymeleaf entra in funzione e interpreta gli attributi [th] prima di inviare la risposta al client.
Il tag HTML:
<title th:text="'Les vues'">Spring 4 MVC</title>
viene elaborato da Thymeleaf nel modo seguente:
- th:text ha la sintassi th:text="espressione", dove espressione è un'espressione da valutare. Quando tale espressione è una stringa di caratteri, come in questo caso, è necessario racchiuderla tra apostrofi;
- il valore di [expression] sostituisce il testo del tag HTML, in questo caso il testo del tag [title];
Dopo l’elaborazione, il tag sopra riportato è diventato:
<title>Les vues</title>
Richiediamo l’azione [/v01]:
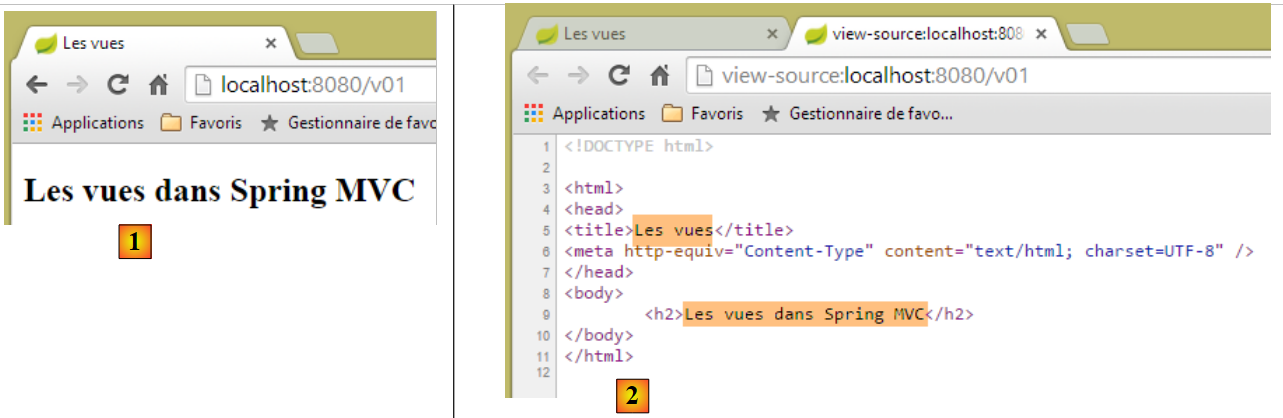 |
- in [2], si vede il lavoro di sostituzione effettuato da Thymeleaf;
Ora sostituiamo URL con [http://localhost:8080/v01.html]:
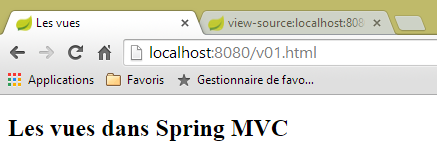 |
Come va interpretato questo? La vista [templates/v01.html] è stata fornita direttamente senza passare attraverso un'azione? Per chiarire la situazione, creiamo la seguente azione [/v02]:
    // Nozioni di base su Thymeleaf - 2
    @RequestMapping(value = "/v02", method = RequestMethod.GET)
    public String v02() {
        System.out.println("action v02");
        return "vue-02";
}
La vista [vue-02.html] è una copia di [v01.html]:
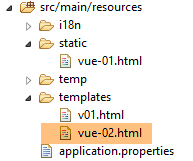 |
Ora richiediamo URL e [http://localhost:8080/vue-02.html]:
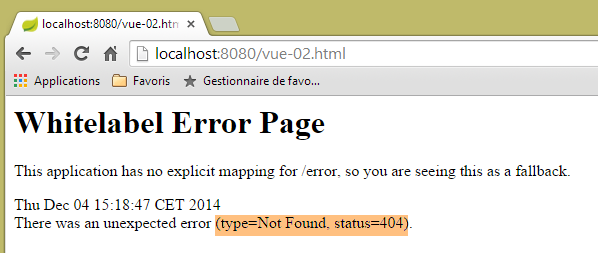 |
URL non è stato trovato. Ora richiediamo URL e [http://localhost:8080/v02.html]
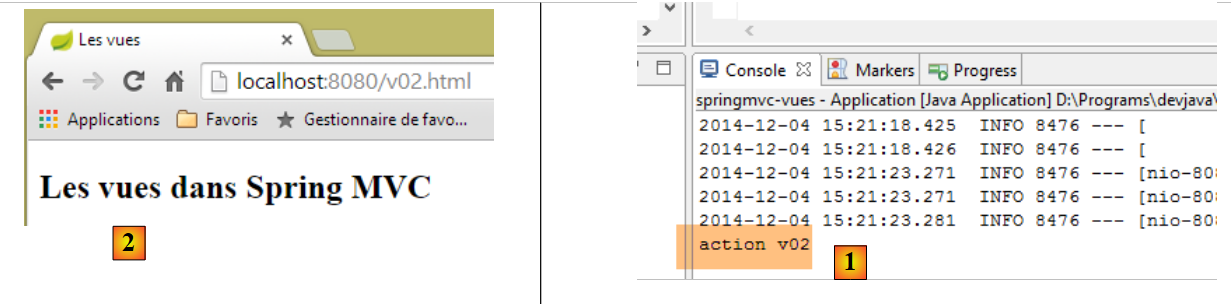 |
- nei log della console, in [1], si vede che è stata richiamata l’azione [/v02], la quale ha fatto visualizzare la vista [vue-02.html] in [2];
Ora sappiamo che URL [http://localhost:8080/v02.html] può indicare anche un file [/v02.html] nella cartella [static]. Cosa succede se questo file esiste? Proviamo. Creiamo nella cartella [static] il seguente file [v02.html]:
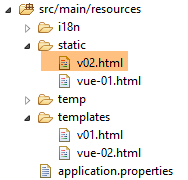 |
<!DOCTYPE html>
<html xmlns:th="http://www.thymeleaf.org">
<head>
<title>Spring 4 MVC</title>
<meta http-equiv="Content-Type" content="text/html; charset=UTF-8" />
</head>
<body>
    <h2>Spring 4 MVC</h2>
</body>
</html>
quindi richiediamo URL e [http://localhost:8080/v02.html]:
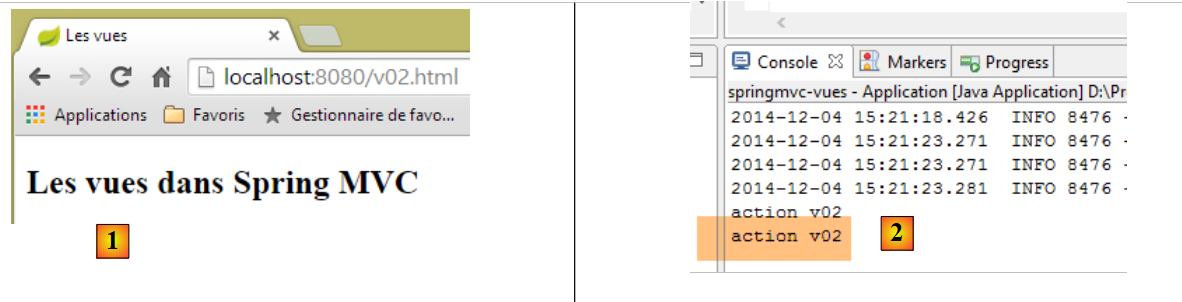 |
[1] e [2] indicano che è stata richiamata l'azione [/v02]. Si noti quindi che quando l'azione URL richiesta ha la forma [/x.html], Spring / Thymeleaf:
- esegue l'azione [/x] se esiste;
- visualizza la pagina [/static/x.html] se esiste;
- genera un'eccezione 404 Not found in caso contrario;
Per evitare confusione, d'ora in poi le azioni e le viste non avranno gli stessi nomi.
5.3. [/v03]: internazionalizzazione delle viste
L'integrazione Spring / Thymeleaf consente a Thymeleaf di utilizzare i file di messaggi di Spring. Consideriamo la seguente nuova azione [/v03]:
    // internazionalizzazione delle viste
    @RequestMapping(value = "/v03", method = RequestMethod.GET)
    public String v03() {
        return "vue-03";
}
Essa fa visualizzare la seguente vista [vue-03.html]:
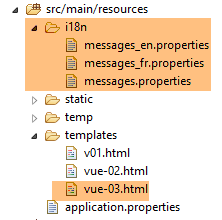 |
<!DOCTYPE html>
<html xmlns:th="http://www.thymeleaf.org">
<head>
<title th:text="#{title}">Spring 4 MVC</title>
<meta http-equiv="Content-Type" content="text/html; charset=UTF-8" />
</head>
<body>
    <h2 th:text="#{title}">Spring 4 MVC</h2>
</body>
</html>
Alle righe 4 e 8, l’espressione dell’attributo [th:text] è #{title}, il cui valore è il messaggio chiave [title]. Creiamo i seguenti file [messages_fr.properties] e [messages_en.properties]:
[messages_fr.properties]
title=Les vues dans Spring MVC
[messages_en.properties]
title=Views in Spring MVC
Richiediamo i seguenti URL, [http://localhost:8080/v03.html?lang=fr] e [http://localhost:8080/v03.html?lang=en]:
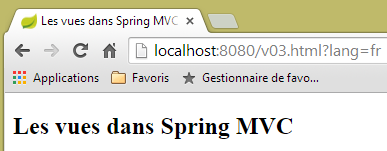 | 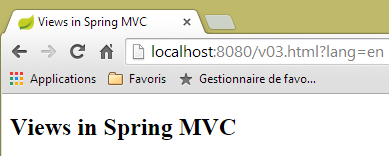 |
Notiamo che abbiamo applicato ciò che abbiamo imparato di recente. Anziché denominare l’azione [v03] con [/v03], l’abbiamo denominata [/v03.html].
5.4. [/v04]: creazione del modello M di una vista V
Consideriamo la seguente nuova azione [/v04]:
    // Creazione del modello M di una vista V
    @RequestMapping(value = "/v04", method = RequestMethod.GET)
    public String v04(Model model) {
        model.addAttribute("personne", new Personne(7, "martin", 17));
        System.out.println(String.format("Modèle=%s", model));
        return "vue-04";
}
- riga 4: il modello della vista viene inserito nei parametri dell’azione. Per impostazione predefinita, questo modello iniziale è vuoto. Vedremo che è possibile precompilarlo;
- riga 4: un modello di tipo [Model] è una sorta di dizionario di elementi di tipo <String, Object>. Riga 4: aggiungiamo una voce in questo dizionario con la chiave [personne] associata a un valore di tipo [Personne];
- riga 5: visualizziamo il modello sulla console per vedere come si presenta;
- riga 6: visualizziamo la vista [vue-04.html];
La classe [Personne] è quella utilizzata nel capitolo precedente:
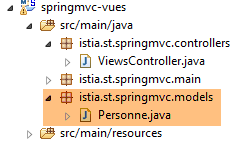 |
package istia.st.springmvc.models;

public class Personne {

    // identificativo
    private Integer id;
    // nome
    private String nom;
    // età
    private int age;

    // costruttori
    public Personne() {

    }

    public Personne(String nom, int age) {
        this.nom = nom;
        this.age = age;
    }

    public Personne(Integer id, String nom, int age) {
        this(nom, age);
        this.id = id;
    }

    @Override
    public String toString() {
        return String.format("[id=%s, nom=%s,  age=%d]", id, nom, age);
    }

    // getter e setter
...
}
La vista [vue-04.html] è la seguente:
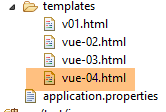 |
<!DOCTYPE html>
<html xmlns:th="http://www.thymeleaf.org">
    <head>
        <title th:text="#{title}">Spring 4 MVC</title>
        <meta http-equiv="Content-Type" content="text/html; charset=UTF-8" />
    </head>
    <body>
        <p>
            <span th:text="#{personne.nom}">Nom :</span>
            <span th:text="${personne.nom}">Bill</span>
        </p>
        <p>
            <span th:text="#{personne.age}">Age :</span>
            <span th:text="${personne.age}">56</span>
        </p>
    </body>
</html>
- alla riga 10, introduce un nuovo tipo di espressione Thymeleaf ${var}, dove var è una chiave del modello M della vista. Ricordiamo che l’azione [/v04] ha inserito nel modello una chiave [personne] associata a un tipo Personne[id, nom, age];
- riga 10: visualizza il nome della persona presente nel modello;
- riga 14: visualizza la sua età;
I file dei messaggi vengono modificati per aggiungere le chiavi [personne.nom] e [personne.age] delle righe 9 e 13. Il risultato è il seguente:
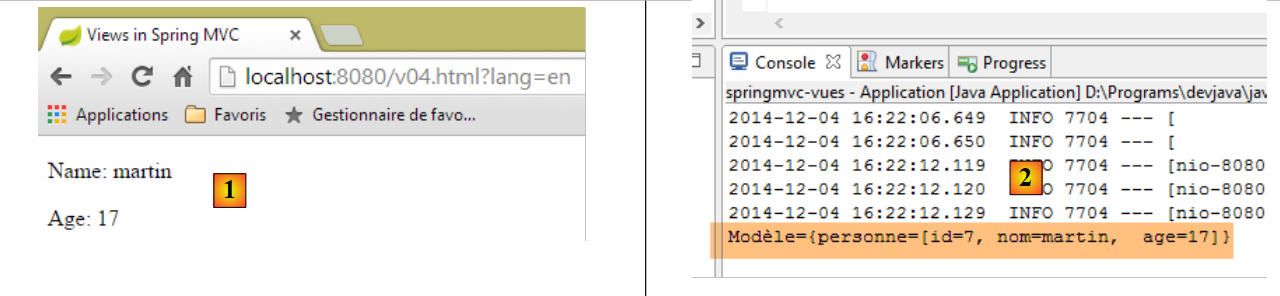 |
e la natura del modello M si trova nei log della console [2].
Ci si potrebbe chiedere perché la vista [vue-04] non venga scritta nel modo seguente:
<!DOCTYPE html>
<html xmlns:th="http://www.thymeleaf.org">
    <head>
        <title th:text="#{title}"></title>
        <meta http-equiv="Content-Type" content="text/html; charset=UTF-8" />
    </head>
    <body>
        <p>
            <span th:text="#{personne.nom}" /></span>
            <span th:text="${personne.nom}"></span>
        </p>
        <p>
            <span th:text="#{personne.age}"></span>
            <span th:text="${personne.age}"></span>
        </p>
    </body>
</html>
Questa vista è perfettamente valida e darà lo stesso risultato di prima. Uno degli obiettivi di Thymeleaf è che la pagina Thymeleaf possa essere visualizzata anche se non passa attraverso Thymeleaf. Creiamo quindi due nuove pagine statiche:
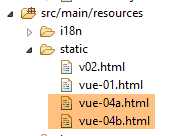 |
La vista [vue-04b.html] è una copia della vista [vue-04.html]. Lo stesso vale per la vista [vue-04a.html], ma in questo caso sono stati rimossi i testi statici dalla pagina. Se visualizziamo le due pagine, otteniamo i seguenti risultati:
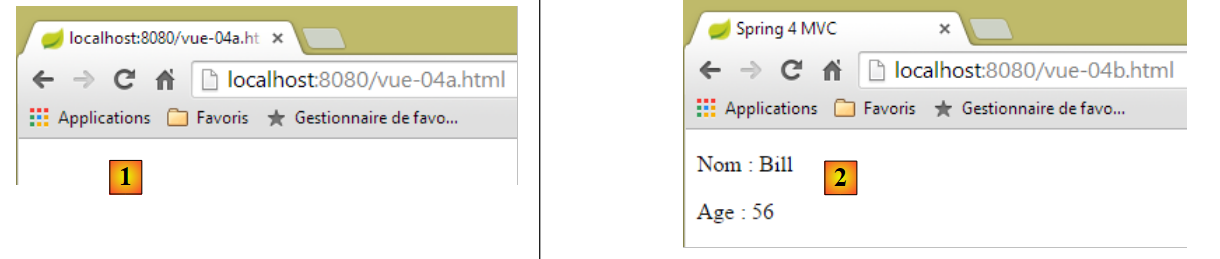 |
Nel caso di [1], la struttura della pagina non appare, mentre nel caso di [2] è ben visibile. Ecco perché è utile inserire testi statici in una vista Thymeleaf, anche se in fase di esecuzione verranno sostituiti da altri testi.
Ora esaminiamo un dettaglio tecnico. Nella vista [vue-04.html], formattiamo il codice tramite [ctrl-Maj-F]. Otteniamo il seguente risultato:
<!DOCTYPE html>
<html xmlns:th="http://www.thymeleaf.org">
<head>
<title th:text="#{title}">Spring 4 MVC</title>
<meta http-equiv="Content-Type" content="text/html; charset=UTF-8" />
</head>
<body>
    <p>
        <span th:text="#{personne.nom}">Nom :</span> <span
            th:text="${personne.nom}">Bill</span>
    </p>
    <p>
        <span th:text="#{personne.age}">Age :</span> <span
            th:text="${personne.age}">56</span>
    </p>
</body>
</html>
I tag sono disallineati e il codice diventa più difficile da leggere. Se rinominiamo [vue-04.html] in [vue-04.xml] e riformattiamo il codice, i tag tornano ad essere allineati. Pertanto, il suffisso [xml] sarebbe più pratico. È possibile lavorare con questo suffisso. A tal fine è necessario configurare Thymeleaf. Per non vanificare quanto fatto finora, duplichiamo il progetto [springmvc-vues] esaminato in precedenza in un progetto [springmvc-vues-xml]
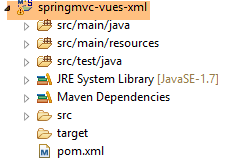 |
Modifichiamo il file [pom.xml] nel modo seguente:
    <groupId>istia.st.springmvc</groupId>
    <artifactId>springmvc-vues-xml</artifactId>
    <version>0.0.1-SNAPSHOT</version>
    <packaging>jar</packaging>

    <name>springmvc-vues-xml</name>
<description>Les vues dans Spring MVC</description>
Il nome del progetto viene modificato alle righe 2 e 6. Inoltre, modifichiamo il suffisso delle viste presenti nella cartella [templates]:
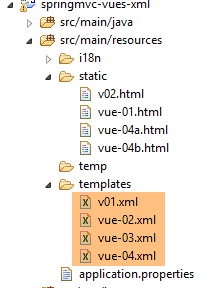 |
Il documento [http://docs.spring.io/spring-boot/docs/current/reference/html/common-application-properties.html] elenca le proprietà di configurazione di Spring Boot utilizzabili nel file [application.properties]:
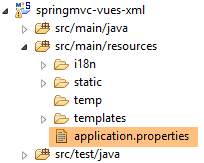 |
Questo documento illustra le proprietà che Spring Boot utilizza durante l’autoconfigurazione e che è possibile modificare impostando una configurazione diversa nel file [application.properties]. Per Thymeleaf, le proprietà di autoconfigurazione sono le seguenti:
# THYMELEAF (ThymeleafAutoConfiguration)
spring.thymeleaf.check-template-location=true
spring.thymeleaf.prefix=classpath:/templates/
spring.thymeleaf.suffix=.html
spring.thymeleaf.mode=HTML5
spring.thymeleaf.encoding=UTF-8
spring.thymeleaf.content-type=text/html # ; viene aggiunto "charset=<encoding>"
spring.thymeleaf.cache=true # impostato su false per l'aggiornamento a caldo
Basterebbe quindi inserire la riga
spring.thymeleaf.suffix=.xml
in [application.properties]. Seguiremo però un altro approccio, quello della configurazione tramite programmazione. Configureremo Thymeleaf nella classe [Config]:
package istia.st.springmvc.main;

import java.util.Locale;

...
import org.thymeleaf.spring4.SpringTemplateEngine;
import org.thymeleaf.spring4.templateresolver.SpringResourceTemplateResolver;

@Configuration
@ComponentScan({ "istia.st.springmvc.controllers", "istia.st.springmvc.models" })
@EnableAutoConfiguration
public class Config extends WebMvcConfigurerAdapter {
    ...

    @Bean
    public SpringResourceTemplateResolver templateResolver() {
        SpringResourceTemplateResolver templateResolver = new SpringResourceTemplateResolver();
        templateResolver.setPrefix("classpath:/templates/");
        templateResolver.setSuffix(".xml");
        templateResolver.setTemplateMode("HTML5");
        templateResolver.setCharacterEncoding("UTF-8");
     templateResolver.setCacheable(true);
        return templateResolver;
    }

    @Bean
    SpringTemplateEngine templateEngine(SpringResourceTemplateResolver templateResolver) {
        SpringTemplateEngine templateEngine = new SpringTemplateEngine();
        templateEngine.setTemplateResolver(templateResolver);
        return templateEngine;
    }

}
- le righe 16-24 configurano un oggetto [TemplateResolver] per Thymeleaf. È questo oggetto che viene caricato a partire dal nome della vista fornito da un'azione, per individuare il file corrispondente;
- le righe 18 e 19 definiscono il prefisso e il suffisso da aggiungere al nome della vista per individuare il file. Pertanto, se il nome della vista è [vue04], il file ricercato sarà [classpath:/templates/vue04.xml]. [classpath:/templates] è una sintassi Spring che indica una cartella [/templates] situata nella radice del Classpath del progetto;
- riga 21: affinché nella risposta inviata al client sia presente l’intestazione HTTP:
Content-Type:text/html;charset=UTF-8
- riga 20: indica che la vista è conforme allo standard HTML5;
- riga 22: indica che le viste Thymeleaf possono essere memorizzate nella cache;
- righe 26-31: imposta il motore di risoluzione delle viste della coppia Spring/Thymeleaf con il motore di risoluzione precedente;
Avviamo l'eseguibile di questo nuovo progetto e richiediamo il URL [http://localhost:8080/v04.html?lang=en]:
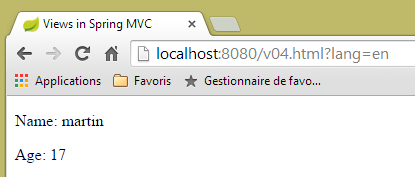 |
Si nota che nel URL, l’azione [/v04] è stata sostituita anche in questo caso da [v04.html].
5.5. [/v05]: fattorizzazione di un oggetto in una vista Thymeleaf
Creiamo la seguente azione [/v05]:
    // creazione del modello M di una vista V - 2
    @RequestMapping(value = "/v05", method = RequestMethod.GET)
    public String v05(Model model) {
        model.addAttribute("personne", new Personne(7, "martin", 17));
        return "vue-05";
}
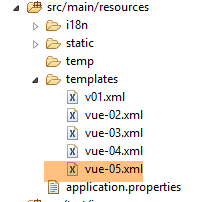
È identica all’azione [/v04]. La vista [vue-05.xml] è la seguente:
 |
<!DOCTYPE html>
<html xmlns:th="http://www.thymeleaf.org">
    <head>
        <title th:text="#{title}">Spring 4 MVC</title>
        <meta http-equiv="Content-Type" content="text/html; charset=UTF-8" />
    </head>
    <body>
        <div th:object="${personne}">
            <p>
                <span th:text="#{personne.nom}">Nom :</span>
                <span th:text="*{nom}">Bill</span>
            </p>
            <p>
                <span th:text="#{personne.age}">Age :</span>
                <span th:text="*{age}">56</span>
            </p>
        </div>
    </body>
</html>
- righe 8-17: all’interno di queste righe viene definito un oggetto Thymeleaf tramite l’attributo [th:object="${personne}"] (riga 8). Questo oggetto corrisponde alla chiave [personne] presente nel modello:
- riga 11: l'espressione Thymeleaf [*{nom}] è equivalente a [${objet.nom}], dove [objet] è l'oggetto Thymeleaf corrente. Quindi, in questo caso, l’espressione [*{nom}] è equivalente a [${personne.nom}];
- riga 15: idem;
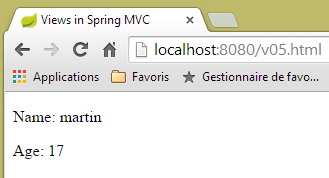
Il risultato:
 |
5.6. [/v06]: i test in una vista Thymeleaf
Consideriamo la seguente azione [/v06]:
    // creazione del modello M di una vista V - 3
    @RequestMapping(value = "/v06", method = RequestMethod.GET)
    public String v06(Model model) {
        model.addAttribute("personne", new Personne(7, "martin", 17));
        return "vue-06";
}
È identica alle due azioni precedenti. Visualizza la seguente vista [vue-06.xml]:
<!DOCTYPE html>
<html xmlns:th="http://www.thymeleaf.org">
<head>
<title th:text="#{title}">Spring 4 MVC</title>
<meta http-equiv="Content-Type" content="text/html; charset=UTF-8" />
</head>
<body>
<div th:object="${personne}">
<p>
<span th:text="#{personne.nom}">Nom :</span>
<span th:text="*{nom}">Bill</span>
</p>
<p>
<span th:text="#{personne.age}">Age :</span>
<span th:text="*{age}">56</span>
</p>
<p th:if="*{age} >= 18" th:text="#{personne.majeure}">Vous êtes majeur</p>
<p th:if="*{age} < 18" th:text="#{personne.mineure}">Vous êtes mineur</p>
</div>
</body>
</html>
- riga 17: l'attributo [th:if] valuta un'espressione booleana. Se l'espressione è vera, il tag viene visualizzato, altrimenti no. Quindi, in questo caso, se ${personne.age}>=18, verrà visualizzato il testo [#{personne.majeure}], ovvero il messaggio con chiave [personne.majeure] presente nei file dei messaggi;
- riga 18: non è possibile scrivere [*{age} < 18] poiché il segno < è un carattere riservato. È quindi necessario utilizzare il suo equivalente HTML [<], denominato anche entità HTML [http://en.wikipedia.org/wiki/List_of_XML_and_HTML_character_entity_references];
I file dei messaggi vengono modificati:
[messages_fr.properties]
title=Les vues dans Spring MVC
personne.nom=Nom :
personne.age=Age :
personne.mineure=Vous êtes mineur
personne.majeure=Vous êtes majeur
[messages_en.properties]
title=Views in Spring MVC
personne.nom=Name:
personne.age=Age:
personne.mineure=You are under 18
personne.majeure=You are over 18
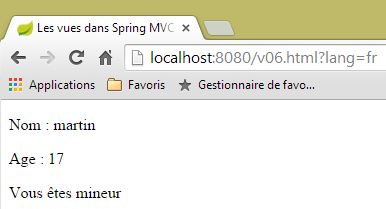
Il risultato è il seguente:
 | 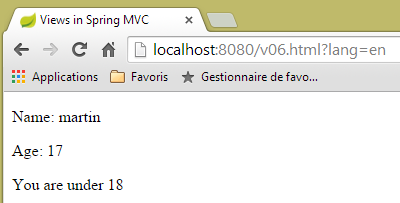 |
5.7. [/v07]: iterazione in una vista Thymeleaf
Consideriamo la seguente azione [/v07]:
    // creazione del modello M di una vista V - 4
    @RequestMapping(value = "/v07", method = RequestMethod.GET)
    public String v07(Model model) {
        model.addAttribute("liste", new Personne[] { new Personne(7, "martin", 17), new Personne(8, "lucie", 32),
                new Personne(9, "paul", 7) });
        return "vue-07";
}
- l'azione crea un elenco di tre persone, lo inserisce nel modello associato alla chiave [liste] e visualizza la vista [vue-07];
La vista [vue-07.xml] è la seguente:
<!DOCTYPE html>
<html xmlns:th="http://www.thymeleaf.org">
    <head>
        <title th:text="#{title}">Spring 4 MVC</title>
        <meta http-equiv="Content-Type" content="text/html; charset=UTF-8" />
    </head>
    <body>
        <h3 th:text="#{liste.personnes}">Liste de personnes</h3>
        <ul>
            <li th:each="element : ${liste}" th:text="'['+ ${element.id} + ', ' +${element.nom}+ ', ' + ${element.age} + ']'">[id,nom,age]</li>
        </ul>
    </body>
</html>
- riga 10: l'attributo [th:each] ripete il tag in cui si trova, in questo caso un tag <li>. Qui presenta due parametri [element : collection], dove [collection] è una collezione di oggetti, in questo caso un elenco di persone. Thymeleaf scorrerà la collezione e genererà tanti tag <li> quanti sono gli elementi presenti nella collezione. Per ogni tag <li>, [element] rappresenterà l’elemento della collezione associato al tag. Per questo elemento, verrà valutato l’attributo [th:text]. La sua espressione è in questo caso una concatenazione di stringhe per ottenere il risultato [id, nom, age];
- riga 8: si aggiunge la chiave [liste.personnes] nei file dei messaggi;
Ecco il risultato:
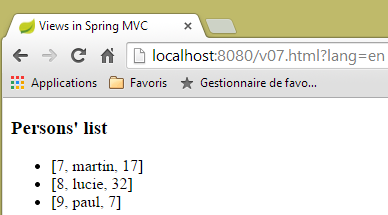 | 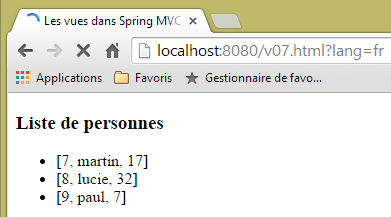 |
5.8. [/v08-/v10]: @ModelAttribute
Torniamo su un aspetto che abbiamo visto durante lo studio delle azioni, ovvero il ruolo dell’annotazione [@ModelAttribute]. Aggiungiamo la seguente nuova azione:
    // --------------- Binding e ModelAttribute ----------------------------------

    // se il parametro è un oggetto, viene istanziato ed eventualmente modificato dai parametri della richiesta
    // diventerà automaticamente parte del modello della vista con la chiave [key]
    // per il parametro @ModelAttribute("xx"), la chiave sarà uguale a xx
    // per il parametro @ModelAttribute, la chiave sarà uguale al nome della classe del parametro che inizia con una lettera minuscola
    // se @ModelAttribute è assente, allora tutto avviene come se fosse presente senza chiave
    // si noti che questa presenza automatica nel modello non avviene se il parametro non è un oggetto

    @RequestMapping(value = "/v08", method = RequestMethod.GET)
    public String v08(@ModelAttribute("someone") Personne p, Model model) {
        System.out.println(String.format("Modèle=%s", model));
        return "vue-08";
}
- riga 11: l'annotazione [@ModelAttribute("someone")] aggiungerà automaticamente l'oggetto [Personne p] nel modello, associato alla chiave [someone];
- riga 12: per verificare il modello;
- riga 13: visualizza la vista [vue-08.xml];
La vista [vue-08.xml] è la seguente:
<!DOCTYPE html>
<html xmlns:th="http://www.thymeleaf.org">
    <head>
        <title th:text="#{title}">Spring 4 MVC</title>
        <meta http-equiv="Content-Type" content="text/html; charset=UTF-8" />
    </head>
    <body>
        <div th:object="${someone}">
            <p>
                <span th:text="#{personne.id}">Id :</span>
                <span th:text="*{id}">14</span>
            </p>
            <p>
                <span th:text="#{personne.nom}">Nom :</span>
                <span th:text="*{nom}">Bill</span>
            </p>
            <p>
                <span th:text="#{personne.age}">Age :</span>
                <span th:text="*{age}">56</span>
            </p>
        </div>
    </body>
</html>
- riga 8: l'oggetto Thymeleaf viene inizializzato con l'oggetto chiave [someone];
Il risultato è il seguente:
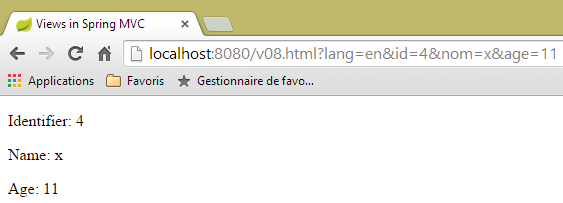 |
e nella console compare il seguente log:
Modèle={someone=[id=4, nom=x, age=11], org.springframework.validation.BindingResult.someone=org.springframework.validation.BeanPropertyBindingResult: 0 errors}
Consideriamo ora la seguente azione [/v09]:
    @RequestMapping(value = "/v09", method = RequestMethod.GET)
    public String v09(Personne p, Model model) {
        System.out.println(String.format("Modèle=%s", model));
        return "vue-09";
}
- riga 1: la presenza del parametro [Personne p] inserirà automaticamente la persona [p] nel modello. Poiché non viene specificata alcuna chiave, la chiave utilizzata è il nome della classe con il primo carattere in minuscolo. Pertanto, [Personne p] è equivalente a [@ModelAttribute("personne") Personne p];
La vista [vue.09.xml] è la seguente:
<!DOCTYPE html>
<html xmlns:th="http://www.thymeleaf.org">
    <head>
        <title th:text="#{title}">Spring 4 MVC</title>
        <meta http-equiv="Content-Type" content="text/html; charset=UTF-8" />
    </head>
    <body>
        <div th:object="${personne}">
            <p>
                <span th:text="#{personne.id}">Id :</span>
                <span th:text="*{id}">14</span>
            </p>
            <p>
                <span th:text="#{personne.nom}">Nom :</span>
                <span th:text="*{nom}">Bill</span>
            </p>
            <p>
                <span th:text="#{personne.age}">Age :</span>
                <span th:text="*{age}">56</span>
            </p>
        </div>
    </body>
</html>
- riga 8: la chiave modello utilizzata è [personne];
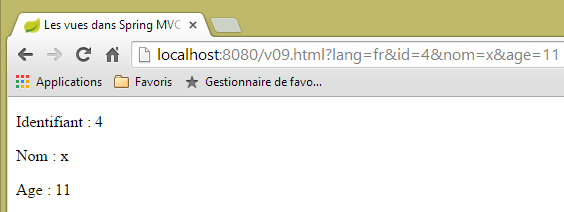
Ecco un risultato:
 |
e il log nella console del server:
Modèle={personne=[id=4, nom=x, age=11], org.springframework.validation.BindingResult.personne=org.springframework.validation.BeanPropertyBindingResult: 0 errors}
Ora consideriamo la seguente nuova azione [/v10]:
    @ModelAttribute("uneAutrePersonne")
    private Personne getPersonne(){
        return new Personne(24,"pauline",55);
    }

    @RequestMapping(value = "/v10", method = RequestMethod.GET)
    public String v10(Model model) {
        System.out.println(String.format("Modèle=%s", model));
        return "vue-10";
}
- righe 1-4: definiscono un metodo che crea nel modello di ogni richiesta un elemento chiave [uneAutrePersonne] associato all'oggetto [new Personne(24,"pauline",55)];
- righe 6-10: l’azione [/v10] non fa altro che passare il modello che riceve alla vista [vue-10.xml]. Da notare che il parametro [Model model] deve essere presente solo per l'istruzione della riga 8. Senza di esso, è superfluo;
La vista [vue-10.xml] è la seguente:
<!DOCTYPE html>
<html xmlns:th="http://www.thymeleaf.org">
    <head>
        <title th:text="#{title}">Spring 4 MVC</title>
        <meta http-equiv="Content-Type" content="text/html; charset=UTF-8" />
    </head>
    <body>
        <div th:object="${uneAutrePersonne}">
            <p>
                <span th:text="#{personne.id}">Id :</span>
                <span th:text="*{id}">14</span>
            </p>
            <p>
                <span th:text="#{personne.nom}">Nom :</span>
                <span th:text="*{nom}">Bill</span>
            </p>
            <p>
                <span th:text="#{personne.age}">Age :</span>
                <span th:text="*{age}">56</span>
            </p>
        </div>
    </body>
</html>
Il risultato è il seguente:
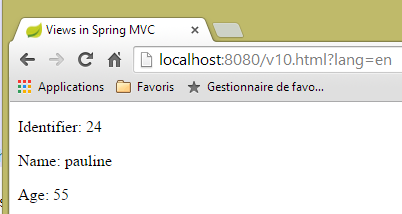 |
e il log della console è il seguente:
5.9. [/v11]: @SessionAttributes
Torniamo su un aspetto che abbiamo visto durante lo studio delle azioni, ovvero il ruolo dell’annotazione [@SessionAttributes]. Aggiungiamo la seguente nuova azione [/v11]:
    @ModelAttribute("jean")
    private Personne getJean(){
        return new Personne(33,"jean",10);
    }

    @RequestMapping(value = "/v11", method = RequestMethod.GET)
    public String v11(Model model, HttpSession session) {
        System.out.println(String.format("Modèle=%s, Session[jean]=%s", model, session.getAttribute("jean")));
        return "vue-11";
}
Abbiamo qualcosa di analogo a quanto appena studiato. La differenza risiede in un'annotazione [@SessionAttributes] posizionata sulla classe stessa:
@Controller
@SessionAttributes("jean")
public class ViewsController {
- riga 2: si indica che la chiave [jean] del modello deve essere inserita nella sessione;
Ecco perché alla riga 7 dell'azione è stata inserita la sessione. Alla riga 8 viene visualizzato il valore della sessione associata alla chiave [jean].
La vista [vue-11.xml] è la seguente:
<!DOCTYPE html>
<html xmlns:th="http://www.thymeleaf.org">
    <head>
        <title th:text="#{title}">Spring 4 MVC</title>
        <meta http-equiv="Content-Type" content="text/html; charset=UTF-8" />
    </head>
    <body>
        <div th:object="${jean}">
            <p>
                <span th:text="#{personne.id}">Id :</span>
                <span th:text="*{id}">14</span>
            </p>
            <p>
                <span th:text="#{personne.nom}">Nom :</span>
                <span th:text="*{nom}">Bill</span>
            </p>
            <p>
                <span th:text="#{personne.age}">Age :</span>
                <span th:text="*{age}">56</span>
            </p>
        </div>
        <hr />
        <div th:object="${session.jean}">
            <p>
                <span th:text="#{personne.id}">Id :</span>
                <span th:text="*{id}">14</span>
            </p>
            <p>
                <span th:text="#{personne.nom}">Nom :</span>
                <span th:text="*{nom}">Bill</span>
            </p>
            <p>
                <span th:text="#{personne.age}">Age :</span>
                <span th:text="*{age}">56</span>
            </p>
        </div>
    </body>
</html>
Vengono visualizzate due persone:
- righe 8-21: la persona con chiave [jean] nel modello;
- righe 23-36: la persona con chiave [jean] nella sessione;
I risultati sono i seguenti:
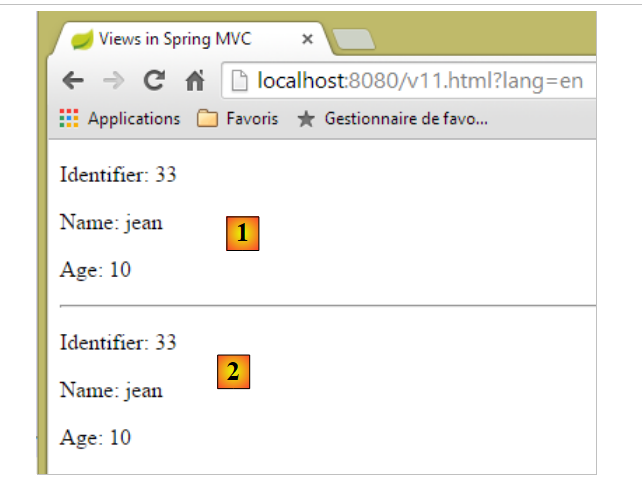 |
- in [1], la persona con chiave [jean] nel modello;
- in [2], la persona con chiave [jean] nella sessione;
Il log della console è il seguente:
Modèle={uneAutrePersonne=[id=24, nom=pauline, age=55], jean=[id=33, nom=jean, age=10]}, Session[jean]=null
Da quanto sopra si evince che la chiave [jean] non è presente nella sessione che riceve l'azione. Ne consegue che la chiave [jean] è stata inserita nella sessione dopo l'esecuzione dell'azione e prima della visualizzazione della vista.
Consideriamo ora il caso in cui una chiave sia referenziata sia da [@ModelAttribute] che da [@SessionAttributes]. Costruiamo le due azioni seguenti:
    @RequestMapping(value = "/v12a", method = RequestMethod.GET)
    @ResponseBody
    public void v12a(HttpSession session) {
        session.setAttribute("paul", new Personne(51, "paul", 33));
    }

    // nel caso in cui la chiave di [@ModelAttribute] sia anche una chiave di [@SessionAttributes]
    // in questo caso, il parametro corrispondente viene inizializzato con il valore della sessione
    @RequestMapping(value = "/v12b", method = RequestMethod.GET)
    public String v12b(Model model, @ModelAttribute("paul") Personne p) {
        System.out.println(String.format("Modèle=%s", model));
        return "vue-12";
}
L’azione [/v12a] serve solo a inserire nella sessione l’elemento ['paul',new Personne(51, "paul", 33)]. Non fa nient’altro. Il fatto che sia contrassegnata da [@ResponseBody] indica che è proprio questa azione a generare la risposta al cliente. Poiché il suo tipo è [void], non viene generata alcuna risposta.
L’azione [/v12b] accetta come parametro [@ModelAttribute("paul") Personne p]. Se non si interviene in altro modo, viene istanziato un oggetto [Personne], che viene poi inizializzato con i parametri della richiesta; tale oggetto non ha nulla a che vedere con l’oggetto chiave [paul] inserito nella sessione dall’azione [/v12a]. Aggiungeremo la chiave [paul] agli attributi di sessione della classe:
@Controller
@SessionAttributes({ "jean", "paul" })
public class ViewsController {
- alla riga 2, ora ci sono due attributi di sessione;
Torniamo ai parametri dell’azione [/v12b]:
public String v12b(Model model, @ModelAttribute("paul") Personne p) {
Ora, l'oggetto [Personne p] non verrà istanziato, ma farà riferimento all'oggetto chiave [paul] nella sessione. A questo punto la procedura rimane la stessa. L’oggetto chiave [paul] si troverà in particolare nel modello della vista che verrà visualizzata. È proprio ciò che vogliamo vedere alla riga 11 dell’azione [/v12b].
La vista [vue-12.xml] sarà la seguente:
<!DOCTYPE html>
<html xmlns:th="http://www.thymeleaf.org">
    <head>
        <title th:text="#{title}">Spring 4 MVC</title>
        <meta http-equiv="Content-Type" content="text/html; charset=UTF-8" />
    </head>
    <body>
        <div th:object="${paul}">
            <p>
                <span th:text="#{personne.id}">Id :</span>
                <span th:text="*{id}">14</span>
            </p>
            <p>
                <span th:text="#{personne.nom}">Nom :</span>
                <span th:text="*{nom}">Bill</span>
            </p>
            <p>
                <span th:text="#{personne.age}">Age :</span>
                <span th:text="*{age}">56</span>
            </p>
        </div>
    </body>
</html>
- riga 8: si fa riferimento alla chiave [paul] del modello della vista;
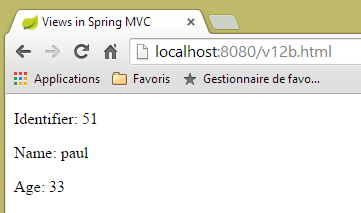
Si ottiene il seguente risultato (dopo aver eseguito l’azione [/v12a] che inserisce la chiave [paul] nella sessione):
 |
Il log della console è il seguente:
Modèle={jean=[id=33, nom=jean, age=10], uneAutrePersonne=[id=24, nom=pauline, age=55], paul=[id=51, nom=paul, age=33], org.springframework.validation.BindingResult.paul=org.springframework.validation.BeanPropertyBindingResult: 0 errors}
La chiave [paul] è stata correttamente inserita nel modello con il valore associato alla chiave [paul] nella sessione.
5.10. [/v13]: generare un modulo di inserimento dati
Passiamo ora all’inserimento dei moduli e alla loro convalida. Creiamo un primo modulo con la seguente azione [/v13]:
  // genera un modulo per l’inserimento dei dati di una persona
  @RequestMapping(value = "/v13", method = RequestMethod.GET)
  public String v13() {
    return "vue-13";
}
che si limita a visualizzare la vista [vue-13.xml] seguente:
<!DOCTYPE html>
<html xmlns:th="http://www.thymeleaf.org">
    <head>
        <title th:text="#{title}">Spring 4 MVC</title>
        <meta http-equiv="Content-Type" content="text/html; charset=UTF-8" />
    </head>
    <body>
        <form action="/someURL" th:action="@{/v14.html}" method="post">
            <h2 th:text="#{personne.formulaire.titre}">Entrez les informations suivantes</h2>
            <div th:object="${personne}">
                <table>
                    <thead></thead>
                    <tbody>
                        <tr>
                            <td th:text="#{personne.id}">Id :</td>
                            <td>
                                <input type="text" name="id" value="11" th:value="''" />
                            </td>
                        </tr>
                        <tr>
                            <td th:text="#{personne.nom}">Nom :</td>
                            <td>
                                <input type="text" name="nom" value="Tintin" th:value="''" />
                            </td>
                        </tr>
                        <tr>
                            <td th:text="#{personne.age}">Age :</td>
                            <td>
                                <input type="text" name="age" value="17" th:value="''" />
                            </td>
                        </tr>
                    </tbody>
                </table>
            </div>
            <input type="submit" value="Valider" th:value="#{personne.formulaire.valider}" />
        </form>
    </body>
</html>
Se inseriamo questa vista nella cartella [static] con il nome [vue-13.html] e richiediamo URL [http://localhost:8080/vue-13.html], otteniamo la pagina seguente:
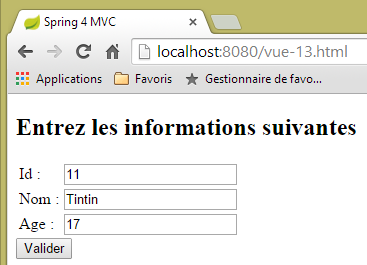 |
- alla riga 8 del modulo si trova il tag <form> con l'attributo [th:action]. Questo attributo verrà valutato da Thymeleaf e il suo valore sostituirà il valore attuale dell'attributo [action], che è quindi presente solo a scopo decorativo. In questo caso il valore dell’attributo [th:action] sarà [/v14.html];
- nelle righe 17, 23 e 29, il valore dell’attributo [th:value] sostituirà quello dell’attributo [value]. In questo caso, tale valore sarà la stringa vuota;
Quando si richiede URL [/v13.html], si ottiene il seguente risultato:
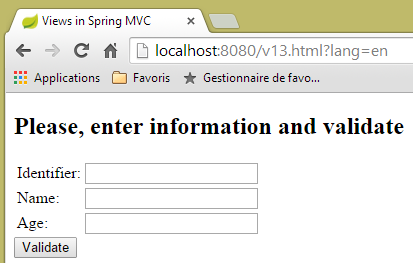 |
Diamo un'occhiata al codice sorgente generato da Thymeleaf:
<!DOCTYPE html>

<html>
    <head>
        <title>Views in Spring MVC</title>
        <meta http-equiv="Content-Type" content="text/html; charset=UTF-8" />
    </head>
    <body>
        <form action="/v14.html" method="post">
            <h2>Please, enter information and validate</h2>
            <div>
                <table>
                    <thead></thead>
                    <tbody>
                        <tr>
                            <td>Identifier:</td>
                            <td>
                                <input type="text" name="id" value="" />
                            </td>
                        </tr>
                        <tr>
                            <td>Name:</td>
                            <td>
                                <input type="text" name="nom" value="" />
                            </td>
                        </tr>
                        <tr>
                            <td>Age:</td>
                            <td>
                                <input type="text" name="age" value="" />
                            </td>
                        </tr>
                    </tbody>
                </table>
            </div>
            <input type="submit" value="Validate" />
        </form>
    </body>
</html>
Alle righe 9, 18, 24 e 30 si vede la valutazione degli attributi [th:action] e [th:value] effettuata da Thymeleaf.
5.11. [/v14]: gestione dei valori inviati tramite un modulo
L'azione [/v14] è quella che riceve i valori inviati tramite POST. È la seguente:
  // elabora i valori del modulo
  @RequestMapping(value = "/v14", method = RequestMethod.POST)
  public String v14(Personne p) {
    return "vue-14";
}
- riga 3: i valori inviati sono racchiusi in un oggetto [Personne p]. Sappiamo che questo oggetto fa automaticamente parte del modello M della vista V che verrà visualizzata dall'azione, associato alla chiave [personne];
- riga 4: la vista visualizzata è la vista [vue-14.xml];
La vista [vue-14.xml] è la seguente:
<!DOCTYPE html>
<html xmlns:th="http://www.thymeleaf.org">
    <head>
        <title th:text="#{title}">Spring 4 MVC</title>
        <meta http-equiv="Content-Type" content="text/html; charset=UTF-8" />
    </head>
    <body>
    <h2 th:text="#{personne.formulaire.saisies}">Voici vos saisies</h2>
        <div th:object="${personne}">
            <p>
                <span th:text="#{personne.id}">Id :</span>
                <span th:text="*{id}">14</span>
            </p>
            <p>
                <span th:text="#{personne.nom}">Nom :</span>
                <span th:text="*{nom}">Bill</span>
            </p>
            <p>
                <span th:text="#{personne.age}">Age :</span>
                <span th:text="*{age}">56</span>
            </p>
        </div>
    </body>
</html>
- riga 9: si recupera dal modello l'oggetto associato alla chiave [personne];
- righe 12, 16 e 20: si visualizzano le caratteristiche di questo oggetto;
Si ottiene il seguente risultato:
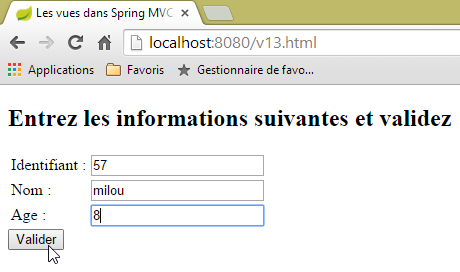 | 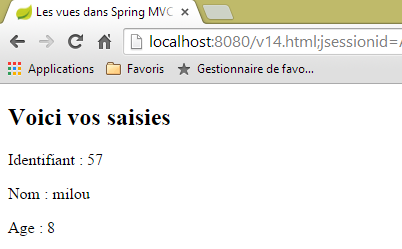 |
5.12. [/v15-/v16]: convalida di un modello
Partendo dall'esempio precedente, osserviamo la sequenza seguente:
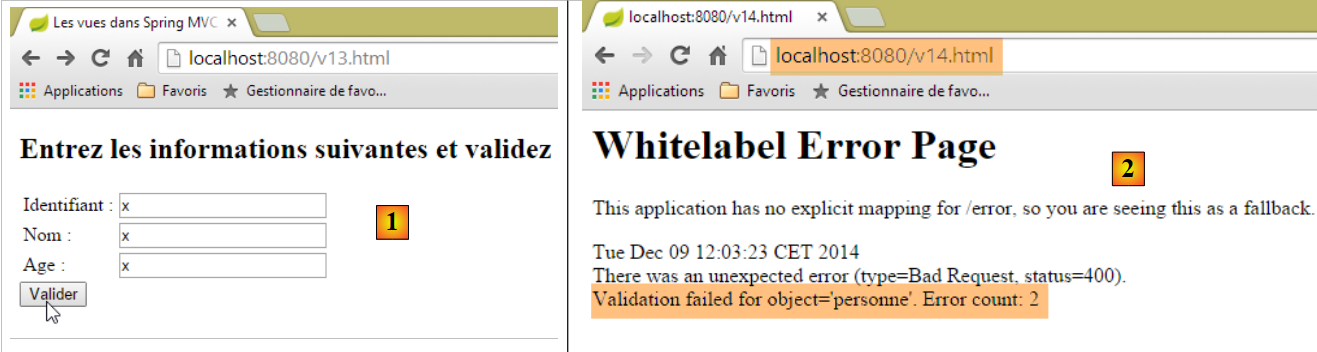 |
- in [1], si inseriscono valori errati per i campi [id] e [age] di tipo [int];
- in [2], la risposta del server ci indica che si sono verificati due errori;
Utilizzeremo lo stesso modulo, ma in caso di errori di convalida, reindirizzeremo l'utente a una pagina che segnala tali errori affinché possa correggerli.
L'azione [/v15] è la seguente:
    // ---------------------- visualizzazione di un modulo
    @RequestMapping(value = "/v15", method = RequestMethod.GET)
    public String v15(SecuredPerson p) {
        return "vue-15";
}
Riceve come parametro un tipo [SecuredPerson] come segue:
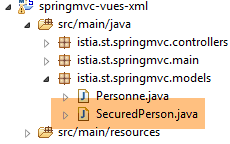 |
package istia.st.springmvc.models;

import javax.validation.constraints.NotNull;

import org.hibernate.validator.constraints.Length;
import org.hibernate.validator.constraints.Range;

public class SecuredPerson {

    @Range(min = 1)
    private int id;

    @Length(min = 4, max = 10)
    private String nom;

    @Range(min = 8, max = 14)
    private int age;

    // costruttori
    public SecuredPerson() {

    }

    public SecuredPerson(int id, String nom, int age) {
        this.id=id;
        this.nom = nom;
        this.age = age;
    }

    // getter e setter
...
}
I campi [id, nom, age] sono stati contrassegnati con vincoli di validazione. La vista [vue-15.xml] visualizzata dall'azione [/v15] è la seguente:
<!DOCTYPE html>
<html xmlns:th="http://www.thymeleaf.org">
    <head>
        <title th:text="#{title}">Spring 4 MVC</title>
        <meta http-equiv="Content-Type" content="text/html; charset=UTF-8" />
    </head>
    <body>
        <form action="/someURL" th:action="@{/v16.html}" method="post">
            <h2 th:text="#{personne.formulaire.titre}">Entrez les informations suivantes</h2>
            <div th:object="${securedPerson}">
                <table>
                    <thead></thead>
                    <tbody>
                        <tr>
                            <td th:text="#{personne.id}">Id :</td>
                            <td>
                                <input type="text" name="id" value="11" th:value="*{id}" />
                            </td>
                            <td>
                                <span th:if="${#fields.hasErrors('id')}" th:errors="*{id}" style="color: red">Identifiant erroné</span>
                            </td>
                        </tr>
                        <tr>
                            <td th:text="#{personne.nom}">Nom :</td>
                            <td>
                                <input type="text" name="nom" value="Tintin" th:value="*{nom}" />
                            </td>
                            <td>
                                <span th:if="${#fields.hasErrors('nom')}" th:errors="*{nom}" style="color: red">Nom erroné</span>
                            </td>
                        </tr>
                        <tr>
                            <td th:text="#{personne.age}">Age :</td>
                            <td>
                                <input type="text" name="age" value="17" th:value="*{age}" />
                            </td>
                            <td>
                                <span th:if="${#fields.hasErrors('age')}" th:errors="*{age}" style="color: red">Âge erroné</span>
                            </td>
                        </tr>
                    </tbody>
                </table>
                <input type="submit" value="Valider" th:value="#{personne.formulaire.valider}" />
                <ul>
                    <li th:each="err : ${#fields.errors('*')}" th:text="${err}" style="color: red" />
                </ul>
            </div>
        </form>
    </body>
</html>
- righe 10-47: viene recuperato l'oggetto del modello della pagina associato alla chiave [securedPerson]. Al termine dell'azione GET, si ottiene un oggetto con il suo valore di istanza [id=0, nom=null, age=0];
- riga 17: il valore del campo [securedPerson.id];
- riga 20: l'espressione [${#fields.hasErrors('id')}] consente di verificare se si sono verificati errori di convalida sul campo [securedPerson.id]. In tal caso, l'attributo [th:errors="*{id}"] visualizza il messaggio di errore associato;
- questo scenario si ripete alla riga 29 per il campo [nom] e alla riga 38 per il campo [age];
- riga 45: l'espressione [${#fields.errors('*')}] indica l'insieme degli errori relativi ai campi dell'oggetto [securedPerson]. Pertanto, è l'insieme di questi errori che verrà visualizzato nelle righe 44-46;
- riga 16: si nota che i valori del modulo verranno inviati all’azione [/v16]. Quest’ultima è la seguente:
    // -------------------- convalida di un modello------------------
    @RequestMapping(value = "/v16", method = RequestMethod.POST)
    public String v16(@Valid SecuredPerson p, BindingResult result) {
        // errori?
        if (result.hasErrors()) {
            return "vue-15";
        } else {
            return "vue-16";
        }
}
- riga 3: l'annotazione [@Valid SecuredPerson p] impone la convalida dei valori inviati;
- riga 5: verifica se il modello dell’azione è errato o meno;
- riga 6: se è errato, viene restituito il modulo [vue-15.xml]. Poiché quest’ultimo visualizza i messaggi di errore, li vedremo;
- riga 8: se il modello dell'azione è valido, viene visualizzata la seguente vista [vue-16.xml]:
<!DOCTYPE html>
<html xmlns:th="http://www.thymeleaf.org">
    <head>
        <title th:text="#{title}">Spring 4 MVC</title>
        <meta http-equiv="Content-Type" content="text/html; charset=UTF-8" />
    </head>
    <body>
    <h2 th:text="#{personne.formulaire.saisies}">Voici vos saisies</h2>
        <div th:object="${securedPerson}">
            <p>
                <span th:text="#{personne.id}">Id :</span>
                <span th:text="*{id}">14</span>
            </p>
            <p>
                <span th:text="#{personne.nom}">Nom :</span>
                <span th:text="*{nom}">Bill</span>
            </p>
            <p>
                <span th:text="#{personne.age}">Age :</span>
                <span th:text="*{age}">56</span>
            </p>
        </div>
    </body>
</html>
Ecco alcuni esempi di esecuzione:
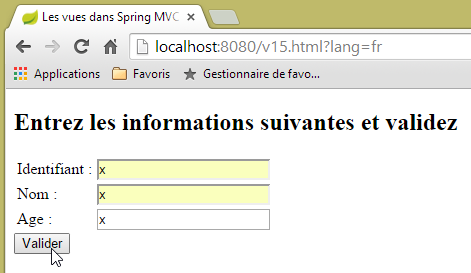 | 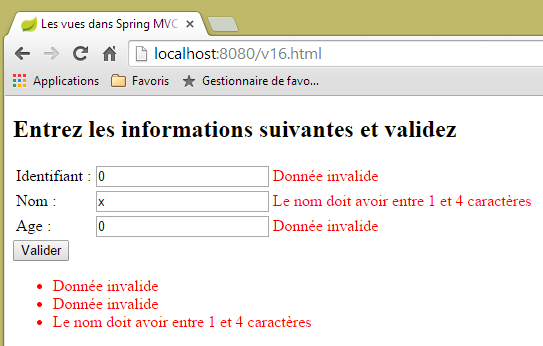 |
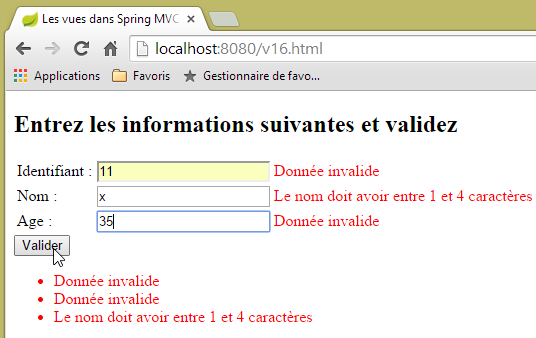 | 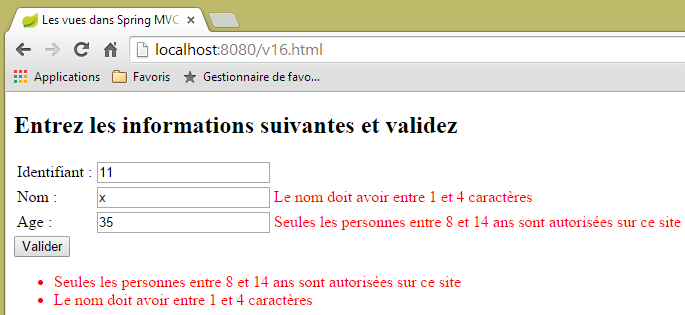 |
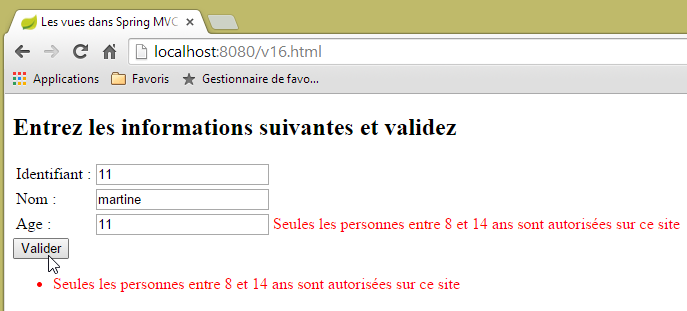 |
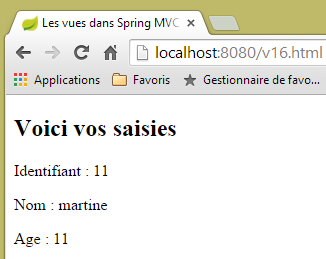 |
5.13. [/v17-/v18]: controllo dei messaggi di errore
Quando si esegue per la prima volta l'azione [/v15], si ottiene il seguente risultato:
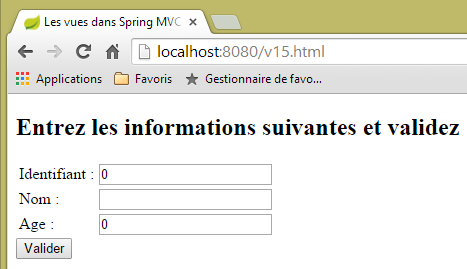 |
Si potrebbe preferire un modulo vuoto piuttosto che degli zeri nei campi [Identifiant, Age]. Per ottenere questo risultato, modifichiamo il modello dell'azione come segue:
package istia.st.springmvc.models;

import javax.validation.constraints.Digits;

import org.hibernate.validator.constraints.Length;
import org.hibernate.validator.constraints.Range;

public class StringSecuredPerson {

    @Range(min = 1)
    @Digits(fraction = 0, integer = 4)
    private String id;

    @Length(min = 4, max = 10)
    private String nom;

    @Range(min = 8, max = 14)
    @Digits(fraction = 0, integer = 2)
    private String age;

    // costruttori
    public StringSecuredPerson() {

    }

    public StringSecuredPerson(String id, String nom, String age) {
        this.id = id;
        this.nom = nom;
        this.age = age;
    }

    // getter e setter
...

}
- righe 12 e 19: i campi [id] e [age] vengono modificati in tipo [String];
- riga 11: si specifica che il campo [id] deve essere un numero di al massimo quattro cifre, senza decimali;
- riga 18: lo stesso vale per il campo [age], che deve essere un numero intero di al massimo due cifre;
L'azione [/v17] diventa la seguente:
    // ---------------------- visualizzazione di un modulo
    @RequestMapping(value = "/v17", method = RequestMethod.GET)
    public String v17(StringSecuredPerson p) {
        return "vue-17";
}
La vista [vue-17.xml] visualizzata dall'azione [/v17] è la seguente:
<!DOCTYPE html>
<html xmlns:th="http://www.thymeleaf.org">
    <head>
        <title th:text="#{title}">Spring 4 MVC</title>
        <meta http-equiv="Content-Type" content="text/html; charset=UTF-8" />
    </head>
    <body>
        <form action="/someURL" th:action="@{/v18.html}" method="post">
            <h2 th:text="#{personne.formulaire.titre}">Entrez les informations suivantes</h2>
            <div th:object="${stringSecuredPerson}">
                <table>
                    <thead></thead>
                    <tbody>
                        <tr>
                            <td th:text="#{personne.id}">Id :</td>
                            <td>
                                <input type="text" name="id" value="11" th:value="*{id}" />
                            </td>
                            <td>
                                <span th:each="err,status : ${#fields.errors('id')}" th:if="${status.index}==0" th:text="${err}" style="color: red">
                                    Identifiant erroné
                                </span>
                            </td>
                        </tr>
                        <tr>
                            <td th:text="#{personne.nom}">Nom :</td>
                            <td>
                                <input type="text" name="nom" value="Tintin" th:value="*{nom}" />
                            </td>
                            <td>
                                <span th:if="${#fields.hasErrors('nom')}" th:errors="*{nom}" style="color: red">Nom erroné</span>
                            </td>
                        </tr>
                        <tr>
                            <td th:text="#{personne.age}">Age :</td>
                            <td>
                                <input type="text" name="age" value="17" th:value="*{age}" />
                            </td>
                            <td>
                                <span th:if="${#fields.hasErrors('age')}" th:errors="*{age}" style="color: red">Âge erroné</span>
                            </td>
                        </tr>
                    </tbody>
                </table>
                <input type="submit" value="Valider" th:value="#{personne.formulaire.valider}" />
                <ul>
                    <li th:each="err : ${#fields.errors('*')}" th:text="${err}" style="color: red" />
                </ul>
            </div>
        </form>
    </body>
</html>
Le modifiche riguardano le seguenti righe:
- riga 10: ora si opera con l’oggetto del modello di chiave [stringSecuredPerson];
- riga 20: si scorre l'elenco degli errori del campo [id]. Nella sintassi [th:each="err,status : ${#fields.errors('id')}"], è la variabile [err] a scorrere l'elenco. La variabile [status] fornisce informazioni su ogni iterazione. Si tratta di un oggetto [index, count, size, current] in cui:
- index: è il numero dell'elemento corrente,
- current: il valore di tale elemento corrente,
- count, size: la dimensione della lista percorsa;
- riga 20: viene visualizzato solo il primo elemento della lista [th:if="${status.index}==0"];
L'azione [/v18] che elabora il POST dell'azione [/v17] è la seguente:
    // -------------------- convalida di un modello------------------
    @RequestMapping(value = "/v18", method = RequestMethod.POST)
    public String v18(@Valid StringSecuredPerson p, BindingResult result) {
        // errori?
        if (result.hasErrors()) {
            return "vue-17";
        } else {
            return "vue-18";
        }
}
I file dei messaggi si evolvono come segue:
[messages_fr.properties]
title=Les vues dans Spring MVC
personne.nom=Nom :
personne.age=Age :
personne.id=Identifiant :
personne.mineure=Vous êtes mineur
personne.majeure=Vous êtes majeur
liste.personnes=Liste de personnes
personne.formulaire.titre=Entrez les informations suivantes et validez
personne.formulaire.valider=Valider
personne.formulaire.saisies=Voici vos saisies
notNull=La donnée est obligatoire
Range.securedPerson.id=L''identifiant doit être un nombre entier >=1
Range.securedPerson.age=Seules les personnes entre 8 et 14 ans sont autorisées sur ce site
Length.securedPerson.nom=Le nom doit avoir entre 1 et 4 caractères
typeMismatch=Donnée invalide
Range.stringSecuredPerson.id=L''identifiant doit être un nombre entier >=1
Range.stringSecuredPerson.age=Seules les personnes entre 8 et 14 ans sont autorisées sur ce site
Length.stringSecuredPerson.nom=Le nom doit avoir entre 1 et 4 caractères
Digits.stringSecuredPerson.id=Tapez un nombre entier de 4 chiffres au plus
Digits.stringSecuredPerson.age=Tapez un nombre entier de 2 chiffres au plus
[messages_en.properties]
title=Views in Spring MVC
personne.nom=Name:
personne.age=Age:
personne.id=Identifier:
personne.mineure=You are under 18
personne.majeure=You are over 18
liste.personnes=Persons' list
personne.formulaire.titre=Please, enter information and validate
personne.formulaire.valider=Validate
personne.formulaire.saisies=Here are your inputs
NotNull=Data is required
Range.securedPerson.id=Identifier must be an integer >=1
Range.securedPerson.age=Only kids who are 8 to 14 years old are allowed on this site
Length.securedPerson.nom=Name must be 4 to 10 characters long
typeMismatch=Invalid format
Range.stringSecuredPerson.id=Identifier must be an integer >=1
Range.stringSecuredPerson.age=Only kids who are 8 to 14 years old are allowed on this site
Length.stringSecuredPerson.nom=Name must be 4 to 10 characters long
Digits.stringSecuredPerson.id=Should be an integer with at most four digits
Digits.stringSecuredPerson.age=Should be an integer with at most two digits
Vediamo alcuni esempi:
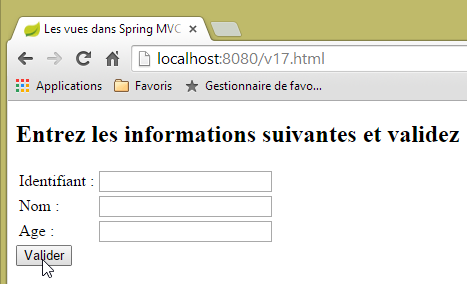 |
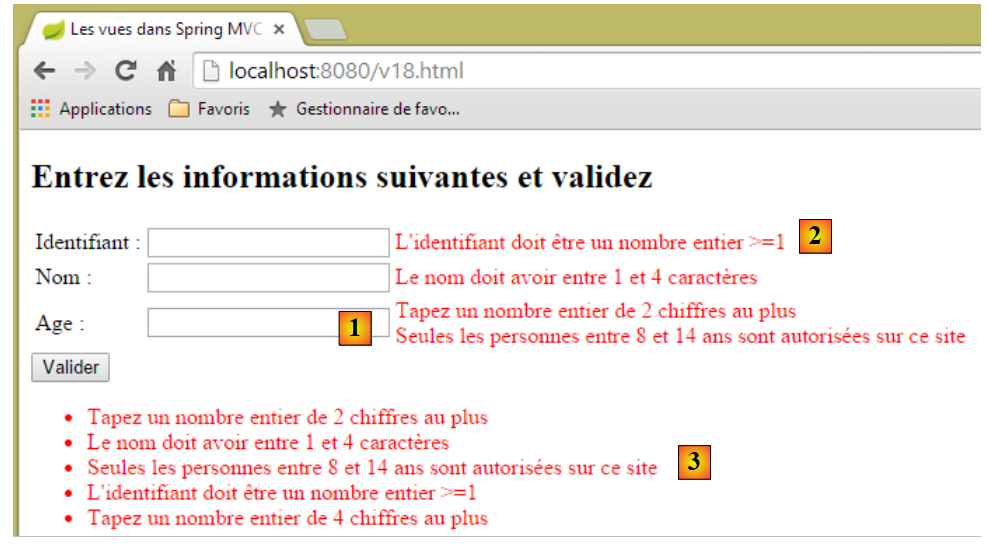 |
Come si può vedere in [1], i due validatori del campo [age] sono stati eseguiti:
    @Range(min = 8, max = 14)
    @Digits(fraction = 0, integer = 2)
    private String age;
Esiste un ordine prestabilito per i messaggi di errore? Per il campo [age], sembra che i validatori siano stati eseguiti nell'ordine [Digits, Range]. Tuttavia, effettuando più richieste, si può notare che tale ordine può variare. Pertanto, non è possibile fare affidamento sull'ordine dei validatori. In [2] viene visualizzato solo uno dei due messaggi relativi al campo [id]. In [3] vengono visualizzati tutti i messaggi di errore.
5.14. [/v19-/v20]: utilizzo di diversi validatori
Consideriamo il seguente nuovo modello di azione:
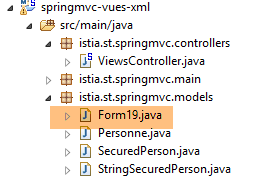 |
package istia.st.springmvc.models;

import java.util.Date;

import javax.validation.constraints.AssertFalse;
import javax.validation.constraints.AssertTrue;
import javax.validation.constraints.Future;
import javax.validation.constraints.Max;
import javax.validation.constraints.Min;
import javax.validation.constraints.NotNull;
import javax.validation.constraints.Past;
import javax.validation.constraints.Pattern;
import javax.validation.constraints.Size;

import org.hibernate.validator.constraints.Email;
import org.hibernate.validator.constraints.Length;
import org.hibernate.validator.constraints.NotBlank;
import org.hibernate.validator.constraints.NotEmpty;
import org.hibernate.validator.constraints.Range;
import org.hibernate.validator.constraints.URL;
import org.springframework.format.annotation.DateTimeFormat;

public class Form19 {

    @NotNull
    @AssertFalse
    private Boolean assertFalse;

    @NotNull
    @AssertTrue
    private Boolean assertTrue;

    @NotNull
    @Future
    @DateTimeFormat(pattern = "yyyy-MM-dd")
    private Date dateInFuture;

    @NotNull
    @Past
    @DateTimeFormat(pattern = "yyyy-MM-dd")
    private Date dateInPast;

    @NotNull
    @Max(value = 100)
    private Integer intMax100;

    @NotNull
    @Min(value = 10)
    private Integer intMin10;

    @NotNull
    @NotEmpty
    private String strNotEmpty;

    @NotNull
    @NotBlank
    private String strNotBlank;

    @NotNull
    @Size(min = 4, max = 6)
    private String strBetween4and6;

    @NotNull
    @Pattern(regexp = "^\\d{2}:\\d{2}:\\d{2}$")
    private String hhmmss;

    @NotNull
    @Email
    @NotBlank
    private String email;

    @NotNull
    @Length(max = 4, min = 4)
    private String str4;

    @Range(min = 10, max = 14)
    @NotNull
    private Integer int1014;

    @URL
    @NotBlank
    private String url;

    // getter e setter
...
}
Verrà visualizzato dall’azione [/v19] seguente:
    // ------------------ visualizzazione di un modulo
    @RequestMapping(value = "/v19", method = RequestMethod.GET, produces = "text/html; charset=UTF-8")
    public String v19(Form19 formulaire) {
        return "vue-19";
}
- riga 3: l'azione riceve come parametro un oggetto [Form19 formulaire]. Se GET non riceve parametri, questo oggetto verrà inizializzato con i valori predefiniti di Java;
- riga 4: viene visualizzata la vista [vue-19.xml]. Questa è la seguente:
<!DOCTYPE HTML>
<html xmlns:th="http://www.thymeleaf.org">
    <head>
        <title>Spring 4 MVC</title>
        <meta http-equiv="Content-Type" content="text/html; charset=UTF-8" />
        <link rel="stylesheet" href="/css/form19.css" />
    </head>
    <body>
        <h3>Formulaire - Validations côté serveur</h3>
        <form action="/someURL" th:action="@{/v20.html}" method="post" th:object="${form19}">
            <table>
                <thead>
                    <tr>
                        <th class="col1">Contrainte</th>
                        <th class="col2">Saisie</th>
                        <th class="col3">Erreur</th>
                    </tr>
                </thead>
                <tbody>
                    <tr>
                        <td class="col1">@NotEmpty</td>
                        <td class="col2">
                            <input type="text" th:field="*{strNotEmpty}" />
                        </td>
                        <td class="col3">
                            <span th:if="${#fields.hasErrors('strNotEmpty')}" th:errors="*{strNotEmpty}" class="error">Donnée erronée</span>
                        </td>
                    </tr>
                    <tr>
                        <td class="col1">@NotBlank</td>
                        <td class="col2">
                            <input type="text" th:field="*{strNotBlank}" />
                        </td>
                        <td class="col3">
                            <span th:if="${#fields.hasErrors('strNotBlank')}" th:errors="*{strNotBlank}" class="error">Donnée erronée</span>
                        </td>
                    </tr>
                    <tr>
                        <td class="col1">@assertFalse</td>
                        <td class="col2">
                            <input type="radio" th:field="*{assertFalse}" value="true" />
                            <label th:for="${#ids.prev('assertFalse')}">True</label>
                            <input type="radio" th:field="*{assertFalse}" value="false" />
                            <label th:for="${#ids.prev('assertFalse')}">False</label>
                        </td>
                        <td class="col3">
                            <span th:if="${#fields.hasErrors('assertFalse')}" th:errors="*{assertFalse}" class="error">Donnée erronée</span>
                        </td>
                    </tr>
                    <tr>
                        <td class="col1">@assertTrue</td>
                        <td class="col2">
                            <select th:field="*{assertTrue}">
                                <option value="true">True</option>
                                <option value="false">False</option>
                            </select>
                        </td>
                        <td class="col3">
                            <span th:if="${#fields.hasErrors('assertTrue')}" th:errors="*{assertTrue}" class="error">Donnée erronée</span>
                        </td>
                    </tr>
                    <tr>
                        <td class="col1">@Past</td>
                        <td class="col2">
                            <input type="date" th:field="*{dateInPast}" th:value="*{dateInPast}" />
                        </td>
                        <td class="col3">
                            <span th:if="${#fields.hasErrors('dateInPast')}" th:errors="*{dateInPast}" class="error">Donnée erronée</span>
                        </td>
                    </tr>
                    <tr>
                        <td class="col1">@Future</td>
                        <td class="col2">
                            <input type="date" th:field="*{dateInFuture}" th:value="*{dateInFuture}" />
                        </td>
                        <td class="col3">
                            <span th:if="${#fields.hasErrors('dateInFuture')}" th:errors="*{dateInFuture}" class="error">Donnée erronée</span>
                        </td>
                    </tr>
                    <tr>
                        <td class="col1">@Max</td>
                        <td class="col2">
                            <input type="text" th:field="*{intMax100}" th:value="*{intMax100}" />
                        </td>
                        <td class="col3">
                            <span th:if="${#fields.hasErrors('intMax100')}" th:errors="*{intMax100}" class="error">Donnée erronée</span>
                        </td>
                    </tr>
                    <tr>
                        <td class="col1">@Min</td>
                        <td class="col2">
                            <input type="text" th:field="*{intMin10}" th:value="*{intMin10}" />
                        </td>
                        <td class="col3">
                            <span th:if="${#fields.hasErrors('intMin10')}" th:errors="*{intMin10}" class="error">Donnée erronée</span>
                        </td>
                    </tr>
                    <tr>
                        <td class="col1">@Size</td>
                        <td class="col2">
                            <input type="text" th:field="*{strBetween4and6}" th:value="*{strBetween4and6}" />
                        </td>
                        <td class="col3">
                            <span th:if="${#fields.hasErrors('strBetween4and6')}" th:errors="*{strBetween4and6}" class="error">Donnée erronée</span>
                        </td>
                    </tr>
                    <tr>
                        <td class="col1">@Pattern(hh:mm:ss)</td>
                        <td class="col2">
                            <input type="text" th:field="*{hhmmss}" th:value="*{hhmmss}" />
                        </td>
                        <td class="col3">
                            <span th:if="${#fields.hasErrors('hhmmss')}" th:errors="*{hhmmss}" class="error">Donnée erronée</span>
                        </td>
                    </tr>
                    <tr>
                        <td class="col1">@Email</td>
                        <td class="col2">
                            <input type="text" th:field="*{email}" th:value="*{email}" />
                        </td>
                        <td class="col3">
                            <span th:if="${#fields.hasErrors('email')}" th:errors="*{email}" class="error">Donnée erronée</span>
                        </td>
                    </tr>
                    <tr>
                        <td class="col1">@Length</td>
                        <td class="col2">
                            <input type="text" th:field="*{str4}" th:value="*{str4}" />
                        </td>
                        <td class="col3">
                            <span th:if="${#fields.hasErrors('str4')}" th:errors="*{str4}" class="error">Donnée erronée</span>
                        </td>
                    </tr>
                    <tr>
                        <td class="col1">@Range</td>
                        <td class="col2">
                            <input type="text" th:field="*{int1014}" th:value="*{int1014}" />
                        </td>
                        <td class="col3">
                            <span th:if="${#fields.hasErrors('int1014')}" th:errors="*{int1014}" class="error">Donnée erronée</span>
                        </td>
                    </tr>
                    <tr>
                        <td class="col1">@URL</td>
                        <td class="col2">
                            <input type="text" th:field="*{url}" th:value="*{url}" />
                        </td>
                        <td class="col3">
                            <span th:if="${#fields.hasErrors('url')}" th:errors="*{url}" class="error">Donnée erronée</span>
                        </td>
                    </tr>
                </tbody>
            </table>
            <p>
                <input type="submit" value="Valider" />
            </p>
        </form>
    </body>
</html>
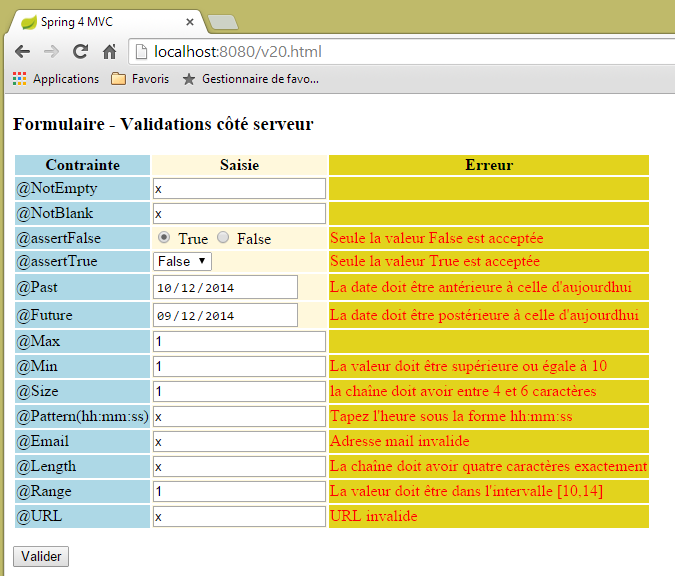
Questo codice visualizza la seguente vista:
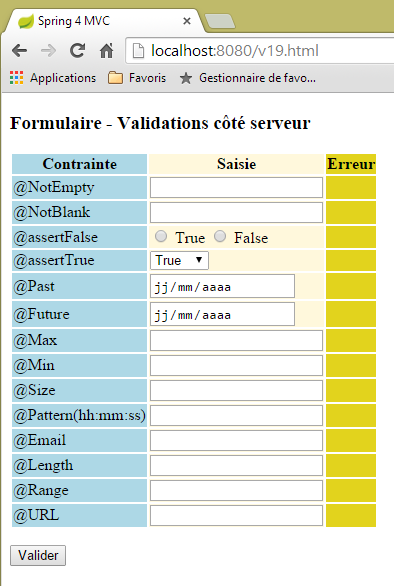 |
La pagina presenta una tabella a tre colonne:
- colonna 1: il validatore del campo di immissione;
- colonna 2: il campo di immissione;
- colonna 3: i messaggi di errore relativi al campo di immissione;
Esaminiamo ad esempio il codice della vista [/v19.html] per il validatore [@Pattern]:
                    <tr>
                        <td class="col1">@Pattern(hh:mm:ss)</td>
                        <td class="col2">
                            <input type="text" th:field="*{hhmmss}" th:value="*{hhmmss}" />
                        </td>
                        <td class="col3">
                            <span th:if="${#fields.hasErrors('hhmmss')}" th:errors="*{hhmmss}" class="error">Donnée erronée</span>
                        </td>
</tr>
Ritroviamo il codice che abbiamo appena studiato con i moduli di tipo [Personne]:
- riga 2: prima colonna: il nome del validatore testato;
- riga 4: l’attributo Thymeleaf [th:field="*{hhmmss}] genererà gli attributi HTML, [id="hhmmss"] e [name="hhmmss"]. L'attributo Thymeleaf [th:value="*{hhmmss}"] genererà l'attributo HTML [value="valeur de [form19.hhmmss]]";
- riga 7: se il valore inserito nel campo [form19.hhmmss] è errato, la riga 7 visualizza i messaggi di errore associati a tale campo;
I valori inviati vengono elaborati dalla seguente azione [/v20]:
    // ----------------- convalida del modello del modulo
    @RequestMapping(value = "/v20", method = RequestMethod.POST, produces = "text/html; charset=UTF-8")
    public String v20(@Valid Form19 formulaire, BindingResult result, RedirectAttributes redirectAttributes) {
        if (result.hasErrors()) {
            return "vue-19";
        } else {
            // reindirizzamento a [vue-19]
            redirectAttributes.addFlashAttribute("form19", formulaire);
            return "redirect:/v19.html";
        }
}
- riga 3: i valori inseriti compileranno i campi dell’oggetto [Form19 formulaire] se sono validi;
- righe 4-6: se i valori inseriti non sono validi, viene nuovamente visualizzato il modulo [vue-19] con i messaggi di errore;
- righe 6-10: se i valori inviati sono validi, l’oggetto [Form19 formulaire] creato con tali valori viene messo a disposizione della richiesta successiva, in questo caso quella di reindirizzamento. Successivamente viene eliminato;
- riga 9: si reindirizza il client all’azione [/v19.html]. Quest’ultima visualizzerà nuovamente il modulo [vue-19] che contiene codice del tipo:
<form action="/someURL" th:action="@{/v20.html}" method="post" th:object="${form19}">
L'attributo [th:object="${form19}"] recupererà quindi l'oggetto associato all'attributo Flash [form19] e visualizzerà nuovamente il modulo così come è stato compilato.
Il codice del modulo merita ancora qualche spiegazione. Consideriamo il codice seguente:
                    <tr>
                        <td class="col1">@assertFalse</td>
                        <td class="col2">
                            <input type="radio" th:field="*{assertFalse}" value="true" />
                            <label th:for="${#ids.prev('assertFalse')}">True</label>
                            <input type="radio" th:field="*{assertFalse}" value="false" />
                            <label th:for="${#ids.prev('assertFalse')}">False</label>
                        </td>
                        <td class="col3">
                            <span th:if="${#fields.hasErrors('assertFalse')}" th:errors="*{assertFalse}" class="error">Donnée erronée</span>
                        </td>
</tr>
Questo genera il seguente codice HTML:
<tr>
  <td class="col1">@assertFalse</td>
  <td class="col2">
    <input type="radio" value="true" id="assertFalse1" name="assertFalse" />
    <label for="assertFalse1">True</label>
    <input type="radio" value="false" id="assertFalse2" name="assertFalse" />
    <label for="assertFalse2">False</label>
  </td>
  <td class="col3">
  </td>
</tr>
Nel codice
<input type="radio" th:field="*{assertFalse}" value="true" />
<label th:for="${#ids.prev('assertFalse')}">True</label>
<input type="radio" th:field="*{assertFalse}" value="false" />
<label th:for="${#ids.prev('assertFalse')}">False</label>
gli attributi Thymeleaf delle righe 1 e 3 [th:field="*{assertFalse}"] pongono un problema. Si è detto che questo attributo generasse gli attributi HTML, [id=assertFalse] e [name=assertFalse]. La difficoltà deriva dal fatto che, essendo generati alle righe 1 e 3, si ottengono due attributi [name] identici e due attributi [id] identici. Se ciò è possibile con l’attributo [name], non lo è con l’attributo [id]. Come si vede nel codice HTML generato, Thymeleaf ha generato due attributi [id] diversi: [id=asserFalse1] e [id=assertFalse2]. Il che è positivo. Il problema è che non conosciamo questi identificatori e potremmo averne bisogno. È il caso del tag [label] alla riga 2. L’attributo [for] di un tag HTML [label] deve fare riferimento a un attributo [id], ovvero quello generato per il tag [input] della riga 1. La documentazione di Thymeleaf indica che l'espressione [${#ids.prev('assertFalse')}"] consente di ottenere l'ultimo attributo [id] generato per il campo [assertFalse].
Consideriamo ora il codice del menu a tendina del modulo:
<select th:field="*{assertTrue}">
   <option value="true">True</option>
   <option value="false">False</option>
</select>
Questo codice genera il codice HTML di un menu a tendina:
Il valore inviato sarà associato al nome [name="assertTrue"].
La vista [vue-19.xml] utilizza un foglio di stile:
    <head>
        <title>Spring 4 MVC</title>
        <meta http-equiv="Content-Type" content="text/html; charset=UTF-8" />
        <link rel="stylesheet" href="/css/form19.css" />
</head>
Riga 4: il foglio di stile utilizzato deve essere inserito nella cartella [static] del progetto:
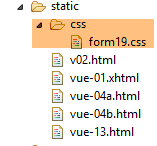 |
Il suo contenuto è il seguente:
@CHARSET "UTF-8";

.col1 {
    background: lightblue;
}

.col2 {
    background: Cornsilk;
}

.col3 {
    background: #e2d31d;
}

.error {
    color: red;
}
Ora esaminiamo le date:
    @NotNull
    @Future
    @DateTimeFormat(pattern = "yyyy-MM-dd")
    private Date dateInFuture;

    @NotNull
    @Past
    @DateTimeFormat(pattern = "yyyy-MM-dd")
    private Date dateInPast;
L'analisi del traffico di rete nello strumento di sviluppo di Chrome (Ctrl-Maiusc-I) mostra che le date sono inviate nel formato (aaaa-mm-gg):
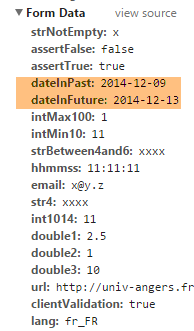 |
Questo è il motivo per cui le date sono state contrassegnate dal validatore:
@DateTimeFormat(pattern = "yyyy-MM-dd")
che definisce il formato previsto per il valore inviato delle date.
Infine, il file dei messaggi in francese [messages_fr.properties]:
title=Les vues dans Spring MVC
personne.nom=Nom :
personne.age=Age :
personne.id=Identifiant :
personne.mineure=Vous êtes mineur
personne.majeure=Vous êtes majeur
liste.personnes=Liste de personnes
personne.formulaire.titre=Entrez les informations suivantes et validez
personne.formulaire.valider=Valider
personne.formulaire.saisies=Voici vos saisies
NotNull=La donnée est obligatoire
Range.securedPerson.id=L''identifiant doit être un nombre entier >=1
Range.securedPerson.age=Seules les personnes entre 8 et 14 ans sont autorisées sur ce site
Length.securedPerson.nom=Le nom doit avoir entre 1 et 4 caractères
typeMismatch=Donnée invalide
Range.stringSecuredPerson.id=L''identifiant doit être un nombre entier >=1
Range.stringSecuredPerson.age=Seules les personnes entre 8 et 14 ans sont autorisées sur ce site
Length.stringSecuredPerson.nom=Le nom doit avoir entre 1 et 4 caractères
Digits.stringSecuredPerson.id=Tapez un nombre entier de 4 chiffres au plus
Digits.stringSecuredPerson.age=Tapez un nombre entier de 2 chiffres au plus
Future.form19.dateInFuture=La date doit être postérieure à celle d''aujourd'hui
Past.form19.dateInPast=La date doit être antérieure à celle d''aujourd'hui
Size.form19.strBetween4and6=la chaîne doit avoir entre 4 et 6 caractères
Min.form19.intMin10=La valeur doit être supérieure ou égale à 10
Max.form19.intMax100=La valeur doit être inférieure ou égale à 100
Length.form19.str4=La chaîne doit avoir quatre caractères exactement
Email.form19.email=Adresse mail invalide
URL.form19.url=URL invalide
Range.form19.int1014=La valeur doit être dans l''intervalle [10,14]
AssertTrue=Seule la valeur True est acceptée
AssertFalse=Seule la valeur False est acceptée
Pattern.form19.hhmmss=Tapez l''heure sous la forme hh:mm:ss
NotEmpty=La donnée ne peut être vide
NotBlank=La donnée ne peut être vide
Vediamo alcuni esempi di esecuzione:
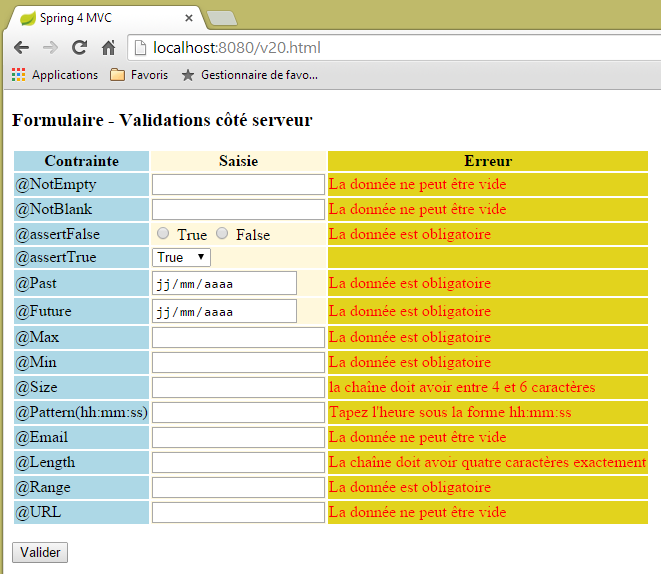 |
 |
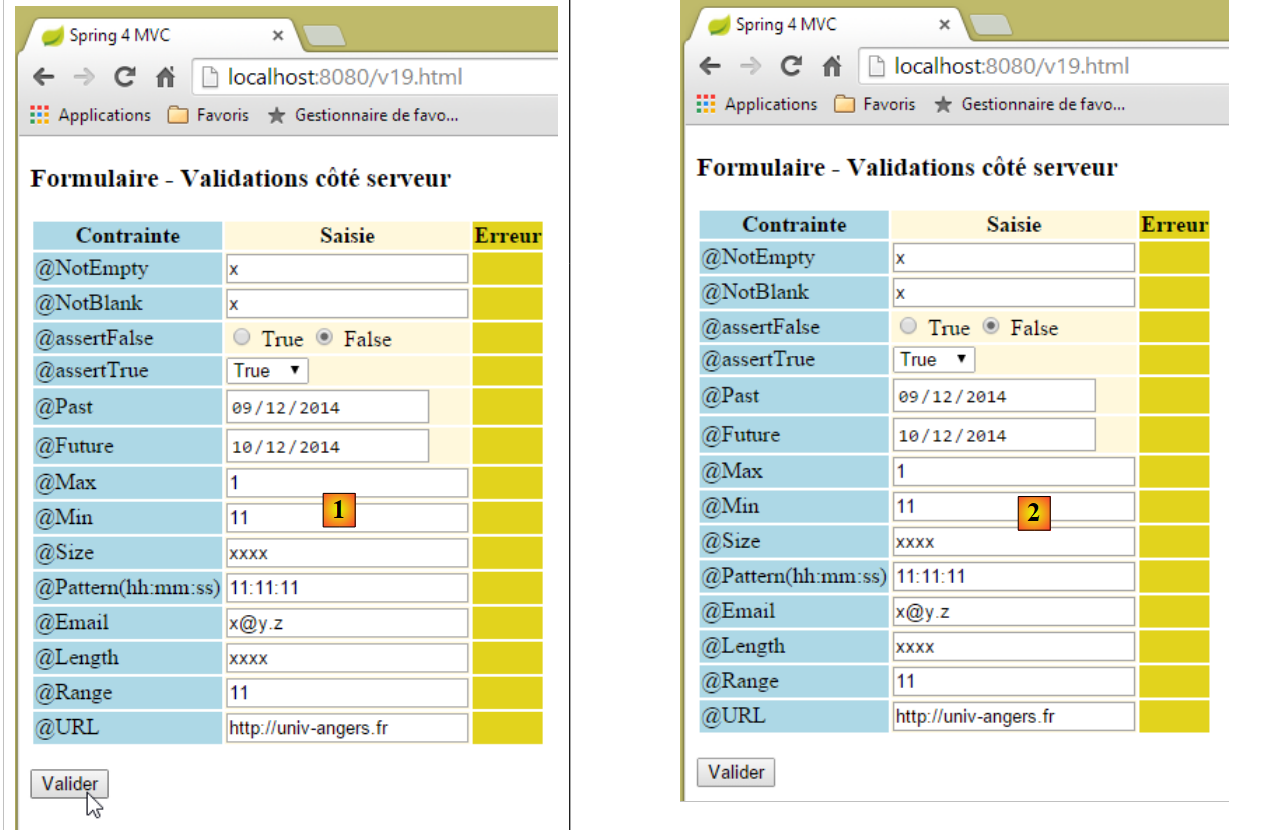 |
Qui sopra, tra [1] e [2], sembra che non sia successo nulla. Se si osservano gli scambi di rete (Ctrl-Maiusc-I), si nota tuttavia che ci sono stati due scambi di rete con il server:
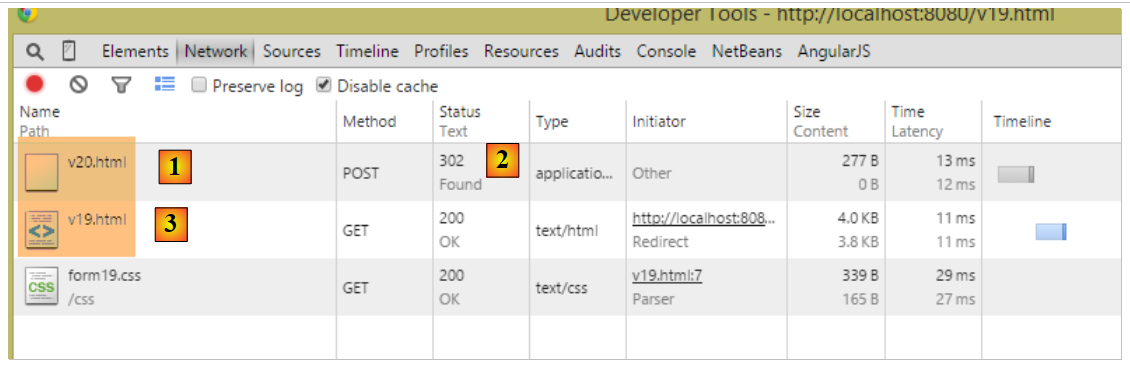 |
- in [1], il POST iniziale verso [/v20];
- a [2], la risposta a questa azione è un reindirizzamento;
- in [3], la seconda richiesta, questa volta verso [/v19];
Viene quindi eseguita l'azione [/v19]:
    // ------------------ visualizzazione di un modulo
    @RequestMapping(value = "/v19", method = RequestMethod.GET, produces = "text/html; charset=UTF-8")
    public String v19(Form19 formulaire) {
        return "vue-19";
}
- riga 3, il parametro [Form19 formulaire] viene inizializzato con l'attributo Flash della chiave [form19], che era stata creata dall'azione precedente [/v19] ed era un oggetto di tipo [Form19] con, come valori, i valori inviati all’azione [/v19];
- riga 4: la vista [vue-19.xml] verrà visualizzata con, nel proprio modello, un oggetto [Form19 formulaire] inizializzato con i valori inviati. Ecco perché l’utente ritrova il modulo così come lo ha inviato;
Perché un reindirizzamento? Perché non si è semplicemente inviato il form all’azione [/v19] sopra indicata? Si sarebbe ottenuto lo stesso risultato, con alcune piccole differenze:
- il browser avrebbe inserito nel campo dell’indirizzo [http://localhost:8080/v20.html] invece di [http://localhost:8080/v19.html] come ha fatto in questo caso, poiché visualizza l’ultimo URL richiamato;
- se l’utente aggiorna la pagina (F5), il risultato non è affatto lo stesso:
- nel caso del reindirizzamento, il URL visualizzato è [http://localhost:8080/v19.html] ottenuto da un GET. Il browser rieseguirà quest’ultimo comando e otterrà così un modulo completamente nuovo (l’attributo Flash viene utilizzato una sola volta),
- nel caso in cui non vi sia reindirizzamento, il URL visualizzato è il [http://localhost:8080/v20.html] ottenuto da un POST. Il browser rieseguirà quest’ultimo comando e genererà quindi nuovamente un POST con gli stessi valori inviati in precedenza. In questo caso non comporta conseguenze, ma spesso è indesiderabile e quindi in genere si preferisce il reindirizzamento;
5.15. [/v21-/v22]: gestione dei pulsanti di opzione
Consideriamo il seguente componente Spring [Listes]:
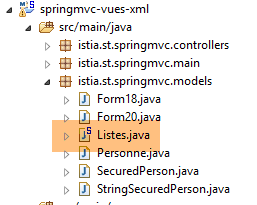 |
package istia.st.springmvc.models;

import org.springframework.stereotype.Component;

@Component
public class Listes {

    private String[] deplacements = new String[] { "0", "1", "2", "3", "4" };
    private String[] libellesDeplacements = new String[] { "vélo", "marche", "train", "avion", "autre" };
    private String[] libellesBijoux = new String[] { "émeraude", "rubis", "diamant", "opaline" };

    // getter e setter
  ...

}
- riga 5: la classe [Listes] sarà un componente Spring;
- righe 8-10: elenchi utilizzati per alimentare pulsanti di opzione, caselle di controllo ed elenchi a discesa;
Nella classe di configurazione [Config] è scritto:
@Configuration
@ComponentScan({ "istia.st.springmvc.controllers", "istia.st.springmvc.models" })
@EnableAutoConfiguration
public class Config extends WebMvcConfigurerAdapter {
- riga 2: il pacchetto [models], in cui si trova il componente [Listes], verrà correttamente esplorato da Spring;
Creiamo le seguenti nuove azioni:
    // ------------------ modulo con pulsanti di opzione
    @Autowired
    private Listes listes;

    @RequestMapping(value = "/v21", method = RequestMethod.GET, produces = "text/html; charset=UTF-8")
    public String v21(@ModelAttribute("form") Form21 formulaire, Model model) {
        model.addAttribute("listes", listes);
        return "vue-21";
    }

    @RequestMapping(value = "/v22", method = RequestMethod.POST, produces = "text/html; charset=UTF-8")
    public String v22(@ModelAttribute("form") Form21 formulaire, RedirectAttributes redirectAttributes) {
        redirectAttributes.addFlashAttribute("form", formulaire);
        return "redirect:/v21.html";
}
- righe 2-3: il componente [Listes] viene iniettato nel controller;
- riga 6: gestiamo un modulo di tipo [Form21] che descriveremo in seguito. Da notare che ne abbiamo specificato la chiave [form] nel modello della vista. Ricordiamo che, per impostazione predefinita, sarebbe stata [form21];
- riga 7: si inserisce il componente [Listes] nel modello. La vista ne avrà bisogno;
- riga 8: si visualizza la vista [vue-21.xml]. Questa vista mostrerà il modulo [Form21] e i valori inviati verranno trasmessi all’azione [/v22] delle righe 12-15;
- righe 12-15: l'azione [/v22] si limita a reindirizzare all'azione [/v21] inserendo i valori inviati che ha ricevuto in un attributo Flash con chiave [form]. È importante che questa chiave sia la stessa di quella utilizzata alla riga 6;
Il modello [Form21] è il seguente:
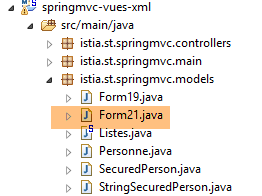 |
package istia.st.springmvc.models;

public class Form21 {

    // valori inviati
    private String marie = "non";
    private String deplacement = "4";
    private String[] couleurs;
    private String strCouleurs;
    private String[] bijoux;
    private String strBijoux;
    private int couleur2;
    private int[] bijoux2;
    private String strBijoux2;

    // getter e setter
    ...
}
La vista [vue-21.xml] è la seguente:
<!DOCTYPE HTML>
<html xmlns:th="http://www.thymeleaf.org">
    <head>
        <title>Spring 4 MVC</title>
        <meta http-equiv="Content-Type" content="text/html; charset=UTF-8" />
        <link rel="stylesheet" href="/css/form19.css" />
    </head>
    <body>

        <h3>Formulaire - Boutons radio</h3>
        <form action="/someURL" th:action="@{/v22.html}" method="post" th:object="${form}">
            <table>
                <thead>
                    <tr>
                        <th class="col1">Texte</th>
                        <th class="col2">Saisie</th>
                        <th class="col3">Valeur</th>
                    </tr>
                </thead>
                <tbody>
                    <tr>
                        <td class="col1">Etes-vous marié(e)</td>
                        <td class="col2">
                            <input type="radio" th:field="*{marie}" value="oui" />
                            <label th:for="${#ids.prev('marie')}">Oui</label>
                            <input type="radio" th:field="*{marie}" value="non" />
                            <label th:for="${#ids.prev('marie')}">Non</label>
                        </td>
                        <td class="col3">
                            <span th:text="*{marie}"></span>
                        </td>
                    </tr>
                    <tr>
                        <td class="col1">Mode de déplacement</td>
                        <td class="col2">
                            <span th:each="mode, status : ${listes.deplacements}">
                                <input type="radio" th:field="*{deplacement}" th:value="${mode}" />
                                <label th:for="${#ids.prev('deplacement')}" th:text="${listes.libellesDeplacements[status.index]}">Autre</label>
                            </span>
                        </td>
                        <td class="col3">
                            <span th:text="*{deplacement}"></span>
                        </td>
                    </tr>
                </tbody>
            </table>
            <p>
                <input type="submit" value="Valider" />
            </p>
        </form>
    </body>
</html>
- righe 36-40: si noti l’utilizzo del componente [Listes] inserito nel modello per generare le diciture delle caselle di selezione;
- la colonna 3 consente di conoscere il valore inserito per un POST, ovvero il valore iniziale del modulo al momento del GET iniziale;
Questo codice visualizza la pagina seguente:
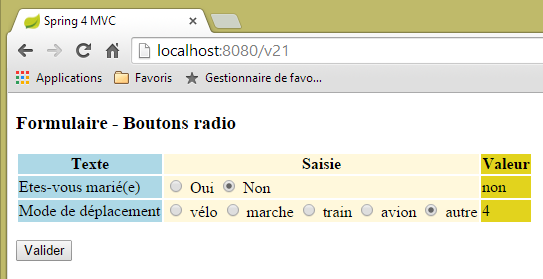 |
corrispondente al seguente codice HTML:
<!DOCTYPE HTML>

<html>
    <head>
        <title>Spring 4 MVC</title>
        <meta http-equiv="Content-Type" content="text/html; charset=UTF-8" />
        <link rel="stylesheet" href="/css/form19.css" />
    </head>
    <body>

        <h3>Formulaire - Boutons radio</h3>
        <form action="/v22.html" method="post">
            <table>
                <thead>
                    <tr>
                        <th class="col1">Texte</th>
                        <th class="col2">Saisie</th>
                        <th class="col3">Valeur</th>
                    </tr>
                </thead>
                <tbody>
                    <tr>
                        <td class="col1">Etes-vous marié(e)</td>
                        <td class="col2">
                            <input type="radio" value="oui" id="marie1" name="marie" />
                            <label for="marie1">Oui</label>
                            <input type="radio" value="non" id="marie2" name="marie" checked="checked" />
                            <label for="marie2">Non</label>
                        </td>
                        <td class="col3">
                            <span>non</span>
                        </td>
                    </tr>
                    <tr>
                        <td class="col1">Mode de déplacement</td>
                        <td class="col2">
                            <span>
                                <input type="radio" value="0" id="deplacement1" name="deplacement" />
                                <label for="deplacement1">vélo</label>
                            </span>
                            <span>
                                <input type="radio" value="1" id="deplacement2" name="deplacement" />
                                <label for="deplacement2">marche</label>
                            </span>
                            <span>
                                <input type="radio" value="2" id="deplacement3" name="deplacement" />
                                <label for="deplacement3">train</label>
                            </span>
                            <span>
                                <input type="radio" value="3" id="deplacement4" name="deplacement" />
                                <label for="deplacement4">avion</label>
                            </span>
                            <span>
                                <input type="radio" value="4" id="deplacement5" name="deplacement" checked="checked" />
                                <label for="deplacement5">autre</label>
                            </span>
                        </td>
                        <td class="col3">
                            <span>4</span>
                        </td>
                    </tr>
                </tbody>
            </table>
            <p>
                <input type="submit" value="Valider" />
            </p>
        </form>
    </body>
</html>
Si nota che i valori inviati (attributi name) vengono inseriti nei seguenti campi del modello [Form21]:
    private String marie = "non";
    private String deplacement = "4";
Si invita il lettore a effettuare dei test. Si noti bene che è l’attributo [value] dei pulsanti di opzione ad essere inviato.
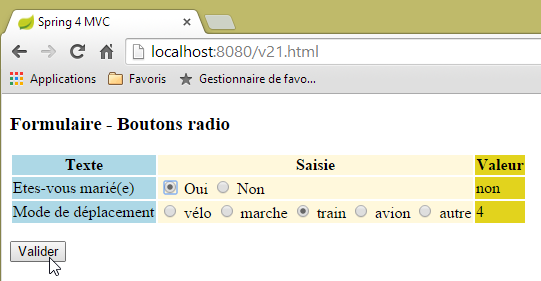 | 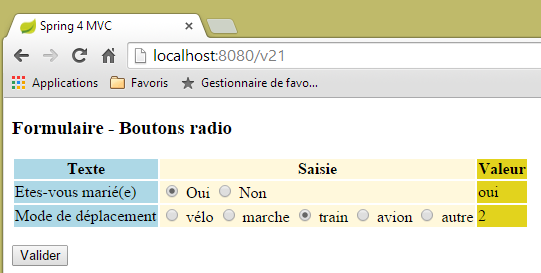 |
5.16. [/v23-/v24]: gestione delle caselle di controllo
Aggiungiamo la seguente nuova azione:
    // ------------------ modulo con caselle di selezione
    @RequestMapping(value = "/v23", method = RequestMethod.GET, produces = "text/html; charset=UTF-8")
    public String av20(@ModelAttribute("form") Form21 formulaire, Model model) {
        model.addAttribute("listes", listes);
        return "vue-23";
}
- riga 3: continuiamo a utilizzare il modello [Form21];
La vista [vue-23.xml] è la seguente:
<!DOCTYPE HTML>
<html xmlns:th="http://www.thymeleaf.org">
    <head>
        <title>Spring 4 MVC</title>
        <meta http-equiv="Content-Type" content="text/html; charset=UTF-8" />
        <link rel="stylesheet" href="/css/form19.css" />
    </head>
    <body>
        <h3>Formulaire - Cases à cocher</h3>
        <form action="/someURL" th:action="@{/v24.html}" method="post" th:object="${form}">
            <table>
                <thead>
                    <tr>
                        <th class="col1">Texte</th>
                        <th class="col2">Saisie</th>
                        <th class="col3">Valeur</th>
                    </tr>
                </thead>
                <tbody>
                    <tr>
                        <td class="col1">Vos couleurs préférées</td>
                        <td class="col2">
                            <input type="checkbox" th:field="*{couleurs}" value="0" />
                            <label th:for="${#ids.prev('couleurs')}">rouge</label>
                            <input type="checkbox" th:field="*{couleurs}" value="1" />
                            <label th:for="${#ids.prev('couleurs')}">vert</label>
                            <input type="checkbox" th:field="*{couleurs}" value="2" />
                            <label th:for="${#ids.prev('couleurs')}">bleu</label>
                        </td>
                        <td class="col3">
                            <span th:text="*{strCouleurs}"></span>
                        </td>
                    </tr>
                    <tr>
                        <td class="col1">Pierres préférées</td>
                        <td class="col2">
                            <span th:each="label, status : ${listes.libellesBijoux}">
                                <input type="checkbox" th:field="*{bijoux}" th:value="${status.index}" />
                                <label th:for="${#ids.prev('bijoux')}" th:text="${label}">Autre</label>
                            </span>
                        </td>
                        <td class="col3">
                            <span th:text="*{strBijoux}"></span>
                        </td>
                    </tr>
                </tbody>
            </table>
            <p>
                <input type="submit" value="Valider" />
            </p>
        </form>
    </body>
</html>
- righe 37-41: si noti l'utilizzo del componente [Listes] per generare le etichette delle caselle di controllo;
Questo codice visualizza la pagina seguente:
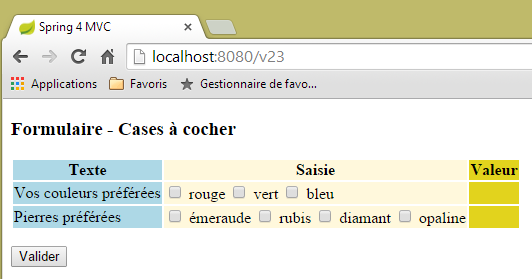 |
derivata dal seguente codice HTML:
<!DOCTYPE HTML>

<html>
    <head>
        <title>Spring 4 MVC</title>
        <meta http-equiv="Content-Type" content="text/html; charset=UTF-8" />
        <link rel="stylesheet" href="/css/form19.css" />
    </head>
    <body>
        <h3>Formulaire - Cases à cocher</h3>
        <form action="/v24.html" method="post">
            <table>
                <thead>
                    <tr>
                        <th class="col1">Texte</th>
                        <th class="col2">Saisie</th>
                        <th class="col3">Valeur</th>
                    </tr>
                </thead>
                <tbody>
                    <tr>
                        <td class="col1">Vos couleurs préférées</td>
                        <td class="col2">
                            <input type="checkbox" value="0" id="couleurs1" name="couleurs" /><input type="hidden" name="_couleurs" value="on" />
                            <label for="couleurs1">rouge</label>
                            <input type="checkbox" value="1" id="couleurs2" name="couleurs" /><input type="hidden" name="_couleurs" value="on" />
                            <label for="couleurs2">vert</label>
                            <input type="checkbox" value="2" id="couleurs3" name="couleurs" /><input type="hidden" name="_couleurs" value="on" />
                            <label for="couleurs3">bleu</label>
                        </td>
                        <td class="col3">
                            <span></span>
                        </td>
                    </tr>
                    <tr>
                        <td class="col1">Pierres préférées</td>
                        <td class="col2">
                            <span>
                                <input type="checkbox" value="0" id="bijoux1" name="bijoux" /><input type="hidden" name="_bijoux" value="on" />
                                <label for="bijoux1">émeraude</label>
                            </span>
                            <span>
                                <input type="checkbox" value="1" id="bijoux2" name="bijoux" /><input type="hidden" name="_bijoux" value="on" />
                                <label for="bijoux2">rubis</label>
                            </span>
                            <span>
                                <input type="checkbox" value="2" id="bijoux3" name="bijoux" /><input type="hidden" name="_bijoux" value="on" />
                                <label for="bijoux3">diamant</label>
                            </span>
                            <span>
                                <input type="checkbox" value="3" id="bijoux4" name="bijoux" /><input type="hidden" name="_bijoux" value="on" />
                                <label for="bijoux4">opaline</label>
                            </span>
                        </td>
                        <td class="col3">
                            <span></span>
                        </td>
                    </tr>
                </tbody>
            </table>
            <p>
                <input type="submit" value="Valider" />
            </p>
        </form>
    </body>
</html>
Si noti che i valori inviati (attributi name) vengono inseriti nei seguenti campi di [Form21]:
    private String[] couleurs;
    private String[] bijoux;
Si tratta di tabelle poiché per ogni campo esistono diverse caselle di selezione che riportano il nome del campo. È quindi possibile che vengano inviati più valori con lo stesso nome (attributo name del modulo). È quindi necessaria una tabella per recuperarli.
Torniamo al codice Thymeleaf della colonna 3 della pagina:
  <td class="col3">
    <span th:text="*{strCouleurs}"></span>
  </td>
</tr>
<tr>
  <td class="col1">Pierres préférées</td>
  <td class="col2">
    <span th:each="label, status : ${listes.libellesBijoux}">
      <input type="checkbox" th:field="*{bijoux}" th:value="${status.index}" />
      <label th:for="${#ids.prev('bijoux')}" th:text="${label}">Autre</label>
    </span>
  </td>
  <td class="col3">
    <span th:text="*{strBijoux}"></span>
  </td>
</tr>
I campi indicati alle righe 2 e 14 sono i seguenti:
    private String strCouleurs;
    private String strBijoux;
Sono calcolati dall'azione [/v24] che gestisce l'azione POST:
    // mappatore Jackson / jSON
    private ObjectMapper mapper = new ObjectMapper();

    @RequestMapping(value = "/v24", method = RequestMethod.POST, produces = "text/html; charset=UTF-8")
    public String av21(@ModelAttribute("form") Form21 formulaire, RedirectAttributes redirectAttributes) throws JsonProcessingException {
        redirectAttributes.addFlashAttribute("form", formulaire);
        formulaire.setStrCouleurs(mapper.writeValueAsString(formulaire.getCouleurs()));
        formulaire.setStrBijoux(mapper.writeValueAsString(formulaire.getBijoux()));
        return "redirect:/v23.html";
}
È importante ricordare che la libreria jackson / jSON è tra le dipendenze del progetto.
- riga 2: si crea un tipo [ObjectMapper] che consente di serializzare/deserializzare oggetti in jSON,
- riga 7: si serializza in jSON l’array dei colori. Il risultato viene inserito nel campo [strCouleurs];
- riga 8: si serializza in jSON l'array dei gioielli. Il risultato viene inserito nel campo [strBijoux];
Ecco un esempio di esecuzione:
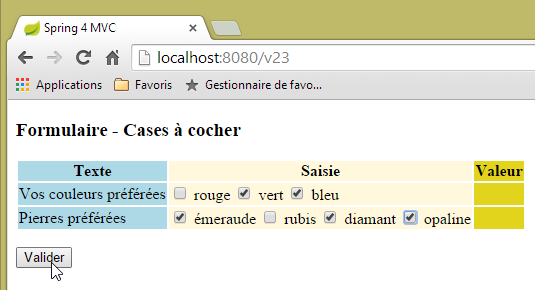 | 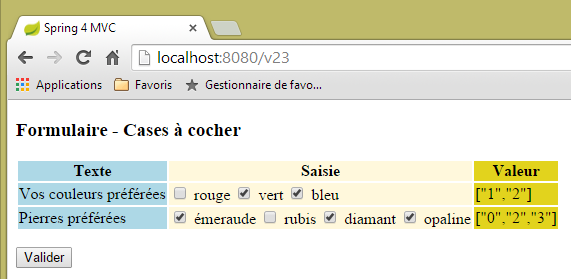 |
Si noti che viene inviato l’attributo [value] delle caselle di selezione.
5.17. [/25-/v26]: gestione delle liste
Aggiungiamo la seguente azione [/v25]:
  // ------------------ modulo con elenchi
  @RequestMapping(value = "/v25", method = RequestMethod.GET, produces = "text/html; charset=UTF-8")
  public String v25(@ModelAttribute("form") Form21 formulaire, Model model) {
        model.addAttribute("listes", listes);
        return "vue-25";
}
La vista [vue-25.xml] è la seguente:
<!DOCTYPE HTML>
<html xmlns:th="http://www.thymeleaf.org">
    <head>
        <title>Spring 4 MVC</title>
        <meta http-equiv="Content-Type" content="text/html; charset=UTF-8" />
        <link rel="stylesheet" href="/css/form19.css" />
    </head>
    <body>

        <h3>Formulaire - Listes</h3>
        <form action="/someURL" th:action="@{/v26.html}" method="post"
            th:object="${form}">
            <table>
                <thead>
                    <tr>
                        <th class="col1">Texte</th>
                        <th class="col2">Saisie</th>
                        <th class="col3">Valeur</th>
                    </tr>
                </thead>
                <tbody>
                    <tr>
                        <td class="col1">Votre couleur préférée</td>
                        <td class="col2">
                            <select th:field="*{couleur2}">
                                <option value="0">rouge</option>
                                <option value="1">bleu</option>
                                <option value="2">vert</option>
                            </select>
                        </td>
                        <td class="col3">
                            <span th:text="*{couleur2}"></span>
                        </td>
                    </tr>
                    <tr>
                        <td class="col1">Pierres préférées (choix multiple)</td>
                        <td class="col2">
                            <select th:field="*{bijoux2}" multiple="multiple" size="3">
                                <option th:each="label, status : ${listes.libellesBijoux}"
                                    th:text="${label}" th:value="${status.index}">
                                </option>
                            </select>
                        </td>
                        <td class="col3">
                            <span th:text="*{strBijoux2}"></span>
                        </td>
                    </tr>

                </tbody>
            </table>
            <input type="submit" value="Valider" />
        </form>
    </body>
</html>
- righe 38-42: generazione di un elenco a scelta multipla in cui le etichette sono prese dal componente [Listes] che abbiamo già utilizzato;
La pagina visualizzata è la seguente:
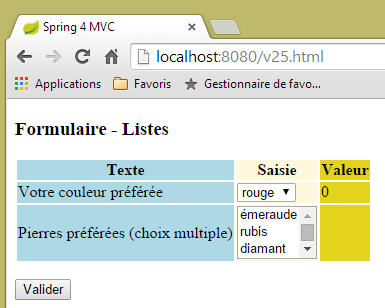 |
generata dal seguente codice HTML:
<!DOCTYPE HTML>

<html>
    <head>
        <title>Spring 4 MVC</title>
        <meta http-equiv="Content-Type" content="text/html; charset=UTF-8" />
        <link rel="stylesheet" href="/css/form19.css" />
    </head>
    <body>

        <h3>Formulaire - Listes</h3>
        <form action="/v26.html" method="post">
            <table>
                <thead>
                    <tr>
                        <th class="col1">Texte</th>
                        <th class="col2">Saisie</th>
                        <th class="col3">Valeur</th>
                    </tr>
                </thead>
                <tbody>
                    <tr>
                        <td class="col1">Votre couleur préférée</td>
                        <td class="col2">
                            <select id="couleur2" name="couleur2">
                                <option value="0" selected="selected">rouge</option>
                                <option value="1">bleu</option>
                                <option value="2">vert</option>
                            </select>
                        </td>
                        <td class="col3">
                            <span>0</span>
                        </td>
                    </tr>
                    <tr>
                        <td class="col1">Pierres préférées (choix multiple)</td>
                        <td class="col2">
                            <select multiple="multiple" size="3" id="bijoux2" name="bijoux2">
                                <option value="0">émeraude</option>
                                <option value="1">rubis</option>
                                <option value="2">diamant</option>
                                <option value="3">opaline</option>
                            </select>
                            <input type="hidden" name="_bijoux2" value="1" />
                        </td>
                        <td class="col3">
                            <span></span>
                        </td>
                    </tr>
                </tbody>
            </table>
            <p>
                <input type="submit" value="Valider" />
            </p>
        </form>
    </body>
</html>
- riga 44: si può notare che Thymeleaf ha creato un campo nascosto. Non ne ho compreso il ruolo:
- i valori inviati (attributi value dei tag option) verranno inseriti nei seguenti campi (attributi name) di [Form21]:
    private int couleur2;
    private int[] bijoux2;
- riga 38: l'elenco [bijoux2] è a scelta multipla. Pertanto, è possibile inviare più valori associati al nome [bijoux2]. Per recuperarli, il campo [bijoux2] deve essere un array. Si noti che si tratta di un array di numeri interi. Ciò è possibile poiché i valori inviati possono essere convertiti in questo tipo;
I valori vengono inviati all'azione successiva [/v26]:
  @RequestMapping(value = "/v26", method = RequestMethod.POST, produces = "text/html; charset=UTF-8")
  public String v26(@ModelAttribute("form") Form21 formulaire, RedirectAttributes redirectAttributes) throws JsonProcessingException {
    redirectAttributes.addFlashAttribute("form", formulaire);
    formulaire.setStrBijoux2(mapper.writeValueAsString(formulaire.getBijoux2()));
    return "redirect:/v25.html";
}
Non c’è nulla qui che non abbiamo già visto. Ecco un esempio di esecuzione:
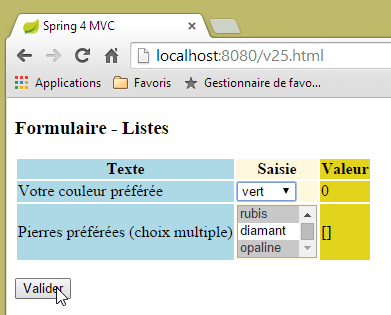 | 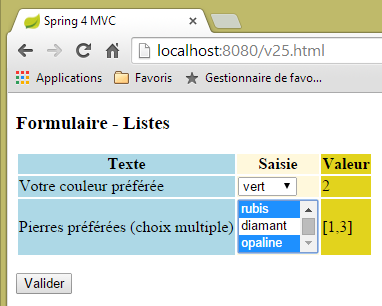 |
5.18. [/v27]: configurazione dei messaggi
Consideriamo la seguente azione [/v27]:
  // ------------------ messaggi personalizzati
  @RequestMapping(value = "/v27", method = RequestMethod.GET, produces = "text/html; charset=UTF-8")
  public String v27(Model model) {
        model.addAttribute("param1","paramètre un");
        model.addAttribute("param2","paramètre deux");
        model.addAttribute("param3","paramètre trois");
        model.addAttribute("param4","messages.param4");
        return "vue-27";
}
L'azione si limita a inserire quattro valori nel modello e visualizza la vista [vue-27.xml] seguente:
<!DOCTYPE html>
<html xmlns:th="http://www.thymeleaf.org">
    <head>
        <title th:text="#{messages.titre}">Spring 4 MVC</title>
        <meta http-equiv="Content-Type" content="text/html; charset=UTF-8" />
    </head>
    <body>
        <h2 th:text="#{messages.titre}">Spring 4 MVC</h2>
        <p th:text="#{messages.msg1(${param1})}"></p>
        <p th:text="#{messages.msg2(${param2},${param3})}"></p>
        <p th:text="#{messages.msg3(#{${param4}})}"></p>
    </body>
</html>
- riga 8: un messaggio senza parametri;
- riga 9: un messaggio con un parametro [$param1] prelevato dal modello;
- riga 10: un messaggio con due parametri [$param2, $param3] prelevati dal modello;
- riga 11: un messaggio con un parametro. Questo parametro è a sua volta una chiave di messaggio (presenza di #). La chiave è fornita da [$param4];
Il file dei messaggi in francese è il seguente:
[messages_fr.properties]
messages.titre=Messages paramétrés
messages.msg1=Un message avec un paramètre : {0}
messages.msg2=Un message avec deux paramètres : {0}, {1}
messages.msg3=Un message avec une clé de message comme paramètre : {0}
messages.param4=paramètre quatre
Per indicare la presenza di parametri nel messaggio, si utilizzano i simboli {0}, {1}, ...
La fusione del modello creato dall'azione [/v27] con la vista [vue-27] produrrà il seguente codice HTML:
<!DOCTYPE html>

<html>
    <head>
        <title>Messages paramétrés</title>
        <meta http-equiv="Content-Type" content="text/html; charset=UTF-8" />
    </head>
    <body>
        <h2>Messages paramétrés</h2>
        <p>Un message avec un paramètre : paramètre un</p>
        <p>Un message avec deux paramètre : paramètre deux, paramètre trois</p>
        <p>Un message avec une clé de message comme paramètre : paramètre quatre</p>
    </body>
</html>
il che dà la seguente vista:
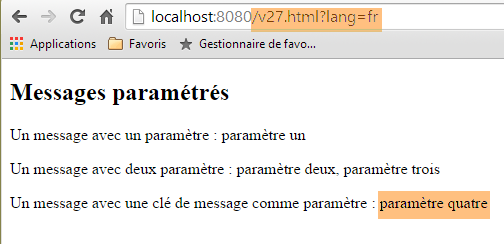 |
Il file dei messaggi in inglese è il seguente:
[messages_fr.properties]
messages.titre=Parameterized messages
messages.msg1=Message with one parameter: {0}
messages.msg2=Message with two parameters: {0}, {1}
messages.msg3=Message with a message key as a parameter: {0}
messages.param4=parameter four
La fusione del modello creato dall'azione [/v27] con la vista [vue-27] produrrà il seguente codice HTML:
<!DOCTYPE html>

<html>
    <head>
        <title>Parameterized messages</title>
        <meta http-equiv="Content-Type" content="text/html; charset=UTF-8" />
    </head>
    <body>
        <h2>Parameterized messages</h2>
        <p>Message with one parameter: paramètre un</p>
        <p>Message with two parameters: paramètre deux, paramètre trois</p>
        <p>Message with a message key as a parameter: parameter four</p>
    </body>
</html>
il che dà origine alla seguente vista:
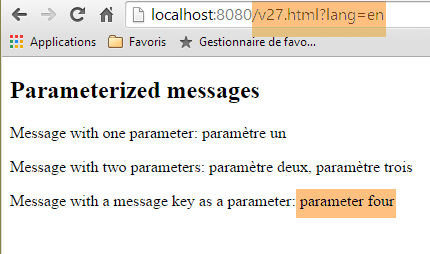 |
Si nota che l’ultimo messaggio è stato internazionalizzato dall’inizio alla fine, cosa che non avviene per i due precedenti.
5.19. Utilizzo di una pagina master
In un’applicazione web, capita spesso che le viste condividano una serie di elementi che possono essere raggruppati in una pagina master. Ecco un esempio:
 |
Nell'esempio sopra riportato, abbiamo due pagine simili in cui il frammento [1] è stato sostituito dal frammento [2]. La vista mostra una pagina master con tre frammenti fissi [3-5] e un frammento variabile [6].
5.19.1. Il progetto
Stiamo realizzando un progetto [springmvc-masterpage] seguendo la procedura descritta nel paragrafo 5.1.
 |
Il file [pom.xml] è il seguente:
<?xml version="1.0" encoding="UTF-8"?>
<project xmlns="http://maven.apache.org/POM/4.0.0" xmlns:xsi="http://www.w3.org/2001/XMLSchema-instance"
    xsi:schemaLocation="http://maven.apache.org/POM/4.0.0 http://maven.apache.org/xsd/maven-4.0.0.xsd">
    <modelVersion>4.0.0</modelVersion>

    <groupId>istia.st.springmvc</groupId>
    <artifactId>springmvc-masterpage</artifactId>
    <version>0.0.1-SNAPSHOT</version>
    <packaging>jar</packaging>

    <name>springmvc-masterpage</name>
    <description>Page maître</description>

    <parent>
        <groupId>org.springframework.boot</groupId>
        <artifactId>spring-boot-starter-parent</artifactId>
        <version>1.1.9.RELEASE</version>
        <relativePath/> <!-- ricerca del genitore dal repository -->
    </parent>

    <dependencies>
        <dependency>
            <groupId>org.springframework.boot</groupId>
            <artifactId>spring-boot-starter-thymeleaf</artifactId>
        </dependency>
        <dependency>
            <groupId>org.springframework.boot</groupId>
            <artifactId>spring-boot-starter-test</artifactId>
            <scope>test</scope>
        </dependency>
    </dependencies>

    <properties>
        <project.build.sourceEncoding>UTF-8</project.build.sourceEncoding>
        <start-class>istia.st.springmvc.main.Main</start-class>
        <java.version>1.7</java.version>
    </properties>

    <build>
        <plugins>
            <plugin>
                <groupId>org.springframework.boot</groupId>
                <artifactId>spring-boot-maven-plugin</artifactId>
            </plugin>
        </plugins>
    </build>

</project>
Una delle dipendenze introdotte da questo file è necessaria per la pagina master:
 |
I pacchetti [config] e [main] sono identici a quelli con lo stesso nome del progetto precedente.
5.19.2. La pagina master
 |
La pagina master è la seguente vista [layout.xml]:
<!DOCTYPE html>
<html xmlns:th="http://www.thymeleaf.org" xmlns:layout="http://www.ultraq.net.nz/thymeleaf/layout">
    <head>
        <title>Layout</title>
        <meta http-equiv="Content-Type" content="text/html; charset=UTF-8" />
    </head>
    <body>
        <table style="width: 400px">
            <tr>
                <td colspan="2" bgcolor="#ccccff">
                    <div th:include="entete" />
                </td>
            </tr>
            <tr style="height: 200px">
                <td bgcolor="#ffcccc">
                    <div th:include="menu" />
                </td>
                <td>
                    <section layout:fragment="contenu">
                        <h2>Contenu</h2>
                    </section>
                </td>
            </tr>
            <tr bgcolor="#ffcc66">
                <td colspan="2">
                    <div th:include="basdepage" />
                </td>
            </tr>
        </table>
    </body>
</html>
- riga 2: la pagina master deve definire lo spazio dei nomi [xmlns:layout="http://www.ultraq.net.nz/thymeleaf/layout"], di cui un elemento viene utilizzato alla riga 19;
- righe 10-12: generano l'area [1] riportata di seguito. Il tag Thymeleaf [th:include] consente di includere nella vista corrente un frammento definito in un altro file. Ciò permette di riutilizzare i frammenti utilizzati in più viste;
- righe 15-17: generano l’area [2] riportata di seguito;
- righe 19-20: generano l'area [3] riportata di seguito. L'attributo [layout:fragment] è un attributo dello spazio dei nomi [xmlns:layout="http://www.ultraq.net.nz/thymeleaf/layout"]. Indica un'area che, in fase di esecuzione, può essere sostituita da un'altra;
- righe 24-28: generano il campo [4] riportato di seguito;
 |
5.19.3. I frammenti
I frammenti [entete.xml], [menu.xml] e [basdepage.xml] sono i seguenti:
[entete.xml]
<!DOCTYPE html>
<html>
    <h2>entête</h2>
</html>
[menu.xml]
<!DOCTYPE html>
<html>
    <h2>menu</h2>
</html>
[basdepage.xml]
<!DOCTYPE html>
<html>
    <h2>bas de page</h2>
</html>
Il frammento [page1.xml] è il seguente:
<!DOCTYPE html>
<html xmlns:th="http://www.thymeleaf.org" xmlns:layout="http://www.ultraq.net.nz/thymeleaf/layout" layout:decorator="layout">
    <section layout:fragment="contenu">
        <h2>Page 1</h2>
        <form action="/someURL" th:action="@{/page2.html}" method="post">
            <input type="submit" value="Page 2" />
        </form>
    </section>
</html>
- riga 2: l'attributo [layout:decorator="layout"] indica che la pagina corrente [page1.xml] è «decorata», ovvero appartiene a una pagina master. Quest’ultima è il valore dell’attributo, in questo caso la vista [layout.xml];
- riga 3: si indica in quale frammento della pagina master verrà inserito [page1.xml]. L'attributo [layout:fragment="contenu"] indica che [page1.xml] verrà inserito nel frammento denominato [contenu], ovvero nell'area [3] della pagina master;
- righe 5-7: il contenuto del frammento è un modulo che presenta un pulsante da POST all'azione [/page2.html];
Il frammento [page2.xml] è analogo:
<!DOCTYPE html>
<html xmlns:th="http://www.thymeleaf.org" xmlns:layout="http://www.ultraq.net.nz/thymeleaf/layout"
    layout:decorator="layout">
    <section layout:fragment="contenu">
        <h2>Page 2</h2>
        <form action="/someURL" th:action="@{/page1.html}" method="post">
            <input type="submit" value="Page 1" />
        </form>
    </section>
</html>
5.19.4. Le azioni
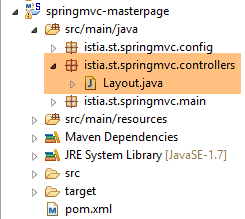 |
Il controller [Layout.java] è il seguente:
package istia.st.springmvc.controllers;

import org.springframework.stereotype.Controller;
import org.springframework.web.bind.annotation.RequestMapping;
import org.springframework.web.bind.annotation.RequestMethod;

@Controller
public class Layout {
    @RequestMapping(value = "/page1")
    public String page1() {
        return "page1";
    }

    @RequestMapping(value = "/page2", method=RequestMethod.POST)
    public String page2() {
        return "page2";
    }
}
- righe 10-12: l'azione [/page1] si limita a visualizzare la vista [page1.xml];
- righe 15-17: lo stesso vale per l'azione [/page2], che visualizza la vista [page2.xml];