5. ویوهای Thymeleaf
بیایید به معماری یک برنامه Spring MVC بازگردیم.
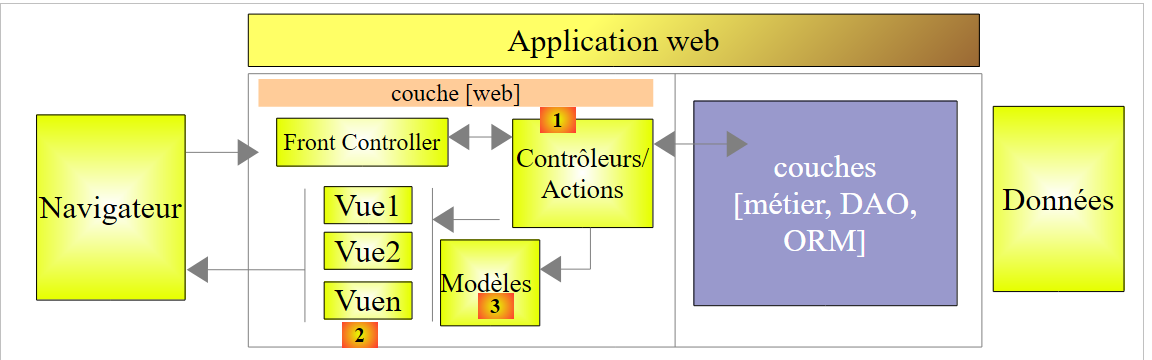 |
دو فصل قبلی جنبههای مختلفی از بلوک [1] را تشریح کردهاند: اکشنها. اکنون به موارد زیر میپردازیم:
- بلوک [2] نماهای V؛
- بلوک [3] مدل M که توسط این نماها نمایش داده میشود؛
از زمان ایجاد Spring MVC، فناوری مورد استفاده برای تولید صفحات HTML که به مرورگرهای مشتری ارسال میشوند، فناوری JSP (Java Server Pages) بوده است. طی چند سال گذشته، فناوریهای [Thymeleaf] و [http://www.thymeleaf.org/] نیز در دسترس بودهاند. این فناوری است که اکنون ارائه میکنیم.
5.1. پروژه STS
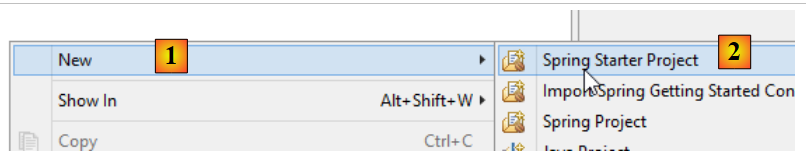
ما در حال ایجاد یک پروژه جدید هستیم:
 |
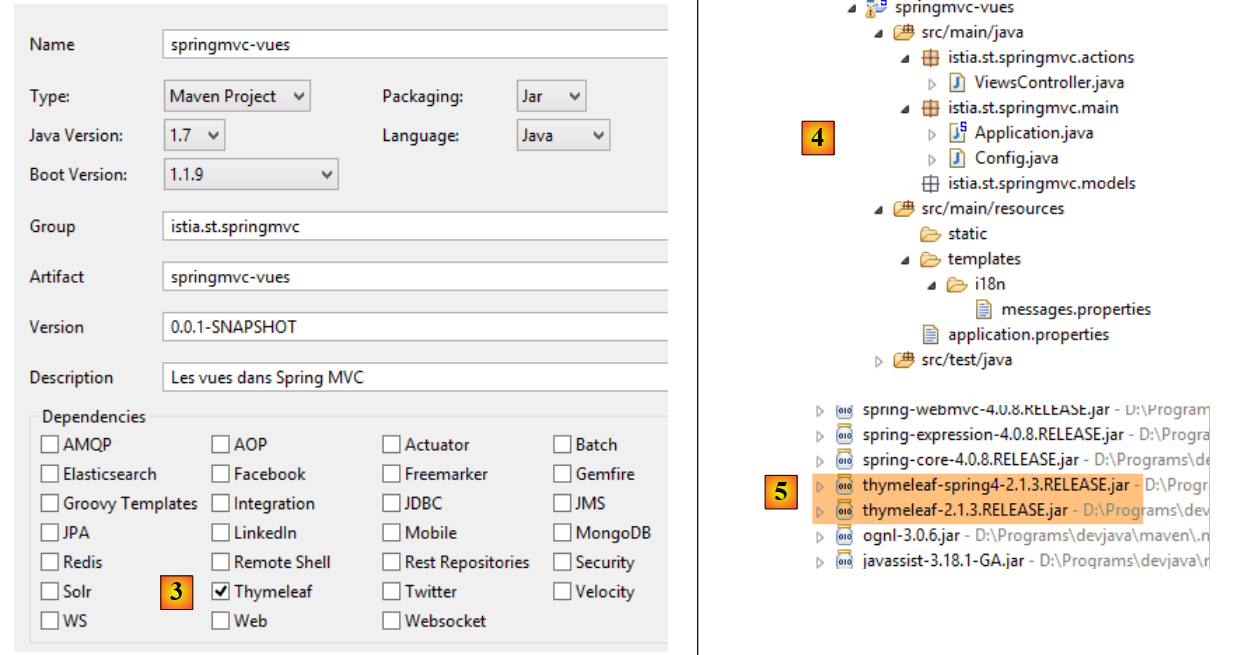 |
- در [3]، مشخص کنید که پروژه به وابستگیهای [Thymeleaf] نیاز دارد. این کار علاوه بر وابستگیهای [Spring MVC] از پروژه قبلی، وابستگیهای فریمورک [Thymeleaf] و [5] را نیز اضافه میکند؛
اکنون، این پروژه را به شرح زیر بهروزرسانی کنیم:
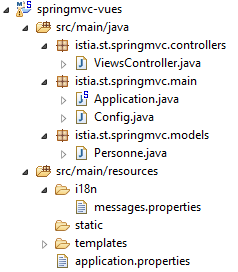 |
ما از پروژه قبلی الهام میگیریم:
- [istia.st.springmvc.controllers] شامل کنترلرها خواهد بود؛
- [istia.st.springmvc.models] شامل مدلهای اکشن و ویو خواهد بود؛
- [istia.st.springmvc.main] بسته کلاس اجرایی Spring Boot است؛
- [templates] حاوی ویوهای Thymeleaf خواهد بود؛
- [i18n] حاوی پیامهای بینالمللیسازیشده نمایشدادهشده توسط ویوها خواهد بود؛
کلاس [Application] به شرح زیر است:
package istia.st.springmvc.main;

import org.springframework.boot.SpringApplication;

public class Application {

    public static void main(String[] args) {
        SpringApplication.run(Config.class, args);
    }
}
کلاس [Config] به شرح زیر است:
package istia.st.springmvc.main;

import java.util.Locale;

import org.springframework.boot.autoconfigure.EnableAutoConfiguration;
import org.springframework.context.MessageSource;
import org.springframework.context.annotation.Bean;
import org.springframework.context.annotation.ComponentScan;
import org.springframework.context.annotation.Configuration;
import org.springframework.context.support.ResourceBundleMessageSource;
import org.springframework.web.servlet.config.annotation.InterceptorRegistry;
import org.springframework.web.servlet.config.annotation.WebMvcConfigurerAdapter;
import org.springframework.web.servlet.i18n.CookieLocaleResolver;
import org.springframework.web.servlet.i18n.LocaleChangeInterceptor;

@Configuration
@ComponentScan({ "istia.st.springmvc.controllers", "istia.st.springmvc.models" })
@EnableAutoConfiguration
public class Config extends WebMvcConfigurerAdapter {
    @Bean
    public MessageSource messageSource() {
        ResourceBundleMessageSource messageSource = new ResourceBundleMessageSource();
        messageSource.setBasename("i18n/messages");
        return messageSource;
    }

    @Bean
    public LocaleChangeInterceptor localeChangeInterceptor() {
        LocaleChangeInterceptor localeChangeInterceptor = new LocaleChangeInterceptor();
        localeChangeInterceptor.setParamName("lang");
        return localeChangeInterceptor;
    }

    @Override
    public void addInterceptors(InterceptorRegistry registry) {
        registry.addInterceptor(localeChangeInterceptor());
    }

    @Bean
    public CookieLocaleResolver localeResolver() {
        CookieLocaleResolver localeResolver = new CookieLocaleResolver();
        localeResolver.setCookieName("lang");
        localeResolver.setDefaultLocale(new Locale("fr"));
        return localeResolver;
    }
}
این پیکربندی در حال حاضر مدیریت لوکال را فعال میکند.
کنترلکننده [ViewController] به شرح زیر است:
package istia.st.springmvc.actions;

import org.springframework.stereotype.Controller;

@Controller
public class ViewsController {

}
- در خط ۵، حاشیه [@Controller] جایگزین حاشیه [@RestController] شده است زیرا از این پس، عملیاتها پاسخی برای مشتری تولید نخواهند کرد. در عوض، آنها:
- ساختن یک مدل M
- یک نوع [String] را بازگردانند، که نام ویوی [Thymeleaf] مسئول نمایش این مدل خواهد بود. این ترکیب ویوی V و مدل M است که جریان HTML را برای ارسال به کلاینت تولید میکند؛
فایل [messages.properties] در حال حاضر خالی است.
5.2. [/v01]: مبانی Thymeleaf
بیایید به اقدام بعدی در [ViewsController] نگاهی بیندازیم:
    // مبانی Thymeleaf – ۱
    @RequestMapping(value = "/v01", method = RequestMethod.GET)
    public String v01() {
        return "v01";
}
- خط ۳: اکشن یک نوع [String] را بازمیگرداند. این نام اکشن خواهد بود؛
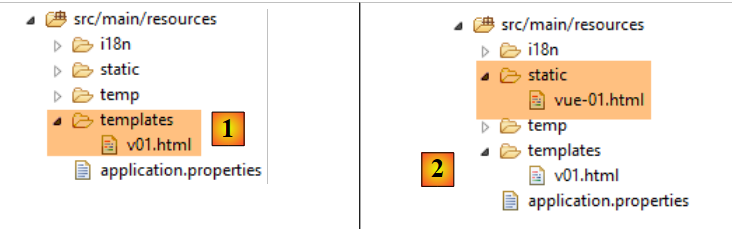
- خط ۴: این ویو [v01] خواهد بود. بهطور پیشفرض، باید در پوشه [templates] قرار گیرد و نام آن [v01.html] باشد؛
ویوی [v01.html] به شرح زیر است:
 |
<!DOCTYPE html>
<html xmlns:th="http://www.thymeleaf.org">
<head>
<title th:text="'Les vues'">Spring 4 MVC</title>
<meta http-equiv="Content-Type" content="text/html; charset=UTF-8" />
</head>
<body>
    <h2 th:text="'Les vues dans Spring MVC'">Spring 4 MVC</h2>
</body>
</html>
این یک فایل HTML است. حضور Thymeleaf قابل مشاهده است:
- در فضای نام [th] در خط ۲؛
- ویژگیهای [th:text] در خطوط ۴ و ۸؛
این یک فایل معتبر HTML است که قابل مشاهده است. ما آن را در پوشه [static] [2] با نام [vue-01.html] قرار میدهیم و مستقیماً از طریق مرورگر به آن دسترسی پیدا میکنیم:
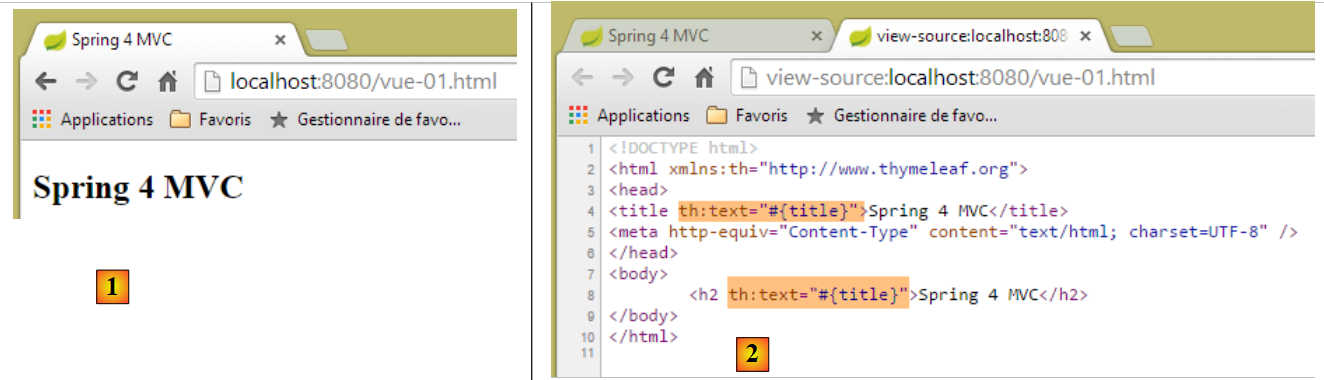 |
اگر کد منبع صفحه در [2] را بررسی کنیم، میتوانیم ببینیم که ویژگیهای [th:text] توسط سرور ارسال شدهاند اما توسط مرورگر نادیده گرفته شدهاند. وقتی یک نما نتیجه یک اقدام باشد، Thymeleaf وارد عمل میشود و ویژگیهای [th] را قبل از ارسال پاسخ به کلاینت تفسیر میکند.
تگ HTML:
<title th:text="'Les vues'">Spring 4 MVC</title>
توسط Thymeleaf به شرح زیر پردازش میشود:
- `th:text` دارای نحوی `th:text="expression"` است، که در آن `expression` یک عبارت است که باید ارزیابی شود. هنگامی که این عبارت یک رشته است، مانند این مورد، باید در گیومه تکی قرار گیرد؛
- مقدار [expression] متن تگ HTML را جایگزین میکند، که در این مورد متن تگ [title] است؛
پس از پردازش، تگ بالا به این صورت درآمده است:
<title>Les vues</title>
بیایید اقدام [/v01] را درخواست کنیم:
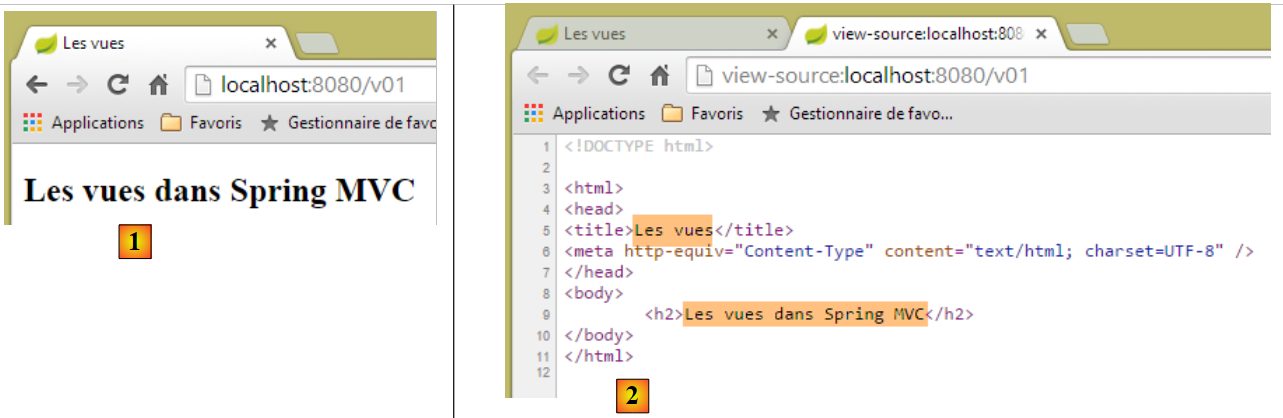 |
- در [2]، میتوانیم جایگزینی انجامشده توسط Thymeleaf را ببینیم؛
حالا بیایید URL را به [http://localhost:8080/v01.html] فراخوانی کنیم:
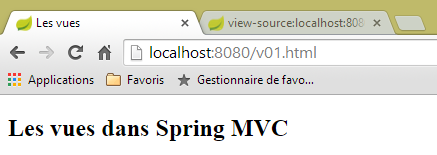 |
چگونه باید این را تفسیر کرد؟ آیا ویوی [templates/v01.html] مستقیماً بدون عبور از یک اکشن سرو شده است؟ برای روشن شدن موضوع، اکشن زیر [/v02] را ایجاد میکنیم:
    // مبانی Thymeleaf – ۲
    @RequestMapping(value = "/v02", method = RequestMethod.GET)
    public String v02() {
        System.out.println("action v02");
        return "vue-02";
}
ویوی [vue-02.html] کپیای از [v01.html] است:
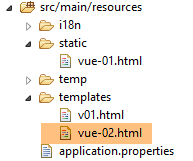 |
اکنون بیایید URL را از [http://localhost:8080/vue-02.html] فراخوانی کنیم:
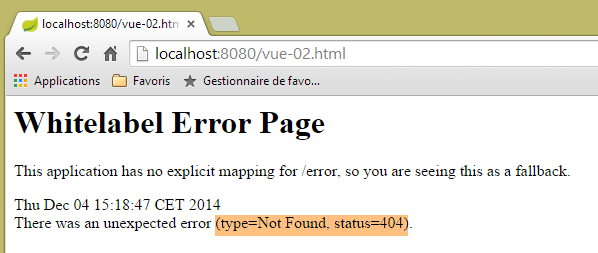 |
URL یافت نشد. اکنون بیایید URL و [http://localhost:8080/v02.html] را درخواست کنیم
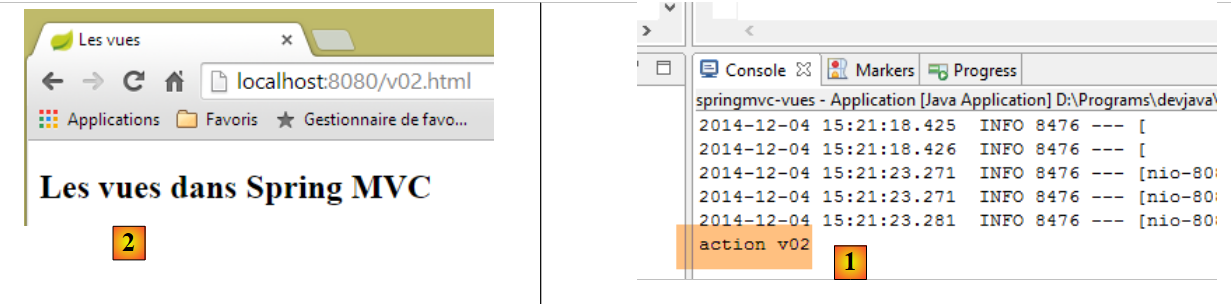 |
- در لاگهای کنسول برای [1]، میتوانیم ببینیم که اکشن [/v02] فراخوانی شده است، و این باعث شد که ویو [vue-02.html] در [2] نمایش داده شود؛
اکنون میدانیم که URL [http://localhost:8080/v02.html] ممکن است به فایلی به نام [/v02.html] در پوشه [static] نیز اشاره کند. اگر این فایل وجود داشته باشد چه اتفاقی میافتد؟ بیایید امتحانش کنیم. در پوشه [static]، فایل زیر را با نام [v02.html] ایجاد میکنیم:
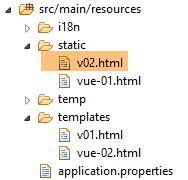 |
<!DOCTYPE html>
<html xmlns:th="http://www.thymeleaf.org">
<head>
<title>Spring 4 MVC</title>
<meta http-equiv="Content-Type" content="text/html; charset=UTF-8" />
</head>
<body>
    <h2>Spring 4 MVC</h2>
</body>
</html>
سپس URL و [http://localhost:8080/v02.html] را درخواست میکنیم:
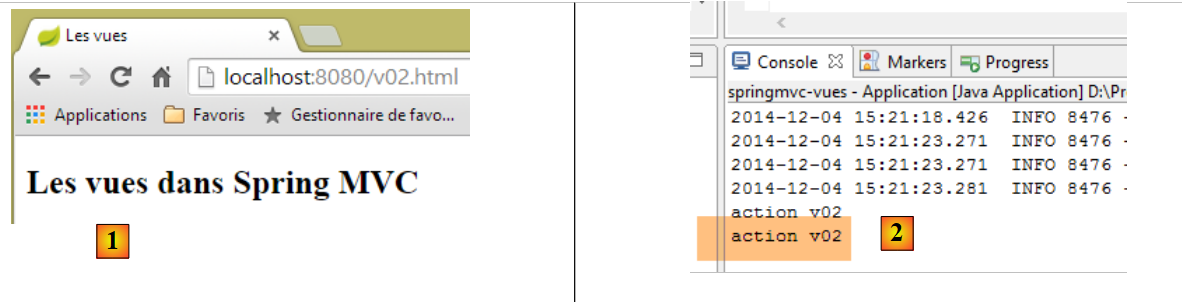 |
[1] و [2] نشان میدهند که اکشن [/v02] فراخوانی شده است. بنابراین باید توجه داشت که وقتی URL درخواستی از شکل [/x.html] باشد، Spring / Thymeleaf:
- اقدام [/x] را در صورت وجود اجرا میکند؛
- صفحه [/static/x.html] را در صورت وجود، ارائه میدهد؛
- در غیر این صورت، یک استثنای 404 Not Found (یافت نشد) را پرتاب میکند؛
برای جلوگیری از سردرگمی، از این پس، اکشنها و ویوها نامهای یکسانی نخواهند داشت.
5.3. [/v03]: بینالمللیسازی ویوها
ادغام Spring/Thymeleaf به Thymeleaf اجازه میدهد از فایلهای پیام Spring استفاده کند. اکشن جدید زیر را در نظر بگیرید: [/v03]:
//بینالمللیسازی ویوها
@RequestMapping(value = "/v03", method = RequestMethod.GET)
public String v03() {
return "vue-03";
}
این اکشن نمای زیر را رندر میکند: [vue-03.html]:
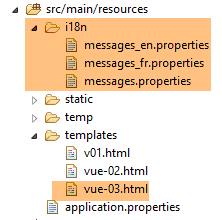 |
<!DOCTYPE html>
<html xmlns:th="http://www.thymeleaf.org">
<head>
<title th:text="#{title}">Spring 4 MVC</title>
<meta http-equiv="Content-Type" content="text/html; charset=UTF-8" />
</head>
<body>
    <h2 th:text="#{title}">Spring 4 MVC</h2>
</body>
</html>
در خطوط ۴ و ۸، عبارت مربوط به ویژگی [th:text] عبارت است از #{title} که مقدار آن پیام کلیدی [title] است. ما فایلهای زیر را ایجاد میکنیم: [messages_fr.properties] و [messages_en.properties]:
[messages_fr.properties]
title=Les vues dans Spring MVC
[messages_en.properties]
title=Views in Spring MVC
بیایید به URL، [http://localhost:8080/v03.html?lang=fr] و [http://localhost:8080/v03.html?lang=en] نگاهی بیندازیم:
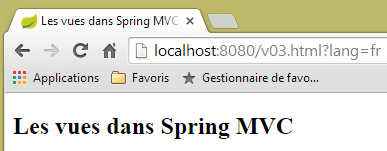 | 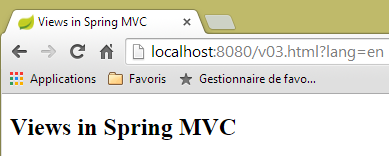 |
توجه کنید که ما آنچه را اخیراً آموختهایم به کار بردهایم. به جای نامگذاری اقدام [v03] به [/v03]، آن را به [/v03.html] نامگذاری کردهایم.
5.4. [/v04]: ایجاد قالب M برای نمای V
بیایید اقدام جدید زیر، [/v04] را در نظر بگیریم:
    // ایجاد قالب M برای نمای V
    @RequestMapping(value = "/v04", method = RequestMethod.GET)
    public String v04(Model model) {
        model.addAttribute("personne", new Personne(7, "martin", 17));
        System.out.println(String.format("Modèle=%s", model));
        return "vue-04";
}
- خط ۴: قالب نما به پارامترهای اکشن تزریق میشود. به طور پیشفرض، این قالب اولیه خالی است. خواهیم دید که میتوان آن را از قبل پر کرد؛
- خط ۴: یک قالب از نوع [Model] نوعی دیکشنری از عناصر از نوع <String, Object> است. خط ۴: ما یک مورد به این دیکشنری با کلید [personne] که با مقداری از نوع [Personne] مرتبط است، اضافه میکنیم؛
- خط ۵: ما مدل را در کنسول نمایش میدهیم تا ببینیم چه شکلی است؛
- خط ۶: ما نمای [vue-04.html] را نمایش میدهیم؛
کلاس [Personne] همان است که در فصل قبلی استفاده شده است:
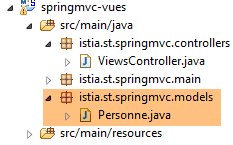 |
package istia.st.springmvc.models;
public class Personne {
// شناسگر
private Integer id;
// نام خانوادگی
private String nom;
// سن
private int age;
// سازندهها
public Personne() {
}
public Personne(String nom, int age) {
this.nom = nom;
this.age = age;
}
public Personne(Integer id, String nom, int age) {
this(nom, age);
this.id = id;
}
@Override
public String toString() {
return String.format("[id=%s, nom=%s, age=%d]", id, nom, age);
}
// گیرندهها و تنظیمکنندهها
...
}
نما [vue-04.html] به شرح زیر است:
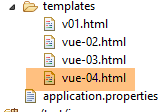 |
<!DOCTYPE html>
<html xmlns:th="http://www.thymeleaf.org">
    <head>
        <title th:text="#{title}">Spring 4 MVC</title>
        <meta http-equiv="Content-Type" content="text/html; charset=UTF-8" />
    </head>
    <body>
        <p>
            <span th:text="#{personne.nom}">Nom :</span>
            <span th:text="${personne.nom}">Bill</span>
        </p>
        <p>
            <span th:text="#{personne.age}">Age :</span>
            <span th:text="${personne.age}">56</span>
        </p>
    </body>
</html>
- در خط ۱۰، نوع جدید عبارت Thymeleaf به نام ${var} معرفی میشود که در آن var کلیدی از قالب M نما است. به یاد داشته باشید که اکشن [/v04] یک کلید [personne] را به مدل اضافه کرد که با نوع Personne[id, nom, age] مرتبط است؛
- خط ۱۰: نام شخص در مدل را نمایش میدهد؛
- خط ۱۴: سن آنها را نمایش میدهد؛
فایلهای پیام برای افزودن کلیدهای [personne.nom] و [personne.age] از خطوط ۹ و ۱۳ اصلاح شدهاند. نتیجه به شرح زیر است:
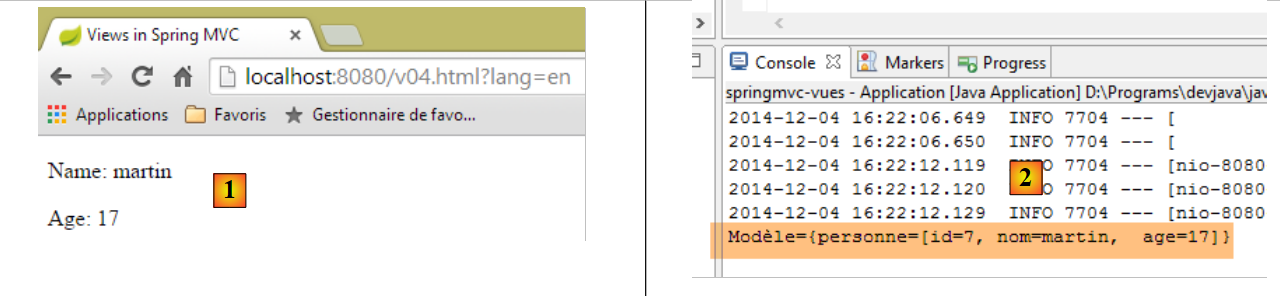 |
و ماهیت قالب M را میتوان در لاگهای کنسول به صورت [2] یافت.
ممکن است این سؤال پیش بیاید که چرا نما [vue-04] به شکل زیر نوشته نشده است:
<!DOCTYPE html>
<html xmlns:th="http://www.thymeleaf.org">
    <head>
        <title th:text="#{title}"></title>
        <meta http-equiv="Content-Type" content="text/html; charset=UTF-8" />
    </head>
    <body>
        <p>
            <span th:text="#{personne.nom}" /></span>
            <span th:text="${personne.nom}"></span>
        </p>
        <p>
            <span th:text="#{personne.age}"></span>
            <span th:text="${personne.age}"></span>
        </p>
    </body>
</html>
این ویو کاملاً معتبر است و همان نتیجه قبلی را تولید خواهد کرد. یکی از اهداف Thymeleaf این است که اطمینان حاصل کند یک صفحه Thymeleaf حتی اگر از طریق Thymeleaf اجرا نشود، قابل نمایش باشد. بنابراین، بیایید دو صفحه استاتیک جدید ایجاد کنیم:
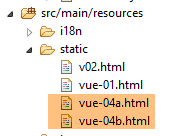 |
ویوی [vue-04b.html] کپی ویوی [vue-04.html] است. همین امر در مورد ویوی [vue-04a.html] نیز صدق میکند، اما متن ثابت از صفحه حذف شده است. اگر هر دو صفحه را مشاهده کنیم، نتایج زیر را به دست میآوریم:
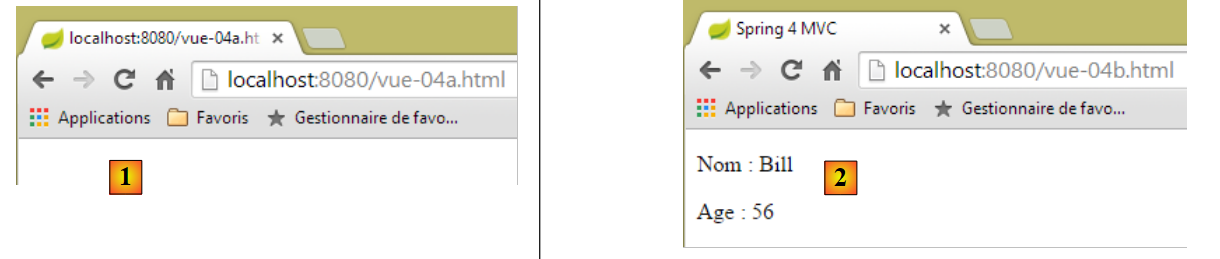 |
در مورد [1]، ساختار صفحه نمایش داده نمیشود، در حالی که در مورد [2] به وضوح قابل مشاهده است. این موضوع مزیت درج متن ثابت در یک ویو Thymeleaf را نشان میدهد، حتی اگر این متن در زمان اجرا با متن دیگری جایگزین شود.
اکنون، بیایید به یک جزئیات فنی نگاه کنیم. در نمای [vue-04.html]، ما کد را با استفاده از [ctrl-Maj-F] قالببندی میکنیم. نتیجه زیر را به دست میآوریم:
<!DOCTYPE html>
<html xmlns:th="http://www.thymeleaf.org">
<head>
<title th:text="#{title}">Spring 4 MVC</title>
<meta http-equiv="Content-Type" content="text/html; charset=UTF-8" />
</head>
<body>
    <p>
        <span th:text="#{personne.nom}">Nom :</span> <span
            th:text="${personne.nom}">Bill</span>
    </p>
    <p>
        <span th:text="#{personne.age}">Age :</span> <span
            th:text="${personne.age}">56</span>
    </p>
</body>
</html>
تگها نامرتب شدهاند و خواندن کد دشوارتر شده است. اگر نام [vue-04.html] را به [vue-04.xml] تغییر دهیم و کد را دوباره قالببندی کنیم، تگها دوباره مرتب میشوند. بنابراین، پسوند [xml] کاربردیتر خواهد بود. کار با این پسوند امکانپذیر است. برای این کار، باید Thymeleaf را پیکربندی کنیم. برای جلوگیری از خنثی کردن کار انجامشده، پروژه [springmvc-vues] را که روی آن کار کردهایم، در پروژهای جدید به نام [springmvc-vues-xml] کپی میکنیم.
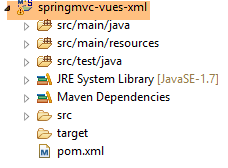 |
ما فایل [pom.xml] را به شرح زیر تغییر میدهیم:
    <groupId>istia.st.springmvc</groupId>
    <artifactId>springmvc-vues-xml</artifactId>
    <version>0.0.1-SNAPSHOT</version>
    <packaging>jar</packaging>

    <name>springmvc-vues-xml</name>
<description>Les vues dans Spring MVC</description>
نام پروژه در خطوط ۲ و ۶ تغییر داده شده است. علاوه بر این، پسوند ویوها در پوشه [templates] تغییر داده شده است:
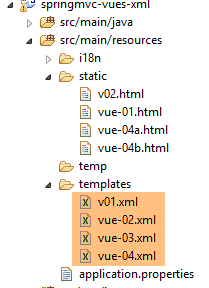 |
سند [http://docs.spring.io/spring-boot/docs/current/reference/html/common-application-properties.html] فهرست ویژگیهای پیکربندی Spring Boot را که میتوان در فایل [application.properties] استفاده کرد، ارائه میدهد:
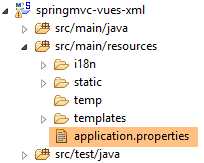 |
این سند ویژگیهایی را که Spring Boot در طول پیکربندی خودکار استفاده میکند، مشخص میکند که میتوان با پیکربندی متفاوت [application.properties] آنها را تغییر داد. برای Thymeleaf، ویژگیهای پیکربندی خودکار به شرح زیر است:
# THYMELEAF (ThymeleafAutoConfiguration)
spring.thymeleaf.check-template-location=true
spring.thymeleaf.prefix=classpath:/templates/
spring.thymeleaf.suffix=.html
spring.thymeleaf.mode=HTML5
spring.thymeleaf.encoding=UTF-8
spring.thymeleaf.content-type=text/html # ;charset=<encoding> اضافه میشود
spring.thymeleaf.cache=true #برای تازهسازی داغ روی false تنظیم شده است
بنابراین میتوانیم به سادگی خط را اضافه کنیم
spring.thymeleaf.suffix=.xml
در [application.properties]. با این حال، ما رویکرد متفاوتی را در پیش میگیریم: پیکربندی از طریق برنامهنویسی. ما Thymeleaf را در کلاس [Config] پیکربندی خواهیم کرد:
package istia.st.springmvc.main;

import java.util.Locale;

...
import org.thymeleaf.spring4.SpringTemplateEngine;
import org.thymeleaf.spring4.templateresolver.SpringResourceTemplateResolver;

@Configuration
@ComponentScan({ "istia.st.springmvc.controllers", "istia.st.springmvc.models" })
@EnableAutoConfiguration
public class Config extends WebMvcConfigurerAdapter {
    ...

    @Bean
    public SpringResourceTemplateResolver templateResolver() {
        SpringResourceTemplateResolver templateResolver = new SpringResourceTemplateResolver();
        templateResolver.setPrefix("classpath:/templates/");
        templateResolver.setSuffix(".xml");
        templateResolver.setTemplateMode("HTML5");
        templateResolver.setCharacterEncoding("UTF-8");
     templateResolver.setCacheable(true);
        return templateResolver;
    }

    @Bean
    SpringTemplateEngine templateEngine(SpringResourceTemplateResolver templateResolver) {
        SpringTemplateEngine templateEngine = new SpringTemplateEngine();
        templateEngine.setTemplateResolver(templateResolver);
        return templateEngine;
    }

}
- خطوط ۱۶ تا ۲۴ یک شیء [TemplateResolver] را برای Thymeleaf پیکربندی میکنند. این شیء است که از یک نام ویو که توسط یک اکشن ارائه میشود، بارگذاری میشود تا فایل متناظر را پیدا کند؛
- خطوط ۱۸ و ۱۹ پیشوند و پسوندی را که باید به نام ویو اضافه شود تا فایل پیدا گردد، تنظیم میکنند. بنابراین، اگر نام ویو [vue04] باشد، فایل مورد نظر [classpath:/templates/vue04.xml] خواهد بود. [classpath:/templates] یک سینتکس Spring است که به پوشهای به نام [/templates] در ریشهٔ مسیر کلاس پروژه اشاره میکند؛
- خط ۲۱: به گونهای که پاسخ ارسالشده به کلاینت شامل هدر HTTP باشد:
Content-Type:text/html;charset=UTF-8
- خط ۲۰: نشان میدهد که ویو مطابق با استاندارد HTML5 است؛
- خط ۲۲: مشخص میکند که ویوهای Thymeleaf میتوانند کش شوند؛
- خطوط ۲۶–۳۱: موتور حلکنندهٔ ویو Spring/Thymeleaf را روی موتور حلکنندهٔ قبلی تنظیم میکند؛
بیایید فایل اجرایی این پروژه جدید را اجرا کنیم و URL [http://localhost:8080/v04.html?lang=en] را درخواست کنیم:
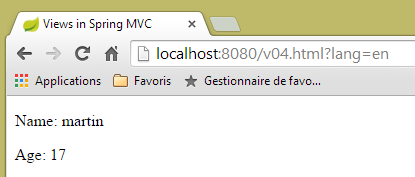 |
میتوانیم ببینیم که در URL، اکشن [/v04] بار دیگر با [v04.html] جایگزین شده است.
5.5. [/v05]: فاکتورگیری یک شیء در یک ویوی Thymeleaf
ما اقدام زیر را ایجاد میکنیم، [/v05]:
    // ایجاد مدل M برای نما V - 2
    @RequestMapping(value = "/v05", method = RequestMethod.GET)
    public String v05(Model model) {
        model.addAttribute("personne", new Personne(7, "martin", 17));
        return "vue-05";
}
این دقیقاً مشابه اکشن [/v04] است. ویوی [vue-05.xml] به شرح زیر است:
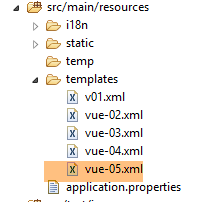 |
<!DOCTYPE html>
<html xmlns:th="http://www.thymeleaf.org">
    <head>
        <title th:text="#{title}">Spring 4 MVC</title>
        <meta http-equiv="Content-Type" content="text/html; charset=UTF-8" />
    </head>
    <body>
        <div th:object="${personne}">
            <p>
                <span th:text="#{personne.nom}">Nom :</span>
                <span th:text="*{nom}">Bill</span>
            </p>
            <p>
                <span th:text="#{personne.age}">Age :</span>
                <span th:text="*{age}">56</span>
            </p>
        </div>
    </body>
</html>
- خطوط ۸–۱۷: در این خطوط، یک شیء Thymeleaf توسط ویژگی [th:object="${personne}"] (خط ۸) تعریف میشود. این شیء در این مورد، شیء کلیدی [personne] است که در قالب قرار دارد:
- خط ۱۱: عبارت Thymeleaf [*{nom}] معادل [${objet.nom}] است، که در آن [objet] شیء جاری Thymeleaf است. بنابراین در اینجا، عبارت [*{nom}] معادل [${personne.nom}] است؛
- خط ۱۵: مشابه؛
نتیجه:
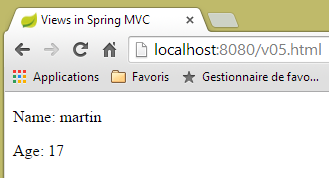 |
5.6. [/v06]: تست در یک نمای Thymeleaf
بیایید اقدام زیر را در نظر بگیریم: [/v06]:
    // ایجاد مدل M برای نما V - 3
    @RequestMapping(value = "/v06", method = RequestMethod.GET)
    public String v06(Model model) {
        model.addAttribute("personne", new Personne(7, "martin", 17));
        return "vue-06";
}
این دقیقاً مشابه دو اقدام قبلی است. این نمای زیر را نمایش میدهد، [vue-06.xml]:
<!DOCTYPE html>
<html xmlns:th="http://www.thymeleaf.org">
<head>
<title th:text="#{title}">Spring 4 MVC</title>
<meta http-equiv="Content-Type" content="text/html; charset=UTF-8" />
</head>
<body>
<div th:object="${personne}">
<p>
<span th:text="#{personne.nom}">Nom :</span>
<span th:text="*{nom}">Bill</span>
</p>
<p>
<span th:text="#{personne.age}">Age :</span>
<span th:text="*{age}">56</span>
</p>
<p th:if="*{age} >= 18" th:text="#{personne.majeure}">Vous êtes majeur</p>
<p th:if="*{age} < 18" th:text="#{personne.mineure}">Vous êtes mineur</p>
</div>
</body>
</html>
- خط ۱۷: ویژگی [th:if] یک عبارت بولی را ارزیابی میکند. اگر این عبارت درست باشد، تگ نمایش داده میشود؛ در غیر این صورت، نمایش داده نمیشود. بنابراین در اینجا، اگر ${personne.age} >= 18 باشد، متن [#{personne.majeure}] نمایش داده میشود، یعنی پیامی با کلید [personne.majeure] در فایلهای پیام؛
- خط ۱۸: شما نمیتوانید [*{age} < 18] را بنویسید زیرا نماد < یک کاراکتر رزرو شده است. بنابراین باید از معادل آن، HTML [<]، که همچنین با نام انتیت HTML [http://en.wikipedia.org/wiki/List_of_XML_and_HTML_character_entity_references] شناخته میشود، استفاده کنید؛
فایلهای پیام اصلاح شدهاند:
[messages_fr.properties]
title=Les vues dans Spring MVC
personne.nom=Nom :
personne.age=Age :
personne.mineure=Vous êtes mineur
personne.majeure=Vous êtes majeur
[messages_en.properties]
title=Views in Spring MVC
personne.nom=Name:
personne.age=Age:
personne.mineure=You are under 18
personne.majeure=You are over 18
نتیجه به شرح زیر است:
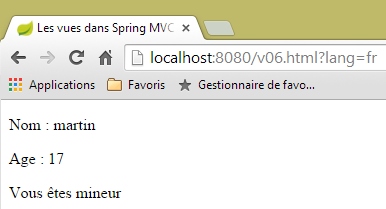 | 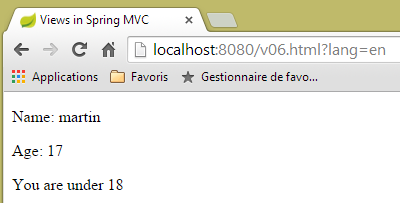 |
5.7. [/v07]: تکرار در یک نمای Thymeleaf
بیایید اقدام زیر را در نظر بگیریم: [/v07]:
    // ایجاد مدل M برای نما V - 4
    @RequestMapping(value = "/v07", method = RequestMethod.GET)
    public String v07(Model model) {
        model.addAttribute("liste", new Personne[] { new Personne(7, "martin", 17), new Personne(8, "lucie", 32),
                new Personne(9, "paul", 7) });
        return "vue-07";
}
- این اکشن یک لیست شامل سه نفر را ایجاد میکند، آن را در قالب مرتبط با کلید [liste] قرار میدهد و نما [vue-07] را نمایش میدهد؛
نما [vue-07.xml] به شرح زیر است:
<!DOCTYPE html>
<html xmlns:th="http://www.thymeleaf.org">
    <head>
        <title th:text="#{title}">Spring 4 MVC</title>
        <meta http-equiv="Content-Type" content="text/html; charset=UTF-8" />
    </head>
    <body>
        <h3 th:text="#{liste.personnes}">Liste de personnes</h3>
        <ul>
            <li th:each="element : ${liste}" th:text="'['+ ${element.id} + ', ' +${element.nom}+ ', ' + ${element.age} + ']'">[id,nom,age]</li>
        </ul>
    </body>
</html>
- خط ۱۰: ویژگی [th:each] تگی را که در آن قرار دارد، در این مورد یک تگ ، تکرار میکند. این ویژگی در اینجا دو پارامتر دارد: [element : collection] و [collection]، که در آن [collection] یک مجموعه از اشیاء، در این مورد یک لیست از افراد، است. Thymeleaf بر روی این مجموعه تکرار میکند و به تعداد عناصر موجود در مجموعه، برچسبهای تولید میکند. برای هر برچسب ، [element] نمایانگر عنصر مرتبط با آن برچسب در مجموعه خواهد بود. برای این عنصر، ویژگی [th:text] ارزیابی خواهد شد. عبارت آن در اینجا یک الحاق رشتهها برای تولید نتیجه [id, nom, age] است؛
- خط ۸: کلید [liste.personnes] به فایلهای پیام اضافه میشود؛
در اینجا نتیجه آمده است:
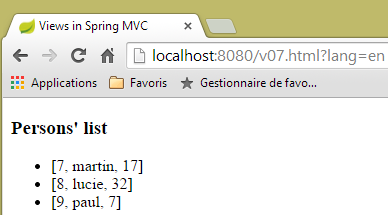 | 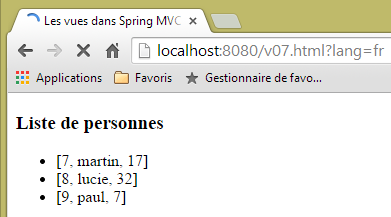 |
5.8. [/v08-/v10]: @ModelAttribute
ما به موضوعی بازمیگردیم که هنگام بررسی عملیات به آن پرداختیم: نقش حاشیهنویسی [@ModelAttribute]. ما عملیات جدید زیر را اضافه میکنیم:
// --------------- پیوند و ModelAttribute ----------------------------------
// اگر پارامتر یک شیء باشد، نمونه آن ایجاد شده و در صورت لزوم توسط پارامترهای پرسوجو تغییر داده میشود
// بهطور خودکار بخشی از مدل نما با کلید [key] خواهد شد
//برای پارامتر @ModelAttribute("xx")، کلید برابر با xx خواهد بود
//برای پارامتر @ModelAttribute، کلید برابر نام کلاس پارامتر خواهد بود که با یک حرف کوچک شروع میشود
//اگر @ModelAttribute غایب باشد، آنگاه همه چیز طوری پیش میرود که گویی بدون کلید وجود دارد
//توجه داشته باشید که این درج خودکار در مدل در صورتی که پارامتر یک شیء نباشد، انجام نمیشود
@RequestMapping(value = "/v08", method = RequestMethod.GET)
public String v08(@ModelAttribute("someone") Personne p, Model model) {
System.out.println(String.format("Modèle=%s", model));
return "vue-08";
}
- خط ۱۱: حاشیهنویسی [@ModelAttribute("someone")] بهطور خودکار شیء [Personne p] را به مدل اضافه میکند، مرتبط با کلید [someone]؛
- خط ۱۲: برای بررسی مدل؛
- خط ۱۳: نمای [vue-08.xml] را نمایش میدهد؛
نما [vue-08.xml] به شرح زیر است:
<!DOCTYPE html>
<html xmlns:th="http://www.thymeleaf.org">
    <head>
        <title th:text="#{title}">Spring 4 MVC</title>
        <meta http-equiv="Content-Type" content="text/html; charset=UTF-8" />
    </head>
    <body>
        <div th:object="${someone}">
            <p>
                <span th:text="#{personne.id}">Id :</span>
                <span th:text="*{id}">14</span>
            </p>
            <p>
                <span th:text="#{personne.nom}">Nom :</span>
                <span th:text="*{nom}">Bill</span>
            </p>
            <p>
                <span th:text="#{personne.age}">Age :</span>
                <span th:text="*{age}">56</span>
            </p>
        </div>
    </body>
</html>
- خط ۸: شیء Thymeleaf با شیء کلیدی [someone] مقداردهی اولیه میشود؛
نتیجه به شرح زیر است:
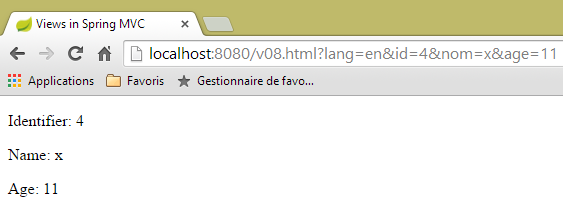 |
و در کنسول، لاگ زیر را مشاهده میکنیم:
Modèle={someone=[id=4, nom=x, age=11], org.springframework.validation.BindingResult.someone=org.springframework.validation.BeanPropertyBindingResult: 0 errors}
اکنون بیایید اقدام زیر [/v09] را در نظر بگیریم:
    @RequestMapping(value = "/v09", method = RequestMethod.GET)
    public String v09(Personne p, Model model) {
        System.out.println(String.format("Modèle=%s", model));
        return "vue-09";
}
- خط ۱: وجود پارامتر [Personne p] به طور خودکار شخص [p] را در قالب قرار میدهد. از آنجایی که هیچ کلیدی مشخص نشده است، کلید مورد استفاده نام کلاس با اولین حرف کوچک است. بنابراین، [Personne p] معادل [@ModelAttribute("personne") Personne p] است؛
نما [vue.09.xml] به شرح زیر است:
<!DOCTYPE html>
<html xmlns:th="http://www.thymeleaf.org">
    <head>
        <title th:text="#{title}">Spring 4 MVC</title>
        <meta http-equiv="Content-Type" content="text/html; charset=UTF-8" />
    </head>
    <body>
        <div th:object="${personne}">
            <p>
                <span th:text="#{personne.id}">Id :</span>
                <span th:text="*{id}">14</span>
            </p>
            <p>
                <span th:text="#{personne.nom}">Nom :</span>
                <span th:text="*{nom}">Bill</span>
            </p>
            <p>
                <span th:text="#{personne.age}">Age :</span>
                <span th:text="*{age}">56</span>
            </p>
        </div>
    </body>
</html>
- خط ۸: کلید قالب مورد استفاده [personne] است؛
در اینجا یک نتیجه آمده است:
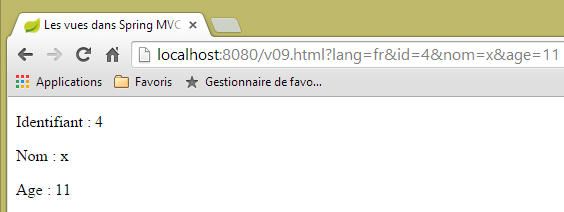 |
و لاگ در کنسول سرور:
Modèle={personne=[id=4, nom=x, age=11], org.springframework.validation.BindingResult.personne=org.springframework.validation.BeanPropertyBindingResult: 0 errors}
اکنون، بیایید اقدام جدید زیر را در نظر بگیریم، [/v10]:
    @ModelAttribute("uneAutrePersonne")
    private Personne getPersonne(){
        return new Personne(24,"pauline",55);
    }

    @RequestMapping(value = "/v10", method = RequestMethod.GET)
    public String v10(Model model) {
        System.out.println(String.format("Modèle=%s", model));
        return "vue-10";
}
- خطوط ۱–۴: متدی را تعریف میکند که در داخل مدل برای هر درخواست، یک عنصر کلیدی [uneAutrePersonne] را که با شی [new Personne(24,"pauline",55)] مرتبط است، ایجاد میکند؛
- خطوط ۶–۱۰: عمل [/v10] کاری جز ارسال مدلی که دریافت میکند به ویو [vue-10.xml] انجام نمیدهد. توجه داشته باشید که پارامتر [Model model] تنها برای دستور در خط ۸ مورد نیاز است. بدون آن، غیرضروری است؛
ویو [vue-10.xml] به شرح زیر است:
<!DOCTYPE html>
<html xmlns:th="http://www.thymeleaf.org">
    <head>
        <title th:text="#{title}">Spring 4 MVC</title>
        <meta http-equiv="Content-Type" content="text/html; charset=UTF-8" />
    </head>
    <body>
        <div th:object="${uneAutrePersonne}">
            <p>
                <span th:text="#{personne.id}">Id :</span>
                <span th:text="*{id}">14</span>
            </p>
            <p>
                <span th:text="#{personne.nom}">Nom :</span>
                <span th:text="*{nom}">Bill</span>
            </p>
            <p>
                <span th:text="#{personne.age}">Age :</span>
                <span th:text="*{age}">56</span>
            </p>
        </div>
    </body>
</html>
نتیجه به شرح زیر است:
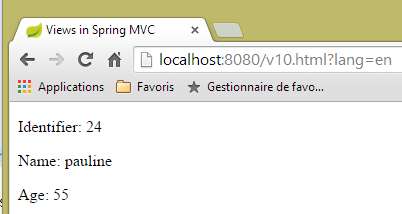 |
و لاگ کنسول به شرح زیر است:
5.9. [/v11]: @SessionAttributes
ما در حال بازنگری چیزی هستیم که هنگام بررسی اقدامات دیدیم: نقش حاشیهنویسی [@SessionAttributes]. ما اقدام جدید زیر را اضافه میکنیم، [/v11]:
    @ModelAttribute("jean")
    private Personne getJean(){
        return new Personne(33,"jean",10);
    }

    @RequestMapping(value = "/v11", method = RequestMethod.GET)
    public String v11(Model model, HttpSession session) {
        System.out.println(String.format("Modèle=%s, Session[jean]=%s", model, session.getAttribute("jean")));
        return "vue-11";
}
این مشابه چیزی است که همین حالا بررسی کردیم. تفاوت در یک حاشیهنویسی، [@SessionAttributes]، است که روی خود کلاس قرار گرفته است:
@Controller
@SessionAttributes("jean")
public class ViewsController {
- خط ۲: مشخص میکند که کلید مدل [jean] باید در جلسه قرار گیرد؛
به همین دلیل، در خط ۷ اکشن، جلسه تزریق شده است. در خط ۸، مقدار جلسه مرتبط با کلید [jean] نمایش داده میشود.
نما [vue-11.xml] به شرح زیر است:
<!DOCTYPE html>
<html xmlns:th="http://www.thymeleaf.org">
    <head>
        <title th:text="#{title}">Spring 4 MVC</title>
        <meta http-equiv="Content-Type" content="text/html; charset=UTF-8" />
    </head>
    <body>
        <div th:object="${jean}">
            <p>
                <span th:text="#{personne.id}">Id :</span>
                <span th:text="*{id}">14</span>
            </p>
            <p>
                <span th:text="#{personne.nom}">Nom :</span>
                <span th:text="*{nom}">Bill</span>
            </p>
            <p>
                <span th:text="#{personne.age}">Age :</span>
                <span th:text="*{age}">56</span>
            </p>
        </div>
        <hr />
        <div th:object="${session.jean}">
            <p>
                <span th:text="#{personne.id}">Id :</span>
                <span th:text="*{id}">14</span>
            </p>
            <p>
                <span th:text="#{personne.nom}">Nom :</span>
                <span th:text="*{nom}">Bill</span>
            </p>
            <p>
                <span th:text="#{personne.age}">Age :</span>
                <span th:text="*{age}">56</span>
            </p>
        </div>
    </body>
</html>
دو نفر نمایش داده میشوند:
- خطوط ۸–۲۱: شخص با کلید [jean] در مدل؛
- خطوط ۲۳–۳۶: شخص دارای کلید [jean] در جلسه؛
نتایج به شرح زیر است:
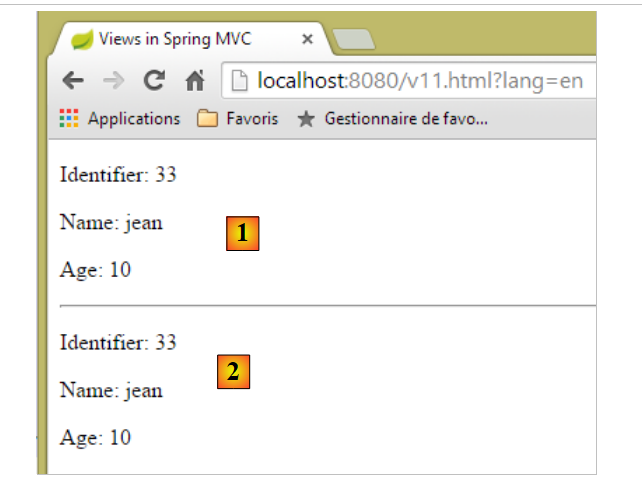 |
- در [1]، شخص دارای کلید [jean] در مدل؛
- به [2]، فردی با کلید [jean] در جلسه؛
لاگ کنسول به شرح زیر است:
Modèle={uneAutrePersonne=[id=24, nom=pauline, age=55], jean=[id=33, nom=jean, age=10]}, Session[jean]=null
از موارد فوق، میتوان دید که کلید [jean] در جلسهای که اقدام را دریافت میکند، وجود ندارد. بنابراین میتوان نتیجه گرفت که کلید [jean] پس از اجرای اقدام و قبل از نمایش نما به جلسه اضافه شده است.
اکنون، بیایید موردی را در نظر بگیریم که یک کلید هم توسط [@ModelAttribute] و هم توسط [@SessionAttributes] ارجاع داده میشود. ما دو اکشن زیر را میسازیم:
@RequestMapping(value = "/v12a", method = RequestMethod.GET)
@ResponseBody
public void v12a(HttpSession session) {
session.setAttribute("paul", new Personne(51, "paul", 33));
}
//در مواردی که کلید برای [@ModelAttribute] همچنین یک کلید برای [@SessionAttributes]
//در این مورد، پارامتر مربوطه با مقدار جلسه مقداردهی اولیه میشود
@RequestMapping(value = "/v12b", method = RequestMethod.GET)
public String v12b(Model model, @ModelAttribute("paul") Personne p) {
System.out.println(String.format("Modèle=%s", model));
return "vue-12";
}
عمل [/v12a] تنها برای قرار دادن عنصر ['paul',new Personne(51, "paul", 33)] در جلسه (session) است. این عمل هیچ کار دیگری انجام نمیدهد. اینکه با [@ResponseBody] تگ شده است، نشان میدهد که این عمل است که پاسخ را برای کلاینت تولید میکند. از آنجا که نوع آن [void] است، هیچ پاسخی تولید نمیشود.
عمل [/v12b]، [@ModelAttribute("paul") Personne p] را بهعنوان پارامتر میپذیرد. اگر هیچ اقدام دیگری انجام نشود، یک شیء [Personne] ایجاد و سپس با پارامترهای درخواست مقداردهی اولیه میشود؛ این شیء هیچ ارتباطی با شیء کلیدی [paul] ندارد که توسط اقدام [/v12a] در جلسه قرار داده شده است. ما کلید [paul] را به ویژگیهای جلسه کلاس اضافه خواهیم کرد:
@Controller
@SessionAttributes({ "jean", "paul" })
public class ViewsController {
- در خط ۲، اکنون دو ویژگی جلسه وجود دارد؛
بیایید به پارامترهای اکشن [/v12b] بازگردیم:
public String v12b(Model model, @ModelAttribute("paul") Personne p) {
اکنون، شیء [Personne p] نمونه برداری نخواهد شد، اما در جلسه به شیء کلیدی [paul] ارجاع خواهد داد. سپس رویه به همان صورت باقی میماند. به طور خاص، شی کلیدی [paul] در قالب نمایی که نمایش داده میشود، ظاهر خواهد شد. این همان چیزی است که میخواهیم در خط 11 از اقدام [/v12b] ببینیم.
نما [vue-12.xml] به شرح زیر خواهد بود:
<!DOCTYPE html>
<html xmlns:th="http://www.thymeleaf.org">
    <head>
        <title th:text="#{title}">Spring 4 MVC</title>
        <meta http-equiv="Content-Type" content="text/html; charset=UTF-8" />
    </head>
    <body>
        <div th:object="${paul}">
            <p>
                <span th:text="#{personne.id}">Id :</span>
                <span th:text="*{id}">14</span>
            </p>
            <p>
                <span th:text="#{personne.nom}">Nom :</span>
                <span th:text="*{nom}">Bill</span>
            </p>
            <p>
                <span th:text="#{personne.age}">Age :</span>
                <span th:text="*{age}">56</span>
            </p>
        </div>
    </body>
</html>
- خط ۸: کلید [paul] از قالب نما ارجاع داده شده است؛
این کار نتیجه زیر را تولید میکند (پس از اجرای اقدام [/v12a] که کلید [paul] را در جلسه قرار میدهد):
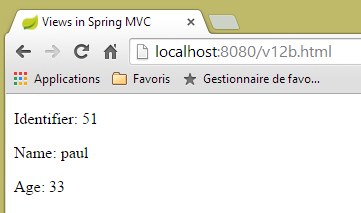 |
لاگ کنسول به شرح زیر است:
Modèle={jean=[id=33, nom=jean, age=10], uneAutrePersonne=[id=24, nom=pauline, age=55], paul=[id=51, nom=paul, age=33], org.springframework.validation.BindingResult.paul=org.springframework.validation.BeanPropertyBindingResult: 0 errors}
کلید [paul] در واقع با مقداری که با کلید [paul] در جلسه مرتبط است، در قالب درج شده است.
5.10. [/v13]: تولید یک فرم ورودی
اکنون به وارد کردن و اعتبارسنجی دادههای فرم میپردازیم. ما یک فرم اولیه را با استفاده از اقدام زیر ایجاد خواهیم کرد: [/v13]:
// یک فرم برای وارد کردن مشخصات شخص تولید میکند
@RequestMapping(value = "/v13", method = RequestMethod.GET)
public String v13() {
return "vue-13";
}
که به سادگی نمای زیر را نمایش میدهد، [vue-13.xml]:
<!DOCTYPE html>
<html xmlns:th="http://www.thymeleaf.org">
    <head>
        <title th:text="#{title}">Spring 4 MVC</title>
        <meta http-equiv="Content-Type" content="text/html; charset=UTF-8" />
    </head>
    <body>
        <form action="/someURL" th:action="@{/v14.html}" method="post">
            <h2 th:text="#{personne.formulaire.titre}">Entrez les informations suivantes</h2>
            <div th:object="${personne}">
                <table>
                    <thead></thead>
                    <tbody>
                        <tr>
                            <td th:text="#{personne.id}">Id :</td>
                            <td>
                                <input type="text" name="id" value="11" th:value="''" />
                            </td>
                        </tr>
                        <tr>
                            <td th:text="#{personne.nom}">Nom :</td>
                            <td>
                                <input type="text" name="nom" value="Tintin" th:value="''" />
                            </td>
                        </tr>
                        <tr>
                            <td th:text="#{personne.age}">Age :</td>
                            <td>
                                <input type="text" name="age" value="17" th:value="''" />
                            </td>
                        </tr>
                    </tbody>
                </table>
            </div>
            <input type="submit" value="Valider" th:value="#{personne.formulaire.valider}" />
        </form>
    </body>
</html>
اگر این نما را در پوشه [static] با نام [vue-13.html] قرار دهیم و URL [http://localhost:8080/vue-13.html] را درخواست کنیم، صفحه زیر را دریافت خواهیم کرد:
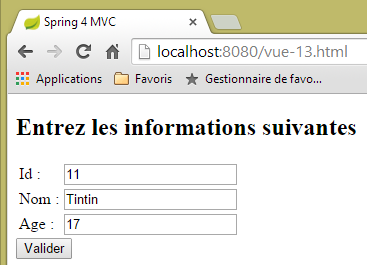 |
- در خط ۸ فرم، تگ <form> را با ویژگی [th:action] مییابیم. این ویژگی توسط Thymeleaf ارزیابی میشود و مقدار آن جایگزین مقدار فعلی ویژگی [action] خواهد شد، که بنابراین فقط برای اهداف تزئینی وجود دارد. در اینجا، مقدار ویژگی [th:action] برابر با [/v14.html] خواهد بود؛
- در خطوط ۱۷، ۲۳ و ۲۹، مقدار ویژگی [th:value] جایگزین مقدار ویژگی [value] خواهد شد. در اینجا، این مقدار رشته خالی خواهد بود؛
وقتی URL برای [/v13.html] پرسوجو میشود، نتیجه زیر بهدست میآید:
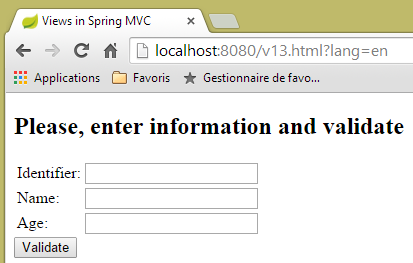 |
بیایید نگاهی به کد منبع تولیدشده توسط Thymeleaf بیندازیم:
<!DOCTYPE html>

<html>
    <head>
        <title>Views in Spring MVC</title>
        <meta http-equiv="Content-Type" content="text/html; charset=UTF-8" />
    </head>
    <body>
        <form action="/v14.html" method="post">
            <h2>Please, enter information and validate</h2>
            <div>
                <table>
                    <thead></thead>
                    <tbody>
                        <tr>
                            <td>Identifier:</td>
                            <td>
                                <input type="text" name="id" value="" />
                            </td>
                        </tr>
                        <tr>
                            <td>Name:</td>
                            <td>
                                <input type="text" name="nom" value="" />
                            </td>
                        </tr>
                        <tr>
                            <td>Age:</td>
                            <td>
                                <input type="text" name="age" value="" />
                            </td>
                        </tr>
                    </tbody>
                </table>
            </div>
            <input type="submit" value="Validate" />
        </form>
    </body>
</html>
در خطوط ۹، ۱۸، ۲۴ و ۳۰ میتوانیم ببینیم که Thymeleaf ویژگیهای [th:action] و [th:value] را ارزیابی میکند.
5.11. [/v14]: رسیدگی به مقادیری که از طریق فرم ارسال شدهاند
اکشن [/v14] اقدامی است که مقادیر ارسالشده را دریافت میکند. این اکشن به شرح زیر است:
// مقادیر فرم را پردازش میکند
@RequestMapping(value = "/v14", method = RequestMethod.POST)
public String v14(Personne p) {
return "vue-14";
}
- خط ۳: مقادیر ارسالشده در یک شیء [Personne p] بستهبندی میشوند. میدانیم که این شیء بهطور خودکار بخشی از مدل M نمای V را که توسط این اقدام نمایش داده میشود، تشکیل میدهد و با کلید [personne] مرتبط است؛
- خط ۴: نمای نمایشدادهشده نمای [vue-14.xml] است؛
نما [vue-14.xml] به شرح زیر است:
<!DOCTYPE html>
<html xmlns:th="http://www.thymeleaf.org">
    <head>
        <title th:text="#{title}">Spring 4 MVC</title>
        <meta http-equiv="Content-Type" content="text/html; charset=UTF-8" />
    </head>
    <body>
    <h2 th:text="#{personne.formulaire.saisies}">Voici vos saisies</h2>
        <div th:object="${personne}">
            <p>
                <span th:text="#{personne.id}">Id :</span>
                <span th:text="*{id}">14</span>
            </p>
            <p>
                <span th:text="#{personne.nom}">Nom :</span>
                <span th:text="*{nom}">Bill</span>
            </p>
            <p>
                <span th:text="#{personne.age}">Age :</span>
                <span th:text="*{age}">56</span>
            </p>
        </div>
    </body>
</html>
- خط ۹: شیء مرتبط با کلید [personne] از مدل بازیابی میشود؛
- خطوط ۱۲، ۱۶ و ۲۰: ویژگیهای این شیء نمایش داده میشوند؛
این کار نتیجه زیر را تولید میکند:
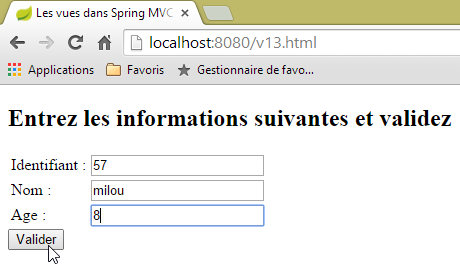 | 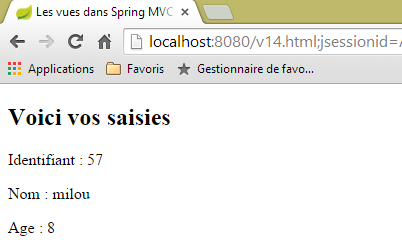 |
5.12. [/v15-/v16]: اعتبارسنجی یک مدل
با استفاده از مثال قبلی، بیایید به دنباله زیر نگاهی بیندازیم:
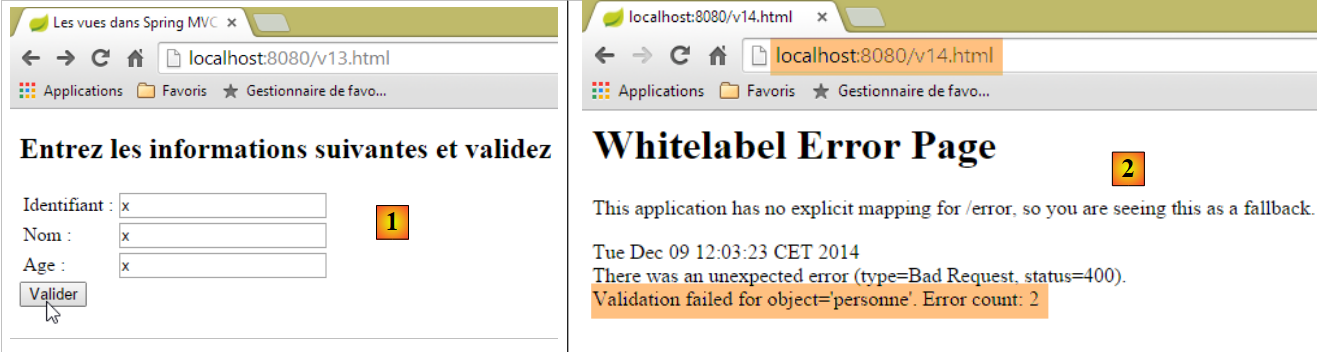 |
- در [1]، مقادیر نادرستی را برای فیلدهای [id] و [age] که از نوع [int] هستند، وارد میکنیم؛
- در [2]، پاسخ سرور نشان میدهد که دو خطا وجود داشته است؛
از همان فرم استفاده خواهیم کرد، اما در صورت بروز خطاهای اعتبارسنجی، کاربر را به صفحهای که این خطاها را فهرست میکند، هدایت خواهیم کرد تا بتواند آنها را اصلاح کند.
عمل [/v15] به شرح زیر است:
//----------------------- یک فرم را نمایش میدهد
@RequestMapping(value = "/v15", method = RequestMethod.GET)
public String v15(SecuredPerson p) {
return "vue-15";
}
این متد پارامتر از نوع [SecuredPerson] را دریافت میکند:
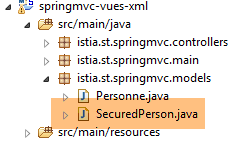 |
package istia.st.springmvc.models;
import javax.validation.constraints.NotNull;
import org.hibernate.validator.constraints.Length;
import org.hibernate.validator.constraints.Range;
public class SecuredPerson {
@Range(min = 1)
private int id;
@Length(min = 4, max = 10)
private String nom;
@Range(min = 8, max = 14)
private int age;
// سازندهها
public SecuredPerson() {
}
public SecuredPerson(int id, String nom, int age) {
this.id=id;
this.nom = nom;
this.age = age;
}
// گیرنده و تنظیمکننده
...
}
میدانهای [id, nom, age] با محدودیتهای اعتبارسنجی نشانهگذاری شدهاند. نمای [vue-15.xml] که توسط اقدام [/v15] نمایش داده میشود، به شرح زیر است:
<!DOCTYPE html>
<html xmlns:th="http://www.thymeleaf.org">
    <head>
        <title th:text="#{title}">Spring 4 MVC</title>
        <meta http-equiv="Content-Type" content="text/html; charset=UTF-8" />
    </head>
    <body>
        <form action="/someURL" th:action="@{/v16.html}" method="post">
            <h2 th:text="#{personne.formulaire.titre}">Entrez les informations suivantes</h2>
            <div th:object="${securedPerson}">
                <table>
                    <thead></thead>
                    <tbody>
                        <tr>
                            <td th:text="#{personne.id}">Id :</td>
                            <td>
                                <input type="text" name="id" value="11" th:value="*{id}" />
                            </td>
                            <td>
                                <span th:if="${#fields.hasErrors('id')}" th:errors="*{id}" style="color: red">Identifiant erroné</span>
                            </td>
                        </tr>
                        <tr>
                            <td th:text="#{personne.nom}">Nom :</td>
                            <td>
                                <input type="text" name="nom" value="Tintin" th:value="*{nom}" />
                            </td>
                            <td>
                                <span th:if="${#fields.hasErrors('nom')}" th:errors="*{nom}" style="color: red">Nom erroné</span>
                            </td>
                        </tr>
                        <tr>
                            <td th:text="#{personne.age}">Age :</td>
                            <td>
                                <input type="text" name="age" value="17" th:value="*{age}" />
                            </td>
                            <td>
                                <span th:if="${#fields.hasErrors('age')}" th:errors="*{age}" style="color: red">Âge erroné</span>
                            </td>
                        </tr>
                    </tbody>
                </table>
                <input type="submit" value="Valider" th:value="#{personne.formulaire.valider}" />
                <ul>
                    <li th:each="err : ${#fields.errors('*')}" th:text="${err}" style="color: red" />
                </ul>
            </div>
        </form>
    </body>
</html>
- خطوط ۱۰–۴۷: شیء مدل صفحه مرتبط با کلید [securedPerson] بازیابی میشود. پس از اجرای GET، ما یک شیء با مقدار نمونهسازی آن [id=0, nom=null, age=0] داریم؛
- خط 17: مقدار فیلد [securedPerson.id];
- خط ۲۰: عبارت [${#fields.hasErrors('id')}] مشخص میکند که آیا خطای اعتبارسنجیای در فیلد [securedPerson.id] وجود داشته است یا خیر. در صورت وجود، ویژگی [th:errors="*{id}"] پیام خطای مربوطه را نمایش میدهد؛
- این سناریو در خط ۲۹ برای فیلد [nom] و در خط ۳۸ برای فیلد [age] تکرار میشود؛
- خط ۴۵: عبارت [${#fields.errors('*')}] به تمام خطاهای موجود در فیلدهای شیء [securedPerson] اشاره دارد. بنابراین، این تمام خطاها هستند که توسط خطوط ۴۴–۴۶ نمایش داده میشوند؛
- خط ۱۶: میبینیم که مقادیر فرم به اکشن [/v16] ارسال خواهند شد. به این صورت:
    // -------------------- اعتبارسنجی یک مدل -------------------
    @RequestMapping(value = "/v16", method = RequestMethod.POST)
    public String v16(@Valid SecuredPerson p, BindingResult result) {
        // خطاها؟
        if (result.hasErrors()) {
            return "vue-15";
        } else {
            return "vue-16";
        }
}
- خط ۳: تگ [@Valid SecuredPerson p] اعتبارسنجی مقادیر ارسالشده را اجباری میکند؛
- خط ۵: بررسی میکند که آیا قالب اکشن نادرست است یا خیر؛
- خط ۶: اگر نادرست باشد، فرم [vue-15.xml] بازگردانده میشود. از آنجا که این فرم پیامهای خطا را نمایش میدهد، ما این پیامها را خواهیم دید؛
- خط ۸: اگر قالب اقدام اعتبارسنجی شود، نمای زیر [vue-16.xml] نمایش داده میشود:
<!DOCTYPE html>
<html xmlns:th="http://www.thymeleaf.org">
    <head>
        <title th:text="#{title}">Spring 4 MVC</title>
        <meta http-equiv="Content-Type" content="text/html; charset=UTF-8" />
    </head>
    <body>
    <h2 th:text="#{personne.formulaire.saisies}">Voici vos saisies</h2>
        <div th:object="${securedPerson}">
            <p>
                <span th:text="#{personne.id}">Id :</span>
                <span th:text="*{id}">14</span>
            </p>
            <p>
                <span th:text="#{personne.nom}">Nom :</span>
                <span th:text="*{nom}">Bill</span>
            </p>
            <p>
                <span th:text="#{personne.age}">Age :</span>
                <span th:text="*{age}">56</span>
            </p>
        </div>
    </body>
</html>
در اینجا چند نمونه از خروجی آورده شده است:
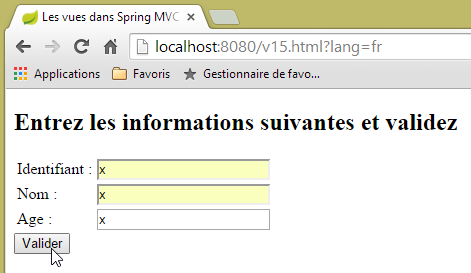 | 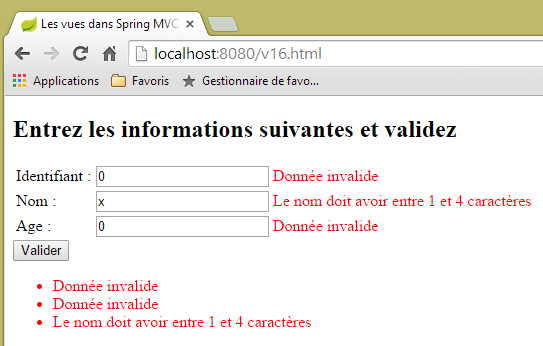 |
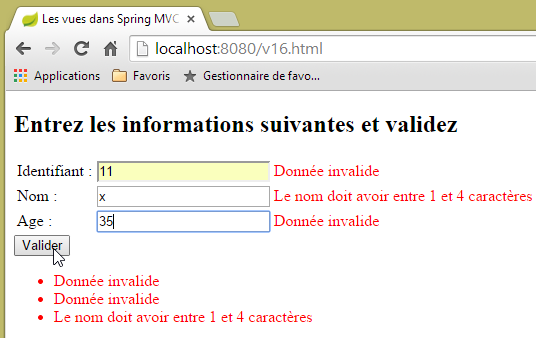 | 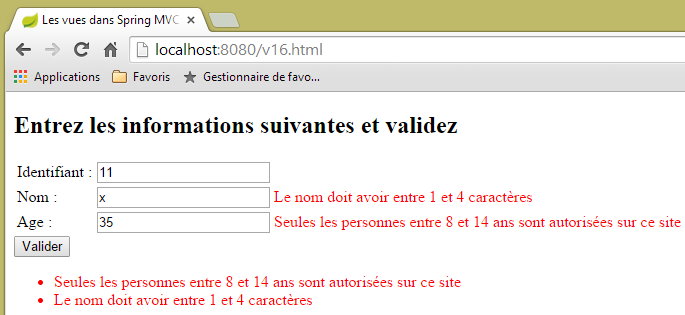 |
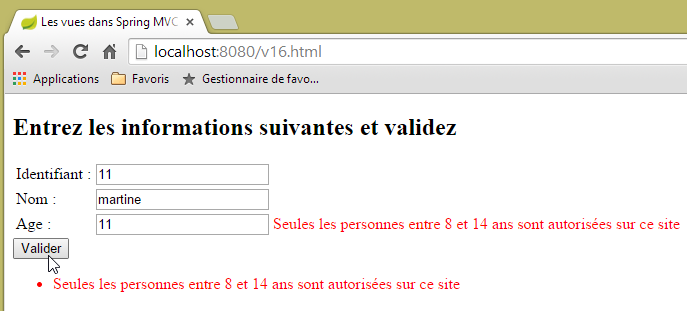 |
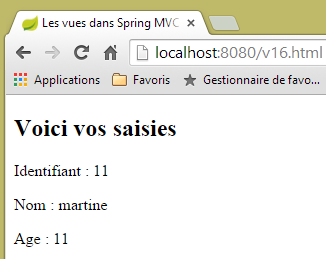 |
5.13. [/v17-/v18]: بررسی پیامهای خطا
هنگامی که برای اولین بار اقدام [/v15] درخواست میشود، نتیجه زیر به دست میآید:
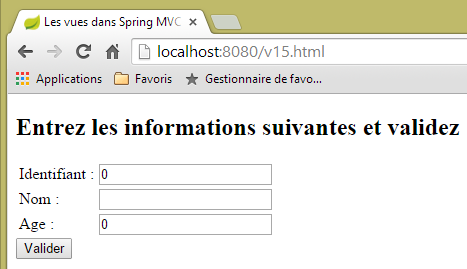 |
ممکن است ترجیح دهید به جای صفرها در فیلدهای [Identifiant, Age] از یک فرم خالی استفاده کنید. برای این کار، قالب اقدام را به شرح زیر تغییر میدهیم:
package istia.st.springmvc.models;
import javax.validation.constraints.Digits;
import org.hibernate.validator.constraints.Length;
import org.hibernate.validator.constraints.Range;
public class StringSecuredPerson {
@Range(min = 1)
@Digits(fraction = 0, integer = 4)
private String id;
@Length(min = 4, max = 10)
private String nom;
@Range(min = 8, max = 14)
@Digits(fraction = 0, integer = 2)
private String age;
// سازندهها
public StringSecuredPerson() {
}
public StringSecuredPerson(String id, String nom, String age) {
this.id = id;
this.nom = nom;
this.age = age;
}
// گیرندهها و تنظیمکنندهها
...
}
- ردههای ۱۲ و ۱۹: فیلدهای [id] و [age] به نوع [String] تغییر داده شدهاند؛
- خط ۱۱: مشخص میکنیم که فیلد [id] باید عددی با حداکثر چهار رقم و بدون اعشار باشد؛
- خط ۱۸: همین امر در مورد فیلد [age] نیز صدق میکند که باید یک عدد صحیح با حداکثر دو رقم باشد؛
عمل [/v17] به شرح زیر درمیآید:
    // ---------------------- نمایش یک فرم
    @RequestMapping(value = "/v17", method = RequestMethod.GET)
    public String v17(StringSecuredPerson p) {
        return "vue-17";
}
نما [vue-17.xml] که توسط اقدام [/v17] نمایش داده میشود، به شرح زیر است:
<!DOCTYPE html>
<html xmlns:th="http://www.thymeleaf.org">
    <head>
        <title th:text="#{title}">Spring 4 MVC</title>
        <meta http-equiv="Content-Type" content="text/html; charset=UTF-8" />
    </head>
    <body>
        <form action="/someURL" th:action="@{/v18.html}" method="post">
            <h2 th:text="#{personne.formulaire.titre}">Entrez les informations suivantes</h2>
            <div th:object="${stringSecuredPerson}">
                <table>
                    <thead></thead>
                    <tbody>
                        <tr>
                            <td th:text="#{personne.id}">Id :</td>
                            <td>
                                <input type="text" name="id" value="11" th:value="*{id}" />
                            </td>
                            <td>
                                <span th:each="err,status : ${#fields.errors('id')}" th:if="${status.index}==0" th:text="${err}" style="color: red">
                                    Identifiant erroné
                                </span>
                            </td>
                        </tr>
                        <tr>
                            <td th:text="#{personne.nom}">Nom :</td>
                            <td>
                                <input type="text" name="nom" value="Tintin" th:value="*{nom}" />
                            </td>
                            <td>
                                <span th:if="${#fields.hasErrors('nom')}" th:errors="*{nom}" style="color: red">Nom erroné</span>
                            </td>
                        </tr>
                        <tr>
                            <td th:text="#{personne.age}">Age :</td>
                            <td>
                                <input type="text" name="age" value="17" th:value="*{age}" />
                            </td>
                            <td>
                                <span th:if="${#fields.hasErrors('age')}" th:errors="*{age}" style="color: red">Âge erroné</span>
                            </td>
                        </tr>
                    </tbody>
                </table>
                <input type="submit" value="Valider" th:value="#{personne.formulaire.valider}" />
                <ul>
                    <li th:each="err : ${#fields.errors('*')}" th:text="${err}" style="color: red" />
                </ul>
            </div>
        </form>
    </body>
</html>
تغییرات در خطوط زیر رخ میدهد:
- خط ۱۰: اکنون با شیء مدل کلیدی [stringSecuredPerson] کار میکنیم؛
- خط ۲۰: لیست خطاها در فیلد [id] به صورت بازگشتی بررسی میشود. در سینتکس [th:each="err,status : ${#fields.errors('id')}"]، متغیر [err] است که لیست را به صورت بازگشتی بررسی میکند. متغیر [status] اطلاعات مربوط به هر تکرار را فراهم میکند. این یک شیء [index, count, size, current] است که در آن:
- index: شماره عنصر فعلی است،
- current: مقدار این عنصر فعلی،
- count، size: اندازه فهرستی که در حال تکرار است؛
- خط ۲۰: تنها عنصر اول لیست [th:if="${status.index}==0"] نمایش داده میشود؛
عمل [/v18] که POST را از عمل [/v17] پردازش میکند، به شرح زیر است:
    // -------------------- اعتبارسنجی یک مدل -------------------
    @RequestMapping(value = "/v18", method = RequestMethod.POST)
    public String v18(@Valid StringSecuredPerson p, BindingResult result) {
        // خطاها؟
        if (result.hasErrors()) {
            return "vue-17";
        } else {
            return "vue-18";
        }
}
فایلهای پیام به شرح زیر تغییر میکنند:
[messages_fr.properties]
title=Les vues dans Spring MVC
personne.nom=Nom :
personne.age=Age :
personne.id=Identifiant :
personne.mineure=Vous êtes mineur
personne.majeure=Vous êtes majeur
liste.personnes=Liste de personnes
personne.formulaire.titre=Entrez les informations suivantes et validez
personne.formulaire.valider=Valider
personne.formulaire.saisies=Voici vos saisies
notNull=La donnée est obligatoire
Range.securedPerson.id=L''identifiant doit être un nombre entier >=1
Range.securedPerson.age=Seules les personnes entre 8 et 14 ans sont autorisées sur ce site
Length.securedPerson.nom=Le nom doit avoir entre 1 et 4 caractères
typeMismatch=Donnée invalide
Range.stringSecuredPerson.id=L''identifiant doit être un nombre entier >=1
Range.stringSecuredPerson.age=Seules les personnes entre 8 et 14 ans sont autorisées sur ce site
Length.stringSecuredPerson.nom=Le nom doit avoir entre 1 et 4 caractères
Digits.stringSecuredPerson.id=Tapez un nombre entier de 4 chiffres au plus
Digits.stringSecuredPerson.age=Tapez un nombre entier de 2 chiffres au plus
[messages_en.properties]
title=Views in Spring MVC
personne.nom=Name:
personne.age=Age:
personne.id=Identifier:
personne.mineure=You are under 18
personne.majeure=You are over 18
liste.personnes=Persons' list
personne.formulaire.titre=Please, enter information and validate
personne.formulaire.valider=Validate
personne.formulaire.saisies=Here are your inputs
NotNull=Data is required
Range.securedPerson.id=Identifier must be an integer >=1
Range.securedPerson.age=Only kids who are 8 to 14 years old are allowed on this site
Length.securedPerson.nom=Name must be 4 to 10 characters long
typeMismatch=Invalid format
Range.stringSecuredPerson.id=Identifier must be an integer >=1
Range.stringSecuredPerson.age=Only kids who are 8 to 14 years old are allowed on this site
Length.stringSecuredPerson.nom=Name must be 4 to 10 characters long
Digits.stringSecuredPerson.id=Should be an integer with at most four digits
Digits.stringSecuredPerson.age=Should be an integer with at most two digits
بیایید به چند مثال نگاه کنیم:
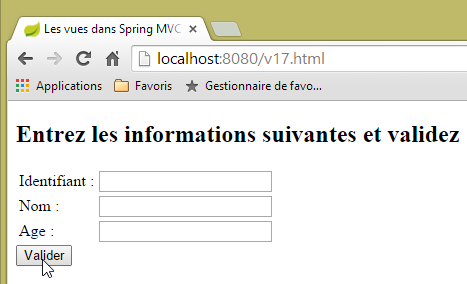 |
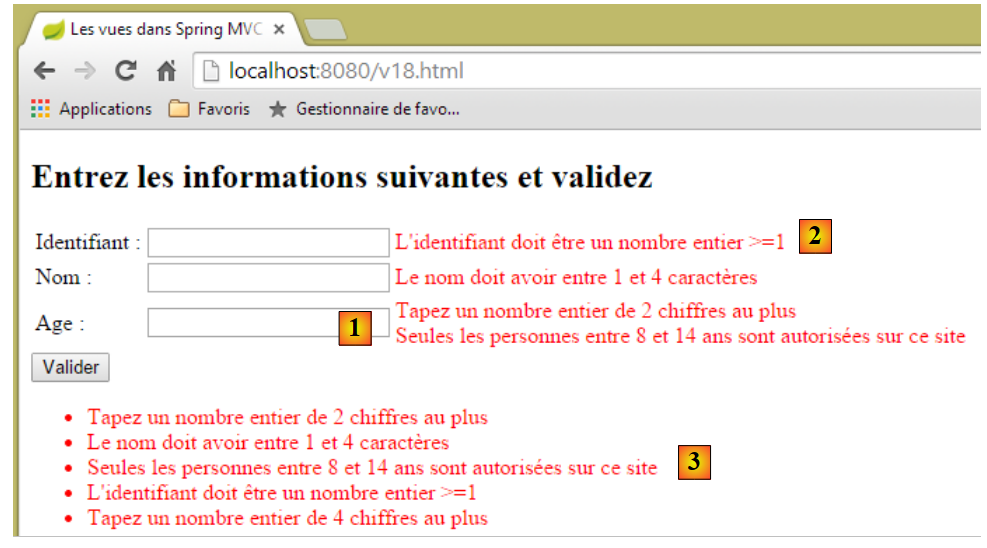 |
از [1] میتوان دید که دو اعتبارسنج برای فیلد [age] اجرا شدهاند:
    @Range(min = 8, max = 14)
    @Digits(fraction = 0, integer = 2)
    private String age;
آیا برای پیامهای خطا ترتیب خاصی وجود دارد؟ برای فیلد [age]، به نظر میرسد که اعتبارسنجها به ترتیبی که در [Digits, Range] نشان داده شده است، اجرا شدهاند. با این حال، اگر چندین پرسوجو انجام شود، مشاهده میشود که این ترتیب ممکن است تغییر کند. بنابراین، نمیتوان به ترتیب اعتبارسنجها اتکا کرد. در [2]، تنها یکی از دو پیام خطا برای فیلد [id] نمایش داده میشود. در [3]، همه پیامهای خطا نمایش داده میشوند.
5.14. [/v19-/v20]: استفاده از اعتبارسنجهای مختلف
بیایید قالب اقدام جدید زیر را در نظر بگیریم:
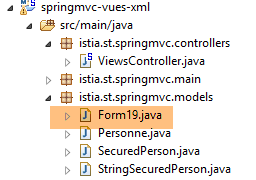 |
package istia.st.springmvc.models;
import java.util.Date;
import javax.validation.constraints.AssertFalse;
import javax.validation.constraints.AssertTrue;
import javax.validation.constraints.Future;
import javax.validation.constraints.Max;
import javax.validation.constraints.Min;
import javax.validation.constraints.NotNull;
import javax.validation.constraints.Past;
import javax.validation.constraints.Pattern;
import javax.validation.constraints.Size;
import org.hibernate.validator.constraints.Email;
import org.hibernate.validator.constraints.Length;
import org.hibernate.validator.constraints.NotBlank;
import org.hibernate.validator.constraints.NotEmpty;
import org.hibernate.validator.constraints.Range;
import org.hibernate.validator.constraints.URL;
import org.springframework.format.annotation.DateTimeFormat;
public class Form19 {
@NotNull
@AssertFalse
private Boolean assertFalse;
@NotNull
@AssertTrue
private Boolean assertTrue;
@NotNull
@Future
@DateTimeFormat(pattern = "yyyy-MM-dd")
private Date dateInFuture;
@NotNull
@Past
@DateTimeFormat(pattern = "yyyy-MM-dd")
private Date dateInPast;
@NotNull
@Max(value = 100)
private Integer intMax100;
@NotNull
@Min(value = 10)
private Integer intMin10;
@NotNull
@NotEmpty
private String strNotEmpty;
@NotNull
@NotBlank
private String strNotBlank;
@NotNull
@Size(min = 4, max = 6)
private String strBetween4and6;
@NotNull
@Pattern(regexp = "^\\d{2}:\\d{2}:\\d{2}$")
private String hhmmss;
@NotNull
@Email
@NotBlank
private String email;
@NotNull
@Length(max = 4, min = 4)
private String str4;
@Range(min = 10, max = 14)
@NotNull
private Integer int1014;
@URL
@NotBlank
private String url;
// گیرندهها و تنظیمکنندهها
...
}
این توسط اقدام زیر، [/v19]، نمایش داده خواهد شد:
    // ------------------ نمایش یک فرم
    @RequestMapping(value = "/v19", method = RequestMethod.GET, produces = "text/html; charset=UTF-8")
    public String v19(Form19 formulaire) {
        return "vue-19";
}
- خط ۳: این عمل یک شیء [Form19 formulaire] را بهعنوان پارامتر دریافت میکند. اگر GET هیچ پارامتری دریافت نکند، این شیء با مقادیر پیشفرض جاوا مقداردهی اولیه میشود؛
- خط ۴: نمای [vue-19.xml] نمایش داده میشود. این نما به شرح زیر است:
<!DOCTYPE HTML>
<html xmlns:th="http://www.thymeleaf.org">
    <head>
        <title>Spring 4 MVC</title>
        <meta http-equiv="Content-Type" content="text/html; charset=UTF-8" />
        <link rel="stylesheet" href="/css/form19.css" />
    </head>
    <body>
        <h3>Formulaire - Validations côté serveur</h3>
        <form action="/someURL" th:action="@{/v20.html}" method="post" th:object="${form19}">
            <table>
                <thead>
                    <tr>
                        <th class="col1">Contrainte</th>
                        <th class="col2">Saisie</th>
                        <th class="col3">Erreur</th>
                    </tr>
                </thead>
                <tbody>
                    <tr>
                        <td class="col1">@NotEmpty</td>
                        <td class="col2">
                            <input type="text" th:field="*{strNotEmpty}" />
                        </td>
                        <td class="col3">
                            <span th:if="${#fields.hasErrors('strNotEmpty')}" th:errors="*{strNotEmpty}" class="error">Donnée erronée</span>
                        </td>
                    </tr>
                    <tr>
                        <td class="col1">@NotBlank</td>
                        <td class="col2">
                            <input type="text" th:field="*{strNotBlank}" />
                        </td>
                        <td class="col3">
                            <span th:if="${#fields.hasErrors('strNotBlank')}" th:errors="*{strNotBlank}" class="error">Donnée erronée</span>
                        </td>
                    </tr>
                    <tr>
                        <td class="col1">@assertFalse</td>
                        <td class="col2">
                            <input type="radio" th:field="*{assertFalse}" value="true" />
                            <label th:for="${#ids.prev('assertFalse')}">True</label>
                            <input type="radio" th:field="*{assertFalse}" value="false" />
                            <label th:for="${#ids.prev('assertFalse')}">False</label>
                        </td>
                        <td class="col3">
                            <span th:if="${#fields.hasErrors('assertFalse')}" th:errors="*{assertFalse}" class="error">Donnée erronée</span>
                        </td>
                    </tr>
                    <tr>
                        <td class="col1">@assertTrue</td>
                        <td class="col2">
                            <select th:field="*{assertTrue}">
                                <option value="true">True</option>
                                <option value="false">False</option>
                            </select>
                        </td>
                        <td class="col3">
                            <span th:if="${#fields.hasErrors('assertTrue')}" th:errors="*{assertTrue}" class="error">Donnée erronée</span>
                        </td>
                    </tr>
                    <tr>
                        <td class="col1">@Past</td>
                        <td class="col2">
                            <input type="date" th:field="*{dateInPast}" th:value="*{dateInPast}" />
                        </td>
                        <td class="col3">
                            <span th:if="${#fields.hasErrors('dateInPast')}" th:errors="*{dateInPast}" class="error">Donnée erronée</span>
                        </td>
                    </tr>
                    <tr>
                        <td class="col1">@Future</td>
                        <td class="col2">
                            <input type="date" th:field="*{dateInFuture}" th:value="*{dateInFuture}" />
                        </td>
                        <td class="col3">
                            <span th:if="${#fields.hasErrors('dateInFuture')}" th:errors="*{dateInFuture}" class="error">Donnée erronée</span>
                        </td>
                    </tr>
                    <tr>
                        <td class="col1">@Max</td>
                        <td class="col2">
                            <input type="text" th:field="*{intMax100}" th:value="*{intMax100}" />
                        </td>
                        <td class="col3">
                            <span th:if="${#fields.hasErrors('intMax100')}" th:errors="*{intMax100}" class="error">Donnée erronée</span>
                        </td>
                    </tr>
                    <tr>
                        <td class="col1">@Min</td>
                        <td class="col2">
                            <input type="text" th:field="*{intMin10}" th:value="*{intMin10}" />
                        </td>
                        <td class="col3">
                            <span th:if="${#fields.hasErrors('intMin10')}" th:errors="*{intMin10}" class="error">Donnée erronée</span>
                        </td>
                    </tr>
                    <tr>
                        <td class="col1">@Size</td>
                        <td class="col2">
                            <input type="text" th:field="*{strBetween4and6}" th:value="*{strBetween4and6}" />
                        </td>
                        <td class="col3">
                            <span th:if="${#fields.hasErrors('strBetween4and6')}" th:errors="*{strBetween4and6}" class="error">Donnée erronée</span>
                        </td>
                    </tr>
                    <tr>
                        <td class="col1">@Pattern(hh:mm:ss)</td>
                        <td class="col2">
                            <input type="text" th:field="*{hhmmss}" th:value="*{hhmmss}" />
                        </td>
                        <td class="col3">
                            <span th:if="${#fields.hasErrors('hhmmss')}" th:errors="*{hhmmss}" class="error">Donnée erronée</span>
                        </td>
                    </tr>
                    <tr>
                        <td class="col1">@Email</td>
                        <td class="col2">
                            <input type="text" th:field="*{email}" th:value="*{email}" />
                        </td>
                        <td class="col3">
                            <span th:if="${#fields.hasErrors('email')}" th:errors="*{email}" class="error">Donnée erronée</span>
                        </td>
                    </tr>
                    <tr>
                        <td class="col1">@Length</td>
                        <td class="col2">
                            <input type="text" th:field="*{str4}" th:value="*{str4}" />
                        </td>
                        <td class="col3">
                            <span th:if="${#fields.hasErrors('str4')}" th:errors="*{str4}" class="error">Donnée erronée</span>
                        </td>
                    </tr>
                    <tr>
                        <td class="col1">@Range</td>
                        <td class="col2">
                            <input type="text" th:field="*{int1014}" th:value="*{int1014}" />
                        </td>
                        <td class="col3">
                            <span th:if="${#fields.hasErrors('int1014')}" th:errors="*{int1014}" class="error">Donnée erronée</span>
                        </td>
                    </tr>
                    <tr>
                        <td class="col1">@URL</td>
                        <td class="col2">
                            <input type="text" th:field="*{url}" th:value="*{url}" />
                        </td>
                        <td class="col3">
                            <span th:if="${#fields.hasErrors('url')}" th:errors="*{url}" class="error">Donnée erronée</span>
                        </td>
                    </tr>
                </tbody>
            </table>
            <p>
                <input type="submit" value="Valider" />
            </p>
        </form>
    </body>
</html>
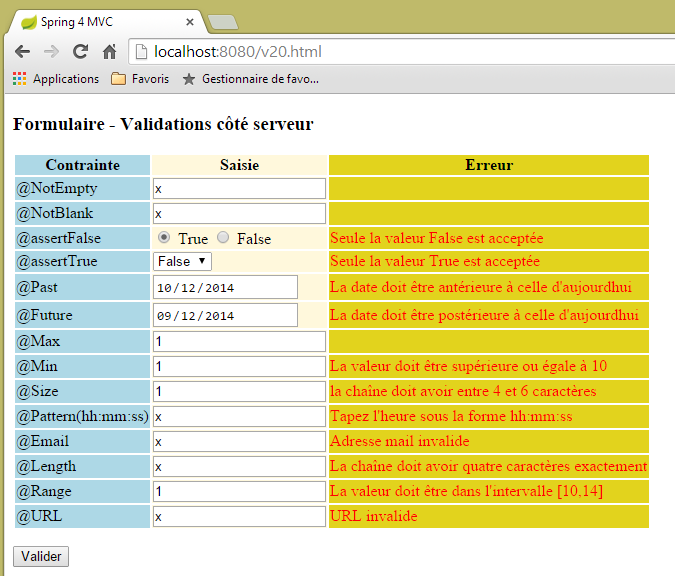
این کد نمای زیر را نمایش میدهد:
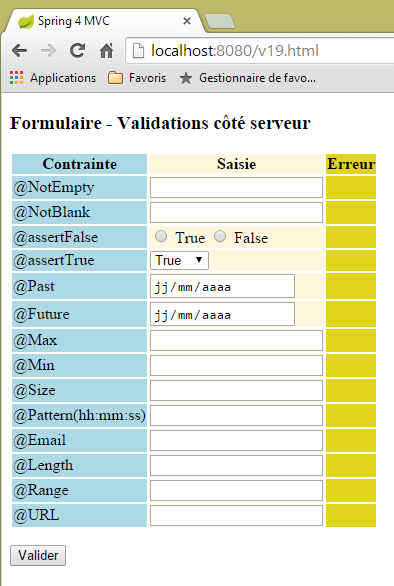 |
صفحه جدولی با سه ستون نمایش میدهد:
- ستون ۱: اعتبارسنج فیلد ورودی؛
- ستون ۲: فیلد ورودی؛
- ستون ۳: پیامهای خطا برای فیلد ورودی؛
برای مثال، بیایید کد نما [/v19.html] را برای اعتبارسنج [@Pattern] بررسی کنیم:
                    <tr>
                        <td class="col1">@Pattern(hh:mm:ss)</td>
                        <td class="col2">
                            <input type="text" th:field="*{hhmmss}" th:value="*{hhmmss}" />
                        </td>
                        <td class="col3">
                            <span th:if="${#fields.hasErrors('hhmmss')}" th:errors="*{hhmmss}" class="error">Donnée erronée</span>
                        </td>
</tr>
ما میتوانیم کدی را که به تازگی با فرمهای نوع [Personne] بررسی کردهایم، ببینیم:
- خط ۲: ستون اول: نام اعتبارسنجی در حال آزمایش؛
- خط ۴: ویژگی Thymeleaf با مقدار [th:field="*{hhmmss}] ویژگیهای HTML، [id="hhmmss"] و [name="hhmmss"] را تولید میکند. ویژگی Thymeleaf با مقدار [th:value="*{hhmmss}"]، ویژگی HTML را تولید میکند [value="valeur de [form19.hhmmss]] ;
- خط ۷: اگر مقداری که برای فیلد [form19.hhmmss] وارد شده نادرست باشد، آنگاه خط ۷ پیامهای خطای مربوط به آن فیلد را نمایش میدهد؛
مقادیر ارسالشده توسط اقدام زیر [/v20] پردازش میشوند:
    // ----------------- اعتبارسنجی قالب فرم
    @RequestMapping(value = "/v20", method = RequestMethod.POST, produces = "text/html; charset=UTF-8")
    public String v20(@Valid Form19 formulaire, BindingResult result, RedirectAttributes redirectAttributes) {
        if (result.hasErrors()) {
            return "vue-19";
        } else {
            // ارسال مجدد به [vue-19]
            redirectAttributes.addFlashAttribute("form19", formulaire);
            return "redirect:/v19.html";
        }
}
- خط ۳: مقادیر ارسالشده در صورت معتبر بودن، فیلدهای شیء [Form19 formulaire] را پر خواهند کرد؛
- خطوط ۴–۶: اگر مقادیر ارسالشده معتبر نباشند، فرم [vue-19] همراه با پیامهای خطا دوباره نمایش داده میشود؛
- خطوط ۶–۱۰: اگر مقادیر ارسالشده معتبر باشند، آنگاه شیء [Form19 formulaire] که با این مقادیر ساخته شده است، برای درخواست بعدی، در این مورد درخواست تغییر مسیر، در دسترس قرار میگیرد. سپس نابود میشود؛
- خط ۹: کلاینت به اقدام [/v19.html] هدایت میشود. این فرم [vue-19] را مجدداً نمایش میدهد که حاوی کدی مانند زیر است:
<form action="/someURL" th:action="@{/v20.html}" method="post" th:object="${form19}">
سپس ویژگی [th:object="${form19}"]، شیء مرتبط با ویژگی فلش [form19] را بازیابی میکند و بدین ترتیب فرم را همانطور که وارد شده بود، مجدداً نمایش میدهد.
کد فرم نیاز به توضیحات بیشتری دارد. کد زیر را در نظر بگیرید:
                    <tr>
                        <td class="col1">@assertFalse</td>
                        <td class="col2">
                            <input type="radio" th:field="*{assertFalse}" value="true" />
                            <label th:for="${#ids.prev('assertFalse')}">True</label>
                            <input type="radio" th:field="*{assertFalse}" value="false" />
                            <label th:for="${#ids.prev('assertFalse')}">False</label>
                        </td>
                        <td class="col3">
                            <span th:if="${#fields.hasErrors('assertFalse')}" th:errors="*{assertFalse}" class="error">Donnée erronée</span>
                        </td>
</tr>
این کد، کد زیر را تولید میکند: HTML
<tr>
  <td class="col1">@assertFalse</td>
  <td class="col2">
    <input type="radio" value="true" id="assertFalse1" name="assertFalse" />
    <label for="assertFalse1">True</label>
    <input type="radio" value="false" id="assertFalse2" name="assertFalse" />
    <label for="assertFalse2">False</label>
  </td>
  <td class="col3">
  </td>
</tr>
در کد
<input type="radio" th:field="*{assertFalse}" value="true" />
<label th:for="${#ids.prev('assertFalse')}">True</label>
<input type="radio" th:field="*{assertFalse}" value="false" />
<label th:for="${#ids.prev('assertFalse')}">False</label>
ویژگیهای Thymeleaf در خطوط ۱ و ۳، [th:field="*{assertFalse}"]، مشکلساز هستند. گفته شده بود که این ویژگی، ویژگیهای HTML، [id=assertFalse] و [name=assertFalse] را تولید میکند. مشکل از آنجا ناشی میشود که چون این ویژگیها در خطوط ۱ و ۳ تولید میشوند، در نهایت با دو ویژگی یکسان [name] و دو ویژگی یکسان [id] مواجه میشویم. در حالی که این کار با ویژگی [name] امکانپذیر است، با ویژگی [id] امکانپذیر نیست. همانطور که در کد تولید شده HTML قابل مشاهده است، Thymeleaf دو ویژگی [id] متفاوت تولید کرده است: [id=asserFalse1] و [id=assertFalse2]. این یک امر خوب است. مشکل این است که ما این شناسهها را نمیدانیم و ممکن است به آنها نیاز داشته باشیم. این مورد برای تگ [label] در خط ۲ صادق است. ویژگی [for] یک تگ HTML [label] باید به ویژگی [id] اشاره کند، در این مورد، همان که برای تگ [input] در خط ۱ تولید شده است. مستندات Thymeleaf بیان میکند که عبارت [${#ids.prev('assertFalse')}"] آخرین ویژگی [id] تولیدشده برای فیلد [assertFalse] را بازیابی میکند.
حال بیایید نگاهی به کد لیست کشویی فرم بیندازیم:
<select th:field="*{assertTrue}">
   <option value="true">True</option>
   <option value="false">False</option>
</select>
این کد، کد HTML را برای یک لیست کشویی تولید میکند:
مقدار ارسالشده با نام [name="assertTrue"] نامگذاری خواهد شد.
ویوی [vue-19.xml] از یک صفحهشیوهنامه استفاده میکند:
    <head>
        <title>Spring 4 MVC</title>
        <meta http-equiv="Content-Type" content="text/html; charset=UTF-8" />
        <link rel="stylesheet" href="/css/form19.css" />
</head>
خط ۴: شیوهنامهی استفادهشده باید در پوشهی [static] پروژهی قرار داده شود:
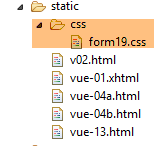 |
محتوای آن به شرح زیر است:
@CHARSET "UTF-8";

.col1 {
    background: lightblue;
}

.col2 {
    background: Cornsilk;
}

.col3 {
    background: #e2d31d;
}

.error {
    color: red;
}
اکنون، بیایید به تاریخها نگاهی بیندازیم:
    @NotNull
    @Future
    @DateTimeFormat(pattern = "yyyy-MM-dd")
    private Date dateInFuture;

    @NotNull
    @Past
    @DateTimeFormat(pattern = "yyyy-MM-dd")
    private Date dateInPast;
بررسی ترافیک شبکه در ابزار توسعهدهندگان کروم (Ctrl+Shift+I) نشان میدهد که تاریخها به فرمت (سال-ماه-روز) ارسال شدهاند:
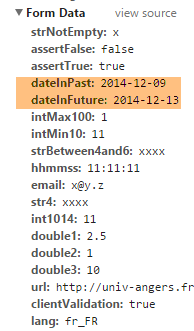 |
به همین دلیل تاریخها توسط اعتبارسنج علامتگذاری شدهاند:
@DateTimeFormat(pattern = "yyyy-MM-dd")
که فرمت مورد انتظار برای مقادیر تاریخ ارسالشده را مشخص میکند.
در نهایت، فایل پیام فرانسوی [messages_fr.properties]:
title=Les vues dans Spring MVC
personne.nom=Nom :
personne.age=Age :
personne.id=Identifiant :
personne.mineure=Vous êtes mineur
personne.majeure=Vous êtes majeur
liste.personnes=Liste de personnes
personne.formulaire.titre=Entrez les informations suivantes et validez
personne.formulaire.valider=Valider
personne.formulaire.saisies=Voici vos saisies
NotNull=La donnée est obligatoire
Range.securedPerson.id=L''identifiant doit être un nombre entier >=1
Range.securedPerson.age=Seules les personnes entre 8 et 14 ans sont autorisées sur ce site
Length.securedPerson.nom=Le nom doit avoir entre 1 et 4 caractères
typeMismatch=Donnée invalide
Range.stringSecuredPerson.id=L''identifiant doit être un nombre entier >=1
Range.stringSecuredPerson.age=Seules les personnes entre 8 et 14 ans sont autorisées sur ce site
Length.stringSecuredPerson.nom=Le nom doit avoir entre 1 et 4 caractères
Digits.stringSecuredPerson.id=Tapez un nombre entier de 4 chiffres au plus
Digits.stringSecuredPerson.age=Tapez un nombre entier de 2 chiffres au plus
Future.form19.dateInFuture=La date doit être postérieure à celle d''aujourd'hui
Past.form19.dateInPast=La date doit être antérieure à celle d''aujourd'hui
Size.form19.strBetween4and6=la chaîne doit avoir entre 4 et 6 caractères
Min.form19.intMin10=La valeur doit être supérieure ou égale à 10
Max.form19.intMax100=La valeur doit être inférieure ou égale à 100
Length.form19.str4=La chaîne doit avoir quatre caractères exactement
Email.form19.email=Adresse mail invalide
URL.form19.url=URL invalide
Range.form19.int1014=La valeur doit être dans l''intervalle [10,14]
AssertTrue=Seule la valeur True est acceptée
AssertFalse=Seule la valeur False est acceptée
Pattern.form19.hhmmss=Tapez l''heure sous la forme hh:mm:ss
NotEmpty=La donnée ne peut être vide
NotBlank=La donnée ne peut être vide
بیایید چند مثال از خروجی را ببینیم:
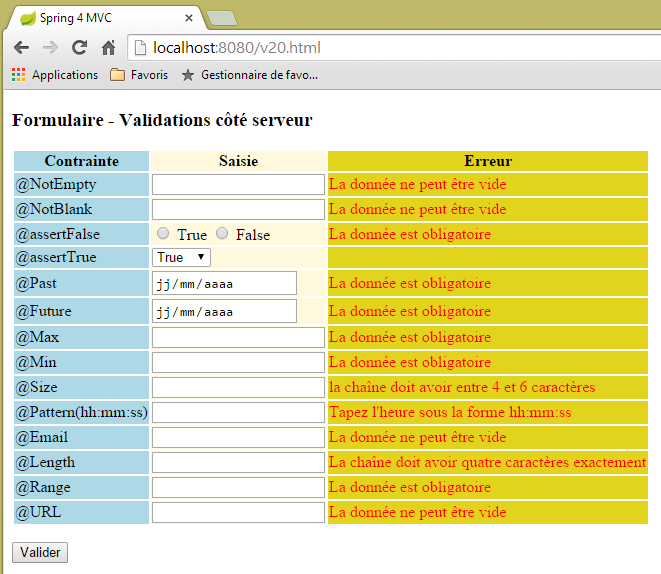 |
 |
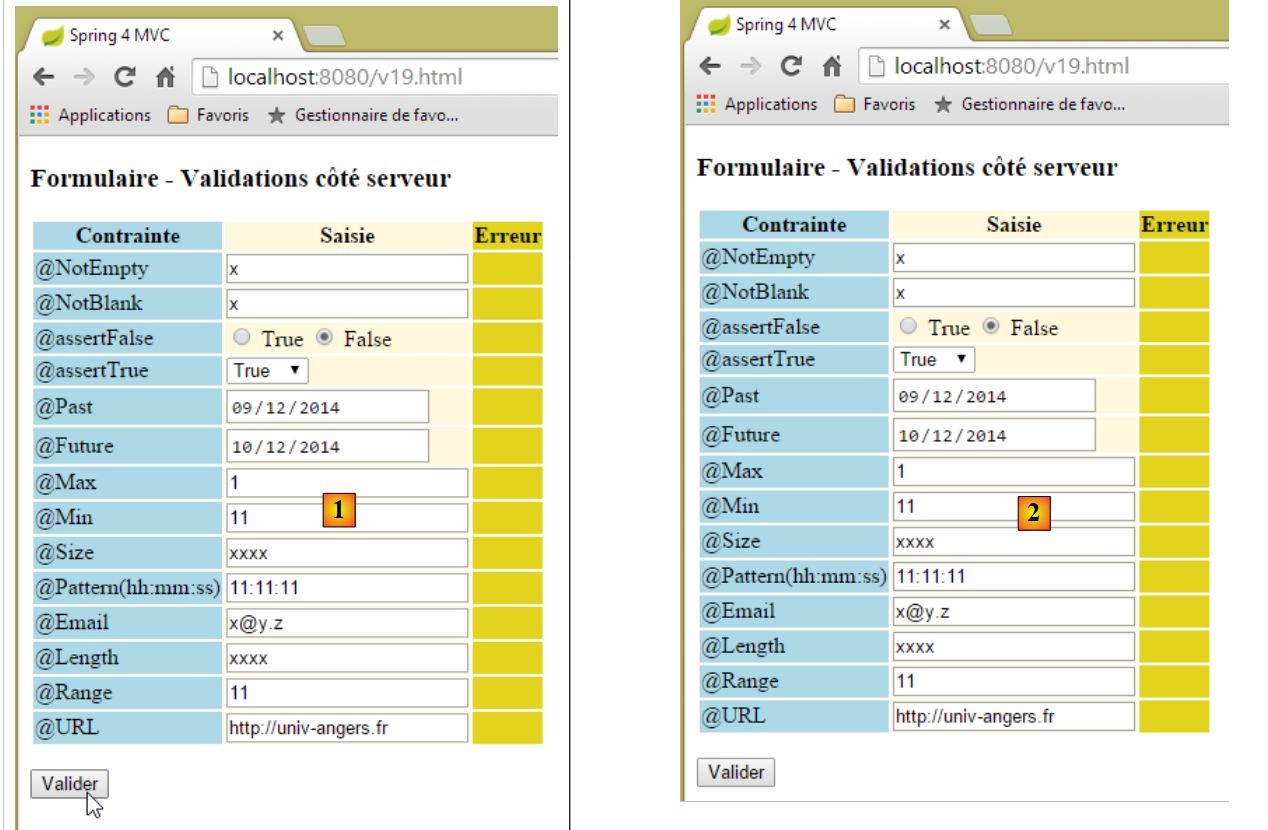 |
در بالا، بین [1] و [2]، به نظر میرسد که هیچ اتفاقی نیفتاده است. با این حال، اگر به ترافیک شبکه (Ctrl-Shift-I) نگاه کنید، میتوانید ببینید که دو تبادل شبکه با سرور وجود داشته است:
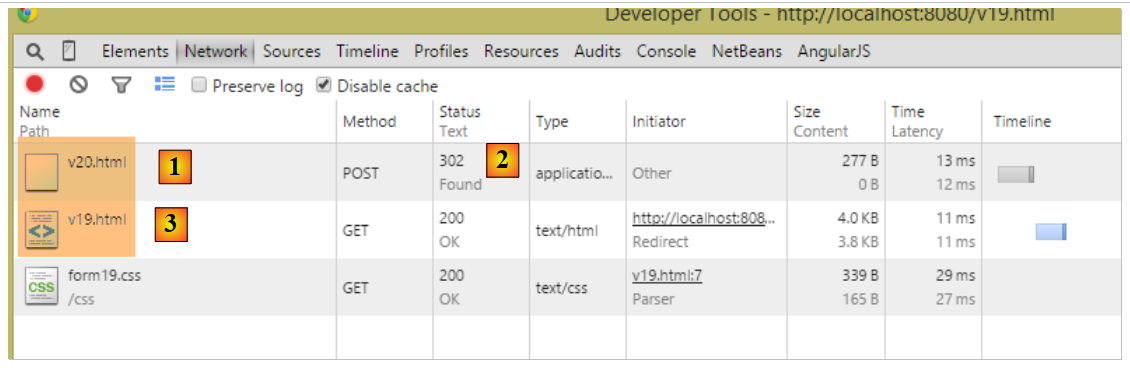 |
- در [1]، درخواست اولیه POST به [/v20]؛
- به [2] – پاسخ به این اقدام یک هدایت (redirect) است؛
- در [3]، درخواست دوم، این بار به [/v19]؛
سپس اقدام [/v19] اجرا میشود:
    // ------------------ نمایش یک فرم
    @RequestMapping(value = "/v19", method = RequestMethod.GET, produces = "text/html; charset=UTF-8")
    public String v19(Form19 formulaire) {
        return "vue-19";
}
- خط ۳، پارامتر [Form19 formulaire] با ویژگی Flash کلید [form19] که توسط عمل قبلی [/v19] ایجاد شده بود، مقداردهی اولیه میشود. این کلید یک شی از نوع [Form19] با مقادیر زیر بود: مقادیر ارسالشده به اقدام [/v19]؛
- خط ۴: نمای [vue-19.xml] نمایش داده خواهد شد، در حالی که قالب آن حاوی یک شیء [Form19 formulaire] است که با مقادیر ارسالشده مقداردهی اولیه شده است. به همین دلیل است که کاربر فرم را دقیقاً همانطور که ارسال کرده است میبیند؛
چرا هدایت؟ چرا به سادگی ارسال به اکشن [/v19] که در بالا ذکر شد را انجام ندادیم؟ به همان نتیجه میرسیدیم، با چند تفاوت:
- مرورگر به جای [http://localhost:8080/v19.html]، [http://localhost:8080/v20.html] را در نوار آدرس خود نمایش میداد، زیرا آخرین URL فراخوانیشده را نمایش میدهد؛
- اگر کاربر صفحه را تازهسازی کند (F5)، نتیجه کاملاً متفاوت است:
- در مورد تغییر مسیر، URL نمایش داده شده، [http://localhost:8080/v19.html] است که از GET به دست آمده است. مرورگر این دستور آخر را مجدداً اجرا میکند و سپس یک فرم کاملاً جدید دریافت خواهد کرد (ویژگی Flash فقط یک بار استفاده میشود)،
- در صورت عدم تغییر مسیر، URL نمایش داده شده، [http://localhost:8080/v20.html] است که از POST به دست آمده است. مرورگر این دستور آخر را مجدداً اجرا میکند و در نتیجه یک POST جدید با همان مقادیر ارسالشده قبلی تولید میکند. این امر در اینجا عواقبی ندارد، اما اغلب نامطلوب است، بنابراین معمولاً هدایت (redirection) ترجیح داده میشود؛
5.15. [/v21-/v22]: رسیدگی به دکمههای رادیویی
بیایید مؤلفه Spring زیر، [Listes] را در نظر بگیریم:
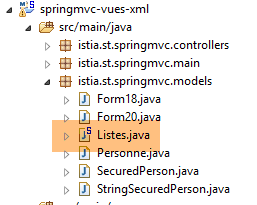 |
package istia.st.springmvc.models;
import org.springframework.stereotype.Component;
@Component
public class Listes {
private String[] deplacements = new String[] { "0", "1", "2", "3", "4" };
private String[] libellesDeplacements = new String[] { "vélo", "marche", "train", "avion", "autre" };
private String[] libellesBijoux = new String[] { "émeraude", "rubis", "diamant", "opaline" };
// گیرندهها و تنظیمکنندهها
...
}
- خط ۵: کلاس [Listes] یک کامپوننت Spring خواهد بود؛
- خطوط ۸–۱۰: فهرستهایی که برای پر کردن دکمههای رادیویی، چکباکسها و فهرستهای کشویی استفاده میشوند؛
در کلاس پیکربندی [Config]، موارد زیر نوشته شده است:
@Configuration
@ComponentScan({ "istia.st.springmvc.controllers", "istia.st.springmvc.models" })
@EnableAutoConfiguration
public class Config extends WebMvcConfigurerAdapter {
- خط ۲: پکیج [models]، که شامل کامپوننت [Listes] است، به درستی توسط Spring اسکن خواهد شد؛
ما اقدامات جدید زیر را ایجاد میکنیم:
// ------------------ فرم با دکمههای رادیویی
@Autowired
private Listes listes;
@RequestMapping(value = "/v21", method = RequestMethod.GET, produces = "text/html; charset=UTF-8")
public String v21(@ModelAttribute("form") Form21 formulaire, Model model) {
model.addAttribute("listes", listes);
return "vue-21";
}
@RequestMapping(value = "/v22", method = RequestMethod.POST, produces = "text/html; charset=UTF-8")
public String v22(@ModelAttribute("form") Form21 formulaire, RedirectAttributes redirectAttributes) {
redirectAttributes.addFlashAttribute("form", formulaire);
return "redirect:/v21.html";
}
- خطوط ۲–۳: کامپوننت [Listes] به کنترلر تزریق میشود؛
- خط ۶: ما یک فرم از نوع [Form21] را که آن را توصیف خواهیم کرد، مدیریت میکنیم. توجه داشته باشید که ما کلید آن، [form]، را در قالب نما مشخص کردهایم. به یاد داشته باشید که به طور پیشفرض، این میبایست [form21] میبود؛
- خط ۷: ما کامپوننت [Listes] را به مدل تزریق میکنیم. ویو به این کامپوننت نیاز خواهد داشت؛
- خط ۸: ما نمای [vue-21.xml] را نمایش میدهیم. این نما فرم [Form21] را نمایش خواهد داد، و مقادیر ارسالشده در خطوط ۱۲–۱۵ به اکشن [/v22] ارسال خواهند شد؛
- خطوط ۱۲–۱۵: اکشن [/v22] به سادگی به اکشن [/v21] هدایت میکند و مقادیر ارسالشده را که دریافت کرده است، در یک ویژگی فلش با کلید [form] قرار میدهد. مهم است که این کلید با کلیدی که در خط ۶ استفاده شده یکسان باشد؛
قالب [Form21] به شرح زیر است:
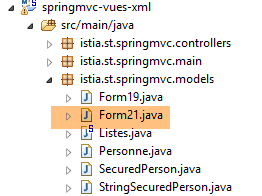 |
package istia.st.springmvc.models;
public class Form21 {
// مقادیر ارسالشده
private String marie = "non";
private String deplacement = "4";
private String[] couleurs;
private String strCouleurs;
private String[] bijoux;
private String strBijoux;
private int couleur2;
private int[] bijoux2;
private String strBijoux2;
// گیرندهها و تنظیمکنندهها
...
}
نما [vue-21.xml] به شرح زیر است:
<!DOCTYPE HTML>
<html xmlns:th="http://www.thymeleaf.org">
    <head>
        <title>Spring 4 MVC</title>
        <meta http-equiv="Content-Type" content="text/html; charset=UTF-8" />
        <link rel="stylesheet" href="/css/form19.css" />
    </head>
    <body>

        <h3>Formulaire - Boutons radio</h3>
        <form action="/someURL" th:action="@{/v22.html}" method="post" th:object="${form}">
            <table>
                <thead>
                    <tr>
                        <th class="col1">Texte</th>
                        <th class="col2">Saisie</th>
                        <th class="col3">Valeur</th>
                    </tr>
                </thead>
                <tbody>
                    <tr>
                        <td class="col1">Etes-vous marié(e)</td>
                        <td class="col2">
                            <input type="radio" th:field="*{marie}" value="oui" />
                            <label th:for="${#ids.prev('marie')}">Oui</label>
                            <input type="radio" th:field="*{marie}" value="non" />
                            <label th:for="${#ids.prev('marie')}">Non</label>
                        </td>
                        <td class="col3">
                            <span th:text="*{marie}"></span>
                        </td>
                    </tr>
                    <tr>
                        <td class="col1">Mode de déplacement</td>
                        <td class="col2">
                            <span th:each="mode, status : ${listes.deplacements}">
                                <input type="radio" th:field="*{deplacement}" th:value="${mode}" />
                                <label th:for="${#ids.prev('deplacement')}" th:text="${listes.libellesDeplacements[status.index]}">Autre</label>
                            </span>
                        </td>
                        <td class="col3">
                            <span th:text="*{deplacement}"></span>
                        </td>
                    </tr>
                </tbody>
            </table>
            <p>
                <input type="submit" value="Valider" />
            </p>
        </form>
    </body>
</html>
- ردههای ۳۶–۴۰: به استفاده از مؤلفه [Listes] که در قالب گنجانده شده است برای تولید برچسبهای کادرهای تیک توجه کنید؛
- ستون ۳ مقدار ارسالشده برای POST را نشان میدهد، یا مقدار اولیه فرم در GET اولیه؛
این کد صفحه زیر را نمایش میدهد:
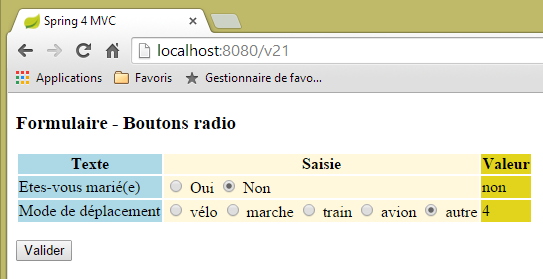 |
مطابق با کد زیر HTML:
<!DOCTYPE HTML>

<html>
    <head>
        <title>Spring 4 MVC</title>
        <meta http-equiv="Content-Type" content="text/html; charset=UTF-8" />
        <link rel="stylesheet" href="/css/form19.css" />
    </head>
    <body>

        <h3>Formulaire - Boutons radio</h3>
        <form action="/v22.html" method="post">
            <table>
                <thead>
                    <tr>
                        <th class="col1">Texte</th>
                        <th class="col2">Saisie</th>
                        <th class="col3">Valeur</th>
                    </tr>
                </thead>
                <tbody>
                    <tr>
                        <td class="col1">Etes-vous marié(e)</td>
                        <td class="col2">
                            <input type="radio" value="oui" id="marie1" name="marie" />
                            <label for="marie1">Oui</label>
                            <input type="radio" value="non" id="marie2" name="marie" checked="checked" />
                            <label for="marie2">Non</label>
                        </td>
                        <td class="col3">
                            <span>non</span>
                        </td>
                    </tr>
                    <tr>
                        <td class="col1">Mode de déplacement</td>
                        <td class="col2">
                            <span>
                                <input type="radio" value="0" id="deplacement1" name="deplacement" />
                                <label for="deplacement1">vélo</label>
                            </span>
                            <span>
                                <input type="radio" value="1" id="deplacement2" name="deplacement" />
                                <label for="deplacement2">marche</label>
                            </span>
                            <span>
                                <input type="radio" value="2" id="deplacement3" name="deplacement" />
                                <label for="deplacement3">train</label>
                            </span>
                            <span>
                                <input type="radio" value="3" id="deplacement4" name="deplacement" />
                                <label for="deplacement4">avion</label>
                            </span>
                            <span>
                                <input type="radio" value="4" id="deplacement5" name="deplacement" checked="checked" />
                                <label for="deplacement5">autre</label>
                            </span>
                        </td>
                        <td class="col3">
                            <span>4</span>
                        </td>
                    </tr>
                </tbody>
            </table>
            <p>
                <input type="submit" value="Valider" />
            </p>
        </form>
    </body>
</html>
میتوانیم ببینیم که مقادیر ارسالشده (ویژگیهای نام) در فیلدهای زیر از قالب [Form21] قرار میگیرند:
    private String marie = "non";
    private String deplacement = "4";
از خوانندگان دعوت میشود تا چند آزمایش انجام دهند. باید توجه داشت که ارسال (post) مربوط به ویژگی [value] دکمه رادیویی است.
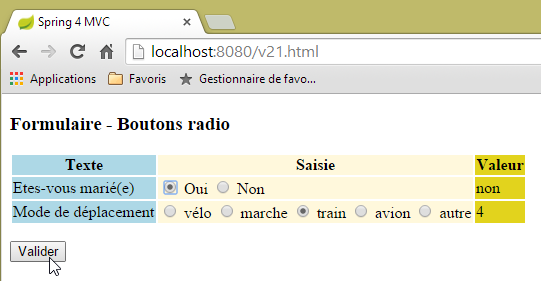 | 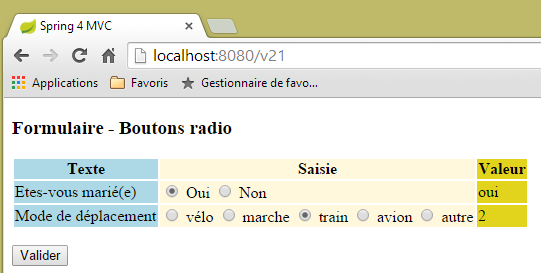 |
5.16. [/v23-/v24]: مدیریت چکباکسها
ما اقدام جدید زیر را اضافه میکنیم:
// ------------------ فرم با چکباکسها
@RequestMapping(value = "/v23", method = RequestMethod.GET, produces = "text/html; charset=UTF-8")
public String av20(@ModelAttribute("form") Form21 formulaire, Model model) {
model.addAttribute("listes", listes);
return "vue-23";
}
- خط ۳: ما به استفاده از قالب [Form21] ادامه میدهیم؛
نما [vue-23.xml] به شرح زیر است:
<!DOCTYPE HTML>
<html xmlns:th="http://www.thymeleaf.org">
    <head>
        <title>Spring 4 MVC</title>
        <meta http-equiv="Content-Type" content="text/html; charset=UTF-8" />
        <link rel="stylesheet" href="/css/form19.css" />
    </head>
    <body>
        <h3>Formulaire - Cases à cocher</h3>
        <form action="/someURL" th:action="@{/v24.html}" method="post" th:object="${form}">
            <table>
                <thead>
                    <tr>
                        <th class="col1">Texte</th>
                        <th class="col2">Saisie</th>
                        <th class="col3">Valeur</th>
                    </tr>
                </thead>
                <tbody>
                    <tr>
                        <td class="col1">Vos couleurs préférées</td>
                        <td class="col2">
                            <input type="checkbox" th:field="*{couleurs}" value="0" />
                            <label th:for="${#ids.prev('couleurs')}">rouge</label>
                            <input type="checkbox" th:field="*{couleurs}" value="1" />
                            <label th:for="${#ids.prev('couleurs')}">vert</label>
                            <input type="checkbox" th:field="*{couleurs}" value="2" />
                            <label th:for="${#ids.prev('couleurs')}">bleu</label>
                        </td>
                        <td class="col3">
                            <span th:text="*{strCouleurs}"></span>
                        </td>
                    </tr>
                    <tr>
                        <td class="col1">Pierres préférées</td>
                        <td class="col2">
                            <span th:each="label, status : ${listes.libellesBijoux}">
                                <input type="checkbox" th:field="*{bijoux}" th:value="${status.index}" />
                                <label th:for="${#ids.prev('bijoux')}" th:text="${label}">Autre</label>
                            </span>
                        </td>
                        <td class="col3">
                            <span th:text="*{strBijoux}"></span>
                        </td>
                    </tr>
                </tbody>
            </table>
            <p>
                <input type="submit" value="Valider" />
            </p>
        </form>
    </body>
</html>
- خطوط ۳۷–۴۱: توجه کنید که از کامپوننت [Listes] برای تولید برچسبهای چکباکسها استفاده شده است؛
این کد صفحه زیر را نمایش میدهد:
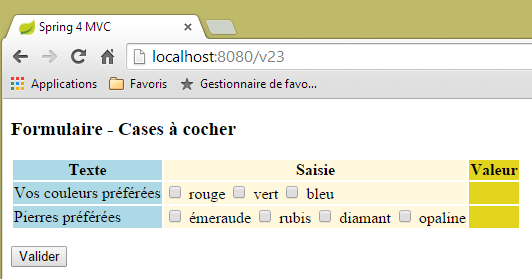 |
تولید شده از کد زیر: HTML:
<!DOCTYPE HTML>

<html>
    <head>
        <title>Spring 4 MVC</title>
        <meta http-equiv="Content-Type" content="text/html; charset=UTF-8" />
        <link rel="stylesheet" href="/css/form19.css" />
    </head>
    <body>
        <h3>Formulaire - Cases à cocher</h3>
        <form action="/v24.html" method="post">
            <table>
                <thead>
                    <tr>
                        <th class="col1">Texte</th>
                        <th class="col2">Saisie</th>
                        <th class="col3">Valeur</th>
                    </tr>
                </thead>
                <tbody>
                    <tr>
                        <td class="col1">Vos couleurs préférées</td>
                        <td class="col2">
                            <input type="checkbox" value="0" id="couleurs1" name="couleurs" /><input type="hidden" name="_couleurs" value="on" />
                            <label for="couleurs1">rouge</label>
                            <input type="checkbox" value="1" id="couleurs2" name="couleurs" /><input type="hidden" name="_couleurs" value="on" />
                            <label for="couleurs2">vert</label>
                            <input type="checkbox" value="2" id="couleurs3" name="couleurs" /><input type="hidden" name="_couleurs" value="on" />
                            <label for="couleurs3">bleu</label>
                        </td>
                        <td class="col3">
                            <span></span>
                        </td>
                    </tr>
                    <tr>
                        <td class="col1">Pierres préférées</td>
                        <td class="col2">
                            <span>
                                <input type="checkbox" value="0" id="bijoux1" name="bijoux" /><input type="hidden" name="_bijoux" value="on" />
                                <label for="bijoux1">émeraude</label>
                            </span>
                            <span>
                                <input type="checkbox" value="1" id="bijoux2" name="bijoux" /><input type="hidden" name="_bijoux" value="on" />
                                <label for="bijoux2">rubis</label>
                            </span>
                            <span>
                                <input type="checkbox" value="2" id="bijoux3" name="bijoux" /><input type="hidden" name="_bijoux" value="on" />
                                <label for="bijoux3">diamant</label>
                            </span>
                            <span>
                                <input type="checkbox" value="3" id="bijoux4" name="bijoux" /><input type="hidden" name="_bijoux" value="on" />
                                <label for="bijoux4">opaline</label>
                            </span>
                        </td>
                        <td class="col3">
                            <span></span>
                        </td>
                    </tr>
                </tbody>
            </table>
            <p>
                <input type="submit" value="Valider" />
            </p>
        </form>
    </body>
</html>
توجه داشته باشید که مقادیر ارسالشده (ویژگیهای name) به فیلدهای زیر در [Form21] ارسال میشوند:
    private String[] couleurs;
    private String[] bijoux;
اینها آرایهاند، زیرا برای هر فیلد، چندین چکباکس وجود دارد که نام آن فیلد را نشان میدهند. بنابراین ممکن است چندین مقدار ارسالشده با همان نام (ویژگی فرم name) دریافت شود. بنابراین برای بازیابی آنها به یک آرایه نیاز است.
بیایید به کد Thymeleaf در ستون ۳ صفحه بازگردیم:
  <td class="col3">
    <span th:text="*{strCouleurs}"></span>
  </td>
</tr>
<tr>
  <td class="col1">Pierres préférées</td>
  <td class="col2">
    <span th:each="label, status : ${listes.libellesBijoux}">
      <input type="checkbox" th:field="*{bijoux}" th:value="${status.index}" />
      <label th:for="${#ids.prev('bijoux')}" th:text="${label}">Autre</label>
    </span>
  </td>
  <td class="col3">
    <span th:text="*{strBijoux}"></span>
  </td>
</tr>
میدانهای اشاره شده در خطوط ۲ و ۱۴ به شرح زیر هستند:
    private String strCouleurs;
    private String strBijoux;
آنها توسط اقدام [/v24] محاسبه میشوند که POST را مدیریت میکند:
    // مبدل جکسون / jSON
    private ObjectMapper mapper = new ObjectMapper();

    @RequestMapping(value = "/v24", method = RequestMethod.POST, produces = "text/html; charset=UTF-8")
    public String av21(@ModelAttribute("form") Form21 formulaire, RedirectAttributes redirectAttributes) throws JsonProcessingException {
        redirectAttributes.addFlashAttribute("form", formulaire);
        formulaire.setStrCouleurs(mapper.writeValueAsString(formulaire.getCouleurs()));
        formulaire.setStrBijoux(mapper.writeValueAsString(formulaire.getBijoux()));
        return "redirect:/v23.html";
}
لازم به ذکر است که کتابخانه جکسون / jSON در وابستگیهای پروژه گنجانده شده است.
- خط ۲: یک نوع [ObjectMapper] ایجاد میشود که امکان سریالیسازی و غیرسریالیسازی اشیاء در jSON را فراهم میکند،
- خط ۷: آرایه رنگها به jSON سریالیزه میشود. نتیجه در فیلد [strCouleurs] ذخیره میشود؛
- خط ۸: آرایه جواهرات به jSON سریال میشود. نتیجه در فیلد [strBijoux] قرار میگیرد؛
در اینجا مثالی از خروجی آورده شده است:
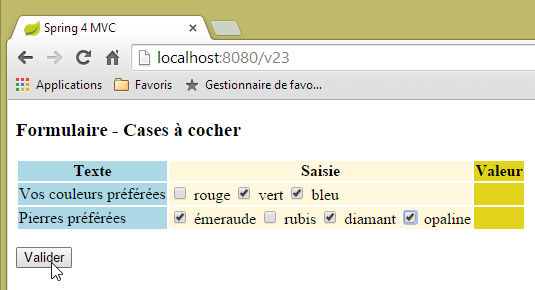 | 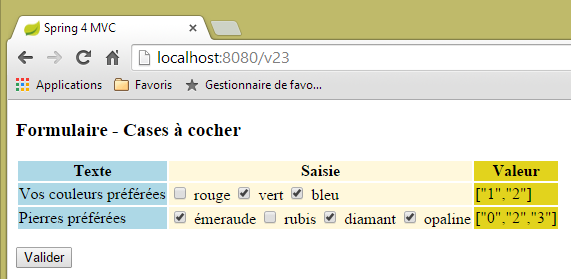 |
لطفاً توجه داشته باشید که این ویژگی [value] مربوط به چکباکسها است که ارسال میشود.
5.17. [/25-/v26]: مدیریت لیستها
ما در حال افزودن اقدام زیر هستیم، [/v25]:
// ------------------ فرم با فهرستها
@RequestMapping(value = "/v25", method = RequestMethod.GET, produces = "text/html; charset=UTF-8")
public String v25(@ModelAttribute("form") Form21 formulaire, Model model) {
model.addAttribute("listes", listes);
return "vue-25";
}
نما [vue-25.xml] به شرح زیر است:
<!DOCTYPE HTML>
<html xmlns:th="http://www.thymeleaf.org">
    <head>
        <title>Spring 4 MVC</title>
        <meta http-equiv="Content-Type" content="text/html; charset=UTF-8" />
        <link rel="stylesheet" href="/css/form19.css" />
    </head>
    <body>

        <h3>Formulaire - Listes</h3>
        <form action="/someURL" th:action="@{/v26.html}" method="post"
            th:object="${form}">
            <table>
                <thead>
                    <tr>
                        <th class="col1">Texte</th>
                        <th class="col2">Saisie</th>
                        <th class="col3">Valeur</th>
                    </tr>
                </thead>
                <tbody>
                    <tr>
                        <td class="col1">Votre couleur préférée</td>
                        <td class="col2">
                            <select th:field="*{couleur2}">
                                <option value="0">rouge</option>
                                <option value="1">bleu</option>
                                <option value="2">vert</option>
                            </select>
                        </td>
                        <td class="col3">
                            <span th:text="*{couleur2}"></span>
                        </td>
                    </tr>
                    <tr>
                        <td class="col1">Pierres préférées (choix multiple)</td>
                        <td class="col2">
                            <select th:field="*{bijoux2}" multiple="multiple" size="3">
                                <option th:each="label, status : ${listes.libellesBijoux}"
                                    th:text="${label}" th:value="${status.index}">
                                </option>
                            </select>
                        </td>
                        <td class="col3">
                            <span th:text="*{strBijoux2}"></span>
                        </td>
                    </tr>

                </tbody>
            </table>
            <input type="submit" value="Valider" />
        </form>
    </body>
</html>
- خطوط ۳۸–۴۲: ایجاد یک لیست چندگزینهای که برچسبهای آن از کامپوننت [Listes] که قبلاً استفاده کردهایم، گرفته شده است؛
صفحه نمایشدادهشده به شرح زیر است:
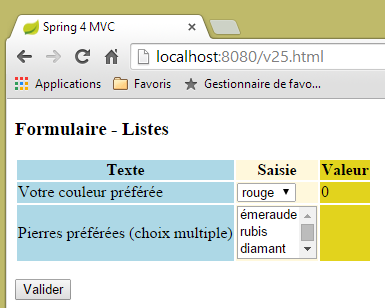 |
تولید شده توسط کد زیر HTML:
<!DOCTYPE HTML>

<html>
    <head>
        <title>Spring 4 MVC</title>
        <meta http-equiv="Content-Type" content="text/html; charset=UTF-8" />
        <link rel="stylesheet" href="/css/form19.css" />
    </head>
    <body>

        <h3>Formulaire - Listes</h3>
        <form action="/v26.html" method="post">
            <table>
                <thead>
                    <tr>
                        <th class="col1">Texte</th>
                        <th class="col2">Saisie</th>
                        <th class="col3">Valeur</th>
                    </tr>
                </thead>
                <tbody>
                    <tr>
                        <td class="col1">Votre couleur préférée</td>
                        <td class="col2">
                            <select id="couleur2" name="couleur2">
                                <option value="0" selected="selected">rouge</option>
                                <option value="1">bleu</option>
                                <option value="2">vert</option>
                            </select>
                        </td>
                        <td class="col3">
                            <span>0</span>
                        </td>
                    </tr>
                    <tr>
                        <td class="col1">Pierres préférées (choix multiple)</td>
                        <td class="col2">
                            <select multiple="multiple" size="3" id="bijoux2" name="bijoux2">
                                <option value="0">émeraude</option>
                                <option value="1">rubis</option>
                                <option value="2">diamant</option>
                                <option value="3">opaline</option>
                            </select>
                            <input type="hidden" name="_bijoux2" value="1" />
                        </td>
                        <td class="col3">
                            <span></span>
                        </td>
                    </tr>
                </tbody>
            </table>
            <p>
                <input type="submit" value="Valider" />
            </p>
        </form>
    </body>
</html>
- خط ۴۴: میتوانید ببینید که Thymeleaf یک فیلد پنهان ایجاد کرده است. من هدف آن را نمیفهمم:
- مقادیر ارسالشده (ویژگیهای value از تگهای option) در فیلدهای زیر (ویژگیهای name) از [Form21] قرار داده خواهند شد:
    private int couleur2;
    private int[] bijoux2;
- خط ۳۸: لیست [bijoux2] یک لیست چندگزینهای است. بنابراین، ممکن است چندین مقدار مرتبط با نام [bijoux2] ارسال شود. برای بازیابی آنها، فیلد [bijoux2] باید یک آرایه باشد. توجه داشته باشید که این یک آرایه از اعداد صحیح است. این امر ممکن است زیرا مقادیر ارسالشده میتوانند به این نوع تبدیل شوند؛
مقادیر به اکشن زیر ارسال میشوند، [/v26]:
  @RequestMapping(value = "/v26", method = RequestMethod.POST, produces = "text/html; charset=UTF-8")
  public String v26(@ModelAttribute("form") Form21 formulaire, RedirectAttributes redirectAttributes) throws JsonProcessingException {
    redirectAttributes.addFlashAttribute("form", formulaire);
    formulaire.setStrBijoux2(mapper.writeValueAsString(formulaire.getBijoux2()));
    return "redirect:/v25.html";
}
در اینجا چیزی نیست که قبلاً ندیده باشیم. در اینجا یک مثال از خروجی آورده شده است:
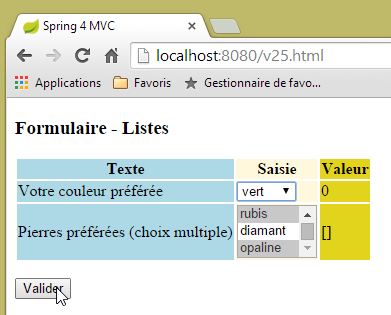 | 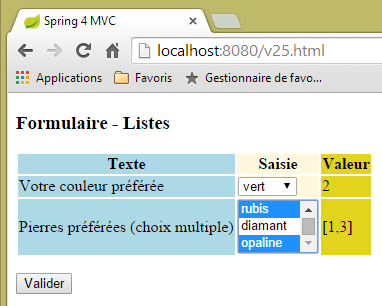 |
5.18. [/v27]: پیکربندی پیام
بیایید اقدام زیر را در نظر بگیریم، [/v27]:
// ------------------ پیامهای سفارشی
@RequestMapping(value = "/v27", method = RequestMethod.GET, produces = "text/html; charset=UTF-8")
public String v27(Model model) {
model.addAttribute("param1","paramètre un");
model.addAttribute("param2","paramètre deux");
model.addAttribute("param3","paramètre trois");
model.addAttribute("param4","messages.param4");
return "vue-27";
}
این اقدام به سادگی چهار مقدار را در قالب تنظیم میکند و نمای زیر را نمایش میدهد، [vue-27.xml]:
<!DOCTYPE html>
<html xmlns:th="http://www.thymeleaf.org">
    <head>
        <title th:text="#{messages.titre}">Spring 4 MVC</title>
        <meta http-equiv="Content-Type" content="text/html; charset=UTF-8" />
    </head>
    <body>
        <h2 th:text="#{messages.titre}">Spring 4 MVC</h2>
        <p th:text="#{messages.msg1(${param1})}"></p>
        <p th:text="#{messages.msg2(${param2},${param3})}"></p>
        <p th:text="#{messages.msg3(#{${param4}})}"></p>
    </body>
</html>
- خط ۸: پیامی بدون پارامتر؛
- خط ۹: پیامی با یک پارامتر [$param1] که از قالب گرفته شده است؛
- خط ۱۰: پیامی با دو پارامتر، [$param2, $param3]، که از قالب گرفته شده است؛
- خط ۱۱: پیامی با یک پارامتر. این پارامتر خود یک کلید پیام است (که با وجود # مشخص میشود). این کلید توسط [$param4] ارائه میشود؛
فایل پیام فرانسوی به شرح زیر است:
[messages_fr.properties]
messages.titre=Messages paramétrés
messages.msg1=Un message avec un paramètre : {0}
messages.msg2=Un message avec deux paramètres : {0}, {1}
messages.msg3=Un message avec une clé de message comme paramètre : {0}
messages.param4=paramètre quatre
برای نشان دادن وجود پارامترها در پیام، از نمادهای {0}، {1}، … استفاده میشود
ادغام قالب تولید شده توسط اقدام [/v27] با نما [vue-27]، کد زیر HTML را تولید میکند:
<!DOCTYPE html>

<html>
    <head>
        <title>Messages paramétrés</title>
        <meta http-equiv="Content-Type" content="text/html; charset=UTF-8" />
    </head>
    <body>
        <h2>Messages paramétrés</h2>
        <p>Un message avec un paramètre : paramètre un</p>
        <p>Un message avec deux paramètre : paramètre deux, paramètre trois</p>
        <p>Un message avec une clé de message comme paramètre : paramètre quatre</p>
    </body>
</html>
که نمای زیر را تولید میکند:
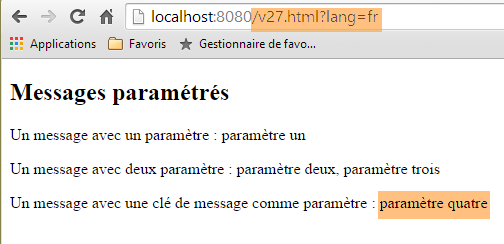 |
فایل پیام انگلیسی به شرح زیر است:
[messages_fr.properties]
messages.titre=Parameterized messages
messages.msg1=Message with one parameter: {0}
messages.msg2=Message with two parameters: {0}, {1}
messages.msg3=Message with a message key as a parameter: {0}
messages.param4=parameter four
ادغام قالب ایجادشده توسط اقدام [/v27] با نما [vue-27] کد زیر را تولید میکند: HTML:
<!DOCTYPE html>

<html>
    <head>
        <title>Parameterized messages</title>
        <meta http-equiv="Content-Type" content="text/html; charset=UTF-8" />
    </head>
    <body>
        <h2>Parameterized messages</h2>
        <p>Message with one parameter: paramètre un</p>
        <p>Message with two parameters: paramètre deux, paramètre trois</p>
        <p>Message with a message key as a parameter: parameter four</p>
    </body>
</html>
که نمای زیر را تولید میکند:
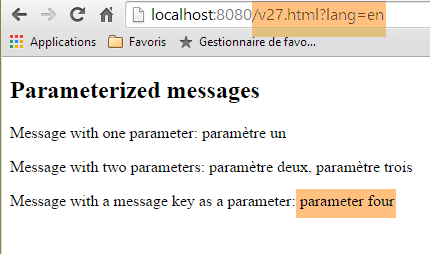 |
میتوانیم ببینیم که پیام آخر بهطور کامل بینالمللیسازی شده است، در حالی که این امر برای دو پیام قبلی صادق نیست.
5.19. استفاده از یک صفحهٔ اصلی
در یک برنامه وب، معمول است که ویوها تعدادی عنصر را به اشتراک بگذارند که میتوان آنها را در یک صفحه اصلی (master page) قرار داد. در اینجا یک مثال آمده است:
 |
در بالا، ما دو صفحه مشابه داریم که در آن قطعه [1] با قطعه [2] جایگزین شده است. این نما مربوط به یک صفحهٔ اصلی با سه قطعهٔ ثابت، [3-5]، و یک قطعهٔ متغیر، [6]، است.
5.19.1. پروژه
ما در حال ساخت پروژه [springmvc-masterpage] با پیروی از رویه ذکر شده در بند 5.1 هستیم.
 |
فایل [pom.xml] به شرح زیر است:
<?xml version="1.0" encoding="UTF-8"?>
<project xmlns="http://maven.apache.org/POM/4.0.0" xmlns:xsi="http://www.w3.org/2001/XMLSchema-instance"
    xsi:schemaLocation="http://maven.apache.org/POM/4.0.0 http://maven.apache.org/xsd/maven-4.0.0.xsd">
    <modelVersion>4.0.0</modelVersion>

    <groupId>istia.st.springmvc</groupId>
    <artifactId>springmvc-masterpage</artifactId>
    <version>0.0.1-SNAPSHOT</version>
    <packaging>jar</packaging>

    <name>springmvc-masterpage</name>
    <description>Page maître</description>

    <parent>
        <groupId>org.springframework.boot</groupId>
        <artifactId>spring-boot-starter-parent</artifactId>
        <version>1.1.9.RELEASE</version>
        <relativePath/> <!-- جستجوی والد از مخزن -->
    </parent>

    <dependencies>
        <dependency>
            <groupId>org.springframework.boot</groupId>
            <artifactId>spring-boot-starter-thymeleaf</artifactId>
        </dependency>
        <dependency>
            <groupId>org.springframework.boot</groupId>
            <artifactId>spring-boot-starter-test</artifactId>
            <scope>test</scope>
        </dependency>
    </dependencies>

    <properties>
        <project.build.sourceEncoding>UTF-8</project.build.sourceEncoding>
        <start-class>istia.st.springmvc.main.Main</start-class>
        <java.version>1.7</java.version>
    </properties>

    <build>
        <plugins>
            <plugin>
                <groupId>org.springframework.boot</groupId>
                <artifactId>spring-boot-maven-plugin</artifactId>
            </plugin>
        </plugins>
    </build>

</project>
یکی از وابستگیهای معرفیشده توسط این فایل برای صفحهٔ اصلی لازم است:
 |
پکیجهای [config] و [main] با پکیجهای همنام در پروژه قبلی یکسان هستند.
5.19.2. صفحهٔ اصلی
 |
صفحهٔ اصلی نمای زیر است: [layout.xml]:
<!DOCTYPE html>
<html xmlns:th="http://www.thymeleaf.org" xmlns:layout="http://www.ultraq.net.nz/thymeleaf/layout">
    <head>
        <title>Layout</title>
        <meta http-equiv="Content-Type" content="text/html; charset=UTF-8" />
    </head>
    <body>
        <table style="width: 400px">
            <tr>
                <td colspan="2" bgcolor="#ccccff">
                    <div th:include="entete" />
                </td>
            </tr>
            <tr style="height: 200px">
                <td bgcolor="#ffcccc">
                    <div th:include="menu" />
                </td>
                <td>
                    <section layout:fragment="contenu">
                        <h2>Contenu</h2>
                    </section>
                </td>
            </tr>
            <tr bgcolor="#ffcc66">
                <td colspan="2">
                    <div th:include="basdepage" />
                </td>
            </tr>
        </table>
    </body>
</html>
- خط ۲: صفحهٔ اصلی باید فضای نام [xmlns:layout="http://www.ultraq.net.nz/thymeleaf/layout"] را تعریف کند، که یک عنصر از آن در خط ۱۹ استفاده میشود؛
- خطوط ۱۰–۱۲: فیلد [1] زیر را ایجاد کنید. تگ Thymeleaf [th:include] اجازه میدهد یک قطعه تعریفشده در فایل دیگر در نمای فعلی گنجانده شود. این امر امکان استفاده مجدد از قطعات مورد استفاده در چندین نما را فراهم میکند؛
- خطوط ۱۵–۱۷: بخش [2] زیر را تولید کنید؛
- خطوط ۱۹–۲۰: ناحیه [3] زیر را تولید کنید. ویژگی [layout:fragment] یک ویژگی از فضای نام [xmlns:layout="http://www.ultraq.net.nz/thymeleaf/layout"] است. این ویژگی یک فیلد را مشخص میکند که در زمان اجرا میتواند با فیلد دیگری جایگزین شود؛
- خطوط ۲۴–۲۸: فیلد [4] زیر را تولید کنید؛
 |
5.19.3. قطعات
قطعات [entete.xml]، [menu.xml] و [basdepage.xml] به شرح زیر هستند:
[entete.xml]
<!DOCTYPE html>
<html>
    <h2>entête</h2>
</html>
[menu.xml]
<!DOCTYPE html>
<html>
    <h2>menu</h2>
</html>
[basdepage.xml]
<!DOCTYPE html>
<html>
    <h2>bas de page</h2>
</html>
قطعه [page1.xml] به شرح زیر است:
<!DOCTYPE html>
<html xmlns:th="http://www.thymeleaf.org" xmlns:layout="http://www.ultraq.net.nz/thymeleaf/layout" layout:decorator="layout">
    <section layout:fragment="contenu">
        <h2>Page 1</h2>
        <form action="/someURL" th:action="@{/page2.html}" method="post">
            <input type="submit" value="Page 2" />
        </form>
    </section>
</html>
- خط ۲: ویژگی [layout:decorator="layout"] نشان میدهد که صفحهٔ جاری [page1.xml] «تزئینشده» است، یعنی به یک صفحهٔ اصلی تعلق دارد. این مقدار ویژگی است، در این مورد نما [layout.xml]؛
- خط ۳: این مشخص میکند که کدام قطعه از صفحهٔ اصلی [page1.xml] در آن درج خواهد شد. ویژگی [layout:fragment="contenu"] نشان میدهد که [page1.xml] در قطعه با نام [contenu]، یعنی ناحیه [3] از صفحه اصلی، درج خواهد شد؛
- خطوط ۵–۷: محتوای این قطعه یک فرم است که شامل یک دکمه از POST به اقدام [/page2.html] میباشد؛
قطعه [page2.xml] مشابه است:
<!DOCTYPE html>
<html xmlns:th="http://www.thymeleaf.org" xmlns:layout="http://www.ultraq.net.nz/thymeleaf/layout"
    layout:decorator="layout">
    <section layout:fragment="contenu">
        <h2>Page 2</h2>
        <form action="/someURL" th:action="@{/page1.html}" method="post">
            <input type="submit" value="Page 1" />
        </form>
    </section>
</html>
5.19.4. اقدامات
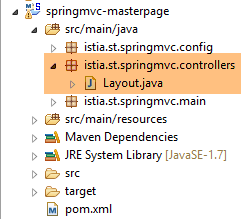 |
کنترلکننده [Layout.java] به شرح زیر است:
package istia.st.springmvc.controllers;

import org.springframework.stereotype.Controller;
import org.springframework.web.bind.annotation.RequestMapping;
import org.springframework.web.bind.annotation.RequestMethod;

@Controller
public class Layout {
    @RequestMapping(value = "/page1")
    public String page1() {
        return "page1";
    }

    @RequestMapping(value = "/page2", method=RequestMethod.POST)
    public String page2() {
        return "page2";
    }
}
- خطوط ۱۰–۱۲: اکشن [/page1] به سادگی نما [page1.xml] را نمایش میدهد؛
- خطوط ۱۵–۱۷: همین امر در مورد اکشن [/page2] نیز صادق است که نمای [page2.xml] را نمایش میدهد؛