5. طرق عرض Thymeleaf
لنعد إلى بنية تطبيق Spring MVC.
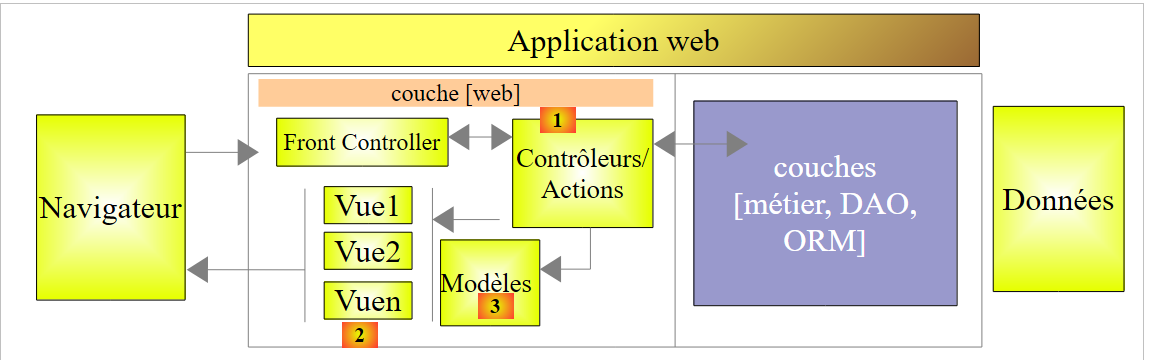 |
وصف الفصلان السابقان جوانب مختلفة من الكتلة [1]، وهي الإجراءات. وسنتناول الآن:
- كتلة [2] الخاصة بعروض V؛
- كتلة [3] الخاصة بالنموذج M الذي تعرضه هذه العروض؛
منذ إنشاء Spring MVC، كانت تقنية إنشاء الصفحات HTML المرسلة إلى متصفحات العملاء هي تقنية صفحات JSP (Java Server Pages). ومنذ بضع سنوات، أصبح من الممكن أيضًا استخدام تقنية [Thymeleaf] [http://www.thymeleaf.org/]. وهذه هي التقنية التي نقدمها الآن.
5.1. مشروع STS
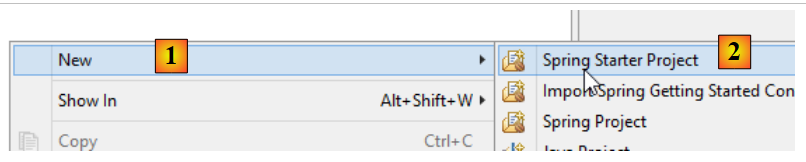
نقوم بإنشاء مشروع جديد:
 |
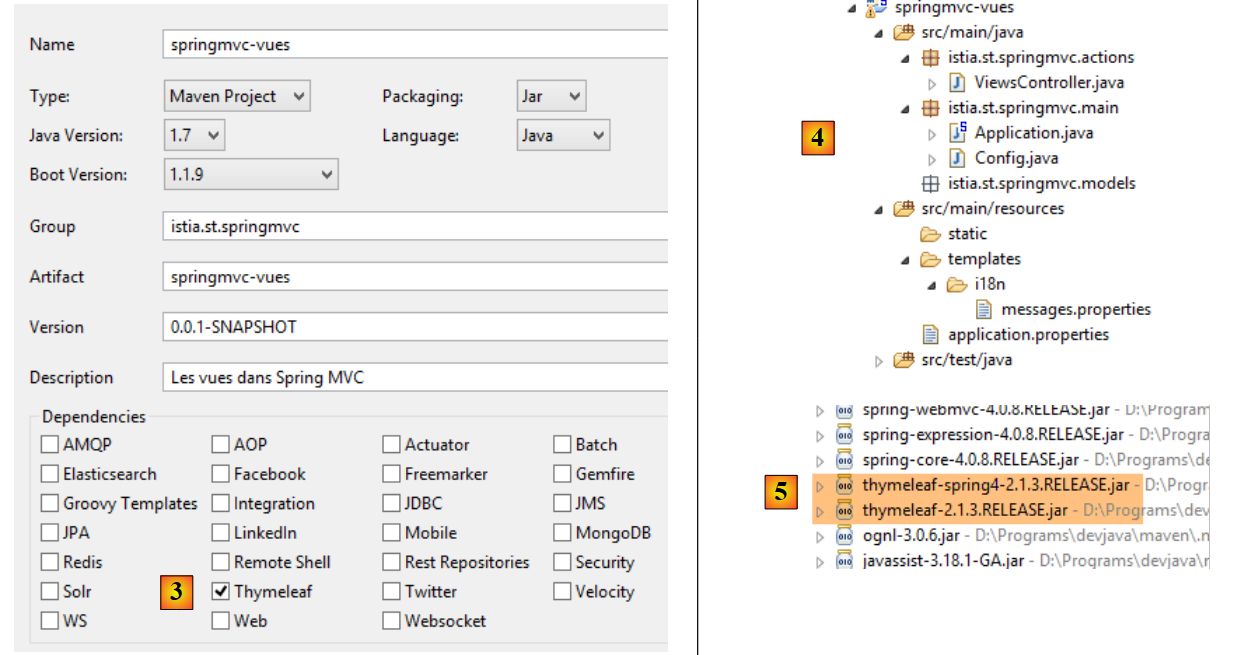 |
- في [3]، نحدد أن المشروع يحتاج إلى التبعيات [Thymeleaf]. سيؤدي ذلك إلى إضافة التبعيات [Spring MVC] من المشروع السابق، بالإضافة إلى تبعيات إطار العمل [Thymeleaf] و[5]؛
الآن، دعونا نطور هذا المشروع بالطريقة التالية:
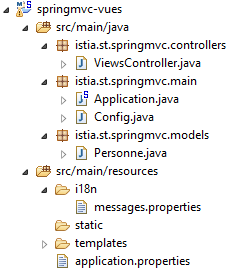 |
نستلهم من المشروع السابق:
- سيحتوي [istia.st.springmvc.controllers] على وحدات التحكم؛
- [istia.st.springmvc.models] سيحتوي على نماذج الإجراءات والعروض؛
- [istia.st.springmvc.main] هو حزمة فئة Spring Boot القابلة للتنفيذ؛
- [templates] سيحتوي على طرق العرض Thymeleaf؛
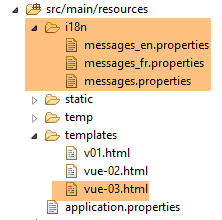
- [i18n] سيحتوي على الرسائل المُترجمة التي تعرضها طرق العرض؛
الفئة [Application] هي كما يلي:
package istia.st.springmvc.main;

import org.springframework.boot.SpringApplication;

public class Application {

    public static void main(String[] args) {
        SpringApplication.run(Config.class, args);
    }
}
الفئة [Config] هي كما يلي:
package istia.st.springmvc.main;

import java.util.Locale;

import org.springframework.boot.autoconfigure.EnableAutoConfiguration;
import org.springframework.context.MessageSource;
import org.springframework.context.annotation.Bean;
import org.springframework.context.annotation.ComponentScan;
import org.springframework.context.annotation.Configuration;
import org.springframework.context.support.ResourceBundleMessageSource;
import org.springframework.web.servlet.config.annotation.InterceptorRegistry;
import org.springframework.web.servlet.config.annotation.WebMvcConfigurerAdapter;
import org.springframework.web.servlet.i18n.CookieLocaleResolver;
import org.springframework.web.servlet.i18n.LocaleChangeInterceptor;

@Configuration
@ComponentScan({ "istia.st.springmvc.controllers", "istia.st.springmvc.models" })
@EnableAutoConfiguration
public class Config extends WebMvcConfigurerAdapter {
    @Bean
    public MessageSource messageSource() {
        ResourceBundleMessageSource messageSource = new ResourceBundleMessageSource();
        messageSource.setBasename("i18n/messages");
        return messageSource;
    }

    @Bean
    public LocaleChangeInterceptor localeChangeInterceptor() {
        LocaleChangeInterceptor localeChangeInterceptor = new LocaleChangeInterceptor();
        localeChangeInterceptor.setParamName("lang");
        return localeChangeInterceptor;
    }

    @Override
    public void addInterceptors(InterceptorRegistry registry) {
        registry.addInterceptor(localeChangeInterceptor());
    }

    @Bean
    public CookieLocaleResolver localeResolver() {
        CookieLocaleResolver localeResolver = new CookieLocaleResolver();
        localeResolver.setCookieName("lang");
        localeResolver.setDefaultLocale(new Locale("fr"));
        return localeResolver;
    }
}
تسمح هذه التهيئة في الوقت الحالي بإدارة الإعدادات المحلية.
وحدة التحكم [ViewController] هي كما يلي:
package istia.st.springmvc.actions;

import org.springframework.stereotype.Controller;

@Controller
public class ViewsController {

}
- في السطر 5، حلت التعليقات التوضيحية [@Controller] محل التعليقات التوضيحية [@RestController] لأن الإجراءات لن تولد استجابة للعميل من الآن فصاعدًا. بل ستقوم بما يلي:
- إنشاء نموذج M
- إرجاع نوع [String] الذي سيكون اسم العرض [Thymeleaf] المكلف بعرض هذا النموذج. وسيؤدي الجمع بين هذا العرض V وهذا النموذج M إلى إنشاء التدفق HTML الذي يتم إرساله إلى العميل؛
ملف [messages.properties] فارغ في الوقت الحالي.
5.2. [/v01]: أساسيات Thymeleaf
ننظر إلى الإجراء الأول التالي في [ViewsController]:
    // أساسيات Thymeleaf - 1
    @RequestMapping(value = "/v01", method = RequestMethod.GET)
    public String v01() {
        return "v01";
}
- السطر 3: تُرجع الإجراء نوعًا [String]. سيكون هذا هو اسم الإجراء؛
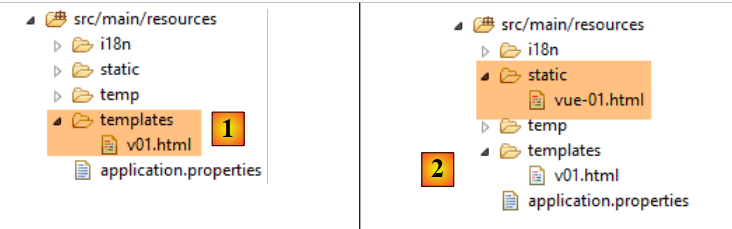
- السطر 4: ستكون هذه العرض [v01]. بشكل افتراضي، يجب أن تكون موجودة في المجلد [templates] وأن يُسمى [v01.html]؛
الطريقة [v01.html] هي كما يلي:
 |
<!DOCTYPE html>
<html xmlns:th="http://www.thymeleaf.org">
<head>
<title th:text="'Les vues'">Spring 4 MVC</title>
<meta http-equiv="Content-Type" content="text/html; charset=UTF-8" />
</head>
<body>
    <h2 th:text="'Les vues dans Spring MVC'">Spring 4 MVC</h2>
</body>
</html>
وهو ملف HTML. ويمكن ملاحظة وجود Thymeleaf:
- في مساحة الاسم [th] في السطر 2؛
- في سمات [th:text] في السطرين 4 و8؛
لدينا هنا ملف HTML صالح يمكن عرضه. نضعه في المجلد [static] [2] تحت اسم [vue-01.html] ونطلبه مباشرةً باستخدام متصفح:
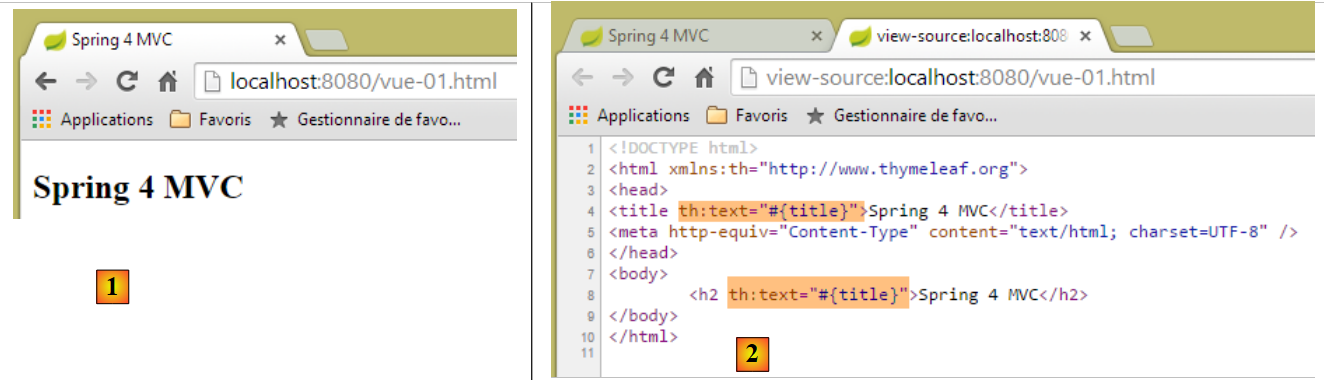 |
إذا قمنا بفحص الكود المصدري للصفحة في [2]، يمكننا ملاحظة أن السمات [th:text] قد أُرسلت من الخادم وتم تجاهلها من قبل المتصفح. عندما تكون الصفحة نتيجة لعملية ما، يتدخل Thymeleaf ويقوم بتفسير السمات [th] قبل إرسال الرد إلى العميل.
العلامة HTML:
<title th:text="'Les vues'">Spring 4 MVC</title>
يتم معالجتها بالطريقة التالية بواسطة Thymeleaf:
- th:text له الصيغة th:text="expression" حيث expression عبارة يجب تقييمها. عندما تكون هذه العبارة سلسلة أحرف كما في هذه الحالة، يجب وضعها بين علامتي اقتباس أحادية؛
- تحل قيمة [expression] محل نص العلامة HTML، وهو في هذه الحالة نص العلامة [title]؛
بعد المعالجة، أصبحت العلامة المذكورة أعلاه كما يلي:
<title>Les vues</title>
لنطلب الإجراء [/v01]:
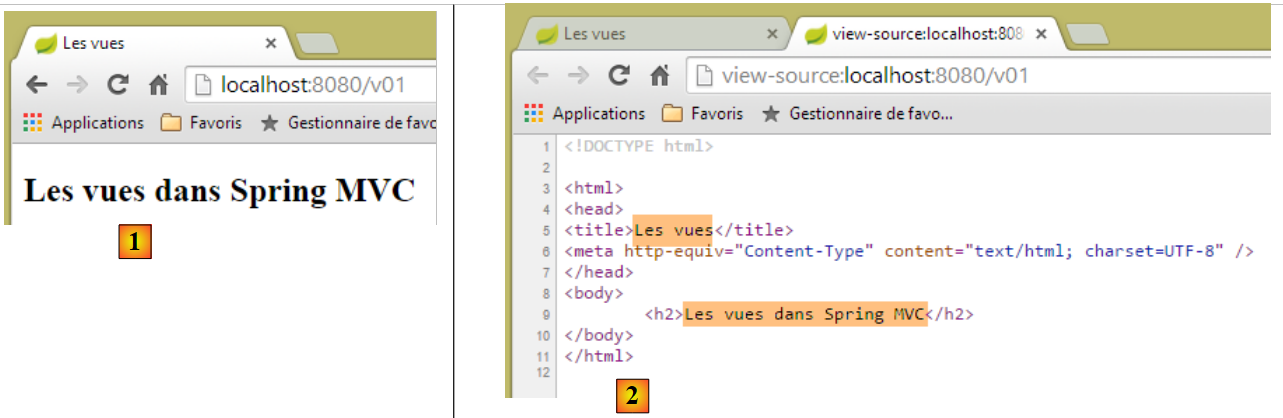 |
- في [2]، نرى عملية الاستبدال التي قام بها Thymeleaf؛
الآن لنطلب URL [http://localhost:8080/v01.html]:
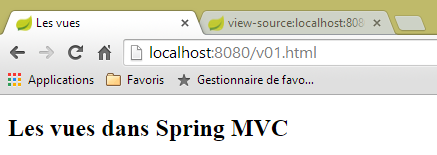 |
كيف يجب تفسير ذلك؟ هل تم تقديم العرض [templates/v01.html] مباشرةً دون المرور عبر إجراء؟ لتوضيح الأمور، نقوم بإنشاء الإجراء [/v02] التالي:
    // أساسيات Thymeleaf - 2
    @RequestMapping(value = "/v02", method = RequestMethod.GET)
    public String v02() {
        System.out.println("action v02");
        return "vue-02";
}
الطريقة [vue-02.html] هي نسخة من [v01.html]:
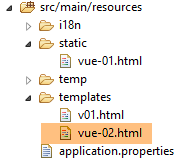 |
الآن نطلب عرض URL و [http://localhost:8080/vue-02.html]:
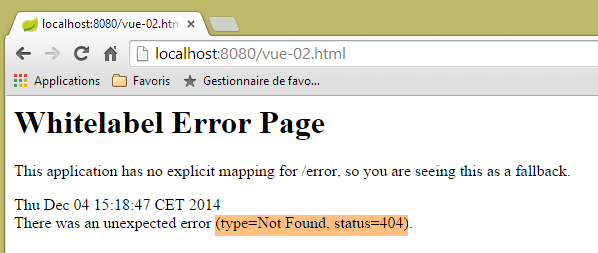 |
لم يتم العثور على URL. والآن نطلب URL و [http://localhost:8080/v02.html]
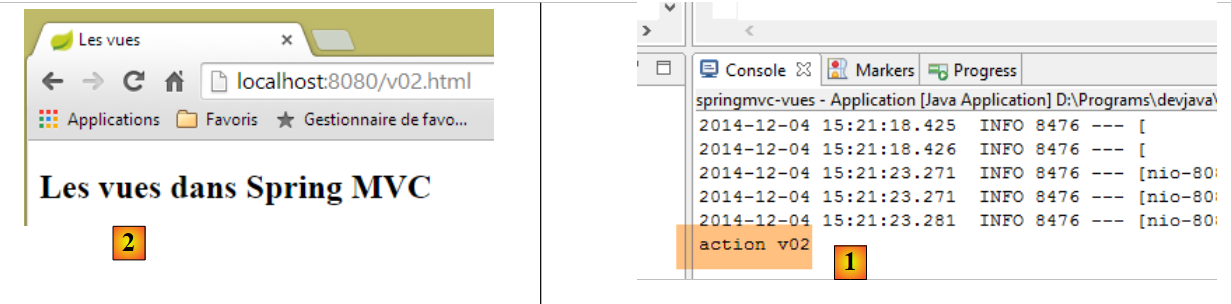 |
- في سجلات وحدة التحكم في [1]، نرى أن الإجراء [/v02] قد تم استدعاؤه، وقد أدى ذلك إلى عرض القسم [vue-02.html] في [2]؛
نحن نعلم الآن أن URL [http://localhost:8080/v02.html] يمكن أن يشير أيضًا إلى ملف [/v02.html] الموجود في المجلد [static]. ماذا يحدث إذا كان هذا الملف موجودًا؟ دعونا نجرب ذلك. نقوم بإنشاء الملف [v02.html] التالي في المجلد [static]:
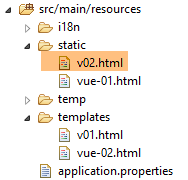 |
<!DOCTYPE html>
<html xmlns:th="http://www.thymeleaf.org">
<head>
<title>Spring 4 MVC</title>
<meta http-equiv="Content-Type" content="text/html; charset=UTF-8" />
</head>
<body>
    <h2>Spring 4 MVC</h2>
</body>
</html>
ثم نطلب ملف URL و [http://localhost:8080/v02.html]:
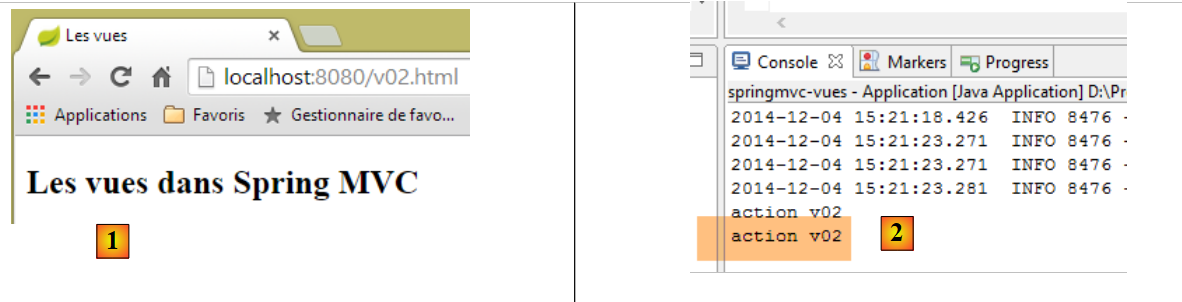 |
تُظهر [1] و [2] أن الإجراء [/v02] هو الذي تم استدعاؤه. وبالتالي، يجب ملاحظة أنه عندما تكون الإجراء URL المطلوب على شكل [/x.html]، فإن Spring / Thymeleaf:
- يُنفذ الإجراء [/x] إذا كان موجودًا؛
- يقدم الصفحة [/static/x.html] إذا كانت موجودة؛
- تطلق استثناءً 404 Not found في حالة عدم وجودها؛
لتجنب الالتباس، لن تحمل الإجراءات والعروض نفس الأسماء من الآن فصاعدًا.
5.3. [/v03]: تدويل العروض
يتيح تكامل Spring / Thymeleaf لـ Thymeleaf استخدام ملفات رسائل Spring. لننظر إلى الإجراء الجديد [/v03] التالي:
    // تدويل العروض
    @RequestMapping(value = "/v03", method = RequestMethod.GET)
    public String v03() {
        return "vue-03";
}
وهي تعرض العرض التالي [vue-03.html]:
 |
<!DOCTYPE html>
<html xmlns:th="http://www.thymeleaf.org">
<head>
<title th:text="#{title}">Spring 4 MVC</title>
<meta http-equiv="Content-Type" content="text/html; charset=UTF-8" />
</head>
<body>
    <h2 th:text="#{title}">Spring 4 MVC</h2>
</body>
</html>
في السطرين 4 و8، تعبير السمة [th:text] هو #{title}، وقيمته هي رسالة المفتاح [title]. نقوم بإنشاء الملفين التاليين: [messages_fr.properties] و [messages_en.properties]:
[messages_fr.properties]
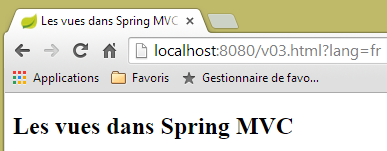
title=Les vues dans Spring MVC
[messages_en.properties]
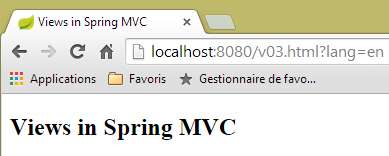
title=Views in Spring MVC
لنطلب URL و [http://localhost:8080/v03.html?lang=fr] و [http://localhost:8080/v03.html?lang=en]:
 |  |
لاحظ أننا استخدمنا ما تعلمناه مؤخرًا. فبدلاً من تسمية الإجراء [v03] بـ [/v03]، قمنا بتسميته بـ [/v03.html].
5.4. [/v04]: إنشاء النموذج M لعرض V
لننظر إلى الإجراء الجديد [/v04] التالي:
    // إنشاء القالب M لصفحة العرض V
    @RequestMapping(value = "/v04", method = RequestMethod.GET)
    public String v04(Model model) {
        model.addAttribute("personne", new Personne(7, "martin", 17));
        System.out.println(String.format("Modèle=%s", model));
        return "vue-04";
}
- السطر 4: يتم إدراج قالب العرض في معلمات الإجراء. بشكل افتراضي، يكون هذا القالب الأولي فارغًا. سنرى أنه من الممكن ملؤه مسبقًا؛
- السطر 4: القالب من النوع [Model] هو نوع من القاموس الذي يحتوي على عناصر من النوع <String, Object>. السطر 4، نضيف إدخالًا في هذا القاموس بالمفتاح [personne] المرتبط بقيمة من النوع [Personne]؛
- السطر 5: نعرض النموذج على وحدة التحكم لنرى كيف يبدو؛
- السطر 6: نعرض طريقة العرض [vue-04.html]؛
الفئة [Personne] هي نفسها المستخدمة في الفصل السابق:
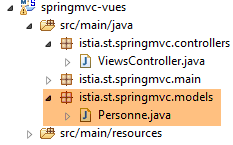 |
package istia.st.springmvc.models;

public class Personne {

    // المعرف
    private Integer id;
    // الاسم
    private String nom;
    // العمر
    private int age;

    // المنشئات
    public Personne() {

    }

    public Personne(String nom, int age) {
        this.nom = nom;
        this.age = age;
    }

    public Personne(Integer id, String nom, int age) {
        this(nom, age);
        this.id = id;
    }

    @Override
    public String toString() {
        return String.format("[id=%s, nom=%s,  age=%d]", id, nom, age);
    }

    // أدوات الاسترجاع والتعيين
...
}
الطريقة [vue-04.html] هي كما يلي:
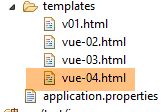 |
<!DOCTYPE html>
<html xmlns:th="http://www.thymeleaf.org">
    <head>
        <title th:text="#{title}">Spring 4 MVC</title>
        <meta http-equiv="Content-Type" content="text/html; charset=UTF-8" />
    </head>
    <body>
        <p>
            <span th:text="#{personne.nom}">Nom :</span>
            <span th:text="${personne.nom}">Bill</span>
        </p>
        <p>
            <span th:text="#{personne.age}">Age :</span>
            <span th:text="${personne.age}">56</span>
        </p>
    </body>
</html>
- في السطر 10، يتم إدخال نوع جديد من تعبيرات Thymeleaf ${var} حيث var هو مفتاح من نموذج M الخاص بالعرض. نتذكر أن الإجراء [/v04] قد أضاف إلى النموذج مفتاحًا [personne] مرتبطًا بنوع Personne[id, nom, age]؛
- السطر 10: يعرض اسم الشخص الموجود في النموذج؛
- السطر 14: يعرض عمره؛
تم تعديل ملفات الرسائل لإضافة المفاتيح [personne.nom] و [personne.age] من السطرين 9 و 13. والنتيجة هي كما يلي:
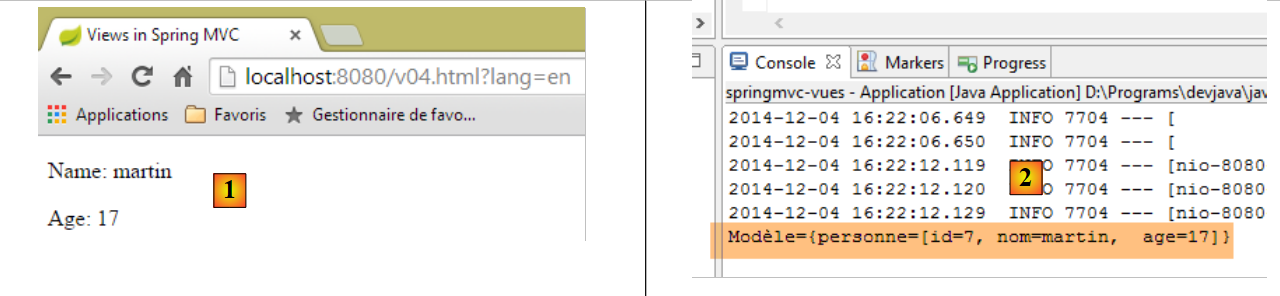 |
ونجد طبيعة النموذج M في سجلات وحدة التحكم [2].
قد يتساءل المرء عن سبب عدم كتابة العرض [vue-04] بالطريقة التالية:
<!DOCTYPE html>
<html xmlns:th="http://www.thymeleaf.org">
    <head>
        <title th:text="#{title}"></title>
        <meta http-equiv="Content-Type" content="text/html; charset=UTF-8" />
    </head>
    <body>
        <p>
            <span th:text="#{personne.nom}" /></span>
            <span th:text="${personne.nom}"></span>
        </p>
        <p>
            <span th:text="#{personne.age}"></span>
            <span th:text="${personne.age}"></span>
        </p>
    </body>
</html>
هذه الطريقة صحيحة تمامًا وستعطي نفس النتيجة السابقة. أحد أهداف Thymeleaf هو أن يتم عرض صفحة Thymeleaf حتى لو لم تمر عبر Thymeleaf. لذا، لنقم بإنشاء صفحتين ثابتتين جديدتين:
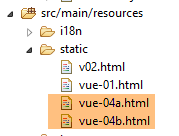 |
الطريقة [vue-04b.html] هي نسخة من الطريقة [vue-04.html]. وينطبق الأمر نفسه على الطريقة [vue-04a.html]، لكننا أزلنا النصوص الثابتة من الصفحة. إذا قمنا بعرض الصفحتين، فسنحصل على النتائج التالية:
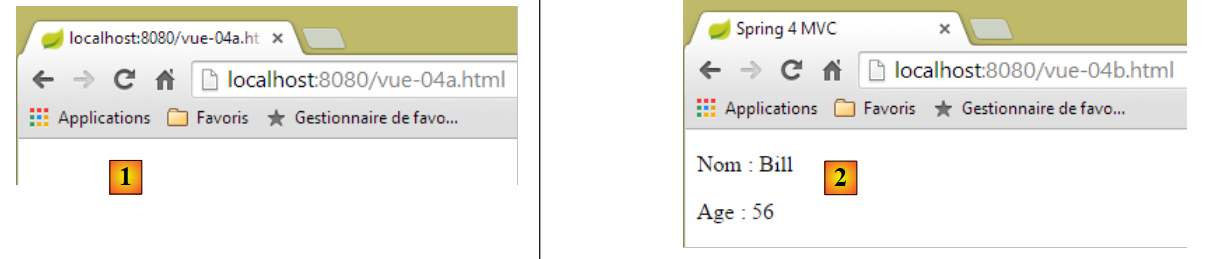 |
في حالة [1]، لا تظهر بنية الصفحة، بينما في حالة [2] تظهر بوضوح. وهنا تكمن فائدة وضع النصوص الثابتة في عرض Thymeleaf حتى لو تم استبدالها بنصوص أخرى عند التنفيذ.
الآن، لنلقِ نظرة على تفصيل تقني. في عرض [vue-04.html]، نقوم بتنسيق الكود باستخدام [ctrl-Maj-F]. ونحصل على النتيجة التالية:
<!DOCTYPE html>
<html xmlns:th="http://www.thymeleaf.org">
<head>
<title th:text="#{title}">Spring 4 MVC</title>
<meta http-equiv="Content-Type" content="text/html; charset=UTF-8" />
</head>
<body>
    <p>
        <span th:text="#{personne.nom}">Nom :</span> <span
            th:text="${personne.nom}">Bill</span>
    </p>
    <p>
        <span th:text="#{personne.age}">Age :</span> <span
            th:text="${personne.age}">56</span>
    </p>
</body>
</html>
العلامات غير محاذاة بشكل صحيح، مما يجعل قراءة الكود أكثر صعوبة. إذا قمنا بتغيير اسم [vue-04.html] إلى [vue-04.xml] وأعدنا تنسيق الكود، فستصبح العلامات محاذاة مرة أخرى. لذا فإن اللاحقة [xml] ستكون أكثر ملاءمة. من الممكن العمل باستخدام هذه اللاحقة. وللقيام بذلك، يجب تهيئة Thymeleaf. ولتجنب إبطال ما قمنا به، نقوم بنسخ المشروع [springmvc-vues] الذي درسناه إلى مشروع [springmvc-vues-xml]
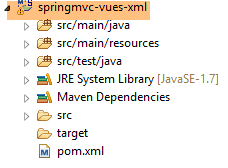 |
نقوم بتعديل الملف [pom.xml] على النحو التالي:
    <groupId>istia.st.springmvc</groupId>
    <artifactId>springmvc-vues-xml</artifactId>
    <version>0.0.1-SNAPSHOT</version>
    <packaging>jar</packaging>

    <name>springmvc-vues-xml</name>
<description>Les vues dans Spring MVC</description>
تم تغيير اسم المشروع في السطرين 2 و6. بالإضافة إلى ذلك، نقوم بتغيير اللاحقة الخاصة بالعروض الموجودة في المجلد [templates]:
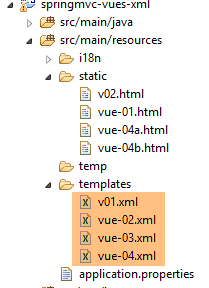 |
يسرد المستند [http://docs.spring.io/spring-boot/docs/current/reference/html/common-application-properties.html] خصائص تكوين Spring Boot التي يمكن استخدامها في الملف [application.properties]:
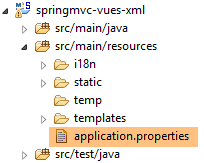 |
يقدم هذا المستند الخصائص التي يستخدمها Spring Boot عند إجراء التكوين التلقائي، والتي يمكن تعديلها عن طريق إجراء تكوين مختلف في ملف [application.properties]. بالنسبة لـ Thymeleaf، فإن خصائص التكوين التلقائي هي كما يلي:
# THYMELEAF (ThymeleafAutoConfiguration)
spring.thymeleaf.check-template-location=true
spring.thymeleaf.prefix=classpath:/templates/
spring.thymeleaf.suffix=.html
spring.thymeleaf.mode=HTML5
spring.thymeleaf.encoding=UTF-8
spring.thymeleaf.content-type=text/html # ;تمت إضافة charset=<encoding>
spring.thymeleaf.cache=true # تم تعيينه على false للتحديث الفوري
لذلك يمكن الاكتفاء بإدراج السطر
spring.thymeleaf.suffix=.xml
في ملف [application.properties]. لكننا سنتبع طريقة أخرى، وهي التهيئة برمجيًا. سنقوم بتهيئة Thymeleaf في الفئة [Config]:
package istia.st.springmvc.main;

import java.util.Locale;

...
import org.thymeleaf.spring4.SpringTemplateEngine;
import org.thymeleaf.spring4.templateresolver.SpringResourceTemplateResolver;

@Configuration
@ComponentScan({ "istia.st.springmvc.controllers", "istia.st.springmvc.models" })
@EnableAutoConfiguration
public class Config extends WebMvcConfigurerAdapter {
    ...

    @Bean
    public SpringResourceTemplateResolver templateResolver() {
        SpringResourceTemplateResolver templateResolver = new SpringResourceTemplateResolver();
        templateResolver.setPrefix("classpath:/templates/");
        templateResolver.setSuffix(".xml");
        templateResolver.setTemplateMode("HTML5");
        templateResolver.setCharacterEncoding("UTF-8");
     templateResolver.setCacheable(true);
        return templateResolver;
    }

    @Bean
    SpringTemplateEngine templateEngine(SpringResourceTemplateResolver templateResolver) {
        SpringTemplateEngine templateEngine = new SpringTemplateEngine();
        templateEngine.setTemplateResolver(templateResolver);
        return templateEngine;
    }

}
- تقوم الأسطر 16-24 بتكوين كائن [TemplateResolver] لـ Thymeleaf. هذا الكائن هو الذي يتم تحميله بناءً على اسم العرض الذي توفره إحدى الإجراءات، للعثور على الملف المطابق؛
- تحدد السطران 18 و19 البادئة واللاحقة اللتين يجب إضافتهما إلى اسم العرض للعثور على الملف. وبالتالي، إذا كان اسم العرض هو [vue04]، فسيكون الملف المطلوب هو [classpath:/templates/vue04.xml]. [classpath:/templates] هي صيغة Spring تشير إلى مجلد [/templates] الموجود في جذر مسار الفئات (Classpath) للمشروع؛
- السطر 21: لكي تحتوي الاستجابة المرسلة إلى العميل على الرأس HTTP:
Content-Type:text/html;charset=UTF-8
- السطر 20: يشير إلى أن العرض يتوافق مع المعيار HTML5؛
- السطر 22: يشير إلى أن طرق عرض Thymeleaf يمكن تخزينها مؤقتًا؛
- الأسطر 26-31: تحدد محرك تحليل العروض المكون من Spring وThymeleaf ليحل محل محرك التحليل السابق؛
دعونا نُشغّل الملف القابل للتنفيذ لهذا المشروع الجديد ونطلب URL [http://localhost:8080/v04.html?lang=en]:
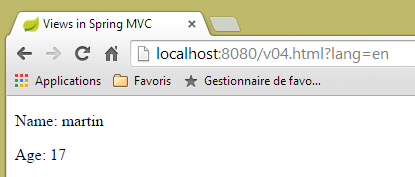 |
نلاحظ أنه في URL، تم استبدال الإجراء [/v04] مرة أخرى بـ [v04.html].
5.5. [/v05]: تحليل كائن في عرض Thymeleaf
نقوم بإنشاء الإجراء [/v05] التالي:
    // إنشاء النموذج M لعرض V - 2
    @RequestMapping(value = "/v05", method = RequestMethod.GET)
    public String v05(Model model) {
        model.addAttribute("personne", new Personne(7, "martin", 17));
        return "vue-05";
}
وهي مطابقة للإجراء [/v04]. وتبدو طريقة العرض [vue-05.xml] كما يلي:
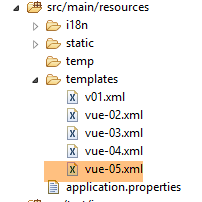 |
<!DOCTYPE html>
<html xmlns:th="http://www.thymeleaf.org">
    <head>
        <title th:text="#{title}">Spring 4 MVC</title>
        <meta http-equiv="Content-Type" content="text/html; charset=UTF-8" />
    </head>
    <body>
        <div th:object="${personne}">
            <p>
                <span th:text="#{personne.nom}">Nom :</span>
                <span th:text="*{nom}">Bill</span>
            </p>
            <p>
                <span th:text="#{personne.age}">Age :</span>
                <span th:text="*{age}">56</span>
            </p>
        </div>
    </body>
</html>
- الأسطر 8-17: داخل هذه الأسطر، يتم تعريف كائن Thymeleaf بواسطة السمة [th:object="${personne}"] (السطر 8). هذا الكائن هو هنا كائن المفتاح [personne] الموجود في النموذج:
- السطر 11: تعبير Thymeleaf [*{nom}] مكافئ لـ [${objet.nom}] حيث [objet] هو كائن Thymeleaf الحالي. لذا فإن التعبير [*{nom}] هنا يعادل [${personne.nom}]؛
- السطر 15: نفس الشيء؛
النتيجة:
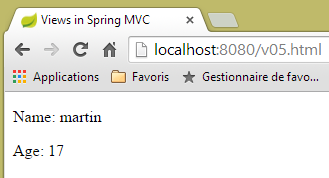 |
5.6. [/v06]: الاختبارات في عرض Thymeleaf
لننظر إلى الإجراء [/v06] التالي:
    // إنشاء النموذج M لعرض V - 3
    @RequestMapping(value = "/v06", method = RequestMethod.GET)
    public String v06(Model model) {
        model.addAttribute("personne", new Personne(7, "martin", 17));
        return "vue-06";
}
وهي مطابقة للإجراءين السابقين. وهي تعرض العرض التالي [vue-06.xml]:
<!DOCTYPE html>
<html xmlns:th="http://www.thymeleaf.org">
<head>
<title th:text="#{title}">Spring 4 MVC</title>
<meta http-equiv="Content-Type" content="text/html; charset=UTF-8" />
</head>
<body>
<div th:object="${personne}">
<p>
<span th:text="#{personne.nom}">Nom :</span>
<span th:text="*{nom}">Bill</span>
</p>
<p>
<span th:text="#{personne.age}">Age :</span>
<span th:text="*{age}">56</span>
</p>
<p th:if="*{age} >= 18" th:text="#{personne.majeure}">Vous êtes majeur</p>
<p th:if="*{age} < 18" th:text="#{personne.mineure}">Vous êtes mineur</p>
</div>
</body>
</html>
- السطر 17: يقوم السمة [th:if] بتقييم تعبير منطقي. إذا كان هذا التعبير صحيحًا، يتم عرض العلامة، وإلا فلا يتم عرضها. لذلك، إذا كان ${personne.age}>=18، فسيتم عرض النص [#{personne.majeure}]، أي رسالة المفتاح [personne.majeure] الموجودة في ملفات الرسائل؛
- السطر 18: لا يمكن كتابة [*{age} < 18] لأن الرمز < هو حرف محجوز. لذلك يجب استخدام ما يعادله HTML [<]، والذي يُسمى أيضًا الكيان HTML [http://en.wikipedia.org/wiki/List_of_XML_and_HTML_character_entity_references]؛
تم تعديل ملفات الرسائل:
[messages_fr.properties]
title=Les vues dans Spring MVC
personne.nom=Nom :
personne.age=Age :
personne.mineure=Vous êtes mineur
personne.majeure=Vous êtes majeur
[messages_en.properties]
title=Views in Spring MVC
personne.nom=Name:
personne.age=Age:
personne.mineure=You are under 18
personne.majeure=You are over 18
والنتيجة هي كما يلي:
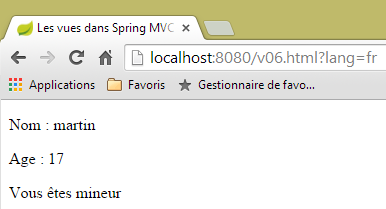 | 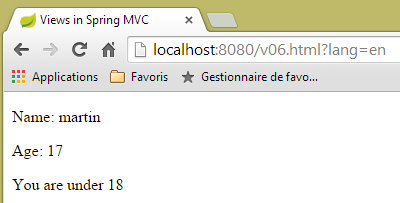 |
5.7. [/v07]: تكرار في عرض Thymeleaf
لننظر إلى الإجراء [/v07] التالي:
    // إنشاء النموذج M لعرض V - 4
    @RequestMapping(value = "/v07", method = RequestMethod.GET)
    public String v07(Model model) {
        model.addAttribute("liste", new Personne[] { new Personne(7, "martin", 17), new Personne(8, "lucie", 32),
                new Personne(9, "paul", 7) });
        return "vue-07";
}
- تقوم هذه العملية بإنشاء قائمة تضم ثلاثة أشخاص، وتضعها في القالب المرتبط بالمفتاح [liste]، وتقوم بعرض العرض [vue-07]؛
الطريقة [vue-07.xml] هي كما يلي:
<!DOCTYPE html>
<html xmlns:th="http://www.thymeleaf.org">
    <head>
        <title th:text="#{title}">Spring 4 MVC</title>
        <meta http-equiv="Content-Type" content="text/html; charset=UTF-8" />
    </head>
    <body>
        <h3 th:text="#{liste.personnes}">Liste de personnes</h3>
        <ul>
            <li th:each="element : ${liste}" th:text="'['+ ${element.id} + ', ' +${element.nom}+ ', ' + ${element.age} + ']'">[id,nom,age]</li>
        </ul>
    </body>
</html>
- السطر 10: السمة [th:each] تكرر العلامة التي توجد فيها، وهي هنا علامة <li>. ولها هنا معلمتان هما [element : collection] و [collection]، حيث تمثل [collection] مجموعة من الكائنات، وهي هنا قائمة بالأشخاص. سيقوم Thymeleaf بتفحص المجموعة وإنشاء عدد من العلامات <li> يساوي عدد العناصر الموجودة في المجموعة. بالنسبة لكل علامة <li>، سيمثل [element] العنصر الموجود في المجموعة المرتبط بهذه العلامة. بالنسبة لهذا العنصر، سيتم تقييم السمة [th:text]. تعبيرها هنا عبارة عن تسلسل سلاسل للحصول على النتيجة [id, nom, age]؛
- السطر 8: نضيف المفتاح [liste.personnes] إلى ملفات الرسائل؛
إليك النتيجة:
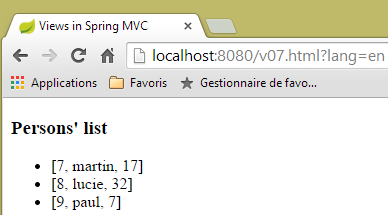 | 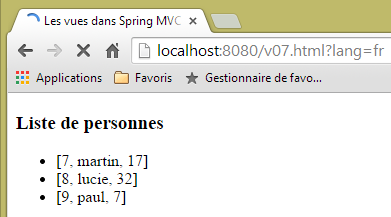 |
5.8. [/v08-/v10]: @ModelAttribute
نعود إلى أمر سبق أن تناولناه عند دراسة الإجراءات، وهو دور التعليق التوضيحي [@ModelAttribute]. نضيف الإجراء الجديد التالي:
    // --------------- الربط و ModelAttribute ----------------------------------

    // إذا كان المعلمة كائنًا، يتم إنشاء مثيل له وربما يتم تعديله بواسطة معلمات الاستعلام
    // سيصبح تلقائيًا جزءًا من نموذج العرض باستخدام المفتاح [key]
    // بالنسبة للمعلمة @ModelAttribute("xx")، سيكون key مساوياً لـ xx
    // بالنسبة للمعلمة @ModelAttribute، سيكون المفتاح مساويًا لاسم فئة المعلمة الذي يبدأ بحرف صغير
    // إذا كان @ModelAttribute غائبًا، فسيتم التعامل مع الأمر كما لو كان موجودًا بدون مفتاح
    // تجدر الإشارة إلى أن هذا التضمين التلقائي في النموذج لا يتم إذا لم يكن المعلمة كائنًا

    @RequestMapping(value = "/v08", method = RequestMethod.GET)
    public String v08(@ModelAttribute("someone") Personne p, Model model) {
        System.out.println(String.format("Modèle=%s", model));
        return "vue-08";
}
- السطر 11: سيقوم التعليق التوضيحي [@ModelAttribute("someone")] تلقائيًا بإضافة الكائن [Personne p] إلى النموذج، مرتبطًا بالمفتاح [someone]؛
- السطر 12: للتحقق من النموذج؛
- السطر 13: يعرض العرض [vue-08.xml]؛
الطريقة [vue-08.xml] هي كما يلي:
<!DOCTYPE html>
<html xmlns:th="http://www.thymeleaf.org">
    <head>
        <title th:text="#{title}">Spring 4 MVC</title>
        <meta http-equiv="Content-Type" content="text/html; charset=UTF-8" />
    </head>
    <body>
        <div th:object="${someone}">
            <p>
                <span th:text="#{personne.id}">Id :</span>
                <span th:text="*{id}">14</span>
            </p>
            <p>
                <span th:text="#{personne.nom}">Nom :</span>
                <span th:text="*{nom}">Bill</span>
            </p>
            <p>
                <span th:text="#{personne.age}">Age :</span>
                <span th:text="*{age}">56</span>
            </p>
        </div>
    </body>
</html>
- السطر 8: يتم تهيئة كائن Thymeleaf باستخدام كائن المفتاح [someone]؛
والنتيجة هي كما يلي:
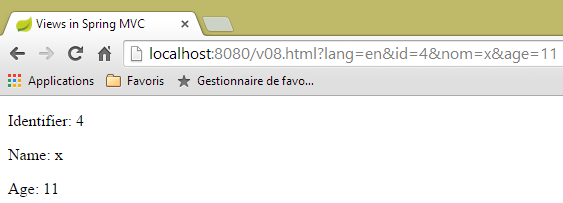 |
وفي وحدة التحكم، يظهر السجل التالي:
Modèle={someone=[id=4, nom=x, age=11], org.springframework.validation.BindingResult.someone=org.springframework.validation.BeanPropertyBindingResult: 0 errors}
لننظر الآن إلى الإجراء [/v09] التالي:
    @RequestMapping(value = "/v09", method = RequestMethod.GET)
    public String v09(Personne p, Model model) {
        System.out.println(String.format("Modèle=%s", model));
        return "vue-09";
}
- السطر 1: سيؤدي وجود المعلمة [Personne p] تلقائيًا إلى إدراج الشخص [p] في النموذج. ونظرًا لعدم تحديد مفتاح، فإن المفتاح المستخدم هو اسم الفئة مع كتابة الحرف الأول منه بحرف صغير. وبالتالي، فإن [Personne p] يعادل [@ModelAttribute("personne") Personne p]؛
وتبدو طريقة العرض [vue.09.xml] كما يلي:
<!DOCTYPE html>
<html xmlns:th="http://www.thymeleaf.org">
    <head>
        <title th:text="#{title}">Spring 4 MVC</title>
        <meta http-equiv="Content-Type" content="text/html; charset=UTF-8" />
    </head>
    <body>
        <div th:object="${personne}">
            <p>
                <span th:text="#{personne.id}">Id :</span>
                <span th:text="*{id}">14</span>
            </p>
            <p>
                <span th:text="#{personne.nom}">Nom :</span>
                <span th:text="*{nom}">Bill</span>
            </p>
            <p>
                <span th:text="#{personne.age}">Age :</span>
                <span th:text="*{age}">56</span>
            </p>
        </div>
    </body>
</html>
- السطر 8: مفتاح النموذج المستخدم هو [personne]؛
فيما يلي إحدى النتائج:
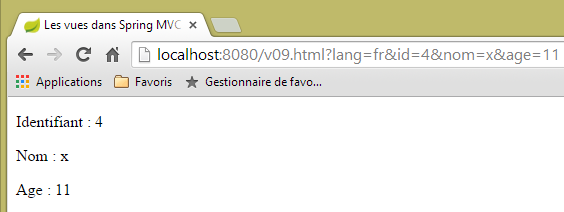 |
وسجل في وحدة التحكم الخاصة بالخادم:
Modèle={personne=[id=4, nom=x, age=11], org.springframework.validation.BindingResult.personne=org.springframework.validation.BeanPropertyBindingResult: 0 errors}
الآن، لننظر إلى الإجراء الجديد التالي [/v10]:
    @ModelAttribute("uneAutrePersonne")
    private Personne getPersonne(){
        return new Personne(24,"pauline",55);
    }

    @RequestMapping(value = "/v10", method = RequestMethod.GET)
    public String v10(Model model) {
        System.out.println(String.format("Modèle=%s", model));
        return "vue-10";
}
- الأسطر 1-4: تحدد طريقة تُنشئ في نموذج كل طلب عنصر مفتاح [uneAutrePersonne] مرتبطًا بالكائن [new Personne(24,"pauline",55)]؛
- الأسطر 6-10: لا تقوم العملية [/v10] بأي شيء سوى تمرير النموذج الذي تتلقاه إلى العرض [vue-10.xml]. تجدر الإشارة إلى أن المعلمة [Model model] لا يلزم وجودها إلا في الأمر الموجود في السطر 8. وبدونها، فإنها لا فائدة منها؛
الطريقة [vue-10.xml] هي كما يلي:
<!DOCTYPE html>
<html xmlns:th="http://www.thymeleaf.org">
    <head>
        <title th:text="#{title}">Spring 4 MVC</title>
        <meta http-equiv="Content-Type" content="text/html; charset=UTF-8" />
    </head>
    <body>
        <div th:object="${uneAutrePersonne}">
            <p>
                <span th:text="#{personne.id}">Id :</span>
                <span th:text="*{id}">14</span>
            </p>
            <p>
                <span th:text="#{personne.nom}">Nom :</span>
                <span th:text="*{nom}">Bill</span>
            </p>
            <p>
                <span th:text="#{personne.age}">Age :</span>
                <span th:text="*{age}">56</span>
            </p>
        </div>
    </body>
</html>
والنتيجة هي كما يلي:
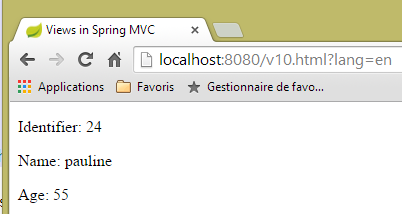 |
وسجل وحدة التحكم كما يلي:
5.9. [/v11]: @SessionAttributes
نعود إلى أمر سبق أن تناولناه عند دراسة الإجراءات، وهو دور التعليق التوضيحي [@SessionAttributes]. نضيف الإجراء الجديد التالي [/v11]:
    @ModelAttribute("jean")
    private Personne getJean(){
        return new Personne(33,"jean",10);
    }

    @RequestMapping(value = "/v11", method = RequestMethod.GET)
    public String v11(Model model, HttpSession session) {
        System.out.println(String.format("Modèle=%s, Session[jean]=%s", model, session.getAttribute("jean")));
        return "vue-11";
}
لدينا هنا شيء مشابه لما تمت دراسته للتو. ويكمن الاختلاف في وجود تعليق توضيحي [@SessionAttributes] موضوع على الفئة نفسها:
@Controller
@SessionAttributes("jean")
public class ViewsController {
- السطر 2: يُشار إلى أن المفتاح [jean] الخاص بالنموذج يجب وضعه في الجلسة؛
ولهذا السبب، تم إدراج الجلسة في السطر 7 من الإجراء. في السطر 8، يتم عرض قيمة الجلسة المرتبطة بالمفتاح [jean].
تبدو طريقة العرض [vue-11.xml] كما يلي:
<!DOCTYPE html>
<html xmlns:th="http://www.thymeleaf.org">
    <head>
        <title th:text="#{title}">Spring 4 MVC</title>
        <meta http-equiv="Content-Type" content="text/html; charset=UTF-8" />
    </head>
    <body>
        <div th:object="${jean}">
            <p>
                <span th:text="#{personne.id}">Id :</span>
                <span th:text="*{id}">14</span>
            </p>
            <p>
                <span th:text="#{personne.nom}">Nom :</span>
                <span th:text="*{nom}">Bill</span>
            </p>
            <p>
                <span th:text="#{personne.age}">Age :</span>
                <span th:text="*{age}">56</span>
            </p>
        </div>
        <hr />
        <div th:object="${session.jean}">
            <p>
                <span th:text="#{personne.id}">Id :</span>
                <span th:text="*{id}">14</span>
            </p>
            <p>
                <span th:text="#{personne.nom}">Nom :</span>
                <span th:text="*{nom}">Bill</span>
            </p>
            <p>
                <span th:text="#{personne.age}">Age :</span>
                <span th:text="*{age}">56</span>
            </p>
        </div>
    </body>
</html>
يتم عرض شخصين:
- الأسطر 8-21: الشخص ذو المفتاح [jean] في النموذج؛
- الأسطر 23-36: الشخص ذو المفتاح [jean] في الجلسة؛
والنتائج هي كما يلي:
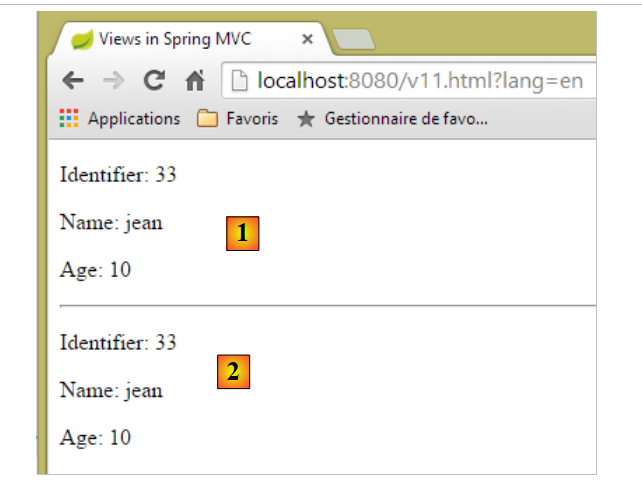 |
- في [1]، الشخص ذو المفتاح [jean] في النموذج؛
- إلى [2]، الشخص ذو المفتاح [jean] في الجلسة؛
أما سجل وحدة التحكم فهو كما يلي:
Modèle={uneAutrePersonne=[id=24, nom=pauline, age=55], jean=[id=33, nom=jean, age=10]}, Session[jean]=null
في ما سبق، نرى أن المفتاح [jean] غير موجود في الجلسة التي تتلقى الإجراء. ونستنتج من ذلك أن المفتاح [jean] قد أُضيف إلى الجلسة بعد تنفيذ الإجراء وقبل عرض الصفحة.
الآن، لنفكر في الحالة التي يتم فيها الإشارة إلى مفتاح ما في كل من [@ModelAttribute] و [@SessionAttributes]. نقوم بإنشاء الإجراءين التاليين:
    @RequestMapping(value = "/v12a", method = RequestMethod.GET)
    @ResponseBody
    public void v12a(HttpSession session) {
        session.setAttribute("paul", new Personne(51, "paul", 33));
    }

    // في الحالة التي يكون فيها مفتاح [@ModelAttribute] هو أيضًا مفتاح لـ [@SessionAttributes]
    // في هذه الحالة، يتم تهيئة المعلمة المقابلة بقيمة الجلسة
    @RequestMapping(value = "/v12b", method = RequestMethod.GET)
    public String v12b(Model model, @ModelAttribute("paul") Personne p) {
        System.out.println(String.format("Modèle=%s", model));
        return "vue-12";
}
لا تخدم الإجراء [/v12a] سوى وضع العنصر ['paul',new Personne(51, "paul", 33)] في الجلسة. ولا تقوم بأي شيء آخر. وحقيقة أنها مُعلمة بواسطة [@ResponseBody] تشير إلى أنها هي التي تولد الاستجابة للعميل. وبما أن نوعها هو [void]، فلا يتم توليد أي استجابة.
تقبل الإجراء [/v12b] المعلمة [@ModelAttribute("paul") Personne p]. وإذا لم يتم القيام بأي إجراء آخر، يتم إنشاء مثيل لكائن [Personne] ثم تهيئته باستخدام معلمات الطلب، ولا علاقة لهذا الكائن بكائن المفتاح [paul] الذي تم وضعه في الجلسة بواسطة الإجراء [/v12a]. سنقوم بإضافة المفتاح [paul] إلى سمات الجلسة الخاصة بالفئة:
@Controller
@SessionAttributes({ "jean", "paul" })
public class ViewsController {
- السطر 2، يوجد الآن سمتان للجلسة؛
لنعد إلى معلمات الإجراء [/v12b]:
public String v12b(Model model, @ModelAttribute("paul") Personne p) {
الآن، لن يتم إنشاء مثيل للكائن [Personne p]، بل سيشير إلى كائن المفتاح [paul] في الجلسة. بعد ذلك، تظل الإجراءات كما هي. وسيظهر الكائن الرئيسي [paul] على وجه الخصوص في نموذج العرض الذي سيتم عرضه. وهذا ما نريده في السطر 11 من الإجراء [/v12b].
وستكون طريقة العرض [vue-12.xml] كما يلي:
<!DOCTYPE html>
<html xmlns:th="http://www.thymeleaf.org">
    <head>
        <title th:text="#{title}">Spring 4 MVC</title>
        <meta http-equiv="Content-Type" content="text/html; charset=UTF-8" />
    </head>
    <body>
        <div th:object="${paul}">
            <p>
                <span th:text="#{personne.id}">Id :</span>
                <span th:text="*{id}">14</span>
            </p>
            <p>
                <span th:text="#{personne.nom}">Nom :</span>
                <span th:text="*{nom}">Bill</span>
            </p>
            <p>
                <span th:text="#{personne.age}">Age :</span>
                <span th:text="*{age}">56</span>
            </p>
        </div>
    </body>
</html>
- السطر 8: يتم الإشارة إلى المفتاح [paul] الخاص بنموذج العرض؛
وينتج عن ذلك النتيجة التالية (بعد تنفيذ الإجراء [/v12a] الذي يضع المفتاح [paul] في الجلسة):
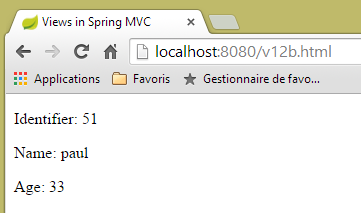 |
سجل وحدة التحكم هو كما يلي:
Modèle={jean=[id=33, nom=jean, age=10], uneAutrePersonne=[id=24, nom=pauline, age=55], paul=[id=51, nom=paul, age=33], org.springframework.validation.BindingResult.paul=org.springframework.validation.BeanPropertyBindingResult: 0 errors}
تم بالفعل إدراج المفتاح [paul] في النموذج بقيمة مرتبطة بالمفتاح [paul] في الجلسة.
5.10. [/v13]: إنشاء نموذج إدخال
ننتقل الآن إلى إدخال البيانات في النماذج والتحقق من صحتها. نقوم بإنشاء نموذج أول باستخدام الإجراء [/v13] التالي:
  // يُنشئ نموذجًا لإدخال بيانات شخص
  @RequestMapping(value = "/v13", method = RequestMethod.GET)
  public String v13() {
    return "vue-13";
}
التي تقتصر على عرض العرض التالي [vue-13.xml]:
<!DOCTYPE html>
<html xmlns:th="http://www.thymeleaf.org">
    <head>
        <title th:text="#{title}">Spring 4 MVC</title>
        <meta http-equiv="Content-Type" content="text/html; charset=UTF-8" />
    </head>
    <body>
        <form action="/someURL" th:action="@{/v14.html}" method="post">
            <h2 th:text="#{personne.formulaire.titre}">Entrez les informations suivantes</h2>
            <div th:object="${personne}">
                <table>
                    <thead></thead>
                    <tbody>
                        <tr>
                            <td th:text="#{personne.id}">Id :</td>
                            <td>
                                <input type="text" name="id" value="11" th:value="''" />
                            </td>
                        </tr>
                        <tr>
                            <td th:text="#{personne.nom}">Nom :</td>
                            <td>
                                <input type="text" name="nom" value="Tintin" th:value="''" />
                            </td>
                        </tr>
                        <tr>
                            <td th:text="#{personne.age}">Age :</td>
                            <td>
                                <input type="text" name="age" value="17" th:value="''" />
                            </td>
                        </tr>
                    </tbody>
                </table>
            </div>
            <input type="submit" value="Valider" th:value="#{personne.formulaire.valider}" />
        </form>
    </body>
</html>
إذا وضعنا هذه العرض في المجلد [static] تحت اسم [vue-13.html] وطلبنا URL [http://localhost:8080/vue-13.html]، فسنحصل على الصفحة التالية:
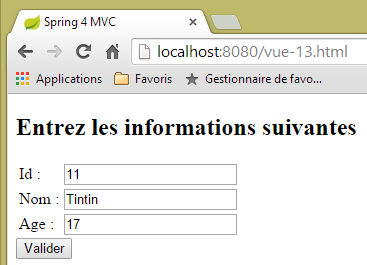 |
- في السطر 8 من النموذج، نجد العلامة <form> مع السمة [th:action]. سيتم تقييم هذه السمة بواسطة Thymeleaf وستحل قيمتها محل القيمة الحالية للسمة [action] التي لا توجد سوى لأغراض تجميلية. وهنا ستكون قيمة السمة [th:action] هي [/v14.html]؛
- في الأسطر 17 و23 و29، ستحل قيمة السمة [th:value] محل قيمة السمة [value]. وهنا ستكون هذه القيمة عبارة عن سلسلة فارغة؛
عند طلب URL [/v13.html]، نحصل على النتيجة التالية:
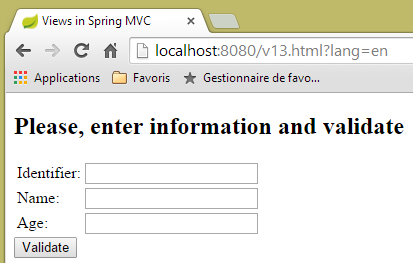 |
لنلقِ نظرة على شفرة المصدر التي أنشأها Thymeleaf:
<!DOCTYPE html>

<html>
    <head>
        <title>Views in Spring MVC</title>
        <meta http-equiv="Content-Type" content="text/html; charset=UTF-8" />
    </head>
    <body>
        <form action="/v14.html" method="post">
            <h2>Please, enter information and validate</h2>
            <div>
                <table>
                    <thead></thead>
                    <tbody>
                        <tr>
                            <td>Identifier:</td>
                            <td>
                                <input type="text" name="id" value="" />
                            </td>
                        </tr>
                        <tr>
                            <td>Name:</td>
                            <td>
                                <input type="text" name="nom" value="" />
                            </td>
                        </tr>
                        <tr>
                            <td>Age:</td>
                            <td>
                                <input type="text" name="age" value="" />
                            </td>
                        </tr>
                    </tbody>
                </table>
            </div>
            <input type="submit" value="Validate" />
        </form>
    </body>
</html>
في الأسطر 9 و18 و24 و30، نرى تقييم السمتين [th:action] و[th:value] الذي أجراه Thymeleaf.
5.11. [/v14]: معالجة القيم المرسلة عبر نموذج
الإجراء [/v14] هو الإجراء الذي يستقبل القيم المرسلة. وهو كما يلي:
  // يعالج قيم النموذج
  @RequestMapping(value = "/v14", method = RequestMethod.POST)
  public String v14(Personne p) {
    return "vue-14";
}
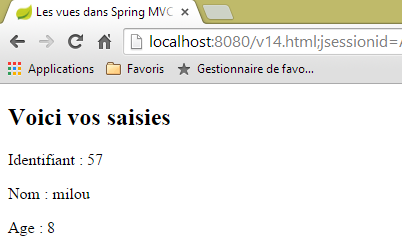
- السطر 3: يتم تغليف القيم المرسلة في كائن [Personne p]. ومن المعروف أن هذا الكائن يصبح تلقائيًا جزءًا من النموذج M للطريقة العرض V التي سيتم عرضها بواسطة الإجراء، مرتبطًا بالمفتاح [personne]؛
- السطر 4: العرض المعروض هو العرض [vue-14.xml]؛
الطريقة [vue-14.xml] هي كما يلي:
<!DOCTYPE html>
<html xmlns:th="http://www.thymeleaf.org">
    <head>
        <title th:text="#{title}">Spring 4 MVC</title>
        <meta http-equiv="Content-Type" content="text/html; charset=UTF-8" />
    </head>
    <body>
    <h2 th:text="#{personne.formulaire.saisies}">Voici vos saisies</h2>
        <div th:object="${personne}">
            <p>
                <span th:text="#{personne.id}">Id :</span>
                <span th:text="*{id}">14</span>
            </p>
            <p>
                <span th:text="#{personne.nom}">Nom :</span>
                <span th:text="*{nom}">Bill</span>
            </p>
            <p>
                <span th:text="#{personne.age}">Age :</span>
                <span th:text="*{age}">56</span>
            </p>
        </div>
    </body>
</html>
- السطر 9: يتم استرداد الكائن المرتبط بالمفتاح [personne] من النموذج؛
- السطور 12 و16 و20: يتم عرض خصائص هذا الكائن؛
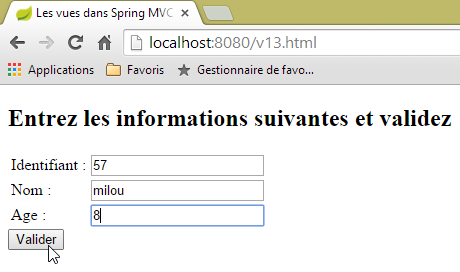
وينتج عن ذلك النتيجة التالية:
 |  |
5.12. [/v15-/v16]: التحقق من صحة نموذج
بالاستناد إلى المثال السابق، لنلقِ نظرة على التسلسل التالي:
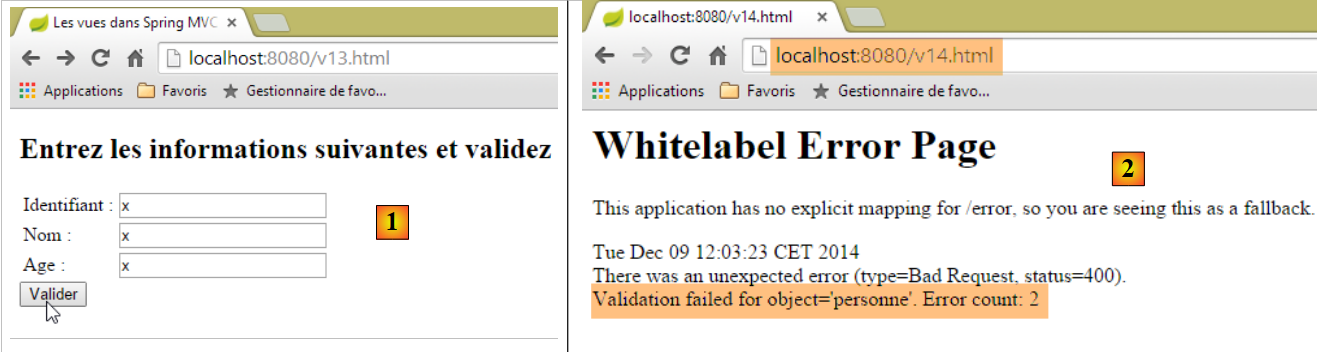 |
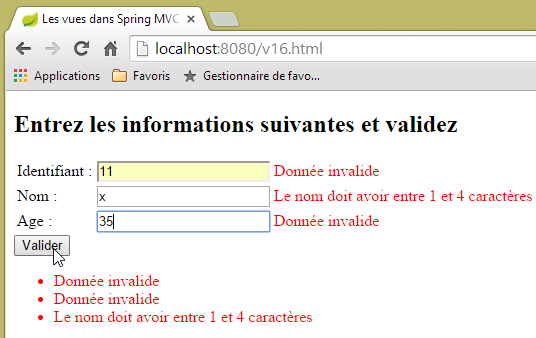
- في [1]، يتم إدخال قيم خاطئة للحقول [id] و [age] من النوع [int]؛
- في [2]، تشير استجابة الخادم إلى وجود خطأين؛
سنستخدم النموذج نفسه، ولكن في حالة حدوث أخطاء في التحقق من الصحة، سنقوم بإعادة توجيه المستخدم إلى صفحة تُشير إلى هذه الأخطاء حتى يتمكن من تصحيحها.
الإجراء [/v15] هو كما يلي:
    // ---------------------- عرض نموذج
    @RequestMapping(value = "/v15", method = RequestMethod.GET)
    public String v15(SecuredPerson p) {
        return "vue-15";
}
وتتلقى كمعلمة نوعًا [SecuredPerson] كما يلي:
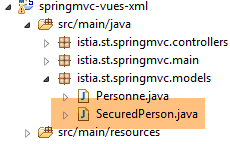 |
package istia.st.springmvc.models;

import javax.validation.constraints.NotNull;

import org.hibernate.validator.constraints.Length;
import org.hibernate.validator.constraints.Range;

public class SecuredPerson {

    @Range(min = 1)
    private int id;

    @Length(min = 4, max = 10)
    private String nom;

    @Range(min = 8, max = 14)
    private int age;

    // الشركات المصنعة
    public SecuredPerson() {

    }

    public SecuredPerson(int id, String nom, int age) {
        this.id=id;
        this.nom = nom;
        this.age = age;
    }

    // أدوات الاسترجاع والتعيين
...
}
تم توضيح الحقول [id, nom, age] بقيود التحقق من الصحة. العرض [vue-15.xml] الذي تعرضه الإجراء [/v15] هو كما يلي:
<!DOCTYPE html>
<html xmlns:th="http://www.thymeleaf.org">
    <head>
        <title th:text="#{title}">Spring 4 MVC</title>
        <meta http-equiv="Content-Type" content="text/html; charset=UTF-8" />
    </head>
    <body>
        <form action="/someURL" th:action="@{/v16.html}" method="post">
            <h2 th:text="#{personne.formulaire.titre}">Entrez les informations suivantes</h2>
            <div th:object="${securedPerson}">
                <table>
                    <thead></thead>
                    <tbody>
                        <tr>
                            <td th:text="#{personne.id}">Id :</td>
                            <td>
                                <input type="text" name="id" value="11" th:value="*{id}" />
                            </td>
                            <td>
                                <span th:if="${#fields.hasErrors('id')}" th:errors="*{id}" style="color: red">Identifiant erroné</span>
                            </td>
                        </tr>
                        <tr>
                            <td th:text="#{personne.nom}">Nom :</td>
                            <td>
                                <input type="text" name="nom" value="Tintin" th:value="*{nom}" />
                            </td>
                            <td>
                                <span th:if="${#fields.hasErrors('nom')}" th:errors="*{nom}" style="color: red">Nom erroné</span>
                            </td>
                        </tr>
                        <tr>
                            <td th:text="#{personne.age}">Age :</td>
                            <td>
                                <input type="text" name="age" value="17" th:value="*{age}" />
                            </td>
                            <td>
                                <span th:if="${#fields.hasErrors('age')}" th:errors="*{age}" style="color: red">Âge erroné</span>
                            </td>
                        </tr>
                    </tbody>
                </table>
                <input type="submit" value="Valider" th:value="#{personne.formulaire.valider}" />
                <ul>
                    <li th:each="err : ${#fields.errors('*')}" th:text="${err}" style="color: red" />
                </ul>
            </div>
        </form>
    </body>
</html>
- الأسطر 10-47: يتم استرداد كائن نموذج الصفحة المرتبط بالمفتاح [securedPerson]. عند انتهاء العملية GET، نحصل على كائن بقيمة مثيله [id=0, nom=null, age=0]؛
- السطر 17: قيمة الحقل [securedPerson.id]؛
- السطر 20: يتيح التعبير [${#fields.hasErrors('id')}] معرفة ما إذا كانت هناك أخطاء في التحقق من صحة الحقل [securedPerson.id]. إذا كان الأمر كذلك، فإن السمة [th:errors="*{id}"] تعرض رسالة الخطأ المرتبطة بذلك؛
- يتكرر هذا السيناريو في السطر 29 للحقل [nom] وفي السطر 38 للحقل [age]؛
- السطر 45: يشير التعبير [${#fields.errors('*')}] إلى مجموعة الأخطاء في حقول الكائن [securedPerson]. وبالتالي، فإن مجموعة هذه الأخطاء هي التي سيتم عرضها في الأسطر 44-46؛
- السطر 16: نلاحظ أن قيم النموذج سيتم إرسالها إلى الإجراء [/v16]. وهذا الإجراء هو كما يلي:
    // -------------------- التحقق من صحة النموذج -------------------
    @RequestMapping(value = "/v16", method = RequestMethod.POST)
    public String v16(@Valid SecuredPerson p, BindingResult result) {
        // أخطاء؟
        if (result.hasErrors()) {
            return "vue-15";
        } else {
            return "vue-16";
        }
}
- السطر 3، التعليق التوضيحي [@Valid SecuredPerson p] يفرض التحقق من صحة القيم المرسلة؛
- السطر 5: يختبر ما إذا كان نموذج الإجراء خاطئًا أم لا؛
- السطر 6: إذا كان نموذج الإجراء خاطئًا، يتم إرجاع النموذج [vue-15.xml]. وبما أن هذا النموذج يعرض رسائل الخطأ، فسوف نرى هذه الرسائل؛
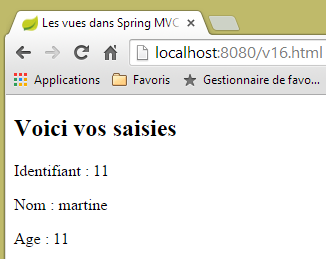
- السطر 8: إذا تم التحقق من صحة نموذج الإجراء، يتم عرض العرض التالي [vue-16.xml]:
<!DOCTYPE html>
<html xmlns:th="http://www.thymeleaf.org">
    <head>
        <title th:text="#{title}">Spring 4 MVC</title>
        <meta http-equiv="Content-Type" content="text/html; charset=UTF-8" />
    </head>
    <body>
    <h2 th:text="#{personne.formulaire.saisies}">Voici vos saisies</h2>
        <div th:object="${securedPerson}">
            <p>
                <span th:text="#{personne.id}">Id :</span>
                <span th:text="*{id}">14</span>
            </p>
            <p>
                <span th:text="#{personne.nom}">Nom :</span>
                <span th:text="*{nom}">Bill</span>
            </p>
            <p>
                <span th:text="#{personne.age}">Age :</span>
                <span th:text="*{age}">56</span>
            </p>
        </div>
    </body>
</html>
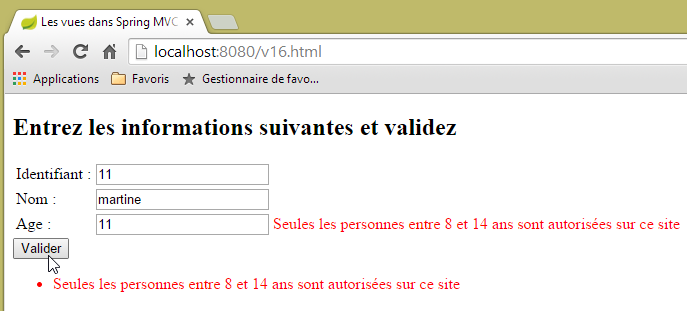
فيما يلي أمثلة على التنفيذ:
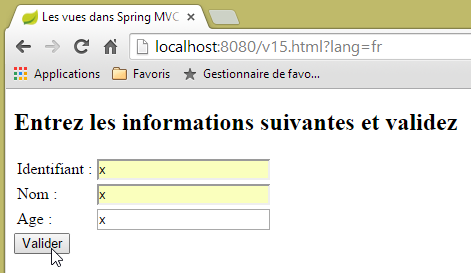 | 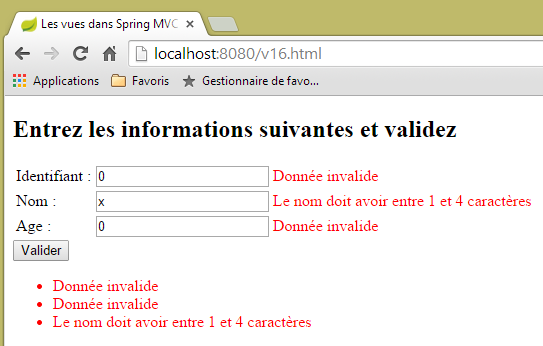 |
 | 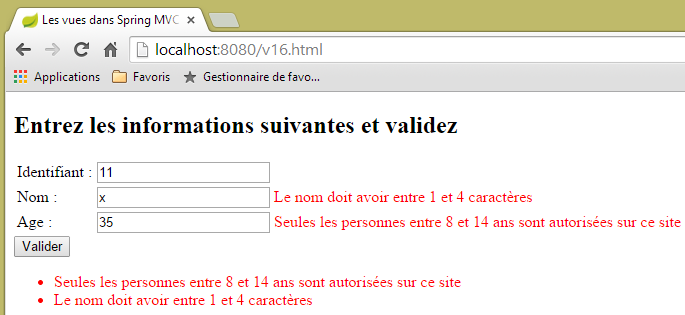 |
 |
 |
5.13. [/v17-/v18]: التحقق من رسائل الخطأ
عند طلب الإجراء [/v15] لأول مرة، يتم الحصول على النتيجة التالية:
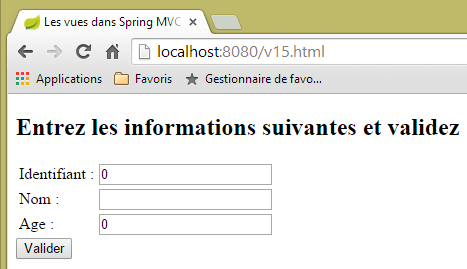 |
قد نرغب في الحصول على نموذج فارغ بدلاً من الأصفار في الحقول [Identifiant, Age]. لتحقيق ذلك، نقوم بتعديل نموذج الإجراء على النحو التالي:
package istia.st.springmvc.models;

import javax.validation.constraints.Digits;

import org.hibernate.validator.constraints.Length;
import org.hibernate.validator.constraints.Range;

public class StringSecuredPerson {

    @Range(min = 1)
    @Digits(fraction = 0, integer = 4)
    private String id;

    @Length(min = 4, max = 10)
    private String nom;

    @Range(min = 8, max = 14)
    @Digits(fraction = 0, integer = 2)
    private String age;

    // منشئات
    public StringSecuredPerson() {

    }

    public StringSecuredPerson(String id, String nom, String age) {
        this.id = id;
        this.nom = nom;
        this.age = age;
    }

    // دالات الاسترجاع والتعيين
...

}
- السطران 12 و19: تم تغيير نوع الحقول [id] و[age] إلى [String]؛
- السطر 11: يُشار إلى أن الحقل [id] يجب أن يكون رقمًا مكونًا من أربعة أرقام كحد أقصى، بدون أرقام عشرية؛
- السطر 18: الأمر نفسه بالنسبة للحقل [age] الذي يجب أن يكون عددًا صحيحًا مكونًا من رقمين كحد أقصى؛
يصبح الإجراء [/v17] كما يلي:
    // ---------------------- عرض نموذج
    @RequestMapping(value = "/v17", method = RequestMethod.GET)
    public String v17(StringSecuredPerson p) {
        return "vue-17";
}
العرض [vue-17.xml] الذي تعرضه الإجراء [/v17] هو كما يلي:
<!DOCTYPE html>
<html xmlns:th="http://www.thymeleaf.org">
    <head>
        <title th:text="#{title}">Spring 4 MVC</title>
        <meta http-equiv="Content-Type" content="text/html; charset=UTF-8" />
    </head>
    <body>
        <form action="/someURL" th:action="@{/v18.html}" method="post">
            <h2 th:text="#{personne.formulaire.titre}">Entrez les informations suivantes</h2>
            <div th:object="${stringSecuredPerson}">
                <table>
                    <thead></thead>
                    <tbody>
                        <tr>
                            <td th:text="#{personne.id}">Id :</td>
                            <td>
                                <input type="text" name="id" value="11" th:value="*{id}" />
                            </td>
                            <td>
                                <span th:each="err,status : ${#fields.errors('id')}" th:if="${status.index}==0" th:text="${err}" style="color: red">
                                    Identifiant erroné
                                </span>
                            </td>
                        </tr>
                        <tr>
                            <td th:text="#{personne.nom}">Nom :</td>
                            <td>
                                <input type="text" name="nom" value="Tintin" th:value="*{nom}" />
                            </td>
                            <td>
                                <span th:if="${#fields.hasErrors('nom')}" th:errors="*{nom}" style="color: red">Nom erroné</span>
                            </td>
                        </tr>
                        <tr>
                            <td th:text="#{personne.age}">Age :</td>
                            <td>
                                <input type="text" name="age" value="17" th:value="*{age}" />
                            </td>
                            <td>
                                <span th:if="${#fields.hasErrors('age')}" th:errors="*{age}" style="color: red">Âge erroné</span>
                            </td>
                        </tr>
                    </tbody>
                </table>
                <input type="submit" value="Valider" th:value="#{personne.formulaire.valider}" />
                <ul>
                    <li th:each="err : ${#fields.errors('*')}" th:text="${err}" style="color: red" />
                </ul>
            </div>
        </form>
    </body>
</html>
تتم التغييرات في الأسطر التالية:
- السطر 10: يتم الآن العمل باستخدام كائن نموذج المفتاح [stringSecuredPerson]؛
- السطر 20: يتم تصفح قائمة الأخطاء في الحقل [id]. في بناء الجملة [th:each="err,status : ${#fields.errors('id')}"]، المتغير [err] هو الذي يقوم بتصفح القائمة. تقدم المتغير [status] معلومات عن كل تكرار. وهو كائن [index, count, size, current] حيث:
- index: هو رقم العنصر الحالي،
- current: قيمة هذا العنصر الحالي،
- count، size: حجم القائمة التي يتم تصفحها؛
- السطر 20: لا يتم عرض سوى العنصر الأول من القائمة [th:if="${status.index}==0"]؛
الإجراء [/v18] الذي يعالج POST الخاص بالإجراء [/v17] هو كما يلي:
    // -------------------- التحقق من صحة النموذج------------------
    @RequestMapping(value = "/v18", method = RequestMethod.POST)
    public String v18(@Valid StringSecuredPerson p, BindingResult result) {
        // أخطاء؟
        if (result.hasErrors()) {
            return "vue-17";
        } else {
            return "vue-18";
        }
}
تتطور ملفات الرسائل على النحو التالي:
[messages_fr.properties]
title=Les vues dans Spring MVC
personne.nom=Nom :
personne.age=Age :
personne.id=Identifiant :
personne.mineure=Vous êtes mineur
personne.majeure=Vous êtes majeur
liste.personnes=Liste de personnes
personne.formulaire.titre=Entrez les informations suivantes et validez
personne.formulaire.valider=Valider
personne.formulaire.saisies=Voici vos saisies
notNull=La donnée est obligatoire
Range.securedPerson.id=L''identifiant doit être un nombre entier >=1
Range.securedPerson.age=Seules les personnes entre 8 et 14 ans sont autorisées sur ce site
Length.securedPerson.nom=Le nom doit avoir entre 1 et 4 caractères
typeMismatch=Donnée invalide
Range.stringSecuredPerson.id=L''identifiant doit être un nombre entier >=1
Range.stringSecuredPerson.age=Seules les personnes entre 8 et 14 ans sont autorisées sur ce site
Length.stringSecuredPerson.nom=Le nom doit avoir entre 1 et 4 caractères
Digits.stringSecuredPerson.id=Tapez un nombre entier de 4 chiffres au plus
Digits.stringSecuredPerson.age=Tapez un nombre entier de 2 chiffres au plus
[messages_en.properties]
title=Views in Spring MVC
personne.nom=Name:
personne.age=Age:
personne.id=Identifier:
personne.mineure=You are under 18
personne.majeure=You are over 18
liste.personnes=Persons' list
personne.formulaire.titre=Please, enter information and validate
personne.formulaire.valider=Validate
personne.formulaire.saisies=Here are your inputs
NotNull=Data is required
Range.securedPerson.id=Identifier must be an integer >=1
Range.securedPerson.age=Only kids who are 8 to 14 years old are allowed on this site
Length.securedPerson.nom=Name must be 4 to 10 characters long
typeMismatch=Invalid format
Range.stringSecuredPerson.id=Identifier must be an integer >=1
Range.stringSecuredPerson.age=Only kids who are 8 to 14 years old are allowed on this site
Length.stringSecuredPerson.nom=Name must be 4 to 10 characters long
Digits.stringSecuredPerson.id=Should be an integer with at most four digits
Digits.stringSecuredPerson.age=Should be an integer with at most two digits
لنلقِ نظرة على بعض الأمثلة:
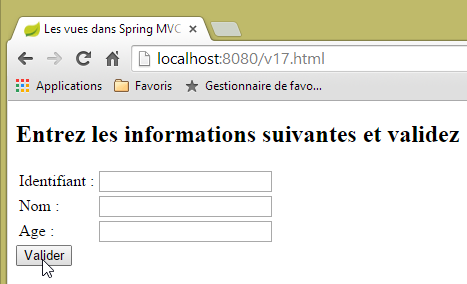 |
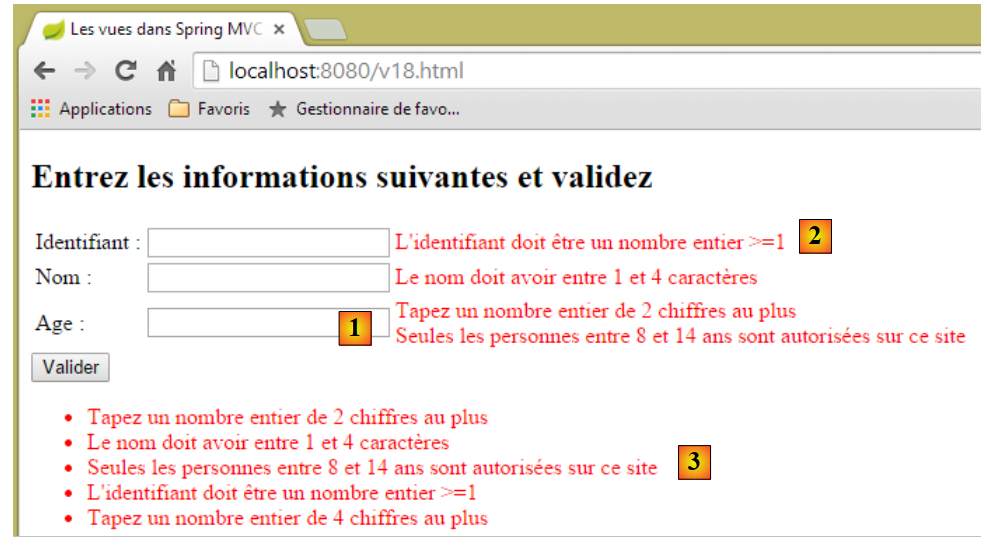 |
نلاحظ في [1] أن أداة التحقق من صحة الحقل [age] قد تم تنفيذها مرتين:
    @Range(min = 8, max = 14)
    @Digits(fraction = 0, integer = 2)
    private String age;
هل هناك ترتيب محدد لرسائل الخطأ؟ بالنسبة للحقل [age]، يبدو أن أدوات التحقق من الصحة قد تم تنفيذها بالترتيب [Digits, Range]. ولكن عند إجراء عدة استعلامات، يمكن ملاحظة أن هذا الترتيب قد يتغير. وبالتالي، لا يمكن الاعتماد على ترتيب أدوات التحقق من الصحة. في [2]، لا يتم عرض سوى رسالة واحدة من الرسالتين الموجودتين في الحقل [id]. أما في [3]، فيتم عرض جميع رسائل الخطأ.
5.14. [/v19-/v20]: استخدام أدوات التحقق المختلفة
لننظر إلى نموذج العمل الجديد التالي:
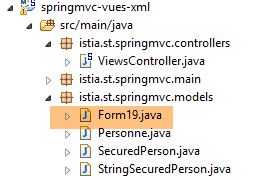 |
package istia.st.springmvc.models;

import java.util.Date;

import javax.validation.constraints.AssertFalse;
import javax.validation.constraints.AssertTrue;
import javax.validation.constraints.Future;
import javax.validation.constraints.Max;
import javax.validation.constraints.Min;
import javax.validation.constraints.NotNull;
import javax.validation.constraints.Past;
import javax.validation.constraints.Pattern;
import javax.validation.constraints.Size;

import org.hibernate.validator.constraints.Email;
import org.hibernate.validator.constraints.Length;
import org.hibernate.validator.constraints.NotBlank;
import org.hibernate.validator.constraints.NotEmpty;
import org.hibernate.validator.constraints.Range;
import org.hibernate.validator.constraints.URL;
import org.springframework.format.annotation.DateTimeFormat;

public class Form19 {

    @NotNull
    @AssertFalse
    private Boolean assertFalse;

    @NotNull
    @AssertTrue
    private Boolean assertTrue;

    @NotNull
    @Future
    @DateTimeFormat(pattern = "yyyy-MM-dd")
    private Date dateInFuture;

    @NotNull
    @Past
    @DateTimeFormat(pattern = "yyyy-MM-dd")
    private Date dateInPast;

    @NotNull
    @Max(value = 100)
    private Integer intMax100;

    @NotNull
    @Min(value = 10)
    private Integer intMin10;

    @NotNull
    @NotEmpty
    private String strNotEmpty;

    @NotNull
    @NotBlank
    private String strNotBlank;

    @NotNull
    @Size(min = 4, max = 6)
    private String strBetween4and6;

    @NotNull
    @Pattern(regexp = "^\\d{2}:\\d{2}:\\d{2}$")
    private String hhmmss;

    @NotNull
    @Email
    @NotBlank
    private String email;

    @NotNull
    @Length(max = 4, min = 4)
    private String str4;

    @Range(min = 10, max = 14)
    @NotNull
    private Integer int1014;

    @URL
    @NotBlank
    private String url;

    // دالات الاسترجاع والتعيين
...
}
سيتم عرضه بواسطة الإجراء التالي [/v19]:
    // ------------------ عرض نموذج
    @RequestMapping(value = "/v19", method = RequestMethod.GET, produces = "text/html; charset=UTF-8")
    public String v19(Form19 formulaire) {
        return "vue-19";
}
- السطر 3: تتلقى الإجراء كمعلمة كائن [Form19 formulaire]. إذا لم يتلقى GET أي معلمات، فسيتم تهيئة هذا الكائن بالقيم الافتراضية في Java؛
- السطر 4: يتم عرض العرض [vue-19.xml]. وهو كما يلي:
<!DOCTYPE HTML>
<html xmlns:th="http://www.thymeleaf.org">
    <head>
        <title>Spring 4 MVC</title>
        <meta http-equiv="Content-Type" content="text/html; charset=UTF-8" />
        <link rel="stylesheet" href="/css/form19.css" />
    </head>
    <body>
        <h3>Formulaire - Validations côté serveur</h3>
        <form action="/someURL" th:action="@{/v20.html}" method="post" th:object="${form19}">
            <table>
                <thead>
                    <tr>
                        <th class="col1">Contrainte</th>
                        <th class="col2">Saisie</th>
                        <th class="col3">Erreur</th>
                    </tr>
                </thead>
                <tbody>
                    <tr>
                        <td class="col1">@NotEmpty</td>
                        <td class="col2">
                            <input type="text" th:field="*{strNotEmpty}" />
                        </td>
                        <td class="col3">
                            <span th:if="${#fields.hasErrors('strNotEmpty')}" th:errors="*{strNotEmpty}" class="error">Donnée erronée</span>
                        </td>
                    </tr>
                    <tr>
                        <td class="col1">@NotBlank</td>
                        <td class="col2">
                            <input type="text" th:field="*{strNotBlank}" />
                        </td>
                        <td class="col3">
                            <span th:if="${#fields.hasErrors('strNotBlank')}" th:errors="*{strNotBlank}" class="error">Donnée erronée</span>
                        </td>
                    </tr>
                    <tr>
                        <td class="col1">@assertFalse</td>
                        <td class="col2">
                            <input type="radio" th:field="*{assertFalse}" value="true" />
                            <label th:for="${#ids.prev('assertFalse')}">True</label>
                            <input type="radio" th:field="*{assertFalse}" value="false" />
                            <label th:for="${#ids.prev('assertFalse')}">False</label>
                        </td>
                        <td class="col3">
                            <span th:if="${#fields.hasErrors('assertFalse')}" th:errors="*{assertFalse}" class="error">Donnée erronée</span>
                        </td>
                    </tr>
                    <tr>
                        <td class="col1">@assertTrue</td>
                        <td class="col2">
                            <select th:field="*{assertTrue}">
                                <option value="true">True</option>
                                <option value="false">False</option>
                            </select>
                        </td>
                        <td class="col3">
                            <span th:if="${#fields.hasErrors('assertTrue')}" th:errors="*{assertTrue}" class="error">Donnée erronée</span>
                        </td>
                    </tr>
                    <tr>
                        <td class="col1">@Past</td>
                        <td class="col2">
                            <input type="date" th:field="*{dateInPast}" th:value="*{dateInPast}" />
                        </td>
                        <td class="col3">
                            <span th:if="${#fields.hasErrors('dateInPast')}" th:errors="*{dateInPast}" class="error">Donnée erronée</span>
                        </td>
                    </tr>
                    <tr>
                        <td class="col1">@Future</td>
                        <td class="col2">
                            <input type="date" th:field="*{dateInFuture}" th:value="*{dateInFuture}" />
                        </td>
                        <td class="col3">
                            <span th:if="${#fields.hasErrors('dateInFuture')}" th:errors="*{dateInFuture}" class="error">Donnée erronée</span>
                        </td>
                    </tr>
                    <tr>
                        <td class="col1">@Max</td>
                        <td class="col2">
                            <input type="text" th:field="*{intMax100}" th:value="*{intMax100}" />
                        </td>
                        <td class="col3">
                            <span th:if="${#fields.hasErrors('intMax100')}" th:errors="*{intMax100}" class="error">Donnée erronée</span>
                        </td>
                    </tr>
                    <tr>
                        <td class="col1">@Min</td>
                        <td class="col2">
                            <input type="text" th:field="*{intMin10}" th:value="*{intMin10}" />
                        </td>
                        <td class="col3">
                            <span th:if="${#fields.hasErrors('intMin10')}" th:errors="*{intMin10}" class="error">Donnée erronée</span>
                        </td>
                    </tr>
                    <tr>
                        <td class="col1">@Size</td>
                        <td class="col2">
                            <input type="text" th:field="*{strBetween4and6}" th:value="*{strBetween4and6}" />
                        </td>
                        <td class="col3">
                            <span th:if="${#fields.hasErrors('strBetween4and6')}" th:errors="*{strBetween4and6}" class="error">Donnée erronée</span>
                        </td>
                    </tr>
                    <tr>
                        <td class="col1">@Pattern(hh:mm:ss)</td>
                        <td class="col2">
                            <input type="text" th:field="*{hhmmss}" th:value="*{hhmmss}" />
                        </td>
                        <td class="col3">
                            <span th:if="${#fields.hasErrors('hhmmss')}" th:errors="*{hhmmss}" class="error">Donnée erronée</span>
                        </td>
                    </tr>
                    <tr>
                        <td class="col1">@Email</td>
                        <td class="col2">
                            <input type="text" th:field="*{email}" th:value="*{email}" />
                        </td>
                        <td class="col3">
                            <span th:if="${#fields.hasErrors('email')}" th:errors="*{email}" class="error">Donnée erronée</span>
                        </td>
                    </tr>
                    <tr>
                        <td class="col1">@Length</td>
                        <td class="col2">
                            <input type="text" th:field="*{str4}" th:value="*{str4}" />
                        </td>
                        <td class="col3">
                            <span th:if="${#fields.hasErrors('str4')}" th:errors="*{str4}" class="error">Donnée erronée</span>
                        </td>
                    </tr>
                    <tr>
                        <td class="col1">@Range</td>
                        <td class="col2">
                            <input type="text" th:field="*{int1014}" th:value="*{int1014}" />
                        </td>
                        <td class="col3">
                            <span th:if="${#fields.hasErrors('int1014')}" th:errors="*{int1014}" class="error">Donnée erronée</span>
                        </td>
                    </tr>
                    <tr>
                        <td class="col1">@URL</td>
                        <td class="col2">
                            <input type="text" th:field="*{url}" th:value="*{url}" />
                        </td>
                        <td class="col3">
                            <span th:if="${#fields.hasErrors('url')}" th:errors="*{url}" class="error">Donnée erronée</span>
                        </td>
                    </tr>
                </tbody>
            </table>
            <p>
                <input type="submit" value="Valider" />
            </p>
        </form>
    </body>
</html>
يعرض هذا الرمز العرض التالي:
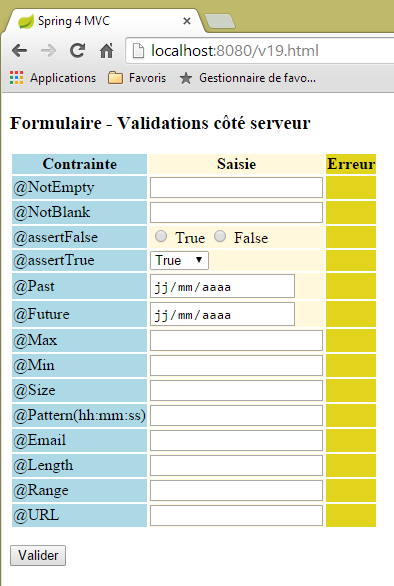 |
تحتوي الصفحة على جدول مكون من ثلاثة أعمدة:
- العمود 1: أداة التحقق من صحة حقل الإدخال؛
- العمود 2: حقل الإدخال؛
- العمود 3: رسائل الخطأ الخاصة بحقل الإدخال؛
لنلقِ نظرة، على سبيل المثال، على كود العرض [/v19.html] الخاص بأداة التحقق [@Pattern]:
                    <tr>
                        <td class="col1">@Pattern(hh:mm:ss)</td>
                        <td class="col2">
                            <input type="text" th:field="*{hhmmss}" th:value="*{hhmmss}" />
                        </td>
                        <td class="col3">
                            <span th:if="${#fields.hasErrors('hhmmss')}" th:errors="*{hhmmss}" class="error">Donnée erronée</span>
                        </td>
</tr>
نجد هنا الكود الذي درسناه للتو مع النماذج من النوع [Personne]:
- السطر 2: العمود الأول: اسم أداة التحقق التي تم اختبارها؛
- السطر 4: ستقوم سمة Thymeleaf [th:field="*{hhmmss}] بإنشاء السمات HTML و [id="hhmmss"] و [name="hhmmss"]. ستقوم سمة Thymeleaf [th:value="*{hhmmss}"] بإنشاء السمة HTML [value="valeur de [form19.hhmmss]]؛
- السطر 7: إذا كانت القيمة التي تم إدخالها في الحقل [form19.hhmmss] خاطئة، فإن السطر 7 يعرض رسائل الخطأ المرتبطة بهذا الحقل؛
تتم معالجة القيم التي تم إدخالها بواسطة الإجراء التالي [/v20]:
    // ----------------- التحقق من صحة نموذج النموذج
    @RequestMapping(value = "/v20", method = RequestMethod.POST, produces = "text/html; charset=UTF-8")
    public String v20(@Valid Form19 formulaire, BindingResult result, RedirectAttributes redirectAttributes) {
        if (result.hasErrors()) {
            return "vue-19";
        } else {
            // إعادة التوجيه إلى [vue-19]
            redirectAttributes.addFlashAttribute("form19", formulaire);
            return "redirect:/v19.html";
        }
}
- السطر 3: ستملأ القيم التي تم إدخالها حقول الكائن [Form19 formulaire] إذا كانت صالحة؛
- السطر 4-6: إذا كانت القيم التي تم إدخالها غير صالحة، يتم إعادة عرض النموذج [vue-19] مع رسائل الخطأ؛
- الأسطر 6-10: إذا كانت القيم المرسلة صالحة، فسيتم إتاحة الكائن [Form19 formulaire] الذي تم إنشاؤه باستخدام هذه القيم للاستعلام التالي، وهو في هذه الحالة استعلام إعادة التوجيه. ثم يتم إتلافه بعد ذلك؛
- السطر 9: يتم إعادة توجيه العميل إلى الإجراء [/v19.html]. وسيقوم هذا الإجراء بإعادة عرض النموذج [vue-19] الذي يحتوي على كود مثل:
<form action="/someURL" th:action="@{/v20.html}" method="post" th:object="${form19}">
ثم يقوم السمة [th:object="${form19}"] باسترداد الكائن المرتبط بالسمة Flash [form19]، وبالتالي يعيد عرض النموذج كما تم إدخاله.
لا يزال كود النموذج يستحق بعض التوضيح. لننظر إلى الكود التالي:
                    <tr>
                        <td class="col1">@assertFalse</td>
                        <td class="col2">
                            <input type="radio" th:field="*{assertFalse}" value="true" />
                            <label th:for="${#ids.prev('assertFalse')}">True</label>
                            <input type="radio" th:field="*{assertFalse}" value="false" />
                            <label th:for="${#ids.prev('assertFalse')}">False</label>
                        </td>
                        <td class="col3">
                            <span th:if="${#fields.hasErrors('assertFalse')}" th:errors="*{assertFalse}" class="error">Donnée erronée</span>
                        </td>
</tr>
وهذا يولد الكود HTML التالي:
<tr>
  <td class="col1">@assertFalse</td>
  <td class="col2">
    <input type="radio" value="true" id="assertFalse1" name="assertFalse" />
    <label for="assertFalse1">True</label>
    <input type="radio" value="false" id="assertFalse2" name="assertFalse" />
    <label for="assertFalse2">False</label>
  </td>
  <td class="col3">
  </td>
</tr>
في الكود
<input type="radio" th:field="*{assertFalse}" value="true" />
<label th:for="${#ids.prev('assertFalse')}">True</label>
<input type="radio" th:field="*{assertFalse}" value="false" />
<label th:for="${#ids.prev('assertFalse')}">False</label>
تشكل سمات Thymeleaf في السطرين 1 و3 [th:field="*{assertFalse}"] مشكلة. وقد قيل إن هذه السمة تولد السمات HTML و[id=assertFalse] و[name=assertFalse]. وتكمن الصعوبة في أنه نظرًا لإنشاء هذه السمات في السطرين 1 و3، فإننا نحصل على سمتين متطابقتين [name] وسمتين متطابقتين [id]. وإذا كان ذلك ممكنًا مع السمة [name]، فإنه غير ممكن مع السمة [id]. وكما نرى في الكود HTML الذي تم إنشاؤه، قام Thymeleaf بإنشاء سمتين مختلفتين [id] هما [id=asserFalse1] و [id=assertFalse2]. وهذا أمر جيد. المشكلة هي أننا لا نعرف هذه المعرفات وقد نحتاج إليها. وهذا هو الحال بالنسبة لعلامة [label] في السطر 2. يجب أن يشير السمة [for] لعلامة HTML [label] إلى سمة [id]، وهي في هذه الحالة السمة التي تم إنشاؤها لعلامة [input] في السطر 1. تشير وثائق Thymeleaf إلى أن التعبير [${#ids.prev('assertFalse')}"] يسمح بالحصول على آخر سمة [id] تم إنشاؤها للحقل [assertFalse].
لننظر الآن إلى كود القائمة المنسدلة في النموذج:
<select th:field="*{assertTrue}">
   <option value="true">True</option>
   <option value="false">False</option>
</select>
يُنشئ هذا الرمز الرمز HTML لقائمة منسدلة:
سيتم إرسال القيمة باسم [name="assertTrue"].
تستخدم طريقة العرض [vue-19.xml] ورقة أنماط:
    <head>
        <title>Spring 4 MVC</title>
        <meta http-equiv="Content-Type" content="text/html; charset=UTF-8" />
        <link rel="stylesheet" href="/css/form19.css" />
</head>
في السطر 4، يجب وضع ورقة الأنماط المستخدمة في المجلد [static] الخاص بالمشروع:
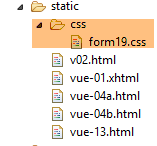 |
ومحتواها كما يلي:
@CHARSET "UTF-8";

.col1 {
    background: lightblue;
}

.col2 {
    background: Cornsilk;
}

.col3 {
    background: #e2d31d;
}

.error {
    color: red;
}
الآن، دعونا نلقي نظرة على التواريخ:
    @NotNull
    @Future
    @DateTimeFormat(pattern = "yyyy-MM-dd")
    private Date dateInFuture;

    @NotNull
    @Past
    @DateTimeFormat(pattern = "yyyy-MM-dd")
    private Date dateInPast;
يُظهر فحص تبادل البيانات عبر الشبكة في أداة تطوير Chrome (Ctrl-Shift-I) أن التواريخ يتم نشرها بالتنسيق (aaaa-mm-dd):
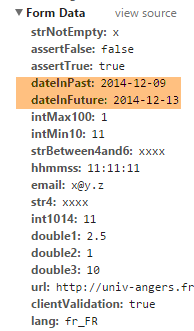 |
وهذا هو السبب في أن التواريخ تم توضيحها باستخدام أداة التحقق من الصحة:
@DateTimeFormat(pattern = "yyyy-MM-dd")
الذي يحدد التنسيق المتوقع للقيمة المرسلة للتواريخ.
وأخيرًا، ملف الرسائل باللغة الفرنسية [messages_fr.properties]:
title=Les vues dans Spring MVC
personne.nom=Nom :
personne.age=Age :
personne.id=Identifiant :
personne.mineure=Vous êtes mineur
personne.majeure=Vous êtes majeur
liste.personnes=Liste de personnes
personne.formulaire.titre=Entrez les informations suivantes et validez
personne.formulaire.valider=Valider
personne.formulaire.saisies=Voici vos saisies
NotNull=La donnée est obligatoire
Range.securedPerson.id=L''identifiant doit être un nombre entier >=1
Range.securedPerson.age=Seules les personnes entre 8 et 14 ans sont autorisées sur ce site
Length.securedPerson.nom=Le nom doit avoir entre 1 et 4 caractères
typeMismatch=Donnée invalide
Range.stringSecuredPerson.id=L''identifiant doit être un nombre entier >=1
Range.stringSecuredPerson.age=Seules les personnes entre 8 et 14 ans sont autorisées sur ce site
Length.stringSecuredPerson.nom=Le nom doit avoir entre 1 et 4 caractères
Digits.stringSecuredPerson.id=Tapez un nombre entier de 4 chiffres au plus
Digits.stringSecuredPerson.age=Tapez un nombre entier de 2 chiffres au plus
Future.form19.dateInFuture=La date doit être postérieure à celle d''aujourd'hui
Past.form19.dateInPast=La date doit être antérieure à celle d''aujourd'hui
Size.form19.strBetween4and6=la chaîne doit avoir entre 4 et 6 caractères
Min.form19.intMin10=La valeur doit être supérieure ou égale à 10
Max.form19.intMax100=La valeur doit être inférieure ou égale à 100
Length.form19.str4=La chaîne doit avoir quatre caractères exactement
Email.form19.email=Adresse mail invalide
URL.form19.url=URL invalide
Range.form19.int1014=La valeur doit être dans l''intervalle [10,14]
AssertTrue=Seule la valeur True est acceptée
AssertFalse=Seule la valeur False est acceptée
Pattern.form19.hhmmss=Tapez l''heure sous la forme hh:mm:ss
NotEmpty=La donnée ne peut être vide
NotBlank=La donnée ne peut être vide
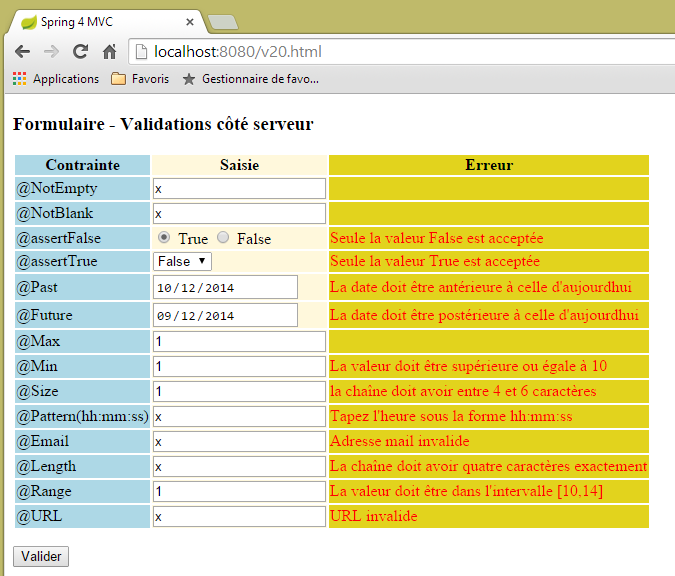
لنلقِ نظرة على بعض أمثلة التنفيذ:
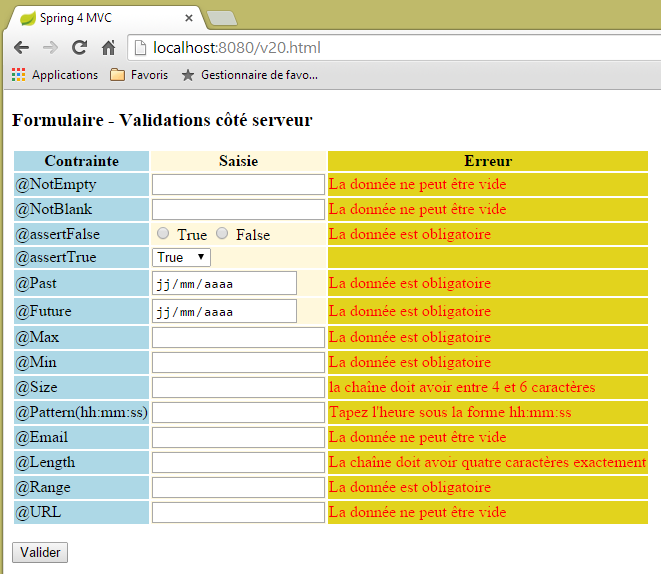 |
 |
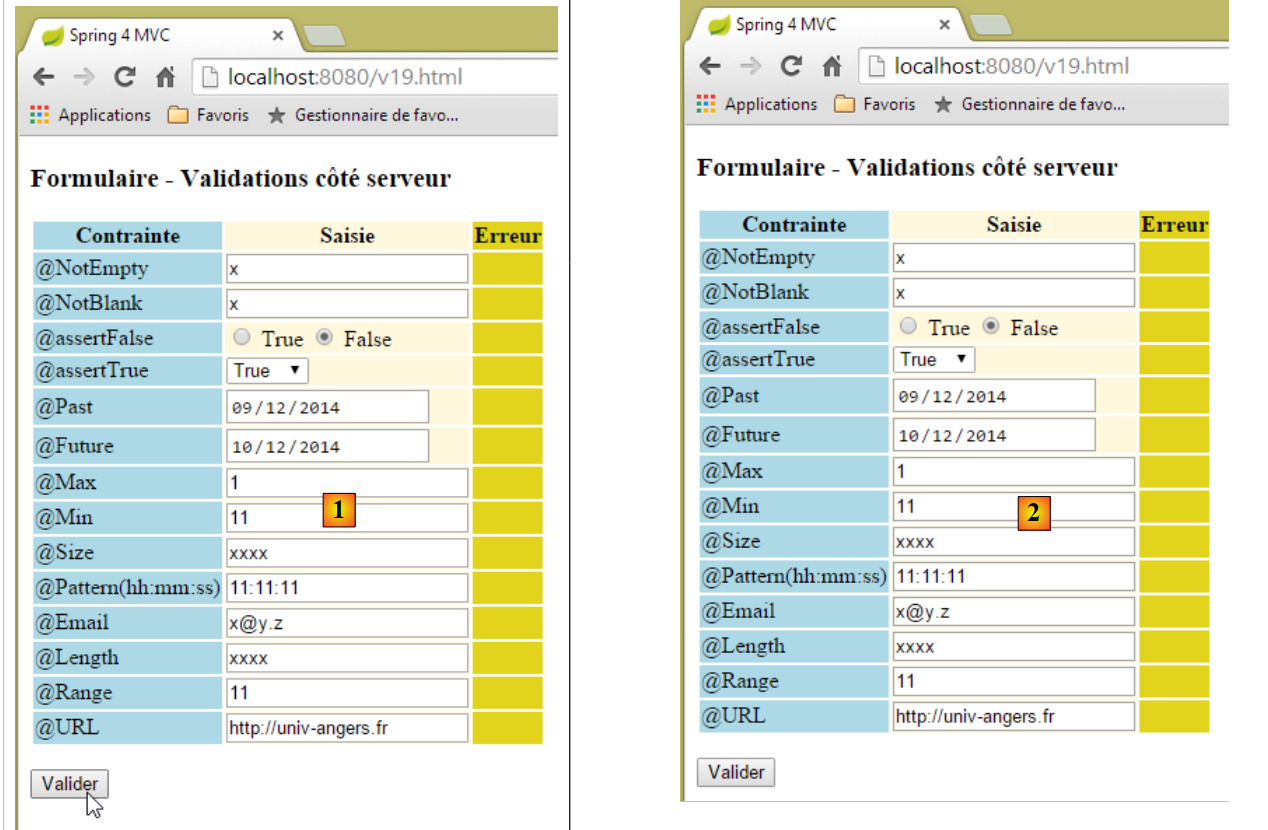 |
فيما سبق، بين [1] و [2]، يبدو أنه لم يحدث شيء. لكن إذا نظرنا إلى عمليات تبادل البيانات عبر الشبكة (Ctrl-Shift-I)، نرى أنه كانت هناك عمليتا تبادل بيانات مع الخادم:
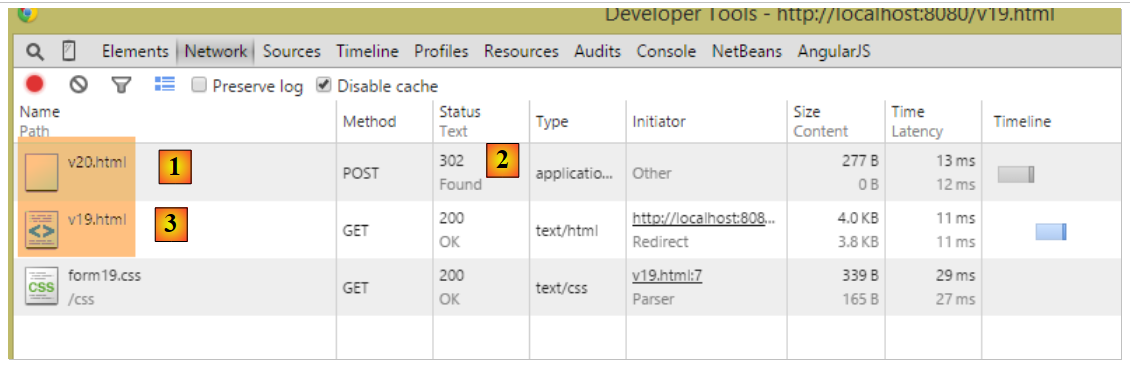 |
- في [1]، الرسالة الأولية POST الموجهة إلى [/v20]؛
- إلى [2]، وكانت استجابة هذه العملية عبارة عن إعادة توجيه؛
- في [3]، الطلب الثاني موجه هذه المرة إلى [/v19]؛
ثم يتم تنفيذ الإجراء [/v19]:
    // ------------------ عرض نموذج
    @RequestMapping(value = "/v19", method = RequestMethod.GET, produces = "text/html; charset=UTF-8")
    public String v19(Form19 formulaire) {
        return "vue-19";
}
- السطر 3، يتم تهيئة المعلمة [Form19 formulaire] باستخدام سمة Flash للمفتاح [form19] الذي تم إنشاؤه بواسطة الإجراء السابق [/v19]، والذي كان كائنًا من النوع [Form19] بقيم، القيم التي تم إرسالها إلى الإجراء [/v19]؛
- السطر 4: سيتم عرض طريقة العرض [vue-19.xml] مع وجود كائن [Form19 formulaire] في نموذجها، تم تهيئته بالقيم التي تم إرسالها. ولهذا السبب، يرى المستخدم النموذج كما أرسله؛
لماذا إعادة التوجيه؟ لماذا لم نقم ببساطة بإرسال البيانات إلى الإجراء [/v19] المذكور أعلاه؟ كنا سنحصل على نفس النتيجة. مع بعض الاختلافات الطفيفة:
- كان المتصفح سيضع في حقل العنوان [http://localhost:8080/v20.html] بدلاً من [http://localhost:8080/v19.html] كما فعل هنا، لأنه يعرض آخر URL تم استدعاؤها؛
- إذا قام المستخدم بتحديث الصفحة (F5)، فلن نحصل على النتيجة نفسها على الإطلاق:
- في حالة إعادة التوجيه، فإن URL المعروضة هي [http://localhost:8080/v19.html] التي تم الحصول عليها من GET. سيقوم المتصفح بإعادة تشغيل هذا الأمر الأخير وسيحصل عندئذٍ على نموذج جديد تمامًا (لا يُستخدم السمة Flash إلا مرة واحدة)،
- في حالة عدم إعادة التوجيه، فإن URL المعروضة هي [http://localhost:8080/v20.html] التي تم الحصول عليها من POST. سيقوم المتصفح بإعادة تنفيذ هذا الأمر الأخير، وبالتالي سيقوم مرة أخرى بإنشاء POST بنفس القيم المرسلة سابقًا. لا يترتب على ذلك أي عواقب هنا، ولكنه غالبًا ما يكون غير مرغوب فيه، ولذلك نفضل عمومًا إعادة التوجيه؛
5.15. [/v21-/v22]: إدارة أزرار الاختيار
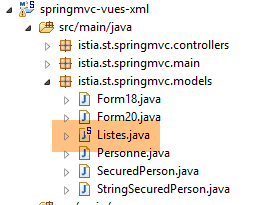
لنأخذ المكون Spring [Listes] التالي كمثال:
 |
package istia.st.springmvc.models;

import org.springframework.stereotype.Component;

@Component
public class Listes {

    private String[] deplacements = new String[] { "0", "1", "2", "3", "4" };
    private String[] libellesDeplacements = new String[] { "vélo", "marche", "train", "avion", "autre" };
    private String[] libellesBijoux = new String[] { "émeraude", "rubis", "diamant", "opaline" };

    // دالات الاسترجاع والتعيين
  ...

}
- السطر 5: ستكون الفئة [Listes] مكونًا من مكونات Spring؛
- الأسطر 8-10: قوائم تُستخدم لتغذية أزرار الاختيار ومربعات الاختيار والقوائم المنسدلة؛
في فئة التكوين [Config]، مكتوب:
@Configuration
@ComponentScan({ "istia.st.springmvc.controllers", "istia.st.springmvc.models" })
@EnableAutoConfiguration
public class Config extends WebMvcConfigurerAdapter {
- السطر 2: ستقوم Spring باستكشاف الحزمة [models] التي توجد بها المكونة [Listes] بشكل جيد؛
نقوم بإنشاء الإجراءات الجديدة التالية:
    // ------------------ نموذج مع أزرار الاختيار
    @Autowired
    private Listes listes;

    @RequestMapping(value = "/v21", method = RequestMethod.GET, produces = "text/html; charset=UTF-8")
    public String v21(@ModelAttribute("form") Form21 formulaire, Model model) {
        model.addAttribute("listes", listes);
        return "vue-21";
    }

    @RequestMapping(value = "/v22", method = RequestMethod.POST, produces = "text/html; charset=UTF-8")
    public String v22(@ModelAttribute("form") Form21 formulaire, RedirectAttributes redirectAttributes) {
        redirectAttributes.addFlashAttribute("form", formulaire);
        return "redirect:/v21.html";
}
- السطران 2-3: يتم حقن المكون [Listes] في وحدة التحكم؛
- السطر 6: ندير نموذجًا من النوع [Form21] الذي سنقوم بوصفه لاحقًا. تجدر الإشارة إلى أننا حددنا مفتاحه [form] في نموذج العرض. نذكر أن المفتاح الافتراضي كان سيكون [form21]؛
- السطر 7: نقوم بإدراج المكون [Listes] في النموذج. ستحتاج إليه طريقة العرض؛
- السطر 8: يتم عرض العرض [vue-21.xml]. سيعرض هذا العرض النموذج [Form21]، وستُرسل القيم المُرسلة إلى الإجراء [/v22] في الأسطر 12-15؛
- الأسطر 12-15: تقتصر الإجراء [/v22] على إعادة التوجيه إلى الإجراء [/v21] عن طريق وضع القيم المرسلة التي تلقتها في سمة Flash ذات المفتاح [form]. من المهم أن تكون هذه المفتاح هي نفسها المستخدمة في السطر 6؛
القالب [Form21] هو كما يلي:
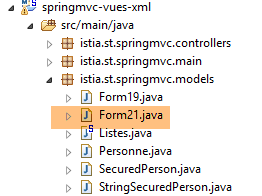 |
package istia.st.springmvc.models;

public class Form21 {

    // القيم المرسلة
    private String marie = "non";
    private String deplacement = "4";
    private String[] couleurs;
    private String strCouleurs;
    private String[] bijoux;
    private String strBijoux;
    private int couleur2;
    private int[] bijoux2;
    private String strBijoux2;

    // دالات الاسترجاع والتعيين
    ...
}
الطريقة [vue-21.xml] هي كما يلي:
<!DOCTYPE HTML>
<html xmlns:th="http://www.thymeleaf.org">
    <head>
        <title>Spring 4 MVC</title>
        <meta http-equiv="Content-Type" content="text/html; charset=UTF-8" />
        <link rel="stylesheet" href="/css/form19.css" />
    </head>
    <body>

        <h3>Formulaire - Boutons radio</h3>
        <form action="/someURL" th:action="@{/v22.html}" method="post" th:object="${form}">
            <table>
                <thead>
                    <tr>
                        <th class="col1">Texte</th>
                        <th class="col2">Saisie</th>
                        <th class="col3">Valeur</th>
                    </tr>
                </thead>
                <tbody>
                    <tr>
                        <td class="col1">Etes-vous marié(e)</td>
                        <td class="col2">
                            <input type="radio" th:field="*{marie}" value="oui" />
                            <label th:for="${#ids.prev('marie')}">Oui</label>
                            <input type="radio" th:field="*{marie}" value="non" />
                            <label th:for="${#ids.prev('marie')}">Non</label>
                        </td>
                        <td class="col3">
                            <span th:text="*{marie}"></span>
                        </td>
                    </tr>
                    <tr>
                        <td class="col1">Mode de déplacement</td>
                        <td class="col2">
                            <span th:each="mode, status : ${listes.deplacements}">
                                <input type="radio" th:field="*{deplacement}" th:value="${mode}" />
                                <label th:for="${#ids.prev('deplacement')}" th:text="${listes.libellesDeplacements[status.index]}">Autre</label>
                            </span>
                        </td>
                        <td class="col3">
                            <span th:text="*{deplacement}"></span>
                        </td>
                    </tr>
                </tbody>
            </table>
            <p>
                <input type="submit" value="Valider" />
            </p>
        </form>
    </body>
</html>
- الأسطر 36-40: تجدر الإشارة إلى استخدام المكون [Listes] المضمن في النموذج، لتوليد نصوص مربعات الاختيار؛
- يتيح العمود 3 معرفة القيمة التي تم إدخالها لـ POST، أو القيمة الأولية للنموذج عند GET الأولي؛
يعرض هذا الكود الصفحة التالية:
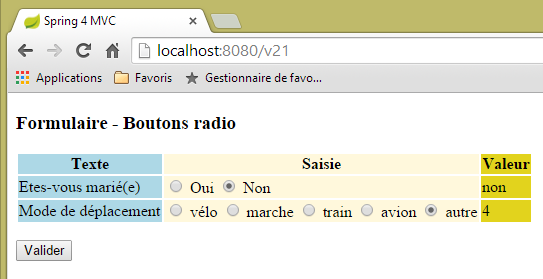 |
المطابق للرمز HTML التالي:
<!DOCTYPE HTML>

<html>
    <head>
        <title>Spring 4 MVC</title>
        <meta http-equiv="Content-Type" content="text/html; charset=UTF-8" />
        <link rel="stylesheet" href="/css/form19.css" />
    </head>
    <body>

        <h3>Formulaire - Boutons radio</h3>
        <form action="/v22.html" method="post">
            <table>
                <thead>
                    <tr>
                        <th class="col1">Texte</th>
                        <th class="col2">Saisie</th>
                        <th class="col3">Valeur</th>
                    </tr>
                </thead>
                <tbody>
                    <tr>
                        <td class="col1">Etes-vous marié(e)</td>
                        <td class="col2">
                            <input type="radio" value="oui" id="marie1" name="marie" />
                            <label for="marie1">Oui</label>
                            <input type="radio" value="non" id="marie2" name="marie" checked="checked" />
                            <label for="marie2">Non</label>
                        </td>
                        <td class="col3">
                            <span>non</span>
                        </td>
                    </tr>
                    <tr>
                        <td class="col1">Mode de déplacement</td>
                        <td class="col2">
                            <span>
                                <input type="radio" value="0" id="deplacement1" name="deplacement" />
                                <label for="deplacement1">vélo</label>
                            </span>
                            <span>
                                <input type="radio" value="1" id="deplacement2" name="deplacement" />
                                <label for="deplacement2">marche</label>
                            </span>
                            <span>
                                <input type="radio" value="2" id="deplacement3" name="deplacement" />
                                <label for="deplacement3">train</label>
                            </span>
                            <span>
                                <input type="radio" value="3" id="deplacement4" name="deplacement" />
                                <label for="deplacement4">avion</label>
                            </span>
                            <span>
                                <input type="radio" value="4" id="deplacement5" name="deplacement" checked="checked" />
                                <label for="deplacement5">autre</label>
                            </span>
                        </td>
                        <td class="col3">
                            <span>4</span>
                        </td>
                    </tr>
                </tbody>
            </table>
            <p>
                <input type="submit" value="Valider" />
            </p>
        </form>
    </body>
</html>
ونلاحظ أن القيم المرسلة (سمات name) يتم إدخالها في الحقول التالية من النموذج [Form21]:
    private String marie = "non";
    private String deplacement = "4";
ندعو القارئ إلى إجراء بعض الاختبارات. تجدر الإشارة إلى أن السمة [value] الخاصة بأزرار الاختيار هي التي يتم إرسالها.
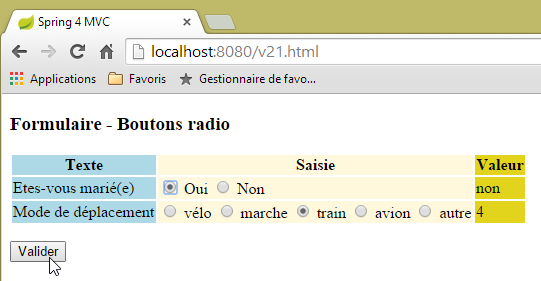 | 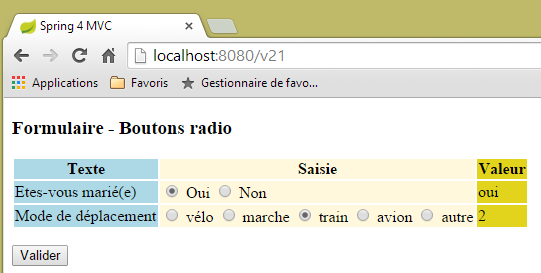 |
5.16. [/v23-/v24]: إدارة مربعات الاختيار
نضيف الإجراء الجديد التالي:
    // ------------------ نموذج مع مربعات الاختيار
    @RequestMapping(value = "/v23", method = RequestMethod.GET, produces = "text/html; charset=UTF-8")
    public String av20(@ModelAttribute("form") Form21 formulaire, Model model) {
        model.addAttribute("listes", listes);
        return "vue-23";
}
- السطر 3: نستمر في استخدام النموذج [Form21]؛
تبدو طريقة العرض [vue-23.xml] كما يلي:
<!DOCTYPE HTML>
<html xmlns:th="http://www.thymeleaf.org">
    <head>
        <title>Spring 4 MVC</title>
        <meta http-equiv="Content-Type" content="text/html; charset=UTF-8" />
        <link rel="stylesheet" href="/css/form19.css" />
    </head>
    <body>
        <h3>Formulaire - Cases à cocher</h3>
        <form action="/someURL" th:action="@{/v24.html}" method="post" th:object="${form}">
            <table>
                <thead>
                    <tr>
                        <th class="col1">Texte</th>
                        <th class="col2">Saisie</th>
                        <th class="col3">Valeur</th>
                    </tr>
                </thead>
                <tbody>
                    <tr>
                        <td class="col1">Vos couleurs préférées</td>
                        <td class="col2">
                            <input type="checkbox" th:field="*{couleurs}" value="0" />
                            <label th:for="${#ids.prev('couleurs')}">rouge</label>
                            <input type="checkbox" th:field="*{couleurs}" value="1" />
                            <label th:for="${#ids.prev('couleurs')}">vert</label>
                            <input type="checkbox" th:field="*{couleurs}" value="2" />
                            <label th:for="${#ids.prev('couleurs')}">bleu</label>
                        </td>
                        <td class="col3">
                            <span th:text="*{strCouleurs}"></span>
                        </td>
                    </tr>
                    <tr>
                        <td class="col1">Pierres préférées</td>
                        <td class="col2">
                            <span th:each="label, status : ${listes.libellesBijoux}">
                                <input type="checkbox" th:field="*{bijoux}" th:value="${status.index}" />
                                <label th:for="${#ids.prev('bijoux')}" th:text="${label}">Autre</label>
                            </span>
                        </td>
                        <td class="col3">
                            <span th:text="*{strBijoux}"></span>
                        </td>
                    </tr>
                </tbody>
            </table>
            <p>
                <input type="submit" value="Valider" />
            </p>
        </form>
    </body>
</html>
- الأسطر 37-41: لاحظ استخدام المكون [Listes] لتوليد نصوص مربعات الاختيار؛
يعرض هذا الرمز الصفحة التالية:
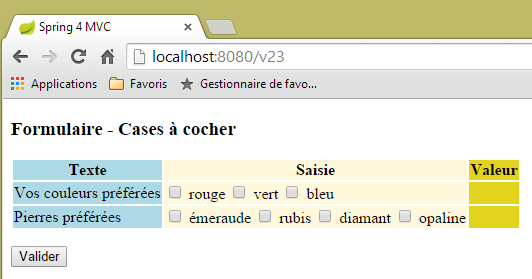 |
الناشئة عن الكود HTML التالي:
<!DOCTYPE HTML>

<html>
    <head>
        <title>Spring 4 MVC</title>
        <meta http-equiv="Content-Type" content="text/html; charset=UTF-8" />
        <link rel="stylesheet" href="/css/form19.css" />
    </head>
    <body>
        <h3>Formulaire - Cases à cocher</h3>
        <form action="/v24.html" method="post">
            <table>
                <thead>
                    <tr>
                        <th class="col1">Texte</th>
                        <th class="col2">Saisie</th>
                        <th class="col3">Valeur</th>
                    </tr>
                </thead>
                <tbody>
                    <tr>
                        <td class="col1">Vos couleurs préférées</td>
                        <td class="col2">
                            <input type="checkbox" value="0" id="couleurs1" name="couleurs" /><input type="hidden" name="_couleurs" value="on" />
                            <label for="couleurs1">rouge</label>
                            <input type="checkbox" value="1" id="couleurs2" name="couleurs" /><input type="hidden" name="_couleurs" value="on" />
                            <label for="couleurs2">vert</label>
                            <input type="checkbox" value="2" id="couleurs3" name="couleurs" /><input type="hidden" name="_couleurs" value="on" />
                            <label for="couleurs3">bleu</label>
                        </td>
                        <td class="col3">
                            <span></span>
                        </td>
                    </tr>
                    <tr>
                        <td class="col1">Pierres préférées</td>
                        <td class="col2">
                            <span>
                                <input type="checkbox" value="0" id="bijoux1" name="bijoux" /><input type="hidden" name="_bijoux" value="on" />
                                <label for="bijoux1">émeraude</label>
                            </span>
                            <span>
                                <input type="checkbox" value="1" id="bijoux2" name="bijoux" /><input type="hidden" name="_bijoux" value="on" />
                                <label for="bijoux2">rubis</label>
                            </span>
                            <span>
                                <input type="checkbox" value="2" id="bijoux3" name="bijoux" /><input type="hidden" name="_bijoux" value="on" />
                                <label for="bijoux3">diamant</label>
                            </span>
                            <span>
                                <input type="checkbox" value="3" id="bijoux4" name="bijoux" /><input type="hidden" name="_bijoux" value="on" />
                                <label for="bijoux4">opaline</label>
                            </span>
                        </td>
                        <td class="col3">
                            <span></span>
                        </td>
                    </tr>
                </tbody>
            </table>
            <p>
                <input type="submit" value="Valider" />
            </p>
        </form>
    </body>
</html>
تجدر الإشارة إلى أن القيم المرسلة (سمات name) يتم إرسالها إلى الحقول التالية في [Form21]:
    private String[] couleurs;
    private String[] bijoux;
هذه جداول لأن لكل حقل عدة خانات اختيار تحمل اسم الحقل. لذا، من الممكن أن تصل عدة قيم مرسلة تحمل الاسم نفسه (السمة name في النموذج). لذا، يلزم وجود جدول لاستردادها.
لنعد إلى كود Thymeleaf في العمود 3 من الصفحة:
  <td class="col3">
    <span th:text="*{strCouleurs}"></span>
  </td>
</tr>
<tr>
  <td class="col1">Pierres préférées</td>
  <td class="col2">
    <span th:each="label, status : ${listes.libellesBijoux}">
      <input type="checkbox" th:field="*{bijoux}" th:value="${status.index}" />
      <label th:for="${#ids.prev('bijoux')}" th:text="${label}">Autre</label>
    </span>
  </td>
  <td class="col3">
    <span th:text="*{strBijoux}"></span>
  </td>
</tr>
الحقول المشار إليها في السطرين 2 و14 هي التالية:
    private String strCouleurs;
    private String strBijoux;
يتم حسابها بواسطة الإجراء [/v24] الذي يدير الإجراء POST:
    // مُخطِّط جاكسون / jSON
    private ObjectMapper mapper = new ObjectMapper();

    @RequestMapping(value = "/v24", method = RequestMethod.POST, produces = "text/html; charset=UTF-8")
    public String av21(@ModelAttribute("form") Form21 formulaire, RedirectAttributes redirectAttributes) throws JsonProcessingException {
        redirectAttributes.addFlashAttribute("form", formulaire);
        formulaire.setStrCouleurs(mapper.writeValueAsString(formulaire.getCouleurs()));
        formulaire.setStrBijoux(mapper.writeValueAsString(formulaire.getBijoux()));
        return "redirect:/v23.html";
}
يجب أن نتذكر هنا أن مكتبة jackson / jSON موجودة ضمن تبعيات المشروع.
- السطر 2: يتم إنشاء نوع [ObjectMapper] الذي يسمح بتسلسل/إلغاء تسلسل الكائنات في jSON،
- السطر 7: يتم تحويل مصفوفة الألوان إلى صيغة تسلسلية باسم jSON. وتُوضع النتيجة في الحقل [strCouleurs]؛
- السطر 8: يتم تسلسل مصفوفة المجوهرات إلى jSON. يتم وضع النتيجة في الحقل [strBijoux]؛
فيما يلي مثال على التنفيذ:
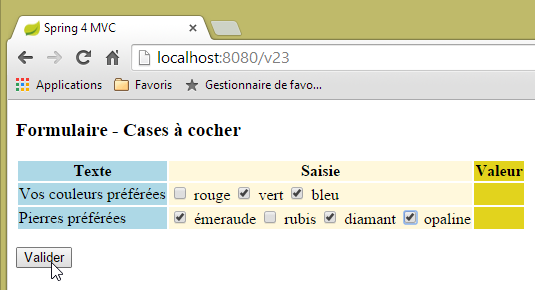 | 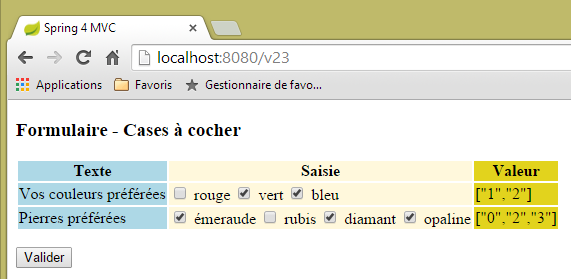 |
تجدر الإشارة إلى أن السمة [value] الخاصة بمربعات الاختيار هي التي يتم إرسالها.
5.17. [/25-/v26]: إدارة القوائم
نضيف الإجراء التالي [/v25]:
  // ------------------ نموذج يحتوي على قوائم
  @RequestMapping(value = "/v25", method = RequestMethod.GET, produces = "text/html; charset=UTF-8")
  public String v25(@ModelAttribute("form") Form21 formulaire, Model model) {
        model.addAttribute("listes", listes);
        return "vue-25";
}
تبدو طريقة العرض [vue-25.xml] كما يلي:
<!DOCTYPE HTML>
<html xmlns:th="http://www.thymeleaf.org">
    <head>
        <title>Spring 4 MVC</title>
        <meta http-equiv="Content-Type" content="text/html; charset=UTF-8" />
        <link rel="stylesheet" href="/css/form19.css" />
    </head>
    <body>

        <h3>Formulaire - Listes</h3>
        <form action="/someURL" th:action="@{/v26.html}" method="post"
            th:object="${form}">
            <table>
                <thead>
                    <tr>
                        <th class="col1">Texte</th>
                        <th class="col2">Saisie</th>
                        <th class="col3">Valeur</th>
                    </tr>
                </thead>
                <tbody>
                    <tr>
                        <td class="col1">Votre couleur préférée</td>
                        <td class="col2">
                            <select th:field="*{couleur2}">
                                <option value="0">rouge</option>
                                <option value="1">bleu</option>
                                <option value="2">vert</option>
                            </select>
                        </td>
                        <td class="col3">
                            <span th:text="*{couleur2}"></span>
                        </td>
                    </tr>
                    <tr>
                        <td class="col1">Pierres préférées (choix multiple)</td>
                        <td class="col2">
                            <select th:field="*{bijoux2}" multiple="multiple" size="3">
                                <option th:each="label, status : ${listes.libellesBijoux}"
                                    th:text="${label}" th:value="${status.index}">
                                </option>
                            </select>
                        </td>
                        <td class="col3">
                            <span th:text="*{strBijoux2}"></span>
                        </td>
                    </tr>

                </tbody>
            </table>
            <input type="submit" value="Valider" />
        </form>
    </body>
</html>
- الأسطر 38-42: إنشاء قائمة متعددة الخيارات حيث يتم أخذ العناوين من المكون [Listes] الذي استخدمناه سابقًا؛
الصفحة المعروضة هي كما يلي:
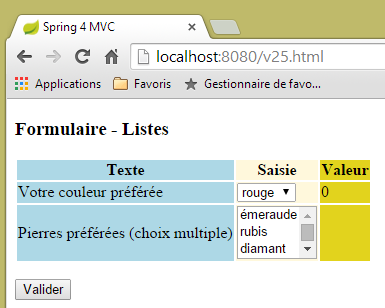 |
تم إنشاؤها بواسطة الكود HTML التالي:
<!DOCTYPE HTML>

<html>
    <head>
        <title>Spring 4 MVC</title>
        <meta http-equiv="Content-Type" content="text/html; charset=UTF-8" />
        <link rel="stylesheet" href="/css/form19.css" />
    </head>
    <body>

        <h3>Formulaire - Listes</h3>
        <form action="/v26.html" method="post">
            <table>
                <thead>
                    <tr>
                        <th class="col1">Texte</th>
                        <th class="col2">Saisie</th>
                        <th class="col3">Valeur</th>
                    </tr>
                </thead>
                <tbody>
                    <tr>
                        <td class="col1">Votre couleur préférée</td>
                        <td class="col2">
                            <select id="couleur2" name="couleur2">
                                <option value="0" selected="selected">rouge</option>
                                <option value="1">bleu</option>
                                <option value="2">vert</option>
                            </select>
                        </td>
                        <td class="col3">
                            <span>0</span>
                        </td>
                    </tr>
                    <tr>
                        <td class="col1">Pierres préférées (choix multiple)</td>
                        <td class="col2">
                            <select multiple="multiple" size="3" id="bijoux2" name="bijoux2">
                                <option value="0">émeraude</option>
                                <option value="1">rubis</option>
                                <option value="2">diamant</option>
                                <option value="3">opaline</option>
                            </select>
                            <input type="hidden" name="_bijoux2" value="1" />
                        </td>
                        <td class="col3">
                            <span></span>
                        </td>
                    </tr>
                </tbody>
            </table>
            <p>
                <input type="submit" value="Valider" />
            </p>
        </form>
    </body>
</html>
- السطر 44: يمكن ملاحظة أن Thymeleaf قد أنشأ حقلًا مخفيًا. لم أفهم دوره:
- القيم المرسلة (سمات value لعلامات option) ستُوضع في الحقول التالية (سمات name) لـ [Form21]:
    private int couleur2;
    private int[] bijoux2;
- السطر 38: القائمة [bijoux2] هي قائمة متعددة الخيارات. وبالتالي، يمكن إرسال عدة قيم مرتبطة بالاسم [bijoux2]. لاستردادها، يجب أن يكون الحقل [bijoux2] عبارة عن مصفوفة. وتجدر الإشارة إلى أنه مصفوفة من الأعداد الصحيحة. وهذا ممكن لأن القيم التي تم إرسالها يمكن تحويلها إلى هذا النوع؛
يتم إرسال القيم إلى الإجراء التالي [/v26]:
  @RequestMapping(value = "/v26", method = RequestMethod.POST, produces = "text/html; charset=UTF-8")
  public String v26(@ModelAttribute("form") Form21 formulaire, RedirectAttributes redirectAttributes) throws JsonProcessingException {
    redirectAttributes.addFlashAttribute("form", formulaire);
    formulaire.setStrBijoux2(mapper.writeValueAsString(formulaire.getBijoux2()));
    return "redirect:/v25.html";
}
لا يوجد هنا ما لم نره من قبل. فيما يلي مثال على التنفيذ:
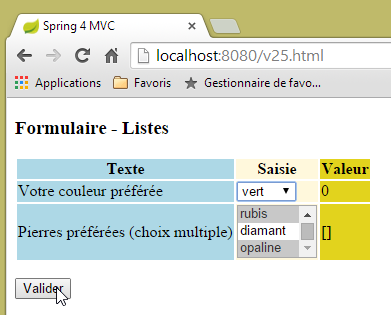 | 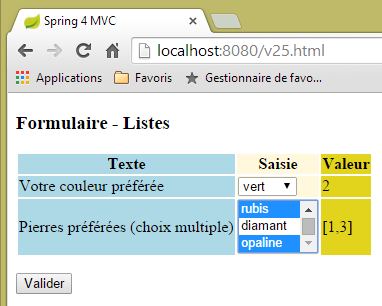 |
5.18. [/v27]: إعدادات الرسائل
لننظر إلى الإجراء [/v27] التالي:
  // ------------------ رسائل معلمة
  @RequestMapping(value = "/v27", method = RequestMethod.GET, produces = "text/html; charset=UTF-8")
  public String v27(Model model) {
        model.addAttribute("param1","paramètre un");
        model.addAttribute("param2","paramètre deux");
        model.addAttribute("param3","paramètre trois");
        model.addAttribute("param4","messages.param4");
        return "vue-27";
}
تكتفي هذه العملية بوضع أربع قيم في النموذج وتعرض العرض التالي [vue-27.xml]:
<!DOCTYPE html>
<html xmlns:th="http://www.thymeleaf.org">
    <head>
        <title th:text="#{messages.titre}">Spring 4 MVC</title>
        <meta http-equiv="Content-Type" content="text/html; charset=UTF-8" />
    </head>
    <body>
        <h2 th:text="#{messages.titre}">Spring 4 MVC</h2>
        <p th:text="#{messages.msg1(${param1})}"></p>
        <p th:text="#{messages.msg2(${param2},${param3})}"></p>
        <p th:text="#{messages.msg3(#{${param4}})}"></p>
    </body>
</html>
- السطر 8: رسالة بدون معلمات؛
- السطر 9: رسالة مع معلمة [$param1] مأخوذة من النموذج؛
- السطر 10: رسالة تحتوي على معلمتين [$param2, $param3] مأخوذتين من النموذج؛
- السطر 11: رسالة تحتوي على معلمة واحدة. هذه المعلمة هي نفسها مفتاح الرسالة (وجود علامة #). يتم توفير المفتاح بواسطة [$param4]؛
ملف الرسائل باللغة الفرنسية هو التالي:
[messages_fr.properties]
messages.titre=Messages paramétrés
messages.msg1=Un message avec un paramètre : {0}
messages.msg2=Un message avec deux paramètres : {0}, {1}
messages.msg3=Un message avec une clé de message comme paramètre : {0}
messages.param4=paramètre quatre
للإشارة إلى وجود معلمات في الرسالة، تُستخدم الرموز {0}، {1}، ...
سيؤدي دمج النموذج الذي تم إنشاؤه بواسطة الإجراء [/v27] مع العرض [vue-27] إلى إنتاج الكود HTML التالي:
<!DOCTYPE html>

<html>
    <head>
        <title>Messages paramétrés</title>
        <meta http-equiv="Content-Type" content="text/html; charset=UTF-8" />
    </head>
    <body>
        <h2>Messages paramétrés</h2>
        <p>Un message avec un paramètre : paramètre un</p>
        <p>Un message avec deux paramètre : paramètre deux, paramètre trois</p>
        <p>Un message avec une clé de message comme paramètre : paramètre quatre</p>
    </body>
</html>
مما يعطي العرض التالي:
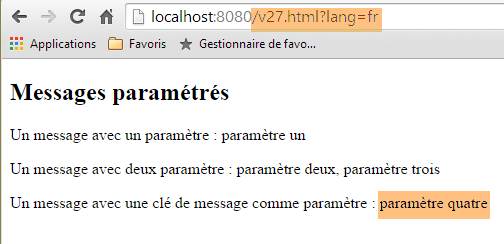 |
ملف الرسائل باللغة الإنجليزية هو التالي:
[messages_fr.properties]
messages.titre=Parameterized messages
messages.msg1=Message with one parameter: {0}
messages.msg2=Message with two parameters: {0}, {1}
messages.msg3=Message with a message key as a parameter: {0}
messages.param4=parameter four
سيؤدي دمج النموذج الذي تم إنشاؤه بواسطة الإجراء [/v27] مع العرض [vue-27] إلى إنتاج الكود HTML التالي:
<!DOCTYPE html>

<html>
    <head>
        <title>Parameterized messages</title>
        <meta http-equiv="Content-Type" content="text/html; charset=UTF-8" />
    </head>
    <body>
        <h2>Parameterized messages</h2>
        <p>Message with one parameter: paramètre un</p>
        <p>Message with two parameters: paramètre deux, paramètre trois</p>
        <p>Message with a message key as a parameter: parameter four</p>
    </body>
</html>
مما ينتج عنه العرض التالي:
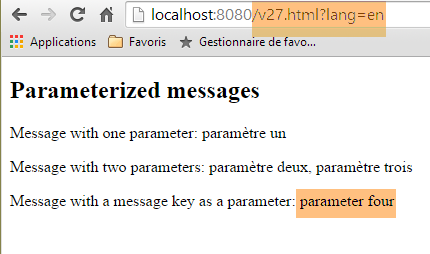 |
نلاحظ أن الرسالة الأخيرة قد تمت تدويلها بالكامل، وهو ما لم يحدث في الرسالتين السابقتين.
5.19. استخدام صفحة رئيسية
في تطبيق الويب، من الشائع أن تشترك العروض في عدد معين من العناصر التي يمكن تجميعها في صفحة رئيسية. إليك مثال على ذلك:
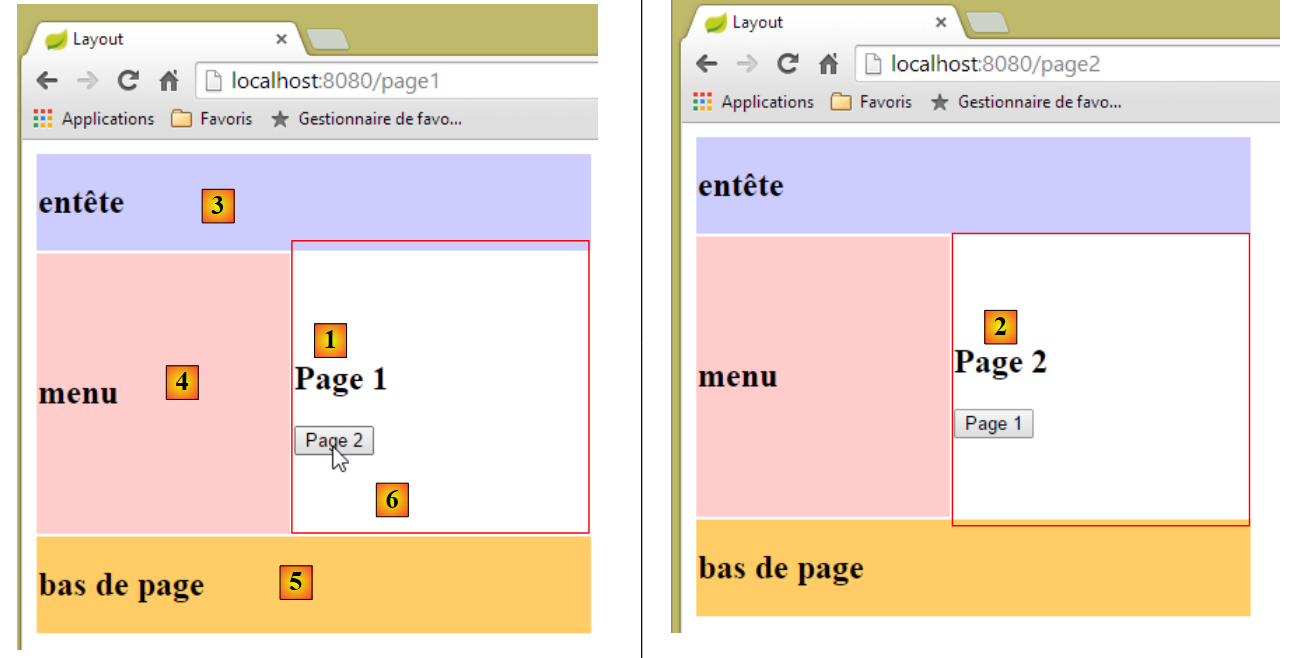 |
في المثال أعلاه، لدينا صفحتان متشابهتان حيث تم استبدال الجزء [1] بالجزء [2]. العرض هو عرض لصفحة رئيسية تحتوي على ثلاثة أجزاء ثابتة [3-5] وجزء متغير [6].
5.19.1. المشروع
نقوم بإنشاء مشروع [springmvc-masterpage] باتباع الخطوات الموضحة في الفقرة 5.1.
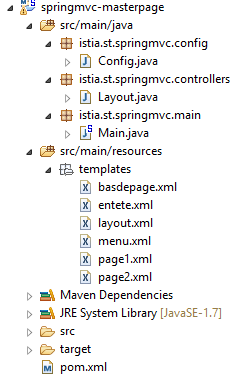 |
الملف [pom.xml] هو كما يلي:
<?xml version="1.0" encoding="UTF-8"?>
<project xmlns="http://maven.apache.org/POM/4.0.0" xmlns:xsi="http://www.w3.org/2001/XMLSchema-instance"
    xsi:schemaLocation="http://maven.apache.org/POM/4.0.0 http://maven.apache.org/xsd/maven-4.0.0.xsd">
    <modelVersion>4.0.0</modelVersion>

    <groupId>istia.st.springmvc</groupId>
    <artifactId>springmvc-masterpage</artifactId>
    <version>0.0.1-SNAPSHOT</version>
    <packaging>jar</packaging>

    <name>springmvc-masterpage</name>
    <description>Page maître</description>

    <parent>
        <groupId>org.springframework.boot</groupId>
        <artifactId>spring-boot-starter-parent</artifactId>
        <version>1.1.9.RELEASE</version>
        <relativePath/> <!-- البحث عن العنصر الأصلي من المستودع -->
    </parent>

    <dependencies>
        <dependency>
            <groupId>org.springframework.boot</groupId>
            <artifactId>spring-boot-starter-thymeleaf</artifactId>
        </dependency>
        <dependency>
            <groupId>org.springframework.boot</groupId>
            <artifactId>spring-boot-starter-test</artifactId>
            <scope>test</scope>
        </dependency>
    </dependencies>

    <properties>
        <project.build.sourceEncoding>UTF-8</project.build.sourceEncoding>
        <start-class>istia.st.springmvc.main.Main</start-class>
        <java.version>1.7</java.version>
    </properties>

    <build>
        <plugins>
            <plugin>
                <groupId>org.springframework.boot</groupId>
                <artifactId>spring-boot-maven-plugin</artifactId>
            </plugin>
        </plugins>
    </build>

</project>
إحدى التبعيات التي يوفرها هذا الملف ضرورية للصفحة الرئيسية:
 |
الحزمتان [config] و [main] متطابقتان مع الحزمتين اللتين تحملان نفس الاسمين في المشروع السابق.
5.19.2. الصفحة الرئيسية
 |
الصفحة الرئيسية هي العرض التالي [layout.xml]:
<!DOCTYPE html>
<html xmlns:th="http://www.thymeleaf.org" xmlns:layout="http://www.ultraq.net.nz/thymeleaf/layout">
    <head>
        <title>Layout</title>
        <meta http-equiv="Content-Type" content="text/html; charset=UTF-8" />
    </head>
    <body>
        <table style="width: 400px">
            <tr>
                <td colspan="2" bgcolor="#ccccff">
                    <div th:include="entete" />
                </td>
            </tr>
            <tr style="height: 200px">
                <td bgcolor="#ffcccc">
                    <div th:include="menu" />
                </td>
                <td>
                    <section layout:fragment="contenu">
                        <h2>Contenu</h2>
                    </section>
                </td>
            </tr>
            <tr bgcolor="#ffcc66">
                <td colspan="2">
                    <div th:include="basdepage" />
                </td>
            </tr>
        </table>
    </body>
</html>
- السطر 2: يجب أن تحدد الصفحة الرئيسية مساحة الأسماء [xmlns:layout="http://www.ultraq.net.nz/thymeleaf/layout"] التي يُستخدم أحد عناصرها في السطر 19؛
- الأسطر 10-12: تُنشئ المنطقة [1] الموضحة أدناه. تسمح علامة Thymeleaf [th:include] بتضمين جزء محدد في ملف آخر في العرض الحالي. وهذا يتيح تجميع الأجزاء المستخدمة في عدة عروض؛
- الأسطر 15-17: تُنشئ المنطقة [2] الموضحة أدناه؛
- الأسطر 19-20: تُنشئ المنطقة [3] الموضحة أدناه. السمة [layout:fragment] هي سمة تابعة لمساحة الأسماء [xmlns:layout="http://www.ultraq.net.nz/thymeleaf/layout"]. وهي تشير إلى منطقة يمكن استبدالها بأخرى عند التنفيذ؛
- الأسطر 24-28: تُنشئ المنطقة [4] أدناه؛
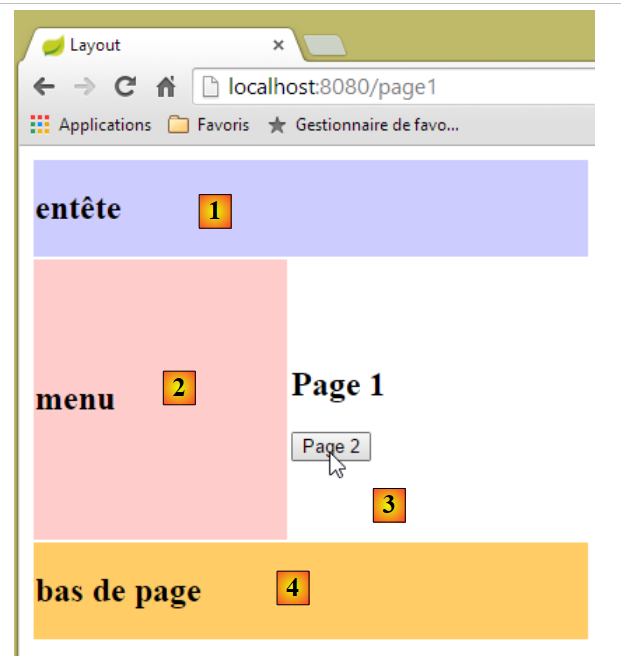 |
5.19.3. الأجزاء
الأجزاء [entete.xml] و [menu.xml] و [basdepage.xml] هي كما يلي:
[entete.xml]
<!DOCTYPE html>
<html>
    <h2>entête</h2>
</html>
[menu.xml]
<!DOCTYPE html>
<html>
    <h2>menu</h2>
</html>
[basdepage.xml]
<!DOCTYPE html>
<html>
    <h2>bas de page</h2>
</html>
المقطع [page1.xml] هو التالي:
<!DOCTYPE html>
<html xmlns:th="http://www.thymeleaf.org" xmlns:layout="http://www.ultraq.net.nz/thymeleaf/layout" layout:decorator="layout">
    <section layout:fragment="contenu">
        <h2>Page 1</h2>
        <form action="/someURL" th:action="@{/page2.html}" method="post">
            <input type="submit" value="Page 2" />
        </form>
    </section>
</html>
- السطر 2: يشير السمة [layout:decorator="layout"] إلى أن الصفحة الحالية [page1.xml] «مزينة»، أي أنها تنتمي إلى صفحة رئيسية. وهذه هي قيمة السمة، وهي في هذه الحالة العرض [layout.xml]؛
- السطر 3: يُشار إلى الجزء الذي سيتم إدراج [page1.xml] فيه من الصفحة الرئيسية. تشير السمة [layout:fragment="contenu"] إلى أن [page1.xml] سيتم إدراجها في الجزء المسمى [contenu]، أي المنطقة [3] من الصفحة الرئيسية؛
- الأسطر 5-7: محتوى الجزء عبارة عن نموذج يوفر زرًا من POST إلى الإجراء [/page2.html]؛
المقتطف [page2.xml] مشابه:
<!DOCTYPE html>
<html xmlns:th="http://www.thymeleaf.org" xmlns:layout="http://www.ultraq.net.nz/thymeleaf/layout"
    layout:decorator="layout">
    <section layout:fragment="contenu">
        <h2>Page 2</h2>
        <form action="/someURL" th:action="@{/page1.html}" method="post">
            <input type="submit" value="Page 1" />
        </form>
    </section>
</html>
5.19.4. الإجراءات
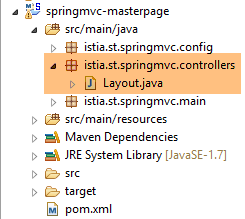 |
وحدة التحكم [Layout.java] هي كما يلي:
package istia.st.springmvc.controllers;

import org.springframework.stereotype.Controller;
import org.springframework.web.bind.annotation.RequestMapping;
import org.springframework.web.bind.annotation.RequestMethod;

@Controller
public class Layout {
    @RequestMapping(value = "/page1")
    public String page1() {
        return "page1";
    }

    @RequestMapping(value = "/page2", method=RequestMethod.POST)
    public String page2() {
        return "page2";
    }
}
- الأسطر 10-12: تقتصر الإجراء [/page1] على عرض العرض [page1.xml]؛
- الأسطر 15-17: الأمر نفسه بالنسبة للإجراء [/page2] الذي يعرض العرض [page2.xml]؛